Приложение входа — это экран, запрашивающий ваши учетные данные для входа в какое-то конкретное приложение. Вы могли видеть это при входе в Facebook, Twitter и т. Д.
В этой главе объясняется, как создать экран входа в систему и как управлять безопасностью при ложных попытках.
Сначала вам нужно определить два TextView, спрашивая имя пользователя и пароль пользователя. Пароль TextView должен иметь inputType установлен в пароль. Его синтаксис приведен ниже —
<EditText
   android:id = "@+id/editText2"
   android:layout_width = "wrap_content"
   android:layout_height = "wrap_content"
   android:inputType = "textPassword" />

<EditText
   android:id = "@+id/editText1"
   android:layout_width = "wrap_content"
   android:layout_height = "wrap_content"
/>
Определите кнопку с текстом для входа и установите ее свойство onClick . После этого определите функцию, указанную в свойстве onClick в файле java.
<Button
   android:id = "@+id/button1"
   android:layout_width = "wrap_content"
   android:layout_height = "wrap_content"
   android:onClick = "login"
   android:text = "@string/Login"
/>
В java-файле внутри метода onClick получите текст имени пользователя и пароля с помощью методов getText () и toString () и сопоставьте его с текстом с помощью функции equals () .
EditText username = (EditText)findViewById(R.id.editText1);
EditText password = (EditText)findViewById(R.id.editText2);

public void login(View view){
   if(username.getText().toString().equals("admin") && password.getText().toString().equals("admin")){

   //correcct password
   }else{
   //wrong password
}
Последнее, что вам нужно сделать, — это создать механизм безопасности, чтобы избежать нежелательных попыток. Для этого инициализируйте переменную и при каждой ложной попытке уменьшайте ее. И когда он достигнет 0, отключите кнопку входа в систему.
int counter = 3;
counter--;

if(counter==0){
   //disble the button, close the application e.t.c
}
пример
Вот пример, демонстрирующий приложение для входа. Он создает базовое приложение, которое дает вам только три попытки войти в приложение.
Чтобы поэкспериментировать с этим примером, вы можете запустить его на реальном устройстве или в эмуляторе.
| меры | Описание |
|---|---|
| 1 | Вы будете использовать Android studio для создания приложения Android в пакете com.example.sairamkrishna.myapplication. |
| 3 | Измените файл src / MainActivity.java, чтобы добавить необходимый код. |
| 4 | Измените res / layout / activity_main, чтобы добавить соответствующие компоненты XML |
| 5 | Запустите приложение и выберите работающее устройство Android, установите на него приложение и проверьте результаты. |
Ниже приводится содержимое измененного основного файла активности src / MainActivity.java .
package com.example.sairamkrishna.myapplication;

import android.app.Activity;
import android.graphics.Color;
import android.os.Bundle;
import android.view.View;

import android.widget.Button;
import android.widget.EditText;
import android.widget.TextView;
import android.widget.Toast;


public class MainActivity extends Activity  {
   Button b1,b2;
   EditText ed1,ed2;

   TextView tx1;
   int counter = 3;

   @Override
   protected void onCreate(Bundle savedInstanceState) {
      super.onCreate(savedInstanceState);
      setContentView(R.layout.activity_main);

      b1 = (Button)findViewById(R.id.button);
      ed1 = (EditText)findViewById(R.id.editText);
      ed2 = (EditText)findViewById(R.id.editText2);

      b2 = (Button)findViewById(R.id.button2);
      tx1 = (TextView)findViewById(R.id.textView3);
      tx1.setVisibility(View.GONE);

      b1.setOnClickListener(new View.OnClickListener() {
         @Override
         public void onClick(View v) {
            if(ed1.getText().toString().equals("admin") &&
               ed2.getText().toString().equals("admin")) {
                  Toast.makeText(getApplicationContext(),
                     "Redirecting...",Toast.LENGTH_SHORT).show();
               }else{
                  Toast.makeText(getApplicationContext(), "Wrong
                     Credentials",Toast.LENGTH_SHORT).show();

                  tx1.setVisibility(View.VISIBLE);
                  tx1.setBackgroundColor(Color.RED);
                  counter--;
                  tx1.setText(Integer.toString(counter));

                  if (counter == 0) {
                     b1.setEnabled(false);
                  }
               }
         }
      });

      b2.setOnClickListener(new View.OnClickListener() {
         @Override
         public void onClick(View v) {
            finish();
         }
      });
   }
}
Ниже приводится измененное содержимое файла xml res / layout / activity_main.xml .
В следующем коде abc указывает на логотип tutorialspoint.com
<?xml version = "1.0" encoding = "utf-8"?>
<RelativeLayout xmlns:android = "http://schemas.android.com/apk/res/android"
   xmlns:tools = "http://schemas.android.com/tools" android:layout_width="match_parent"
   android:layout_height = "match_parent" android:paddingLeft= "@dimen/activity_horizontal_margin"
   android:paddingRight = "@dimen/activity_horizontal_margin"
   android:paddingTop = "@dimen/activity_vertical_margin"
   android:paddingBottom = "@dimen/activity_vertical_margin" tools:context = ".MainActivity">

   <TextView android:text = "Login" android:layout_width="wrap_content"
      android:layout_height = "wrap_content"
      android:id = "@+id/textview"
      android:textSize = "35dp"
      android:layout_alignParentTop = "true"
      android:layout_centerHorizontal = "true" />

   <TextView
      android:layout_width = "wrap_content"
      android:layout_height = "wrap_content"
      android:text = "Tutorials point"
      android:id = "@+id/textView"
      android:layout_below = "@+id/textview"
      android:layout_centerHorizontal = "true"
      android:textColor = "#ff7aff24"
      android:textSize = "35dp" />

   <EditText
      android:layout_width = "wrap_content"
      android:layout_height = "wrap_content"
      android:id = "@+id/editText"
      android:hint = "Enter Name"
      android:focusable = "true"
      android:textColorHighlight = "#ff7eff15"
      android:textColorHint = "#ffff25e6"
      android:layout_marginTop = "46dp"
      android:layout_below = "@+id/imageView"
      android:layout_alignParentLeft = "true"
      android:layout_alignParentStart = "true"
      android:layout_alignParentRight = "true"
      android:layout_alignParentEnd = "true" />

   <ImageView
      android:layout_width="wrap_content"
      android:layout_height="wrap_content"
      android:id="@+id/imageView"
      android:src="@drawable/abc"
      android:layout_below="@+id/textView"
      android:layout_centerHorizontal="true" />

   <EditText
      android:layout_width="wrap_content"
      android:layout_height="wrap_content"
      android:inputType="textPassword"
      android:ems="10"
      android:id="@+id/editText2"
      android:layout_below="@+id/editText"
      android:layout_alignParentLeft="true"
      android:layout_alignParentStart="true"
      android:layout_alignRight="@+id/editText"
      android:layout_alignEnd="@+id/editText"
      android:textColorHint="#ffff299f"
      android:hint="Password" />

   <TextView
      android:layout_width="wrap_content"
      android:layout_height="wrap_content"
      android:text="Attempts Left:"
      android:id="@+id/textView2"
      android:layout_below="@+id/editText2"
      android:layout_alignParentLeft="true"
      android:layout_alignParentStart="true"
      android:textSize="25dp" />

   <TextView
      android:layout_width="wrap_content"
      android:layout_height="wrap_content"
      android:text="New Text"
      android:id="@+id/textView3"
      android:layout_alignTop="@+id/textView2"
      android:layout_alignParentRight="true"
      android:layout_alignParentEnd="true"
      android:layout_alignBottom="@+id/textView2"
      android:layout_toEndOf="@+id/textview"
      android:textSize="25dp"
      android:layout_toRightOf="@+id/textview" />

   <Button
      android:layout_width="wrap_content"
      android:layout_height="wrap_content"
      android:text="login"
      android:id="@+id/button"
      android:layout_alignParentBottom="true"
      android:layout_toLeftOf="@+id/textview"
      android:layout_toStartOf="@+id/textview" />

   <Button
      android:layout_width="wrap_content"
      android:layout_height="wrap_content"
      android:text="Cancel"
      android:id="@+id/button2"
      android:layout_alignParentBottom="true"
      android:layout_toRightOf="@+id/textview"
      android:layout_toEndOf="@+id/textview" />

</RelativeLayout>
Ниже приводится содержимое файла res / values / string.xml .
<resources>
   <string name="app_name">My Application</string>
</resources>
Ниже приводится содержимое файла AndroidManifest.xml .
<?xml version="1.0" encoding="utf-8"?>
<manifest xmlns:android="http://schemas.android.com/apk/res/android"
   package="com.example.sairamkrishna.myapplication" >

   <application
      android:allowBackup="true"
      android:icon="@mipmap/ic_launcher"
      android:label="@string/app_name"
      android:theme="@style/AppTheme" >

      <activity
         android:name=".MainActivity"
         android:label="@string/app_name" >

         <intent-filter>
            <action android:name="android.intent.action.MAIN" />
            <category android:name="android.intent.category.LAUNCHER" />
         </intent-filter>

      </activity>

   </application>
</manifest>
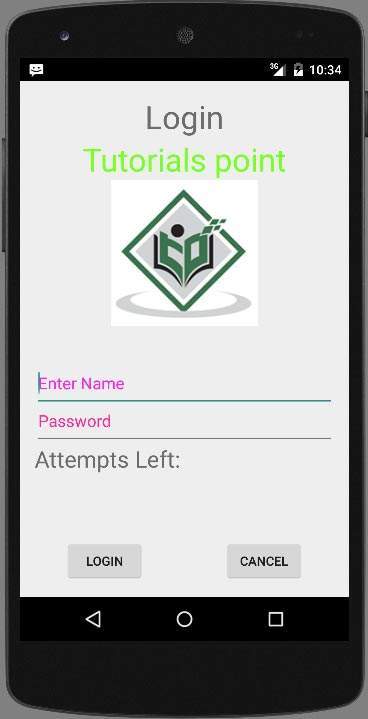
Давайте попробуем запустить наше приложение, которое мы только что изменили. Я предполагаю, что вы создали свой AVD во время настройки среды. Чтобы запустить приложение из студии Android, откройте один из файлов деятельности вашего проекта и нажмите «Выполнить».  значок с панели инструментов. Android-студия устанавливает приложение на AVD и запускает его, и, если все в порядке с настройками и приложением, оно отобразится в следующем окне эмулятора —
Введите что-нибудь в поле имени пользователя и пароля, а затем нажмите кнопку входа. Я поставил abc в поле имени пользователя и abc в поле пароля. Я получил неудачную попытку. Это показано ниже —
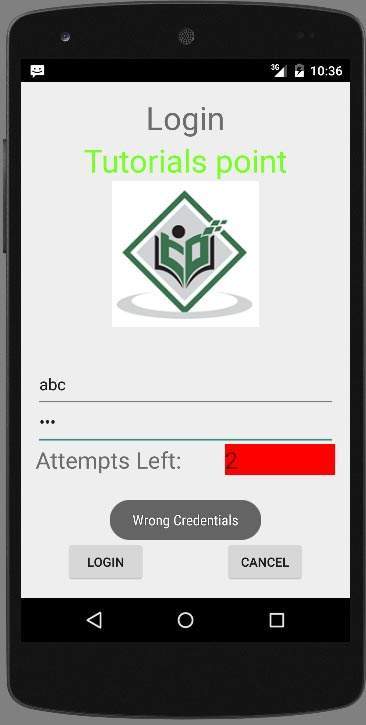
Сделайте это еще два раза, и вы увидите, что у вас осталось 0 попыток входа в систему и ваша кнопка входа отключена.
Теперь снова откройте приложение, и на этот раз введите правильное имя пользователя в качестве администратора и пароль в качестве администратора и нажмите кнопку входа. Вы будете успешно авторизованы.

Если пользователь нажмет кнопку «Отмена», приложение закроет экран входа в систему.