Amp-bind помогает добавить интерактивность к компонентам amp и тегам html на основе действия с использованием привязки данных и JS-подобных выражений. В этой главе подробно обсуждается привязка данных.
Для работы с amp-bind нам нужно добавить следующий скрипт на нашу страницу:
<script async custom-element = "amp-bind"
   src = "https://cdn.ampproject.org/v0/amp-bind-0.1.js">
</script>
Позвольте нам понять это полностью с помощью рабочего примера, как показано —
пример
<!doctype html>
<html amp lang = "en">
   <head>
      <meta charset = "utf-8">
      <script async src = "https://cdn.ampproject.org/v0.js"></script>
      <title>Google AMP - Amp Bind</title>
      <link rel = "canonical" href =
         "http://example.ampproject.org/article-metadata.html">
      <meta name = "viewport" content = "width = device-width,
         minimum-scale = 1,initial-scale = 1">
      <style amp-boilerplate>
         body{
            -webkit-animation:
            -amp-start 8s steps(1,end) 0s 1 normal both;-moz-animation:
            -amp-start 8s steps(1,end) 0s 1 normal both;-ms-animation:
            -amp-start 8s steps(1,end) 0s 1 normal both;animation:
            -amp-start 8s steps(1,end) 0s 1 normal both
         }
         @-webkit-keyframes
         -amp-start{from{visibility:hidden}to{visibility:visible}}@-moz-keyframes
         -amp-start{from{visibility:hidden}to{visibility:visible}}@-ms-keyframes
         -amp-start{from{visibility:hidden}to{visibility:visible}}@-o-keyframes
         -amp-start{from{visibility:hidden}to{visibility:visible}}@keyframes
         -amp-start{from{visibility:hidden}to{visibility:visible}}
      </style>
      <noscript>
         <style amp-boilerplate>
            body{
               -webkit-animation:none;
               -moz-animation:none;
               -ms-animation:none;
               animation:none
            }
         </style>
      </noscript>
      <script async custom-element = "amp-bind"
         src = "https://cdn.ampproject.org/v0/amp-bind-0.1.js"></script>
      <style amp-custom>
         button{
            background-color: #ACAD5C;
            color: white;
            padding: 12px 20px;
            border: none;
            border-radius: 4px;
         }
      </style>
   </head>
   <body>
      <h3>Google AMP - Amp Bind</h3>
      <p [text] = "'Hello ' + world + '.'">
         Click on the button to change the text
      </p>
      <button on = "tap:AMP.setState({world: 'This is amp-bind example'})">
      Click Here
      </button>
   </body>
</html>
Выход
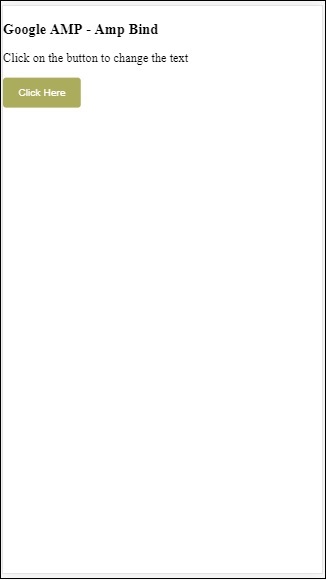
Нажмите кнопку, чтобы увидеть изменение текста, как показано ниже —
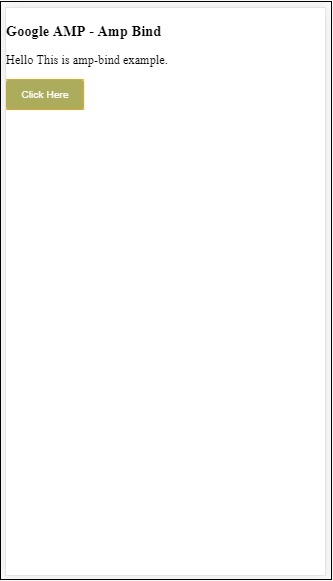
Таким образом, в приведенном выше примере мы использовали amp-bind для изменения текста при нажатии кнопки.
Amp-Bind состоит из трех компонентов:
-
Состояние — изначально состояние пустое. Как только вы нажмете кнопку, состояние изменится. Например,
Состояние — изначально состояние пустое. Как только вы нажмете кнопку, состояние изменится. Например,
<button on = "tap:AMP.setState({world: 'This is amp-bind example'})">
   Click Here
</button>
Метод AMP.setState используется для изменения состояния. Переменной world присваивается значение Это пример amp-bind . Переменная world используется внутри тега html —
<p [text] = "'Hello ' + world + '.'">
   Click on the button to change the text
</p>
При нажатии кнопки миру назначается новое значение: это пример amp-bind.
Мы также можем использовать amp-state с привязкой, как показано ниже —
<amp-state id = "myState">
   <script type = "application/json">
      {
         "foo": "bar"
      }
   </script>
</amp-state>
Выражению будет назначен bmyState.foo во время привязки.
-
Выражения — выражения для amp-bind to work задаются следующим образом —
Выражения — выражения для amp-bind to work задаются следующим образом —
'Hello ' + world
мир называется переменной состояния .
-
Привязки — привязки применяются к специальным атрибутам в форме [атрибуты]. Например —
Привязки — привязки применяются к специальным атрибутам в форме [атрибуты]. Например —
<p [text] = "'Hello ' + world + '.'">
   Click on the button to change the text
</p>
В приведенном выше примере [текст] имеет выражение, которое используется для привязки тега p .
Мы можем использовать следующий атрибут для привязок —
- [текст]
- [учебный класс]
- [Скрыт]
- [Ширина]
- [рост]
Привязки также можно выполнять на компонентах усилителя, допускаются только определенные атрибуты. В следующем списке показаны такие компоненты и атрибуты —
| Sr.No | Усилитель компонент | Атрибуты и описание |
|---|---|---|
| 1 | <amp-carousel type = slides> | [горка]*
Изменить слайд с помощью этого поведения привязки |
| 2 | <Ампы-дата-подборщик> | [мин]
min -> Устанавливает самую раннюю выбираемую дату [Максимум] max -> Устанавливает самую последнюю выбираемую дату |
| 3 | <Амп-IFRAME> | [SRC]
Изменить источник iframe |
| 4 | <Амп-IMG> | [alt] [атрибуция] [src] [srcset]
Мы можем изменить alt, attribution, src и srcset. Если src изменен, измените srcset, так как он используется для кэширования. |
| 5 | <Амп-Lightbox> | [открыть]*
Вы можете показать / скрыть лайтбокс, связавшись с открытым |
| 6 | <Амп-лист> | [SRC]
Если выражение является строкой, извлекает и отображает JSON из строкового URL. Если выражение является объектом или массивом, визуализирует данные выражения. |
| 7 | <Амп-селектор> | [выбрано] * [отключено]
Изменяет выбранные в данный момент дочерние элементы, определенные их значениями атрибута option. Поддерживает разделенный запятыми список значений для множественного выбора |
Изменить слайд с помощью этого поведения привязки
min -> Устанавливает самую раннюю выбираемую дату
max -> Устанавливает самую последнюю выбираемую дату
Изменить источник iframe
Мы можем изменить alt, attribution, src и srcset. Если src изменен, измените srcset, так как он используется для кэширования.
Вы можете показать / скрыть лайтбокс, связавшись с открытым
Если выражение является строкой, извлекает и отображает JSON из строкового URL. Если выражение является объектом или массивом, визуализирует данные выражения.
Изменяет выбранные в данный момент дочерние элементы, определенные их значениями атрибута option. Поддерживает разделенный запятыми список значений для множественного выбора
Связывание с использованием Amp-State
Мы можем определить состояние усилителя со всеми данными, которые мы хотели бы использовать в элементе html или компоненте amp.
Данные, используемые внутри amp-state, должны быть в формате json, как показано ниже —
<amp-state id = "myCarsList">
   <script type = "application/json">
      {
         "currentcar" : "bmw",
         "audi": {
            "imageUrl": "images/audi.jpg"
         },
         "bmw": {
            "imageUrl": "images/bmw.jpg"
         }
      }
   </script>
</amp-state>
Таким образом, мы определили пары ключ-значение с названием автомобиля и изображением, используемым для автомобиля.
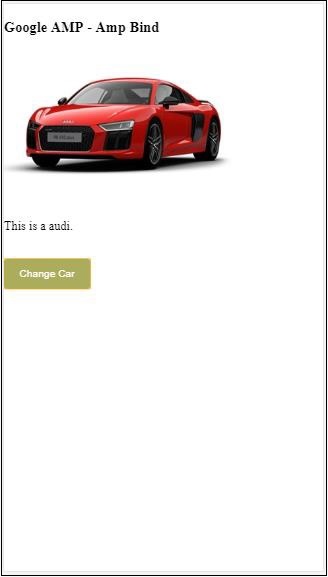
Amp-bind для текста и Amp-Image
Рабочий пример использования amp-state с amp-bind показан ниже —
<!doctype html>
<html amp lang = "en">
   <head>
      <meta charset = "utf-8">
      <script async src = "https://cdn.ampproject.org/v0.js"></script>
      <title>Google AMP - Amp Bind</title>
      <link rel = "canonical" href =
         "http://example.ampproject.org/article-metadata.html">
      <meta name = "viewport" content = "width = device-width,
         minimum-scale = 1,initial-scale = 1">
      <style amp-boilerplate>
         body{
            -webkit-animation:
            -amp-start 8s steps(1,end) 0s 1 normal both;-moz-animation:
            -amp-start 8s steps(1,end) 0s 1 normal both;-ms-animation:
            -amp-start 8s steps(1,end) 0s 1 normal both;animation:
            -amp-start 8s steps(1,end) 0s 1 normal both
         }
         @-webkit-keyframes
         -amp-start{from{visibility:hidden}to{visibility:visible}}@-moz-keyframes
         -amp-start{from{visibility:hidden}to{visibility:visible}}@-ms-keyframes
         -amp-start{from{visibility:hidden}to{visibility:visible}}@-o-keyframes
         -amp-start{from{visibility:hidden}to{visibility:visible}}@keyframes
         -amp-start{from{visibility:hidden}to{visibility:visible}
         }
      </style>
      <noscript>
         <style amp-boilerplate>
            body{
               -webkit-animation:none;
               -moz-animation:none;
               -ms-animation:none;
               animation:none
            }
         </style>
      </noscript>
      <script async custom-element = "amp-bind" src =
         "https://cdn.ampproject.org/v0/amp-bind-0.1.js"></script>
      <style amp-custom>
         button{
            background-color: #ACAD5C;
            color: white;
            padding: 12px 20px;
            border: none;
            border-radius: 4px;
            cursor: pointer;
            float: left;
         }
      </style>
   </head>
   <body>
      <h3>Google AMP - Amp Bind</h3>
      <amp-state id = "myCarsList">
         <script type = "application/json">
            {
               "currentcar" : "bmw",
               "audi": {
               "imageUrl": "images/audi.jpg",
               "style": "greenBackground"
               },
               "bmw": {
               "imageUrl": "images/bmw.jpg",
               "style": "redBackground"
               }
            }
         </script>
      </amp-state>
      <amp-img
         width = "300"
         height = "200"
         src = "images/bmw.jpg"
         [src] = "myCarsList[currentcar].imageUrl">
      </amp-img>
      <p [text] = "'This is a ' + currentcar + '.'">
         This is a BMW.
      </p>
      <br/>
      <button on = "tap:AMP.setState({currentcar: 'audi'})">
         Change Car
      </button>
   </body>
</html>
Выход
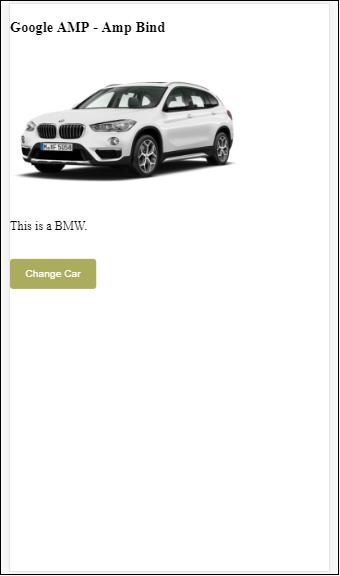
Нажмите кнопку, чтобы увидеть изображение смены автомобиля, а также текст ниже.
Amp-Bind на видео и IFrame
Теперь мы увидим рабочий пример, который изменит amp-iframe и amp-video src.
<!doctype html>
<html amp lang = "en">
<head>
<meta charset = "utf-8">
<script async src = "https://cdn.ampproject.org/v0.js"></script>
<title>Google AMP - Amp Bind</title>
<link rel = "canonical" href =
"http://example.ampproject.org/article-metadata.html">
<meta name = "viewport" content = "width = device-width,
minimum-scale = 1,initial-scale = 1">
<style amp-boilerplate>
body{
-webkit-animation:
-amp-start 8s steps(1,end) 0s 1 normal both;-moz-animation:
-amp-start 8s steps(1,end) 0s 1 normal both;-ms-animation:
-amp-start 8s steps(1,end) 0s 1 normal both;animation:
-amp-start 8s steps(1,end) 0s 1 normal both
}
@-webkit-keyframes
-amp-start{from{visibility:hidden}to{visibility:visible}}@-moz-keyframes
-amp-start{from{visibility:hidden}to{visibility:visible}}@-ms-keyframes
-amp-start{from{visibility:hidden}to{visibility:visible}}@-o-keyframes
-amp-start{from{visibility:hidden}to{visibility:visible}}@keyframes
-amp-start{from{visibility:hidden}to{visibility:visible}}
</style>
<noscript>
<style amp-boilerplate>
body{
-webkit-animation:none;
-moz-animation:none;
-ms-animation:none;
animation:none
}
</style>
</noscript>
<script async custom-element = "amp-bind" src =
"https://cdn.ampproject.org/v0/amp-bind-0.1.js"></script>
<script async custom-element = "amp-video" src =
"https://cdn.ampproject.org/v0/amp-video-0.1.js"></script>
<script async custom-element = "amp-iframe" src =
"https://cdn.ampproject.org/v0/amp-iframe-0.1.js"></script>
<style amp-custom>
button{
background-color: #ACAD5C;
color: white;
padding: 12px 20px;
border: none;
border-radius: 4px;
cursor: pointer;
float: left;
}
</style>
</head>
<body>
<h3>Google AMP - Amp Bind</h3>
<button on = "tap:AMP.setState({currentlist: 'list1'})">
Click Here
</button>
<br/>
<br/>
<amp-state id = "myList">
<script type = "application/json">
{
"currentlist" : "",
"list1": {
"url": "video/m.mp4",
"style": "greenBackground",
"iframeurl":"https://maps.google.com/maps?q=hyderabad&t=&z=13&ie=UTF8&iwloc=&output=embed"
}
}
</script>
</amp-state>
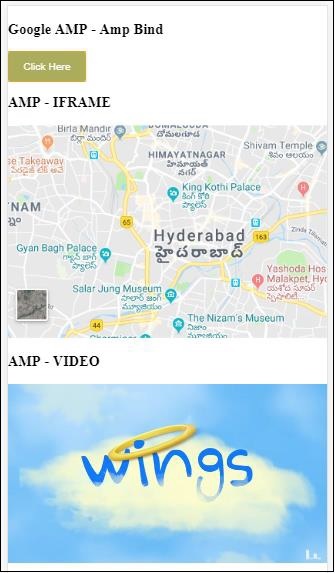
<h3>AMP - IFRAME</h3>
<amp-iframe
width = "600"
title = "Google map"
height = "400"
layout = "responsive"
sandbox = "allow-scripts allow-same-origin allow-popups"
frameborder = "0"
src = "https://maps.google.com/maps?q=telangana&t=&z=13&ie=UTF8&iwloc=&output=embed"
[src] = "myList[currentlist].iframeurl">
<amp-img
layout = "fill"
src = "images/loading.jpg"
placeholder
>
/amp-img>
</amp-iframe>
<h3>AMP - VIDEO</h3>
<amp-video
id = "amp-video"
src = "video/samplevideo.mp4"
layout="responsive"
[src] = "myList[currentlist].url"
width = "300"
height = "170" autoplay controls>
</amp-video>
</body>
</html>
Обратите внимание, что здесь мы использовали amp-state с iframesrc и video src.
<amp-state id = "myList">
   <script type = "application/json">
      {
         "currentlist" : "",
         "list1": {
            "url": "video/m.mp4",
            "style": "greenBackground",
            "iframeurl":"
            https://maps.google.com/maps?q=hyderabad&t=&z=13&ie=UTF8&iwloc=&output=embed"
         }
      }
   </script>
</amp-state>
Текущий список устанавливается пустым, и при нажатии кнопки он устанавливается в список 1. Текущий список varaible используется для src iframe и видео, как показано ниже —
<amp-iframe width="600"
   title = "Google map"
   height = "400"
   layout = "responsive"
   sandbox = "allow-scripts allow-same-origin allow-popups"
   frameborder = "0" src = "https://maps.google.com/maps?q=telangana&t=&z=13&ie=UTF8&iwloc=&output=embed"
   [src] = "myList[currentlist].iframeurl">
      <amp-img layout = "fill" src = "images/loading.jpg" placeholder>
      </amp-img>
</amp-iframe>
<amp-video id = "amp-video" src = "video/samplevideo.mp4"
   layout = "responsive" [src] = "myList[currentlist].url" width = "300"
   height = "170" autoplay controls>
</amp-video>
Выход

Нажмите кнопку, чтобы увидеть, как меняется видео и iframe.
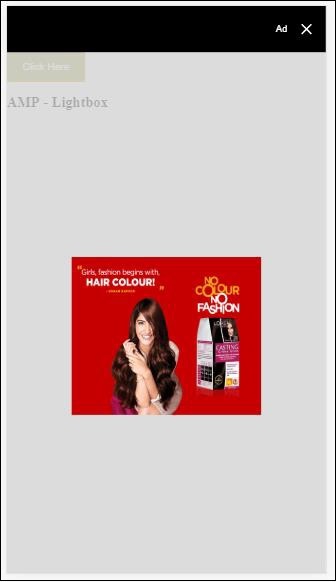
Amp-bind с усилителем-лайтбоксом
Теперь давайте посмотрим, как работает связывание и усилитель-лайтбокс при совместном использовании.
пример
<!doctype html>
<html amp lang = "en">
   <head>
      <meta charset = "utf-8">
      <script async src="https://cdn.ampproject.org/v0.js"></script>
      <title>Google AMP - Amp Bind</title>
      <link rel = "canonical" href =
         "http://example.ampproject.org/article-metadata.html">
      <meta name = "viewport" content = "width = device-width,
         minimum-scale = 1,initial-scale = 1">
      <style amp-boilerplate>
         body{
            -webkit-animation:
            -amp-start 8s steps(1,end) 0s 1 normal both;-moz-animation:
            -amp-start 8s steps(1,end) 0s 1 normal both;-ms-animation:
            -amp-start 8s steps(1,end) 0s 1 normal both;animation:
            -amp-start 8s steps(1,end) 0s 1 normal both
         }
         @-webkit-keyframes
         -amp-start{from{visibility:hidden}to{visibility:visible}}@-moz-keyframes
         -amp-start{from{visibility:hidden}to{visibility:visible}}@-ms-keyframes
         -amp-start{from{visibility:hidden}to{visibility:visible}}@-o-keyframes
         -amp-start{from{visibility:hidden}to{visibility:visible}}@keyframes
         -amp-start{from{visibility:hidden}to{visibility:visible}}
      </style>
      <noscript>
         <style amp-boilerplate>
            body{
               -webkit-animation:none;
               -moz-animation:none;
               -ms-animation:none;
               animation:none
            }
         </style>
      </noscript>
      <script async custom-element = "amp-bind" src =
         "https://cdn.ampproject.org/v0/amp-bind-0.1.js"></script>
      <script async custom-element = "amp-lightbox" src =
         "https://cdn.ampproject.org/v0/amp-lightbox-0.1.js"></script>
      <style amp-custom>
         button{
            background-color: #ACAD5C;
            color: white;
            padding: 12px 20px;
            border: none;
            border-radius: 4px;
            cursor: pointer;
            float: left;
         }
         .lightbox {
            background: rgba(211,211,211,0.8);
            width: 100%;
            height: 100%;
            position: absolute;
            display: flex;
            align-items: center;
            justify-content: center;
         }
      </style>
   </head>
   <body>
      <h3>Google AMP - Amp Bind</h3>
      <button on = "tap:AMP.setState({displaylightbox: true})">
      Click Here
      </button>
      <br/>
      <br/>
      <h3>AMP - Lightbox</h3>
      <amp-lightbox
         id = "my-lightbox"
         [open] = "displaylightbox"
         layout = "nodisplay"
         close-button>
         <div class = "lightbox" on = "tap:AMP.setState({displaylightbox: false})">
            <amp-img alt = "Beautiful Flower"
               src = "images/loreal.gif"
               width = "246"
               height = "205">
            </amp-img>
         </div>
      </amp-lightbox>
   </body>
</html>
Чтобы использовать привязку на amp-lightbox, мы использовали [open] на amp-lightbox, как показано ниже —
<amp-lightbox id = "my-lightbox" [open] = "displaylightbox"
   layout = "nodisplay" close-button>
   <div class = "lightbox" on="tap:AMP.setState({displaylightbox: false})">
      <amp-img alt = "Beautiful Flower"
         src = "images/loreal.gif"
         width = "246"
         height = "205">
      </amp-img>
   </div>
</amp-lightbox>
[Open] = «displaylightbox» — состояние переменной, изменяется при нажатии кнопки и при нажатии элемента освещения лайтбокса на true / false —
<button on = "tap:AMP.setState({displaylightbox: true})">
   Click Here
</button>

<div class = "lightbox" on = "tap:AMP.setState({displaylightbox: false})">
   <amp-img alt = "Beautiful Flower"
      src = "images/loreal.gif"
      width = "246"
      height = "205">
   </amp-img>
</div>
Выход
Привязка усилителя к элементу Input
Давайте разберемся, как работает amp-привязка к элементу ввода с помощью рабочего примера, как показано ниже:
<!doctype html>
<html amp lang = "en">
   <head>
      <meta charset = "utf-8">
      <script async src = "https://cdn.ampproject.org/v0.js"></script>
      <title>Google AMP - Amp Bind</title>
      <link rel = "canonical" href=
         "http://example.ampproject.org/article-metadata.html">
      <meta name = "viewport" content = "width = device-width,
         minimum-scale = 1,initial-scale = 1">
      <style amp-boilerplate>
         body{
            -webkit-animation:
            -amp-start 8s steps(1,end) 0s 1 normal both;-moz-animation:
            -amp-start 8s steps(1,end) 0s 1 normal both;-ms-animation:
            -amp-start 8s steps(1,end) 0s 1 normal both;animation:
            -amp-start 8s steps(1,end) 0s 1 normal both
         }
         @-webkit-keyframes
         -amp-start{from{visibility:hidden}to{visibility:visible}}@-moz-keyframes
         -amp-start{from{visibility:hidden}to{visibility:visible}}@-ms-keyframes
         -amp-start{from{visibility:hidden}to{visibility:visible}}@-o-keyframes
         -amp-start{from{visibility:hidden}to{visibility:visible}}@keyframes
         -amp-start{from{visibility:hidden}to{visibility:visible}}
      </style>
      <noscript>
      <style amp-boilerplate>
         body{
            -webkit-animation:none;
            -moz-animation:none;
            -ms-animation:none;
            animation:none
         }
      </style>
      <noscript>
      <script async custom-element = "amp-bind"
         src = "https://cdn.ampproject.org/v0/amp-bind-0.1.js">
         <script>
         <script async custom-element = "amp-lightbox"
            src = "https://cdn.ampproject.org/v0/amp-lightbox-0.1.js">
      </script>
      <style amp-custom>
         button{
            background-color: #ACAD5C;
            color: white;
            padding: 12px 20px;
            border: none;
            border-radius: 4px;
            cursor: pointer;
            float: left;
         }
         .lightbox {
            background: rgba(211,211,211,0.8);
            width: 100%;
            height: 100%;
            position: absolute;
            display: flex;
            align-items: center;
            justify-content: center;
         }
         #txtname{
            width: 100%;
            padding: 12px 20px;
            margin: 8px 0;
            display: inline-block;
            border: 1px solid #ccc;
            border-radius: 4px;
            box-sizing: border-box;
         }
         div {
            font-size:25px;
         }
      </style>
   </head>
   <body>
      <h3>Google AMP - Amp Bind</h3>
      <button on = "tap:AMP.setState({displaylightbox: true})">
         Click Here
      </button>
      <br/>
      <br/>
      <h3>
         AMP - Input Element
      <h3>
      <input id = "txtname" placeholder = "Type here"
         on = "input-throttled:AMP.setState({name: event.value})">
      <div [text] = "name">
      </div>
   </body>
</html>
Выход
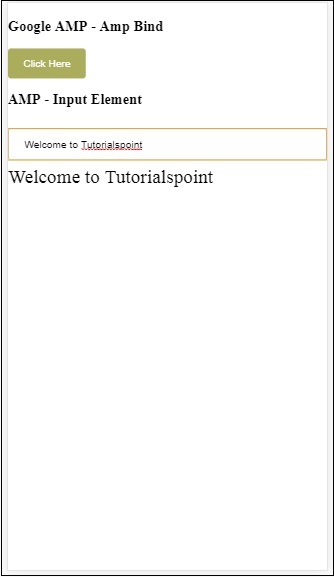
Данные, введенные внутри текстового поля, отображаются внизу. Это можно сделать, изменив имя переменной состояния на входном событии, как показано ниже: