В этой главе мы обсудим, как привязка событий работает в Angular 7. Когда пользователь взаимодействует с приложением в форме движения клавиатуры, щелчка мыши или наведения мыши, он генерирует событие. Эти события должны быть обработаны, чтобы выполнить какое-то действие. Это где привязка событий входит в картину.
Давайте рассмотрим пример, чтобы понять это лучше.
app.component.html
<!--The content below is only a placeholder and can be replaced.-->
<div style = "text-align:center">
   <h1>Welcome to {{title}}.</h1>
</div>

<div> Months :
   <select>
      <option *ngFor = "let i of months">{{i}}</option>
   </select>
</div>
<br/>

<div>
   <span *ngIf = "isavailable; then condition1 else condition2">
      Condition is valid.
   </span>
   <ng-template #condition1>Condition is valid</ng-template>
   <ng-template #condition2>Condition is invalid</ng-template>
</div>
<button (click) = "myClickFunction($event)">
   Click Me
</button>
В файле app.component.html мы определили кнопку и добавили в нее функцию, используя событие click.
Ниже приведен синтаксис для определения кнопки и добавления к ней функции.
(click) = "myClickFunction($event)"
Функция определена в: app.component.ts
import { Component } from '@angular/core';
@Component({
   selector: 'app-root',
   templateUrl: './app.component.html',
   styleUrls: ['./app.component.css']
})
export class AppComponent {
   title = 'Angular 7';

   // declared array of months.
   months = ["January", "February", "March", "April", "May","June", "July",
      "August", "September", "October", "November", "December"];

   isavailable = true; //variable is set to true
   myClickFunction(event) {
      //just added console.log which will display the event details in browser on click of the button.
      alert("Button is clicked");
      console.log(event);
   }
}
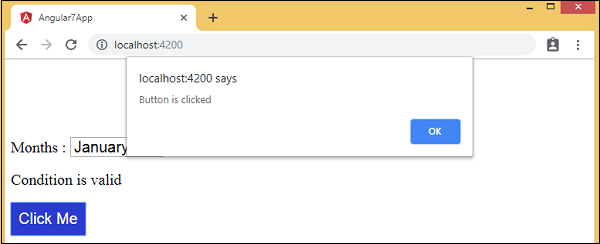
После нажатия кнопки элемент управления перейдет к функции myClickFunction и появится диалоговое окно, в котором будет отображаться нажатие кнопки, как показано на следующем снимке экрана.
Стиль для кнопки добавлен в add.component.css —
button {
   background-color: #2B3BCF;
   border: none;
   color: white;
   padding: 10px 10px;
   text-align: center;
   text-decoration: none;
   display: inline-block;
   font-size: 20px;
}
Давайте теперь добавим событие onchange в выпадающий список.
Следующая строка кода поможет вам добавить событие изменения в выпадающий список —
app.component.html
<!--The content below is only a placeholder and can be replaced.-->
<div style = "text-align:center">
   <h1>Welcome to {{title}}.</h1>
</div>

<div> Months :
   <select (change) = "changemonths($event)">
      <option *ngFor = "let i of months">{{i}}</option>
   </select>
</div>
<br/>

<div>
   <span *ngIf = "isavailable; then condition1 else condition2">
      Condition is valid.
   </span>
   <ng-template #condition1>Condition is valid</ng-template>
   <ng-template #condition2>Condition is invalid</ng-template>
</div>
<br/>

<button (click) = "myClickFunction($event)">
   Click Me
</button>
Функция объявлена в файле app.component.ts —
import { Component } from '@angular/core';
@Component({
   selector: 'app-root',
   templateUrl: './app.component.html',
   styleUrls: ['./app.component.css']
})
export class AppComponent {
   title = 'Angular 7';

   // declared array of months.
   months = ["January", "Feburary", "March", "April", "May", "June", "July",
      "August", "September", "October", "November", "December"];

   isavailable = true; //variable is set to true
   myClickFunction(event) {
      //just added console.log which will display the event
      details in browser on click of the button.
      alert("Button is clicked");
      console.log(event);
   }
   changemonths(event) {
      console.log("Changed month from the Dropdown");
      console.log(event);
   }
}
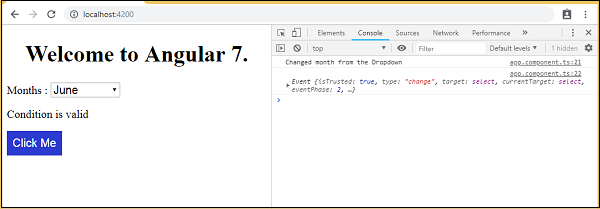
Выберите месяц из раскрывающегося списка, и вы увидите сообщение консоли « Измененный месяц из раскрывающегося списка», отображаемое в консоли вместе с событием.
Давайте добавим предупреждающее сообщение в app.component.ts, когда значение из раскрывающегося списка изменится, как показано ниже —
import { Component } from '@angular/core';
@Component({
   selector: 'app-root',
   templateUrl: './app.component.html',
   styleUrls: ['./app.component.css']
})
export class AppComponent {
   title = 'Angular 7';

   // declared array of months.
   months = ["January", "February", "March", "April", "May", "June", "July",
      "August", "September", "October", "November", "December"];

   isavailable = true; //variable is set to true
   myClickFunction(event) {
      //just added console.log which will display the event
      details in browser on click of the button.
      alert("Button is clicked"); console.log(event);
   }
   changemonths(event) {
      alert("Changed month from the Dropdown");
   }
}
Когда значение в раскрывающемся списке изменяется, появляется диалоговое окно и отображается следующее сообщение:
«Изменен месяц с выпадающего».