GWT предоставляет отличную поддержку для автоматического тестирования клиентского кода с использованием инфраструктуры тестирования JUnit. В этой статье мы продемонстрируем интеграцию GWT и JUNIT.
Скачать архив Junit
Официальный сайт JUnit — https://www.junit.org
Скачать Junit-4.10.jar
| Операционные системы | Название архива |
|---|---|
| Windows | junit4.10.jar |
| Linux | junit4.10.jar |
| макинтош | junit4.10.jar |
Сохраните загруженный файл JAR в каком-либо месте на вашем компьютере. Мы сохранили его в C: /> JUNIT
Найдите папку установки GWT
| Операционные системы | Установочная папка GWT |
|---|---|
| Windows | C: \ GWT \ GWT-2.1.0 |
| Linux | /usr/local/GWT/gwt-2.1.0 |
| макинтош | /Library/GWT/gwt-2.1.0 |
GWTTestCase Class
GWT предоставляет базовый класс GWTTestCase, который обеспечивает интеграцию JUnit. Запуск скомпилированного класса, расширяющего GWTTestCase под JUnit, запускает браузер HtmlUnit, который служит для эмуляции поведения вашего приложения во время выполнения теста.
GWTTestCase является производным классом от TestCase JUnit, и его можно запустить с помощью JUnit TestRunner.
Использование webAppCreator
GWT предоставляет специальный инструмент командной строки webAppCreator, который может сгенерировать для нас стартовый тестовый пример, а также целевые объекты ant и конфигурации запуска eclipse для тестирования как в режиме разработки, так и в рабочем режиме.
Откройте командную строку и перейдите в C: \> GWT_WORKSPACE>, где вы хотите создать новый проект с поддержкой тестирования. Выполните следующую команду
C:\GWT_WORKSPACE>C:\GWT\gwt-2.1.0\webAppCreator
   -out HelloWorld
   -junit C:\JUNIT\junit-4.10.jar
   com.tutorialspoint.HelloWorld
Интересные моменты
- Мы выполняем утилиту командной строки webAppCreator.
- HelloWorld — это название проекта, который будет создан
- Опция -junit указывает webAppCreator добавить поддержку junit в проект
- com.tutorialspoint.HelloWorld — это имя модуля
Проверьте вывод.
Created directory HelloWorld\src
Created directory HelloWorld\war
Created directory HelloWorld\war\WEB-INF
Created directory HelloWorld\war\WEB-INF\lib
Created directory HelloWorld\src\com\tutorialspoint
Created directory HelloWorld\src\com\tutorialspoint\client
Created directory HelloWorld\src\com\tutorialspoint\server
Created directory HelloWorld\src\com\tutorialspoint\shared
Created directory HelloWorld\test\com\tutorialspoint
Created directory HelloWorld\test\com\tutorialspoint\client
Created file HelloWorld\src\com\tutorialspoint\HelloWorld.gwt.xml
Created file HelloWorld\war\HelloWorld.html
Created file HelloWorld\war\HelloWorld.css
Created file HelloWorld\war\WEB-INF\web.xml
Created file HelloWorld\src\com\tutorialspoint\client\HelloWorld.java
Created file
HelloWorld\src\com\tutorialspoint\client\GreetingService.java
Created file
HelloWorld\src\com\tutorialspoint\client\GreetingServiceAsync.java
Created file
HelloWorld\src\com\tutorialspoint\server\GreetingServiceImpl.java
Created file HelloWorld\src\com\tutorialspoint\shared\FieldVerifier.java
Created file HelloWorld\build.xml
Created file HelloWorld\README.txt
Created file HelloWorld\test\com\tutorialspoint\HelloWorldJUnit.gwt.xml
Created file HelloWorld\test\com\tutorialspoint\client\HelloWorldTest.java
Created file HelloWorld\.project
Created file HelloWorld\.classpath
Created file HelloWorld\HelloWorld.launch
Created file HelloWorld\HelloWorldTest-dev.launch
Created file HelloWorld\HelloWorldTest-prod.launch
Понимание тестового класса: HelloWorldTest.java
package com.tutorialspoint.client;

import com.tutorialspoint.shared.FieldVerifier;
import com.google.gwt.core.client.GWT;
import com.google.gwt.junit.client.GWTTestCase;
import com.google.gwt.user.client.rpc.AsyncCallback;
import com.google.gwt.user.client.rpc.ServiceDefTarget;

/**
 * GWT JUnit tests must extend GWTTestCase.
 */
public class HelloWorldTest extends GWTTestCase {

   /**
    * must refer to a valid module that sources this class.
    */
   public String getModuleName() {
      return "com.tutorialspoint.HelloWorldJUnit";
   }

   /**
    * tests the FieldVerifier.
    */
   public void testFieldVerifier() {
      assertFalse(FieldVerifier.isValidName(null));
      assertFalse(FieldVerifier.isValidName(""));
      assertFalse(FieldVerifier.isValidName("a"));
      assertFalse(FieldVerifier.isValidName("ab"));
      assertFalse(FieldVerifier.isValidName("abc"));
      assertTrue(FieldVerifier.isValidName("abcd"));
   }

   /**
    * this test will send a request to the server using the greetServer
    *  method in GreetingService and verify the response.
    */
   public void testGreetingService() {
      /* create the service that we will test. */
      GreetingServiceAsync greetingService =
      GWT.create(GreetingService.class);
      ServiceDefTarget target = (ServiceDefTarget) greetingService;
      target.setServiceEntryPoint(GWT.getModuleBaseURL()
      + "helloworld/greet");

      /* since RPC calls are asynchronous, we will need to wait
       for a response after this test method returns. This line
       tells the test runner to wait up to 10 seconds
       before timing out. */
      delayTestFinish(10000);

      /* send a request to the server. */
      greetingService.greetServer("GWT User",
         new AsyncCallback<String>() {
         public void onFailure(Throwable caught) {
            /* The request resulted in an unexpected error. */
            fail("Request failure: " + caught.getMessage());
         }

         public void onSuccess(String result) {
            /* verify that the response is correct. */
            assertTrue(result.startsWith("Hello, GWT User!"));

            /* now that we have received a response, we need to
             tell the test runner that the test is complete.
             You must call finishTest() after an asynchronous test
             finishes successfully, or the test will time out.*/
            finishTest();
         }
      });
   }
}
Интересные моменты
| Sr.No. | Заметка |
|---|---|
| 1 | Класс HelloWorldTest создан в пакете com.tutorialspoint.client в каталоге HelloWorld / test. |
| 2 | Класс HelloWorldTest будет содержать примеры модульных тестов для HelloWorld. |
| 3 | Класс HelloWorldTest расширяет класс GWTTestCase в пакете com.google.gwt.junit.client. |
| 4 | Класс HelloWorldTest имеет абстрактный метод (getModuleName), который должен возвращать имя модуля GWT. Для HelloWorld это com.tutorialspoint.HelloWorldJUnit. |
| 5 | Класс HelloWorldTest создается с двумя примерами тестовых случаев testFieldVerifier, testSimple. Мы добавили testGreetingService. |
| 6 | Эти методы используют одну из многих функций assert *, которые он наследует от класса JUnit Assert, который является предком GWTTestCase. |
| 7 | Функция assertTrue (логическое значение) утверждает, что переданный логический аргумент имеет значение true. Если нет, тест не пройден при запуске в JUnit. |
GWT — Пример полной интеграции JUnit
Этот пример проведет вас через простые шаги, чтобы показать пример интеграции JUnit в GWT.
Выполните следующие шаги, чтобы обновить приложение GWT, которое мы создали выше —
| шаг | Описание |
|---|---|
| 1 | Импортируйте проект с именем HelloWorld в eclipse, используя мастер импорта существующих проектов (Файл → Импорт → Общие → Существующие проекты в рабочую область). |
| 2 | Измените HelloWorld.gwt.xml , HelloWorld.css , HelloWorld.html и HelloWorld.java, как описано ниже. Сохраните остальные файлы без изменений. |
| 3 | Скомпилируйте и запустите приложение, чтобы проверить результат реализованной логики. |
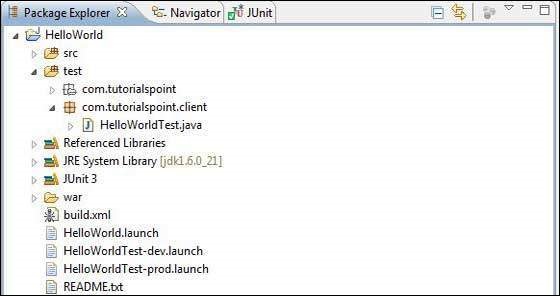
Ниже будет структура проекта в затмении.
Ниже приводится содержимое модифицированного дескриптора модуля src / com.tutorialspoint / HelloWorld.gwt.xml .
<?xml version = "1.0" encoding = "UTF-8"?>
<module rename-to = 'helloworld'>
   <!-- Inherit the core Web Toolkit stuff.                        -->
   <inherits name = 'com.google.gwt.user.User'/>

   <!-- Inherit the default GWT style sheet.                       -->
   <inherits name = 'com.google.gwt.user.theme.clean.Clean'/>
   <!-- Inherit the UiBinder module.                               -->
   <inherits name = "com.google.gwt.uibinder.UiBinder"/>
   <!-- Specify the app entry point class.                         -->
   <entry-point class = 'com.tutorialspoint.client.HelloWorld'/>

   <!-- Specify the paths for translatable code                    -->
   <source path = 'client'/>
   <source path = 'shared'/>

</module>
Ниже приводится содержимое измененного файла таблицы стилей war / HelloWorld.css .
body {
   text-align: center;
   font-family: verdana, sans-serif;
}

h1 {
   font-size: 2em;
   font-weight: bold;
   color: #777777;
   margin: 40px 0px 70px;
   text-align: center;
}
Ниже приведено содержимое модифицированного HTML-файла war / HelloWorld.html .
<html>
   <head>
      <title>Hello World</title>
      <link rel = "stylesheet" href = "HelloWorld.css"/>
      <script language = "javascript" src = "helloworld/helloworld.nocache.js">
      </script>
   </head>

   <body>
      <h1>JUnit Integration Demonstration</h1>
      <div id = "gwtContainer"></div>
   </body>
</html>
Замените содержимое HelloWorld.java в пакете src / com.tutorialspoint / client следующим
package com.tutorialspoint.client;

import com.google.gwt.core.client.EntryPoint;

import com.google.gwt.core.client.GWT;
import com.google.gwt.event.dom.client.ClickEvent;
import com.google.gwt.event.dom.client.ClickHandler;
import com.google.gwt.event.dom.client.KeyCodes;
import com.google.gwt.event.dom.client.KeyUpEvent;
import com.google.gwt.event.dom.client.KeyUpHandler;

import com.google.gwt.user.client.Window;
import com.google.gwt.user.client.rpc.AsyncCallback;
import com.google.gwt.user.client.ui.Button;
import com.google.gwt.user.client.ui.DecoratorPanel;
import com.google.gwt.user.client.ui.HasHorizontalAlignment;
import com.google.gwt.user.client.ui.HorizontalPanel;
import com.google.gwt.user.client.ui.Label;
import com.google.gwt.user.client.ui.RootPanel;
import com.google.gwt.user.client.ui.TextBox;
import com.google.gwt.user.client.ui.VerticalPanel;

public class HelloWorld implements EntryPoint {

   public void onModuleLoad() {
      /*create UI */
      final TextBox txtName = new TextBox();
      txtName.setWidth("200");
      txtName.addKeyUpHandler(new KeyUpHandler() {
         @Override
         public void onKeyUp(KeyUpEvent event) {
            if(event.getNativeKeyCode() == KeyCodes.KEY_ENTER){
               Window.alert(getGreeting(txtName.getValue()));
            }
         }
      });
      Label lblName = new Label("Enter your name: ");

      Button buttonMessage = new Button("Click Me!");

      buttonMessage.addClickHandler(new ClickHandler() {
         @Override
         public void onClick(ClickEvent event) {
            Window.alert(getGreeting(txtName.getValue()));
         }
      });

      HorizontalPanel hPanel = new HorizontalPanel();
      hPanel.add(lblName);
      hPanel.add(txtName);
      hPanel.setCellWidth(lblName, "130");

      VerticalPanel vPanel = new VerticalPanel();
      vPanel.setSpacing(10);
      vPanel.add(hPanel);
      vPanel.add(buttonMessage);
      vPanel.setCellHorizontalAlignment(buttonMessage,
      HasHorizontalAlignment.ALIGN_RIGHT);

      DecoratorPanel panel = new DecoratorPanel();
      panel.add(vPanel);

      // Add widgets to the root panel.
      RootPanel.get("gwtContainer").add(panel);
   }

   public String getGreeting(String name){
      return "Hello "+name+"!";
   }
}
Замените содержимое HelloWorldTest.java в пакете test / com.tutorialspoint / client следующим
package com.tutorialspoint.client;

import com.tutorialspoint.shared.FieldVerifier;
import com.google.gwt.core.client.GWT;
import com.google.gwt.junit.client.GWTTestCase;
import com.google.gwt.user.client.rpc.AsyncCallback;
import com.google.gwt.user.client.rpc.ServiceDefTarget;

/**
 * GWT JUnit tests must extend GWTTestCase.
 */
public class HelloWorldTest extends GWTTestCase {

   /**
    * must refer to a valid module that sources this class.
    */
   public String getModuleName() {
      return "com.tutorialspoint.HelloWorldJUnit";
   }

   /**
    * tests the FieldVerifier.
    */
   public void testFieldVerifier() {
      assertFalse(FieldVerifier.isValidName(null));
      assertFalse(FieldVerifier.isValidName(""));
      assertFalse(FieldVerifier.isValidName("a"));
      assertFalse(FieldVerifier.isValidName("ab"));
      assertFalse(FieldVerifier.isValidName("abc"));
      assertTrue(FieldVerifier.isValidName("abcd"));
   }

   /**
      * this test will send a request to the server using the greetServer
      *  method in GreetingService and verify the response.
   */
   public void testGreetingService() {
      /* create the service that we will test. */
      GreetingServiceAsync greetingService =
      GWT.create(GreetingService.class);
      ServiceDefTarget target = (ServiceDefTarget) greetingService;
      target.setServiceEntryPoint(GWT.getModuleBaseURL()
      + "helloworld/greet");

      /* since RPC calls are asynchronous, we will need to wait
       for a response after this test method returns. This line
       tells the test runner to wait up to 10 seconds
       before timing out. */
      delayTestFinish(10000);

      /* send a request to the server. */
      greetingService.greetServer("GWT User",
         new AsyncCallback<String>() {
         public void onFailure(Throwable caught) {
            /* The request resulted in an unexpected error. */
            fail("Request failure: " + caught.getMessage());
         }

         public void onSuccess(String result) {
            /* verify that the response is correct. */
            assertTrue(result.startsWith("Hello, GWT User!"));

            /* now that we have received a response, we need to
             tell the test runner that the test is complete.
             You must call finishTest() after an asynchronous test
             finishes successfully, or the test will time out.*/
            finishTest();
         }
      });

      /**
         * tests the getGreeting method.
      */
      public void testGetGreeting() {
         HelloWorld helloWorld = new HelloWorld();
         String name = "Robert";
         String expectedGreeting = "Hello "+name+"!";
         assertEquals(expectedGreeting,helloWorld.getGreeting(name));
      }
   }
}
Запустите тестовые случаи в Eclipse, используя сгенерированные конфигурации запуска
Мы будем запускать модульные тесты в Eclipse с использованием конфигураций запуска, созданных webAppCreator, как для режима разработки, так и для режима производства.
Запустите тест JUnit в режиме разработки
- В строке меню Eclipse выберите Run → Run Configurations …
- В разделе JUnit выберите HelloWorldTest-dev
- Чтобы сохранить изменения в Аргументах, нажмите Применить
- Чтобы запустить тест, нажмите Run
Если с вашим приложением все в порядке, это даст следующий результат:
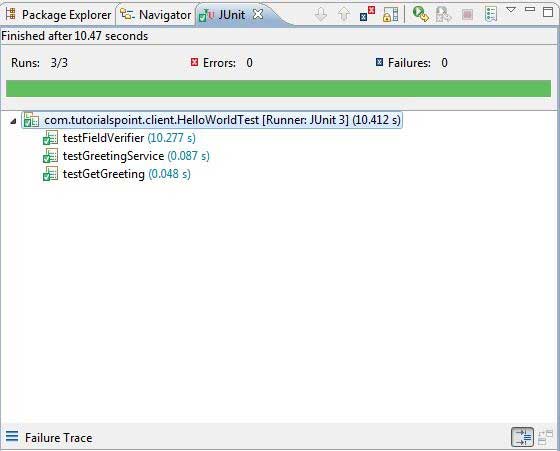
Запустите тест JUnit в производственном режиме
- В строке меню Eclipse выберите Run → Run Configurations …
- В разделе JUnit выберите HelloWorldTest-prod
- Чтобы сохранить изменения в Аргументах, нажмите Применить
- Чтобы запустить тест, нажмите Run
Если с вашим приложением все в порядке, это даст следующий результат: