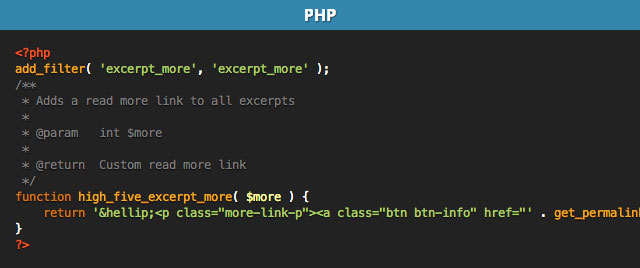
Подсветка синтаксиса стала довольно стандартной на большинстве обучающих сайтов (как вы можете видеть ниже), и доступно много опций, все в зависимости от того, какие языки вы используете и как вы хотите, чтобы ваши фрагменты кода отображались.
Долгое время я использовал Google Prettify, поскольку его было легко настроить. Единственная реальная проблема, с которой я столкнулся, заключалась в том, что он не захватывал все соответствующие элементы в моем коде и не выделял их соответствующим образом. Я попытался переработать его, но это был не самый простой код для навигации.
К счастью, я недавно наткнулся на новую облегченную подсветку синтаксиса от Lea Verou под названием Prism.js, которая предлагает возможность расширения базовой подсветки разметки HTML и CSS с помощью нескольких простых подключаемых модулей.
Я взял ее основной код JavaScript и добавил возможность включить нумерацию строк и подсветку PHP. Я также изменил некоторые из ее базовых шаблонов регулярных выражений, чтобы ее исходный код выделения выделил еще несколько элементов для каждого языка.
Собираем плагин
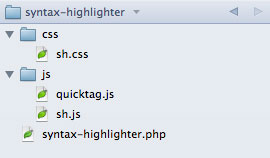
Все, что нам нужно сделать, это добавить функцию шорткода в WordPress, чтобы мы могли легко включать подсветку синтаксиса в наши фрагменты кода, используя мой модифицированный скрипт Prism.js. Самый простой способ объединить все — превратить все в плагин. Наша готовая папка плагинов будет выглядеть так:

Итак, давайте запустим наш плагин с обязательными полями:
|
1
2
3
4
5
6
7
8
|
/*
Plugin Name: Syntax Highlighter
Plugin URI: http://wp.tutsplus.com/tutorials/plugins/adding-a-syntax-highlighter-shortcode-using-prism-js
Description: Highlight your code snippets with an easy to use shortcode based on Lea Verou’s Prism.js.
Version: 1.0.0
Author: c.bavota
Author URI: http://bavotasan.com
*/
|
Следующее, что мы хотим добавить, это наш фактический хук короткого кода и исправление перед обработкой, чтобы убедиться, что оно срабатывает в нужное время:
|
01
02
03
04
05
06
07
08
09
10
11
12
13
14
15
16
17
18
19
20
21
22
23
24
25
26
27
28
29
30
31
32
33
34
35
36
37
38
39
40
41
42
43
44
45
46
47
48
49
50
51
52
53
54
55
56
57
|
add_filter( ‘the_content’, ‘sh_pre_process_shortcode’, 7 );
/**
* Functionality to set up highlighter shortcode correctly.
*
* This function is attached to the ‘the_content’ filter hook.
*
* @since 1.0.0
*/
function sh_pre_process_shortcode( $content ) {
global $shortcode_tags;
$orig_shortcode_tags = $shortcode_tags;
$shortcode_tags = array();
// New shortcodes
add_shortcode( ‘code’, ‘sh_syntax_highlighter’ );
$content = do_shortcode( $content );
$shortcode_tags = $orig_shortcode_tags;
return $content;
}
/**
* Code shortcode function
*
* This function is attached to the ‘code’ shortcode hook.
*
* @since 1.0.0
*/
function sh_syntax_highlighter( $atts, $content = null ) {
extract( shortcode_atts( array(
‘type’ =>
‘title’ =>
‘linenums’ =>
), $atts ) );
$title = ( $title ) ?
$linenums = ( $linenums ) ?
$find_array = array( ‘[‘, ‘]’ );
$replace_array = array( ‘[‘, ‘]’ );
return ‘</pre>
<div class="syntax-highlighter"
<pre><code class="language-‘ .
</div>
<pre>
‘;
}
/**
* Helper function for ‘sh_syntax_highlighter’
*
* @since 1.0.0
*/
function sh_pre_entities( $matches ) {
return str_replace( $matches[1], htmlentities( $matches[1]), $matches[0] );
}
|
Функция sh_pre_process_shortcode() необходима для того, чтобы наш синтаксис шорткода обрабатывался до того, как все фильтры содержимого начнут очищать текст по умолчанию в WordPress. Вспомогательная функция отфильтрует наш код и заменит сущности HTML соответствующими значениями сущностей.
Сценарии и стили
Для того, чтобы наш плагин работал правильно, нам также нужно добавить еще несколько функций для загрузки файлов CSS и JS.
|
01
02
03
04
05
06
07
08
09
10
11
12
13
14
15
16
17
18
19
20
21
22
23
24
25
26
27
28
29
30
31
32
33
|
add_action( ‘wp_enqueue_scripts’, ‘sh_add_js’ );
/**
* Load all JavaScript to header
*
* This function is attached to the ‘wp_enqueue_scripts’ action hook.
*
* @uses is_admin()
* @uses is_singular()
* @uses wp_enqueue_script()
* @uses plugins_url()
*
* @since 1.0.0
*/
function sh_add_js() {
if ( sh_has_shortcode( ‘code’ ) ) {
wp_enqueue_script( ‘sh_js’, plugins_url( ‘js/sh.js’, __FILE__ ), », », true );
wp_enqueue_style( ‘sh_css’, plugins_url( ‘css/sh.css’, __FILE__ ) );
}
}
/**
* Check posts to see if shortcode has been used
*
* @since 1.0.0
*/function sh_has_shortcode( $shortcode = » ) {
global $wp_query;
foreach( $wp_query->posts as $post ) {
if ( ! empty( $shortcode ) && stripos($post->post_content, ‘[‘ . $shortcode) !== false ) {
return true;
}
}
return false;
}
|
Нам нужно поставить в очередь наш скрипт и стили, но только если шорткод был использован в нашем пост-контенте. Следовательно, почему нам нужна эта маленькая условная функция для проверки наличия шорткода.
Quicktag
Добавление быстрой метки для нашего шорткода не очень сложно, поэтому мы могли бы сделать это:
|
01
02
03
04
05
06
07
08
09
10
11
12
|
add_action( ‘admin_enqueue_scripts’, ‘sh_add_quicktags’ );
/**
* Adds a syntax highlighter quicktag to the post editor
*
* This function is attached to the ‘admin_print_footer_scripts’ action hook.
*
* @since 1.0.0
*/
function sh_add_quicktags( $hook ) {
if( ‘post.php’ == $hook || ‘post-new.php’ == $hook )
wp_enqueue_script( ‘sh_quicktag_js’, plugins_url( ‘js/quicktag.js’, __FILE__ ), array( ‘quicktags’ ), », true );
}
|
Это все, что нам нужно в нашем файле quicktag.js :
|
01
02
03
04
05
06
07
08
09
10
11
12
13
14
15
16
17
18
19
20
21
22
23
24
25
|
QTags.SyntaxButton = function() {
QTags.TagButton.call( this, ‘syntax_highlighter’, ‘syntax highlighter’, », ‘[/code]’ );
};
QTags.SyntaxButton.prototype = new QTags.TagButton();
QTags.SyntaxButton.prototype.callback = function( e, c, ed ) {
var type, linenums, title, t = this;
if ( t.isOpen( ed ) === false ) {
type = prompt( ‘Type (markup, php, css, javascript)’, ‘markup’ ),
title = prompt( ‘Title (optional)’ ),
linenums = prompt( ‘Line number (optional)’ );
type = ( type ) ?
title = ( title ) ?
linenums = ( linenums ) ?
if ( type ) {
t.tagStart = ‘[code’ + type + title + linenums + ‘]’;
QTags.TagButton.prototype.callback.call( t, e, c, ed );
}
} else {
QTags.TagButton.prototype.callback.call( t, e, c, ed );
}
};
edButtons[150] = new QTags.SyntaxButton();
|
CSS
Для подсветки синтаксиса я предпочитаю темную тему, поэтому я создал свои блики, используя следующий CSS:
|
001
002
003
004
005
006
007
008
009
010
011
012
013
014
015
016
017
018
019
020
021
022
023
024
025
026
027
028
029
030
031
032
033
034
035
036
037
038
039
040
041
042
043
044
045
046
047
048
049
050
051
052
053
054
055
056
057
058
059
060
061
062
063
064
065
066
067
068
069
070
071
072
073
074
075
076
077
078
079
080
081
082
083
084
085
086
087
088
089
090
091
092
093
094
095
096
097
098
099
100
101
102
103
104
105
106
107
108
109
110
111
112
113
114
115
116
117
118
119
120
121
122
123
124
125
126
127
128
129
130
131
132
133
134
135
136
137
138
139
140
141
142
143
144
145
146
147
148
149
150
151
152
153
154
155
156
157
158
159
160
161
162
163
164
165
166
167
168
169
170
171
172
173
174
175
176
177
178
179
180
181
182
183
184
185
186
187
188
189
190
191
192
193
|
code[class*="language-"],
pre[class*="language-"] {
color: #fff;
text-shadow: 0 1px 1px #000;
font-family: Menlo, Monaco, "Courier New", monospace;
direction: ltr;
text-align: left;
word-spacing: normal;
white-space: pre;
word-wrap: normal;
line-height: 1.4;
background: none;
border: 0;
-moz-tab-size: 4;
-o-tab-size: 4;
tab-size: 4;
-webkit-hyphens: none;
-moz-hyphens: none;
-ms-hyphens: none;
hyphens: none;
}
pre[class*="language-"] code {
float: left;
padding: 0 15px 0 0;
}
pre[class*="language-"],
:not(pre) >
background: #222;
}
.syntax-highlighter[rel] {
position: relative;
}
.syntax-highlighter[rel] pre[class*="language-"] {
padding-top: 44px;
}
.syntax-highlighter[rel]:before {
content: attr(rel);
text-align: center;
text-shadow: 1px 1px 2px rgba(0,0,0,0.6);
position: absolute;
top: -1px;
background: #3A87AD;
padding: 5px 10px;
left: 0;
right: 0;
font: bold 16px/20px "myriad-pro-1","myriad-pro-2","Lucida Grande",Sans-Serif;
color: #fff;
-moz-border-radius: 7px 7px 0 0;
-webkit-border-radius: 7px 7px 0 0;
border-radius: 7px 7px 0 0;
}
/* Code blocks */
pre[class*="language-"] {
padding: 15px;
margin: 1em 0;
overflow: auto;
-moz-border-radius: 8px;
-webkit-border-radius: 8px;
border-radius: 8px;
}
/* Inline code */
:not(pre) >
padding: 5px 10px;
line-height: 1;
-moz-border-radius: 3px;
-webkit-border-radius: 3px;
border-radius: 3px;
}
.token.comment,
.token.line-comment,
.token.prolog,
.token.doctype,
.token.cdata {
color: #797979;
}
.token.selector,
.token.operator,
.token.punctuation {
color: #fff;
}
.namespace {
opacity: .7;
}
.token.tag,
.token.boolean {
color: #ffd893;
}
.token.atrule,
.token.attr-value,
.token.hex,
.token.string {
color: #B0C975;
}
.token.property,
.token.entity,
.token.url,
.token.attr-name,
.token.keyword {
color: #c27628;
}
.token.regex {
color: #9B71C6;
}
.token.entity {
cursor: help;
}
.token.function,
.token.constant {
color: #e5a638;
}
.token.variable {
color: #fdfba8;
}
.token.number {
color: #8799B0;
}
.token.important,
.token.deliminator {
color: #E45734;
}
pre[data-line] {
position: relative;
padding: 1em 0 1em 3em;
}
.line-highlight {
position: absolute;
left: 0;
right: 0;
padding: inherit 0;
margin-top: 1em;
background: rgba(255,255,255,.2);
pointer-events: none;
line-height: inherit;
white-space: pre;
}
.line-highlight:before,
.line-highlight[data-end]:after {
content: attr(data-start);
position: absolute;
top: .3em;
left: .6em;
min-width: 1em;
padding: 0 .5em;
background-color: rgba(255,255,255,.3);
color: #fff;
font: bold 65%/1.5 sans-serif;
text-align: center;
-moz-border-radius: 8px;
-webkit-border-radius: 8px;
border-radius: 8px;
text-shadow: none;
}
.line-highlight[data-end]:after {
content: attr(data-end);
top: auto;
bottom: .4em;
}
/* for line numbers */
ol.linenums {
margin: 0;
padding: 0 0 0 35px;
}
.linenums li {
padding-left: 10px;
border-left: 3px #d9d336 solid;
}
|
Использование шорткода
Шорткод кода для нашей подсветки синтаксиса имеет три атрибута: тип, заголовок и номер строки.
type : есть четыре языковых типа, которые работают с нашим маркером: разметка, css, php и javascript
title : вы можете включить заголовок, который появится над окном подсветки синтаксиса (необязательно)
белье : добавьте номера строк в ваш код, начиная с любого номера, который вы установили (необязательно)
Единственный обязательный атрибут — это «тип», хотя по умолчанию он имеет значение «разметка».
Вывод

Чтобы собрать плагин, который даст вам возможность использовать шорткод подсветки синтаксиса, нужно выполнить несколько шагов, но, к счастью, вы всегда можете просто загрузить плагин и установить его, не зная, как он был собран. Хотя использование WordPress доставляет удовольствие, когда вы понимаете, как все работает, поэтому вы можете настроить его так, чтобы он действительно работал на вас. Таким образом, если вы не являетесь поклонником моей темной темы, вы можете легко поиграть с CSS, чтобы изменить стили подсветки синтаксиса так, чтобы она соответствовала вашему дизайну.
Если у вас есть какие-либо комментарии или отзывы по поводу того, что вы прочитали выше, пожалуйста, обсудите это ниже.