В этой серии учебных пособий (частично бесплатно, частично Premium) мы создадим высокопроизводительную 2D-съемку с использованием нового аппаратно-ускоренного Stage3D рендеринга Stage3D . Мы будем использовать несколько методов жесткой оптимизации для достижения высокой производительности рендеринга 2D спрайтов. В этой части мы создадим высокопроизводительную демонстрацию, которая рисует сотни движущихся спрайтов на экране одновременно.
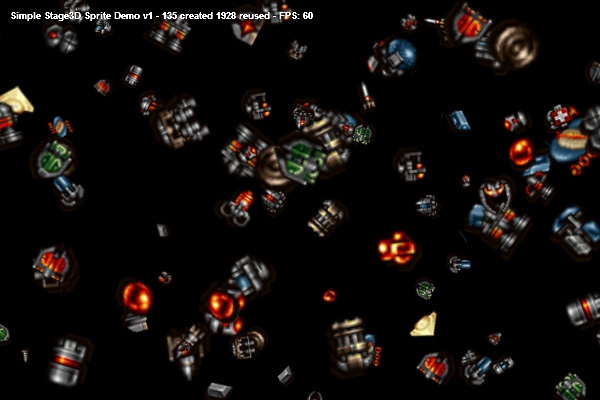
Окончательный результат предварительного просмотра
Давайте посмотрим на конечный результат, к которому мы будем стремиться: демонстрация высокопроизводительного 2D-спрайта с использованием Stage3D с оптимизацией, включающей в себя таблицу спрайтов и пул объектов.
Введение: Flash 11 Stage3D
Если вы надеетесь поднять свои Flash-игры на новый уровень и ищете кучу приятных глаз и удивительной частоты кадров, Stage3D станет вашим новым лучшим другом.
Невероятная скорость нового аппаратно-ускоренного API-интерфейса Stage3D в Flash 11 только начинает использоваться для 2D-игр. Вместо использования старомодных Flash-спрайтов в DisplayList или методах блинтинга последнего поколения, которые популярны в таких движках, как FlashPunk и Flixel, новое поколение 2D-игр использует мощь графического процессора вашей видеокарты для ускорения выполнения задач рендеринга до 1000x. скорость всего, что мог сделать Flash 10.
Хотя это название имеет 3D, этот новый API также отлично подходит для 2D игр. Мы можем визуализировать простую геометрию в виде 2D квадратов (называемых квадратами) и нарисовать их на плоской плоскости. Это позволит нам отображать тонны спрайтов на экране с гладкой и гладкой скоростью 60 кадров в секунду.
Мы сделаем шутер с боковой прокруткой, вдохновленный ретро-аркадными играми, такими как R-Type или Gradius в ActionScript с использованием Flash 11 API Stage3D. Это не так сложно, как говорят некоторые люди, и вам не нужно изучать коды операций AGAL на ассемблере.
В этой серии из 6 частей мы собираемся запрограммировать простую 2D-съемку, которая обеспечивает потрясающую производительность рендеринга. Мы собираемся построить его, используя чистый AS3, скомпилированный в FlashDevelop ( подробнее об этом здесь ). FlashDevelop великолепен, потому что он на 100% бесплатен — не нужно покупать дорогие инструменты, чтобы получить лучшую AS3 IDE.
Шаг 1: Создайте новый проект
Если у вас его еще нет, обязательно скачайте и установите FlashDevelop . Как только вы все настроите (и вы позволите ему автоматически устанавливать последнюю версию компилятора Flex), запустите его и запустите новый «проект AS3».
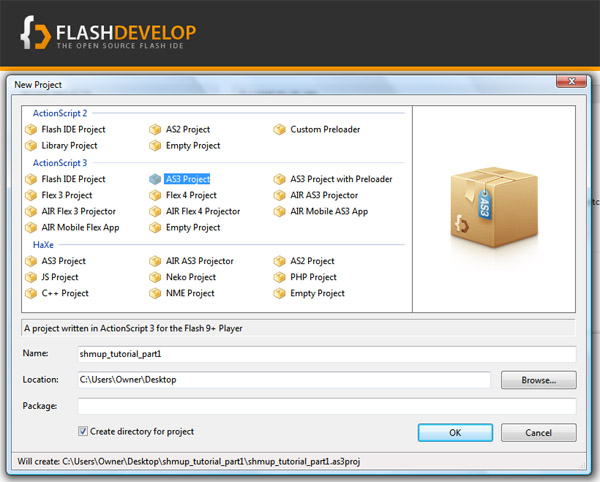
FlashDevelop создаст пустой шаблон проекта для вас. Мы будем заполнять пробелы по частям, пока не создадим достойную игру.
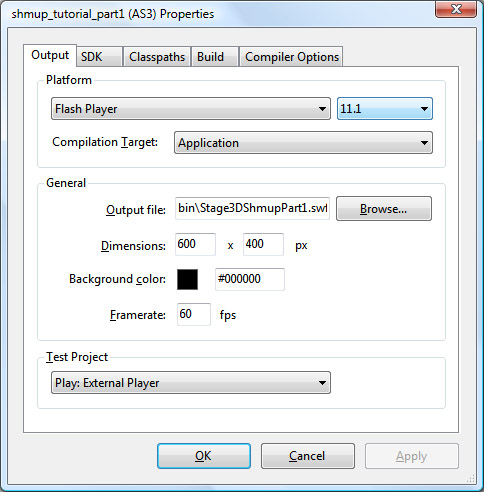
Шаг 2: Target Flash 11
Зайдите в меню проекта и измените несколько параметров:
- Target Flash 11.1
- Измените размер на 600x400px
- Изменить цвет фона на черный
- Измените FPS на 60
- Измените имя файла SWF на имя по вашему выбору
Шаг 3: Импорт
Теперь, когда наш пустой проект настроен, давайте углубимся и немного кодируем. Для начала нам нужно будет импортировать все необходимые функции Stage3D. Добавьте следующее в самый верх вашего файла Main.as
|
01
02
03
04
05
06
07
08
09
10
11
12
13
14
15
16
17
|
// Stage3D Shoot-em-up Tutorial Part 1
// by Christer Kaitila — www.mcfunkypants.com
// Created for active.tutsplus.com
package
{
[SWF(width = «600», height = «400», frameRate = «60», backgroundColor = «#000000»)]
import flash.display3D.*;
import flash.display.Sprite;
import flash.display.StageAlign;
import flash.display.StageQuality;
import flash.display.StageScaleMode;
import flash.events.Event;
import flash.events.ErrorEvent;
import flash.geom.Rectangle;
import flash.utils.getTimer;
|
Шаг 4. Инициализация Stage3D
Следующий шаг — дождаться появления нашей игры на сцене Flash. Выполнение таких действий позволяет в будущем использовать предварительный загрузчик. Для простоты мы будем делать большую часть нашей игры в одном маленьком классе, который наследуется от класса Flash Sprite следующим образом.
|
01
02
03
04
05
06
07
08
09
10
11
12
13
14
15
16
17
18
19
20
21
22
23
24
25
26
27
28
29
30
31
32
|
public class Main extends Sprite
{
private var _entities : EntityManager;
private var _spriteStage : LiteSpriteStage;
private var _gui : GameGUI;
private var _width : Number = 600;
private var _height : Number = 400;
public var context3D : Context3D;
// constructor function for our game
public function Main():void
{
if (stage) init();
else addEventListener(Event.ADDED_TO_STAGE, init);
}
// called once Flash is ready
private function init(e:Event = null):void
{
removeEventListener(Event.ADDED_TO_STAGE, init);
stage.quality = StageQuality.LOW;
stage.align = StageAlign.TOP_LEFT;
stage.scaleMode = StageScaleMode.NO_SCALE;
stage.addEventListener(Event.RESIZE, onResizeEvent);
trace(«Init Stage3D…»);
_gui = new GameGUI(«Simple Stage3D Sprite Demo v1»);
addChild(_gui);
stage.stage3Ds[0].addEventListener(Event.CONTEXT3D_CREATE, onContext3DCreate);
stage.stage3Ds[0].addEventListener(ErrorEvent.ERROR, errorHandler);
stage.stage3Ds[0].requestContext3D(Context3DRenderMode.AUTO);
trace(«Stage3D requested…»);
}
|
После установки некоторых специфичных для стадии свойств мы запрашиваем контекст Stage3D . Это может занять некоторое время (доли секунды), поскольку ваша видеокарта настроена для аппаратного рендеринга, поэтому нам нужно дождаться события onContext3DCreate .
Мы также хотим обнаруживать любые ошибки, которые могут возникнуть, тем более что контент Stage3D не запускается, если HTML-код для встраивания, который загружает ваш SWF-файл, не содержит параметр "wmode=direct" . Эти ошибки также могут возникать, если пользователь использует старую версию Flash или у него нет видеокарты, способной обрабатывать пиксельные шейдеры 2.0.
Шаг 5: обрабатывать любые события
Добавьте следующие функции, которые обнаруживают любые события, которые могут быть вызваны, как указано выше. В случае ошибок из-за запуска старых плагинов Flash, в будущих версиях этой игры мы можем захотеть вывести сообщение и напомнить пользователю о необходимости обновления, но пока эта ошибка просто игнорируется.
Для пользователей со старыми видеокартами (или драйверами), которые не поддерживают шейдерную модель 2.0, хорошая новость заключается в том, что Flash 11 достаточно умен, чтобы предоставлять программный рендер. Он работает не очень быстро, но, по крайней мере, каждый сможет сыграть в вашу игру. Те, у кого есть приличные игровые автоматы, получат фантастическую частоту смены кадров, которую вы никогда раньше не видели во флэш-игре.
|
01
02
03
04
05
06
07
08
09
10
11
12
13
14
15
16
17
18
19
20
21
22
23
24
25
26
27
28
29
30
31
32
33
|
// this is called when the 3d card has been set up
// and is ready for rendering using stage3d
private function onContext3DCreate(e:Event):void
{
trace(«Stage3D context created! Init sprite engine…»);
context3D = stage.stage3Ds[0].context3D;
initSpriteEngine();
}
// this can be called when using an old version of Flash
// or if the html does not include wmode=direct
private function errorHandler(e:ErrorEvent):void
{
trace(«Error while setting up Stage3D: «+e.errorID+» — » +e.text);
}
protected function onResizeEvent(event:Event) : void
{
trace(«resize event…»);
// Set correct dimensions if we resize
_width = stage.stageWidth;
_height = stage.stageHeight;
// Resize Stage3D to continue to fit screen
var view:Rectangle = new Rectangle(0, 0, _width, _height);
if ( _spriteStage != null ) {
_spriteStage.position = view;
}
if(_entities != null) {
_entities.setPosition(view);
}
}
|
Приведенный выше код обработки событий определяет, когда Stage3D готов к аппаратной визуализации, и устанавливает переменную context3D для будущего использования. Ошибки пока игнорируются. Событие resize просто обновляет размер рабочей области и размеры системы пакетной визуализации.
Шаг 6: Инициируйте Двигатель Спрайта
Как только context3D получен, мы готовы начать игру. Продолжая с Main.as , добавьте следующее.
|
01
02
03
04
05
06
07
08
09
10
11
12
13
14
15
16
17
18
19
20
21
22
|
private function initSpriteEngine():void
{
// init a gpu sprite system
var stageRect:Rectangle = new Rectangle(0, 0, _width, _height);
_spriteStage = new LiteSpriteStage(stage.stage3Ds[0], context3D, stageRect);
_spriteStage.configureBackBuffer(_width,_height);
// create a single rendering batch
// which will draw all sprites in one pass
var view:Rectangle = new Rectangle(0,0,_width,_height)
_entities = new EntityManager(stageRect);
_entities.createBatch(context3D);
_spriteStage.addBatch(_entities._batch);
// add the first entity right now
_entities.addEntity();
// tell the gui where to grab statistics from
_gui.statsTarget = _entities;
// start the render loop
stage.addEventListener(Event.ENTER_FRAME,onEnterFrame);
}
|
Эта функция создает механизм визуализации спрайтов (будет реализован ниже) на сцене, готовый использовать полный размер вашего флэш-файла. Затем мы добавляем менеджер сущностей и систему пакетной геометрии (которую мы обсудим ниже). Теперь мы можем дать ссылку на менеджер сущностей на наш класс GUI stats, чтобы он мог отображать на экране некоторые цифры относительно того, сколько спрайтов было создано или повторно использовано. Наконец, мы начинаем прослушивать событие ENTER_FRAME , которое будет ENTER_FRAME со скоростью до 60 раз в секунду.
Шаг 7: Запустите цикл рендеринга
Теперь, когда все инициализировано, мы готовы играть! Следующая функция будет выполняться каждый кадр. В целях этой первой технической демонстрации мы собираемся добавить один новый спрайт на сцене каждый кадр. Поскольку мы собираемся реализовать пул объектов (о котором вы можете прочитать больше в этом учебном пособии ) вместо того, чтобы создавать новые объекты бесконечно, пока у нас не кончится ОЗУ, мы сможем повторно использовать старые объекты, которые вышли за пределы экрана.
После появления другого спрайта мы очищаем область stage3D экрана (устанавливая его в чисто черный). Затем мы обновляем все сущности, которые контролируются нашим менеджером сущностей. Это будет перемещать их немного больше каждый кадр. Как только все спрайты были обновлены, мы говорим системе пакетной геометрии собрать их все в один большой буфер вершин и отобразить их на экране за один вызов отрисовки для эффективности. Наконец, мы сообщаем context3D обновить экран с нашим финальным рендером.
|
01
02
03
04
05
06
07
08
09
10
11
12
13
14
15
16
17
18
19
20
21
22
23
24
25
26
27
28
29
30
31
|
// this function draws the scene every frame
private function onEnterFrame(e:Event):void
{
try
{
// keep adding more sprites — FOREVER!
// this is a test of the entity manager’s
// object reuse «pool»
_entities.addEntity();
// erase the previous frame
context3D.clear(0, 0, 0, 1);
// move/animate all entities
_entities.update(getTimer());
// draw all entities
_spriteStage.render();
// update the screen
context3D.present();
}
catch (e:Error)
{
// this can happen if the computer goes to sleep and
// then re-awakens, requiring reinitialization of stage3D
// (the onContext3DCreate will fire again)
}
}
} // end class
} // end package
|
Вот и все для начальных! Как бы просто это ни звучало, мы создали шаблонный проект, готовый взорвать безумное количество спрайтов. Мы не собираемся использовать векторное искусство. Мы не собираемся помещать какие-либо старомодные Flash-спрайты на сцену, кроме окна Stage3D и нескольких наложений графического интерфейса. Вся работа по визуализации нашей игровой графики будет выполняться Stage3D, чтобы мы могли наслаждаться улучшенной производительностью.
Идем глубже: почему Stage3D такой быстрый?
Две причины:
- Он использует аппаратное ускорение, то есть все команды рисования отправляются в 3D GPU на вашей видеокарте так же, как при воспроизведении игр XBOX360 и PlayStation3.
- Эти команды рендеринга обрабатываются параллельно с остальным кодом ActionScript. Это означает, что после того, как команды отправлены на вашу видеокарту, весь рендеринг выполняется в то же время, что и другой код в вашей игре — Flash не должен ждать их завершения. В то время как на ваш экран высыпаются пиксели, Flash начинает выполнять другие функции, такие как управление вводом игрока, воспроизведение звуков и обновление позиций противника.
- объединение объектов
- spritesheet (текстурный атлас)
- порционная геометрия
Тем не менее, многие движки Stage3D, похоже, увязли в нескольких сотнях спрайтов. Это потому, что они были запрограммированы без учета накладных расходов, которые добавляет каждая команда рисования Когда впервые появился Stage3D, некоторые из первых 2D-движков рисовали каждый спрайт индивидуально в одном гигантском (медленном и неэффективном) цикле. Так как эта статья посвящена экстремальной оптимизации для 2D-игры следующего поколения с невероятной частотой кадров, мы собираемся реализовать чрезвычайно эффективную систему рендеринга, которая буферизует всю геометрию в один большой пакет, чтобы мы могли рисовать все только с помощью одной или двух команд.
Как быть хардкор: оптимизировать!
Хардкорные игры любят оптимизацию. Чтобы получить больше спрайтов на экране с наименьшим количеством изменений состояния (таких как переключение текстур, выбор нового буфера вершин или необходимость обновить преобразование один раз для каждого спрайта на экране), мы собираемся воспользоваться из следующих трех оптимизаций производительности:
Эти три хардкорных трюка с gamedev являются ключом к получению потрясающего FPS в вашей игре. Давайте реализуем их сейчас. Прежде чем мы это сделаем, нам нужно создать несколько крошечных классов, которые будут использовать эти методы.
Шаг 8: Отображение статистики
Если мы собираемся выполнять тонны оптимизаций и использовать Stage3D в попытке достичь невероятно быстрой производительности рендеринга, нам нужен способ отслеживать статистику. Несколько небольших тестов могут иметь большое значение, чтобы доказать, что то, что мы делаем, оказывает положительное влияние на частоту кадров. Прежде чем мы пойдем дальше, создайте новый класс с именем GameGUI.as и реализуйте супер-простой FPS и отображение статистики следующим образом.
|
01
02
03
04
05
06
07
08
09
10
11
12
13
14
15
16
17
18
19
20
21
22
23
24
25
26
27
28
29
30
31
32
33
34
35
36
37
38
39
40
41
42
43
44
45
46
47
48
49
50
51
52
53
54
55
56
57
58
59
60
61
62
63
64
65
66
67
68
69
70
|
// Stage3D Shoot-em-up Tutorial Part 1
// by Christer Kaitila — www.mcfunkypants.com
// GameGUI.as
// A typical simplistic framerate display for benchmarking performance,
// plus a way to track rendering statistics from the entity manager.
package
{
import flash.events.Event;
import flash.events.TimerEvent;
import flash.text.TextField;
import flash.text.TextFormat;
import flash.utils.getTimer;
public class GameGUI extends TextField
{
public var titleText : String = «»;
public var statsText : String = «»;
public var statsTarget : EntityManager;
private var frameCount:int = 0;
private var timer:int;
private var ms_prev:int;
private var lastfps : Number = 60;
public function GameGUI(title:String = «», inX:Number=8, inY:Number=8, inCol:int = 0xFFFFFF)
{
super();
titleText = title;
x = inX;
y = inY;
width = 500;
selectable = false;
defaultTextFormat = new TextFormat(«_sans», 9, 0, true);
text = «»;
textColor = inCol;
this.addEventListener(Event.ADDED_TO_STAGE, onAddedHandler);
}
public function onAddedHandler(e:Event):void {
stage.addEventListener(Event.ENTER_FRAME, onEnterFrame);
}
private function onEnterFrame(evt:Event):void
{
timer = getTimer();
if( timer — 1000 > ms_prev )
{
lastfps = Math.round(frameCount/(timer-ms_prev)*1000);
ms_prev = timer;
// grab the stats from the entity manager
if (statsTarget)
{
statsText =
statsTarget.numCreated + ‘ created ‘ +
statsTarget.numReused + ‘ reused’;
}
text = titleText + ‘ — ‘ + statsText + » — FPS: » + lastfps;
frameCount = 0;
}
// count each frame to determine the framerate
frameCount++;
}
} // end class
} // end package
|
Шаг 9: Класс сущности
Мы собираемся реализовать класс менеджера сущностей, который будет «пулом объектов», как описано выше. Сначала нам нужно создать упрощенный класс для каждой отдельной сущности в нашей игре. Этот класс будет использоваться для всех игровых объектов, от космических кораблей до пуль.
Создайте новый файл с именем Entity.as и добавьте несколько методов получения и установки. Для этой первой технической демонстрации этот класс является просто пустым заполнителем без большой функциональности, но в последующих уроках мы будем реализовывать большую часть игрового процесса.
|
01
02
03
04
05
06
07
08
09
10
11
12
13
14
15
16
17
18
19
20
21
22
23
24
25
26
27
28
29
30
31
32
33
34
35
36
37
38
39
40
41
42
43
44
45
46
47
48
49
50
51
52
53
54
55
56
57
|
// Stage3D Shoot-em-up Tutorial Part 1
// by Christer Kaitila — www.mcfunkypants.com
// Entity.as
// The Entity class will eventually hold all game-specific entity logic
// for the spaceships, bullets and effects in our game.
// it simply holds a reference to a gpu sprite and a few demo properties.
// This is where you would add hit points, weapons, ability scores, etc.
package
{
public class Entity
{
private var _speedX : Number;
private var _speedY : Number;
private var _sprite : LiteSprite;
public var active : Boolean = true;
public function Entity(gs:LiteSprite = null)
{
_sprite = gs;
_speedX = 0.0;
_speedY = 0.0;
}
public function die() : void
{
// allow this entity to be reused by the entitymanager
active = false;
// skip all drawing and updating
sprite.visible = false;
}
public function get speedX() : Number
{
return _speedX;
}
public function set speedX(sx:Number) : void
{
_speedX = sx;
}
public function get speedY() : Number
{
return _speedY;
}
public function set speedY(sy:Number) : void
{
_speedY = sy;
}
public function get sprite():LiteSprite
{
return _sprite;
}
public function set sprite(gs:LiteSprite):void
{
_sprite = gs;
}
} // end class
} // end package
|
Шаг 10: Сделайте Spritesheet
Важной техникой оптимизации, которую мы собираемся использовать, является использование таблицы спрайтов, которую иногда называют текстурным атласом. Вместо того, чтобы загружать десятки или сотни отдельных изображений в видеопамять для использования во время рендеринга, мы собираемся создать одно изображение, которое содержит все спрайты в нашей игре. Таким образом, мы можем использовать одну текстуру, чтобы рисовать тонны различных видов врагов или ландшафта.
Использование таблицы спрайтов считается лучшей практикой для опытных разработчиков игр, которым необходимо обеспечить максимально быструю работу своих игр. Причина, по которой это так сильно ускоряется, во многом аналогична причине, по которой мы собираемся использовать пакетную геометрию: вместо того, чтобы многократно указывать видеокарте использовать конкретную текстуру для рисования конкретного спрайта, мы можем просто сказать, это всегда использовать одну и ту же текстуру для всех вызовов отрисовки.
Это сокращает «изменения состояния», которые являются чрезвычайно дорогостоящими с точки зрения времени. Нам больше не нужно говорить «видеокарта, начните использовать текстуру 24 … теперь нарисуйте спрайт 14» и так далее. Мы просто говорим «нарисуйте все, используя эту текстуру» за один проход. Это может увеличить производительность на порядок.
В нашем примере игры мы будем использовать коллекцию легальных в использовании бесплатных изображений от талантливого DanC, которую вы можете получить здесь . Помните, что если вы используете эти изображения, вы должны указывать их в своей игре следующим образом: «Название коллекции произведений искусства» Дэниела Кука (Lostgarden.com) .
Используя Photoshop (или GIMP, или любой другой графический редактор), вырежьте и вставьте спрайты, которые понадобятся вашей игре, в один файл PNG с прозрачным фоном. Поместите каждый спрайт в равномерно распределенную сетку с парой пикселей между ними. Этот небольшой буфер необходим для того, чтобы избежать любого «вытекания» краевых пикселей из смежных спрайтов, которое может произойти из-за билинейной фильтрации текстур, которая происходит в графическом процессоре. Если каждый спрайт касается следующего, ваши игровые спрайты могут иметь нежелательные края, где они должны быть полностью прозрачными.
По причинам оптимизации, графические процессоры лучше всего работают с изображениями (так называемыми текстурами), которые имеют квадратную форму, а их размеры равны степени двойки и делятся на восемь равномерно. Почему? Из-за способа доступа к данным пикселей эти магические числа оказываются выровненными в VRAM просто правильным способом, чтобы обеспечить быстрый доступ к ним, потому что данные часто читаются порциями.
Поэтому убедитесь, что ваша таблица спрайтов имеет размер 64×64, 128×128, 256×256, 512×512 или 1024×1024. Как и следовало ожидать, чем меньше, тем лучше — не только с точки зрения производительности, но и потому, что меньшая текстура естественным образом сохранит конечный SWF вашей игры меньшим.
Вот таблица, которую мы будем использовать для нашего примера. «Тирийское» искусство Даниэля Кука ( Lostgarden.com ).

Щелкните правой кнопкой мыши, чтобы загрузить
Шаг 11: Менеджер сущностей
Первый метод оптимизации, который мы собираемся использовать для достижения максимальной производительности, — это использование «пулов объектов». Вместо того, чтобы постоянно выделять больше оперативной памяти для таких объектов, как пули или враги, мы собираемся создать пул повторного использования, который снова и снова перерабатывает неиспользованные спрайты.
Этот метод гарантирует, что использование ОЗУ остается очень низким, а GC (сборка мусора) происходит редко. В результате частота кадров будет выше, и ваша игра будет работать независимо от того, как долго вы играете.
Создайте новый класс в вашем проекте с именем EntityManager.as и реализуйте простой механизм повторного использования по требованию следующим образом.
|
01
02
03
04
05
06
07
08
09
10
11
12
13
14
15
16
17
18
19
20
21
22
23
24
25
26
27
28
29
30
31
32
33
34
35
36
37
38
39
40
41
42
43
44
45
46
47
48
|
// Stage3D Shoot-em-up Tutorial Part 1
// by Christer Kaitila — www.mcfunkypants.com
// EntityManager.as
// The entity manager handles a list of all known game entities.
// This object pool will allow for reuse (respawning) of
// sprites: for example, when enemy ships are destroyed,
// they will be re-spawned when needed as an optimization
// that increases fps and decreases ram use.
// This is where you would add all in-game simulation steps,
// such as gravity, movement, collision detection and more.
package
{
import flash.display.Bitmap;
import flash.display3D.*;
import flash.geom.Point;
import flash.geom.Rectangle;
public class EntityManager
{
// the sprite sheet image
private var _spriteSheet : LiteSpriteSheet;
private const SpritesPerRow:int = 8;
private const SpritesPerCol:int = 8;
[Embed(source=»../assets/sprites.png»)]
private var SourceImage : Class;
// a reusable pool of entities
private var _entityPool : Vector.<Entity>;
// all the polygons that make up the scene
public var _batch : LiteSpriteBatch;
// for statistics
public var numCreated : int = 0;
public var numReused : int = 0;
private var maxX:int;
private var minX:int;
private var maxY:int;
private var minY:int;
public function EntityManager(view:Rectangle)
{
_entityPool = new Vector.<Entity>();
setPosition(view);
}
|
Шаг 12: Установите границы
Наш менеджер сущностей собирается перерабатывать сущности, когда они уходят с левого края экрана. Приведенная ниже функция вызывается во время инициализации или при возникновении события изменения размера. Мы добавляем несколько дополнительных пикселей к краям, чтобы спрайты не появлялись или не появлялись внезапно.
|
1
2
3
4
5
6
7
8
|
public function setPosition(view:Rectangle):void
{
// allow moving fully offscreen before looping around
maxX = view.width + 32;
minX = view.x — 32;
maxY = view.height;
minY = view.y;
}
|
Шаг 13: настройка спрайтов
Менеджер сущностей запускает эту функцию один раз при запуске. Он создает новый пакет геометрии, используя изображение таблицы спрайтов, которое было встроено в наш код выше. Он отправляет bitmapData в конструктор класса spritesheet, который будет использоваться для создания текстуры, в которой есть все доступные изображения спрайтов в сетке. Мы сообщаем нашей таблице спрайтов, что мы собираемся использовать 64 различных спрайта (8 на 8) на одной текстуре. Этот spritesheet будет использоваться рендером геометрии пакета.
Если бы мы хотели, мы могли бы использовать более одной таблицы спрайтов, инициализируя дополнительные изображения и пакеты по мере необходимости. В будущем это может быть, когда вы создадите вторую партию для всех тайлов местности, которые идут под спрайтами вашего космического корабля. Вы могли бы даже реализовать третью партию, которая наслоена поверх всего для причудливых эффектов частиц и глазного леденца. На данный момент эта простая техническая демонстрация требует только одного пакета текстур и геометрии spritesheet.
|
01
02
03
04
05
06
07
08
09
10
11
12
|
public function createBatch(context3D:Context3D) : LiteSpriteBatch
{
var sourceBitmap:Bitmap = new SourceImage();
// create a spritesheet with 8×8 (64) sprites on it
_spriteSheet = new LiteSpriteSheet(sourceBitmap.bitmapData, 8, 8);
// Create new render batch
_batch = new LiteSpriteBatch(context3D, _spriteSheet);
return _batch;
}
|
Шаг 14: Пул объектов
Здесь менеджер сущностей увеличивает производительность. Эта единственная оптимизация (пул повторного использования объектов) позволит нам создавать новые сущности только по требованию (когда нет никаких неактивных, которые можно использовать повторно). Обратите внимание, как мы повторно используем любые спрайты, которые в данный момент помечены как неактивные, если только они не используются в данный момент, и в этом случае мы создаем новый. Таким образом, каждый наш пул объектов содержит столько спрайтов, сколько они видимы одновременно. После первых нескольких секунд работы нашей игры пул сущностей будет оставаться постоянным — редко нужно будет создавать новую сущность, как только будет достаточно для обработки происходящего на экране.
Продолжите добавлять в EntityManager.as следующим образом:
|
01
02
03
04
05
06
07
08
09
10
11
12
13
14
15
16
17
18
19
20
21
22
23
24
25
26
27
28
29
30
31
32
33
34
35
36
37
38
39
40
41
42
43
44
45
46
47
|
// search the entity pool for unused entities and reuse one
// if they are all in use, create a brand new one
public function respawn(sprID:uint=0):Entity
{
var currentEntityCount:int = _entityPool.length;
var anEntity:Entity;
var i:int = 0;
// search for an inactive entity
for (i = 0; i < currentEntityCount; i++ )
{
anEntity = _entityPool[i];
if (!anEntity.active && (anEntity.sprite.spriteId == sprID))
{
//trace(‘Reusing Entity #’ + i);
anEntity.active = true;
anEntity.sprite.visible = true;
numReused++;
return anEntity;
}
}
// none were found so we need to make a new one
//trace(‘Need to create a new Entity #’ + i);
var sprite:LiteSprite;
sprite = _batch.createChild(sprID);
anEntity = new Entity(sprite);
_entityPool.push(anEntity);
numCreated++;
return anEntity;
}
// for this test, create random entities that move
// from right to left with random speeds and scales
public function addEntity():void
{
var anEntity:Entity;
var randomSpriteID:uint = Math.floor(Math.random() * 64);
// try to reuse an inactive entity (or create a new one)
anEntity = respawn(randomSpriteID);
// give it a new position and velocity
anEntity.sprite.position.x = maxX;
anEntity.sprite.position.y = Math.random() * maxY;
anEntity.speedX = (-1 * Math.random() * 10) — 2;
anEntity.speedY = (Math.random() * 5) — 2.5;
anEntity.sprite.scaleX = 0.5 + Math.random() * 1.5;
anEntity.sprite.scaleY = anEntity.sprite.scaleX;
anEntity.sprite.rotation = 15 — Math.random() * 30;
}
|
Вышеперечисленные функции запускаются всякий раз, когда на экран необходимо добавить новый спрайт. Менеджер сущностей сканирует пул сущностей на предмет того, который в данный момент не используется, и возвращает его, когда это возможно. Если список полностью содержит активные объекты, необходимо создать совершенно новый.
Шаг 15: Имитация!
Последняя функция, за которую отвечает наш менеджер сущностей, вызывается каждый кадр. Он используется для выполнения любых симуляций, AI, обнаружения столкновений, физики или анимации. Для текущей упрощенной технической демонстрации она просто просматривает список активных объектов в пуле и обновляет их позиции в зависимости от скорости. Каждая сущность перемещается в соответствии с их текущей скоростью. Просто для удовольствия, они настроены на то, чтобы вращать немного каждый кадр.
Любая сущность, которая проходит мимо левой части экрана, «убивается» и помечается как неактивная и невидимая, готовая для повторного использования в функциях выше. Если объект касается трех других краев экрана, скорость меняется на противоположную, поэтому он «отскакивает» от этого края. Продолжите добавлять в EntityManager.as следующим образом:
|
01
02
03
04
05
06
07
08
09
10
11
12
13
14
15
16
17
18
19
20
21
22
23
24
25
26
27
28
29
30
31
32
33
34
35
36
37
38
39
40
|
// called every frame: used to update the simulation
// this is where you would perform AI, physics, etc.
public function update(currentTime:Number) : void
{
var anEntity:Entity;
for(var i:int=0; i<_entityPool.length;i++)
{
anEntity = _entityPool[i];
if (anEntity.active)
{
anEntity.sprite.position.x += anEntity.speedX;
anEntity.sprite.position.y += anEntity.speedY;
anEntity.sprite.rotation += 0.1;
if (anEntity.sprite.position.x > maxX)
{
anEntity.speedX *= -1;
anEntity.sprite.position.x = maxX;
}
else if (anEntity.sprite.position.x < minX)
{
// if we go past the left edge, become inactive
// so the sprite can be respawned
anEntity.die();
}
if (anEntity.sprite.position.y > maxY)
{
anEntity.speedY *= -1;
anEntity.sprite.position.y = maxY;
}
else if (anEntity.sprite.position.y < minY)
{
anEntity.speedY *= -1;
anEntity.sprite.position.y = minY;
}
}
}
}
} // end class
} // end package
|
Шаг 16: Спрайт-класс
Последний шаг, чтобы все заработало и работало, — это реализация четырех классов, составляющих нашу систему «движка рендеринга». Поскольку слово Sprite уже используется во Flash, в следующих нескольких классах будет использоваться термин LiteSprite , который не просто LiteSprite в глаза, но подразумевает легкий и упрощенный характер этого движка.
Для начала мы создадим простой 2D-класс спрайтов, на который ссылается наш класс сущностей. В нашей игре будет много спрайтов, каждый из которых собирается в большую партию полигонов и обрабатывается за один проход.
Создайте новый файл в вашем проекте с именем LiteSprite.as и реализуйте некоторые LiteSprite.as получения и установки следующим образом. Возможно, мы могли бы обойтись без простого использования общедоступных переменных, но в будущих версиях изменение некоторых из этих значений потребует сначала выполнить некоторый код, поэтому этот метод окажется неоценимым.
|
001
002
003
004
005
006
007
008
009
010
011
012
013
014
015
016
017
018
019
020
021
022
023
024
025
026
027
028
029
030
031
032
033
034
035
036
037
038
039
040
041
042
043
044
045
046
047
048
049
050
051
052
053
054
055
056
057
058
059
060
061
062
063
064
065
066
067
068
069
070
071
072
073
074
075
076
077
078
079
080
081
082
083
084
085
086
087
088
089
090
091
092
093
094
095
096
097
098
099
100
101
102
103
104
105
106
107
108
109
110
111
112
113
|
// Stage3D Shoot-em-up Tutorial Part 1
// by Christer Kaitila — www.mcfunkypants.com
// LiteSprite.as
// A 2d sprite that is rendered by Stage3D as a textured quad
// (two triangles) to take advantage of hardware acceleration.
// Based on example code by Chris Nuuja which is a port
// of the haXe+NME bunnymark demo by Philippe Elsass
// which is itself a port of Iain Lobb’s original work.
// Also includes code from the Starling framework.
// Grateful acknowledgements to all involved.
package
{
import flash.geom.Point;
import flash.geom.Rectangle;
public class LiteSprite
{
internal var _parent : LiteSpriteBatch;
internal var _spriteId : uint;
internal var _childId : uint;
private var _pos : Point;
private var _visible : Boolean;
private var _scaleX : Number;
private var _scaleY : Number;
private var _rotation : Number;
private var _alpha : Number;
public function get visible() : Boolean
{
return _visible;
}
public function set visible(isVisible:Boolean) : void
{
_visible = isVisible;
}
public function get alpha() : Number
{
return _alpha;
}
public function set alpha(a:Number) : void
{
_alpha = a;
}
public function get position() : Point
{
return _pos;
}
public function set position(pt:Point) : void
{
_pos = pt;
}
public function get scaleX() : Number
{
return _scaleX;
}
public function set scaleX(val:Number) : void
{
_scaleX = val;
}
public function get scaleY() : Number
{
return _scaleY;
}
public function set scaleY(val:Number) : void
{
_scaleY = val;
}
public function get rotation() : Number
{
return _rotation;
}
public function set rotation(val:Number) : void
{
_rotation = val;
}
public function get rect() : Rectangle
{
return _parent._sprites.getRect(_spriteId);
}
public function get parent() : LiteSpriteBatch
{
return _parent;
}
public function get spriteId() : uint
{
return _spriteId;
}
public function set spriteId(num : uint) : void
{
_spriteId = num;
}
public function get childId() : uint
{
return _childId;
}
// LiteSprites are typically constructed by calling LiteSpriteBatch.createChild()
public function LiteSprite()
{
_parent = null;
_spriteId = 0;
_childId = 0;
_pos = new Point();
_scaleX = 1.0;
_scaleY = 1.0;
_rotation = 0;
_alpha = 1.0;
_visible = true;
}
} // end class
} // end package
|
Теперь каждый спрайт может отслеживать, где он находится на экране, а также насколько он большой, насколько прозрачный и под каким углом он смотрит. Свойство spriteID — это число, используемое во время рендеринга для определения того, какую координату UV (текстуры) необходимо использовать в качестве исходного прямоугольника для пикселей изображения спрайт-листа, которое оно использует.
Шаг 17: Класс Spritesheet
Теперь нам нужно реализовать механизм для обработки изображения таблицы спрайтов, которое мы встроили выше, и использовать его части во всей нашей визуализированной геометрии. Создайте в своем проекте новый файл с именем LiteSpriteSheet.as и начните с импорта необходимых функций, определения нескольких переменных класса и функции конструктора.
|
01
02
03
04
05
06
07
08
09
10
11
12
13
14
15
16
17
18
19
20
21
22
23
24
25
26
27
28
29
30
31
32
33
34
35
36
37
38
39
40
41
42
|
// Stage3D Shoot-em-up Tutorial Part 1
// by Christer Kaitila — www.mcfunkypants.com
// LiteSpriteSheet.as
// An optimization used to improve performance, all sprites used
// in the game are packed onto a single texture so that
// they can be rendered in a single pass rather than individually.
// This also avoids the performance penalty of 3d stage changes.
// Based on example code by Chris Nuuja which is a port
// of the haXe+NME bunnymark demo by Philippe Elsass
// which is itself a port of Iain Lobb’s original work.
// Also includes code from the Starling framework.
// Grateful acknowledgements to all involved.
package
{
import flash.display.Bitmap;
import flash.display.BitmapData;
import flash.display.Stage;
import flash.display3D.Context3D;
import flash.display3D.Context3DTextureFormat;
import flash.display3D.IndexBuffer3D;
import flash.display3D.textures.Texture;
import flash.geom.Point;
import flash.geom.Rectangle;
import flash.geom.Matrix;
public class LiteSpriteSheet
{
internal var _texture : Texture;
protected var _spriteSheet : BitmapData;
protected var _uvCoords : Vector.<Number>;
protected var _rects : Vector.<Rectangle>;
public function LiteSpriteSheet(SpriteSheetBitmapData:BitmapData, numSpritesW:int = 8, numSpritesH:int = 8)
{
_uvCoords = new Vector.<Number>();
_rects = new Vector.<Rectangle>();
_spriteSheet = SpriteSheetBitmapData;
createUVs(numSpritesW, numSpritesH);
}
|
Приведенный выше конструктор класса дает BitmapData для нашей таблицы спрайтов, а также количество спрайтов на ней (в этой демонстрации 64).
Шаг 18: нарежь
Поскольку мы используем одну текстуру для хранения всех изображений спрайтов, нам нужно разделить изображение на несколько частей (по одной для каждого спрайта на нем) при рендеринге. Мы делаем это, назначая разные координаты для каждой вершины (угла) каждой четырехугольной сетки, используемой для рисования спрайта.
Эти координаты называются UV, и каждая из них имеет значение от 0 до 1 и представляет, где на сцене stage3D следует начинать выборку пикселей при рендеринге. Координаты UV и пиксельные прямоугольники сохраняются в массиве для последующего использования во время рендеринга, поэтому нам не нужно рассчитывать их каждый кадр. We also store the size and shape of each sprite (which in this demo are all identical) so that when we rotate a sprite we know its radius (which is used to keep the pivot in the very centre of the sprite).
|
01
02
03
04
05
06
07
08
09
10
11
12
13
14
15
16
17
18
19
20
21
22
23
24
25
26
27
28
29
30
31
32
33
34
35
36
37
38
39
40
41
42
43
44
45
46
47
48
49
50
51
52
53
54
|
// generate a list of uv coordinates for a grid of sprites// on the spritesheet texture for later reference by ID number// sprite ID numbers go from left to right then downpublic function createUVs(numSpritesW:int, numSpritesH:int) : void{
trace('creating a '+_spriteSheet.width+'x'+_spriteSheet.height+ ' spritesheet texture with '+numSpritesW+'x'+ numSpritesH+' sprites.'); var destRect : Rectangle; for (var y:int = 0; y < numSpritesH; y++) {
for (var x:int = 0; x < numSpritesW; x++) {
_uvCoords.push( // bl, tl, tr, br x / numSpritesW, (y+1) / numSpritesH, x / numSpritesW, y / numSpritesH, (x+1) / numSpritesW, y / numSpritesH, (x + 1) / numSpritesW, (y + 1) / numSpritesH); destRect = new Rectangle(); destRect.left = 0; destRect.top = 0; destRect.right = _spriteSheet.width / numSpritesW; destRect.bottom = _spriteSheet.height / numSpritesH; _rects.push(destRect); }
}
}
public function removeSprite(spriteId:uint) : void {
if ( spriteId < _uvCoords.length ) { _uvCoords = _uvCoords.splice(spriteId * 8, 8); _rects.splice(spriteId, 1); }
}
public function get numSprites() : uint {
return _rects.length; }
public function getRect(spriteId:uint) : Rectangle {
return _rects[spriteId]; }
public function getUVCoords(spriteId:uint) : Vector.<Number> {
var startIdx:uint = spriteId * 8; return _uvCoords.slice(startIdx, startIdx + 8); }
|
Step 19: Generate Mipmaps
Now we need to process this image during the init. We are going to upload it for use as a texture by your GPU. As we do so, we are going to create smaller copies that are called «mipmaps». Mip-mapping is used by 3d hardware to further speed up rendering by using smaller versions of the same texture whenever it is seen from far away (scaled down) or, in true 3D games, when it is being viewed at an oblique angle. This avoids any «moiree» effects (flickers) than can happen if mipmapping is not used. Each mipmap is half the width and height as the previous.
Continuing with LiteSpriteSheet.as , let’s implement the routine we need that will generate mipmaps and upload them all to the GPU on your video card.
|
01
02
03
04
05
06
07
08
09
10
11
12
13
14
15
16
17
18
19
20
21
22
23
24
25
|
public function uploadTexture(context3D:Context3D) : void {
if ( _texture == null ) { _texture = context3D.createTexture(_spriteSheet.width, _spriteSheet.height, Context3DTextureFormat.BGRA, false); }
_texture.uploadFromBitmapData(_spriteSheet); // generate mipmaps var currentWidth:int = _spriteSheet.width >> 1; var currentHeight:int = _spriteSheet.height >> 1; var level:int = 1; var canvas:BitmapData = new BitmapData(currentWidth, currentHeight, true, 0); var transform:Matrix = new Matrix(.5, 0, 0, .5); while ( currentWidth >= 1 || currentHeight >= 1 ) { canvas.fillRect(new Rectangle(0, 0, Math.max(currentWidth,1), Math.max(currentHeight,1)), 0); canvas.draw(_spriteSheet, transform, null, null, null, true); _texture.uploadFromBitmapData(canvas, level++); transform.scale(0.5, 0.5); currentWidth = currentWidth >> 1; currentHeight = currentHeight >> 1; }
}
} // end class
} // end package |
Step 20: Batched Geometry
The final hardcore optimization we are going to implement is a batched geometry rendering system. This «batched geometry» technique is often used in particle systems. We are going to use it for everything. This way, we can tell your GPU to draw everything in one go instead of naively sending hundreds of draw commands (one for each sprite on screen).
In order to minimize the number of draw calls and rendering everything in one go, we will be batching all game sprites into a long list of (x,y) coordinates. Essentially, the geometry batch is treated by your video hardware as a single 3D mesh. Then, once per frame, we will upload the entire buffer to Stage3D in a single function call. Doing things this way is far faster than uploading the individual coordinates of each sprite separately.
Create a new file in your project called LiteSpriteBatch.as and begin by including all the imports for functionality it will need, the class variables it will use, and the constructor as follows:
|
01
02
03
04
05
06
07
08
09
10
11
12
13
14
15
16
17
18
19
20
21
22
23
24
25
26
27
28
29
30
31
32
33
34
35
36
37
38
39
40
41
42
43
44
45
46
47
48
49
50
51
52
53
54
55
56
57
58
59
60
61
62
63
64
65
66
67
68
|
// Stage3D Shoot-em-up Tutorial Part 1// by Christer Kaitila - www.mcfunkypants.com// LiteSpriteBatch.as// An optimization used to increase performance that renders multiple// sprites in a single pass by grouping all polygons together,// allowing stage3D to treat it as a single mesh that can be// rendered in a single drawTriangles call. // Each frame, the positions of each// vertex is updated and re-uploaded to video ram.// Based on example code by Chris Nuuja which is a port// of the haXe+NME bunnymark demo by Philippe Elsass// which is itself a port of Iain Lobb's original work.// Also includes code from the Starling framework.// Grateful acknowledgements to all involved.package
{
import com.adobe.utils.AGALMiniAssembler; import flash.display.BitmapData;
import flash.display3D.Context3D; import flash.display3D.Context3DBlendFactor; import flash.display3D.Context3DCompareMode; import flash.display3D.Context3DProgramType; import flash.display3D.Context3DTextureFormat; import flash.display3D.Context3DVertexBufferFormat; import flash.display3D.IndexBuffer3D; import flash.display3D.Program3D; import flash.display3D.VertexBuffer3D; import flash.display3D.textures.Texture; import flash.geom.Matrix;
import flash.geom.Matrix3D; import flash.geom.Point;
import flash.geom.Rectangle;
public class LiteSpriteBatch {
internal var _sprites : LiteSpriteSheet; internal var _verteces : Vector.<Number>; internal var _indeces : Vector.<uint>; internal var _uvs : Vector.<Number>; protected var _context3D : Context3D; protected var _parent : LiteSpriteStage; protected var _children : Vector.<LiteSprite>; protected var _indexBuffer : IndexBuffer3D; protected var _vertexBuffer : VertexBuffer3D; protected var _uvBuffer : VertexBuffer3D; protected var _shader : Program3D; protected var _updateVBOs : Boolean; public function LiteSpriteBatch(context3D:Context3D, spriteSheet:LiteSpriteSheet) {
_context3D = context3D; _sprites = spriteSheet; _verteces = new Vector.<Number>(); _indeces = new Vector.<uint>(); _uvs = new Vector.<Number>(); _children = new Vector.<LiteSprite>; _updateVBOs = true; setupShaders(); updateTexture(); }
|
Step 21: Batch Parent and Children
Continue by implementing getters and setters and functionality for handling the addition of any new sprites to the batch. The parent refers to the sprite stage object used by our game engine, while the children are all the sprites in this one rendering batch. When we add a child sprite, we add more data to the list of verteces (which supplies the locations on screen of that particular sprite) as well as the UV coordinates (the location on the spritesheet texture that this particular sprite is stored at). When a child sprite is added or removed from the batch, we set a boolean variable to tell our batch system that the buffers need to be re-uploaded now that they have changed.
|
01
02
03
04
05
06
07
08
09
10
11
12
13
14
15
16
17
18
19
20
21
22
23
24
25
26
27
28
29
30
31
32
33
34
35
36
37
38
39
40
41
42
43
44
45
46
47
48
49
50
51
52
53
54
55
56
57
58
59
60
61
62
63
64
65
66
67
68
69
70
71
|
public function get parent() : LiteSpriteStage{
return _parent;}
public function set parent(parentStage:LiteSpriteStage) : void{
_parent = parentStage;}
public function get numChildren() : uint{
return _children.length;}
// Constructs a new child sprite and attaches it to the batchpublic function createChild(spriteId:uint) : LiteSprite{
var sprite : LiteSprite = new LiteSprite(); addChild(sprite, spriteId); return sprite;}
public function addChild(sprite:LiteSprite, spriteId:uint) : void{
sprite._parent = this; sprite._spriteId = spriteId; // Add to list of children sprite._childId = _children.length; _children.push(sprite); // Add vertex data required to draw child var childVertexFirstIndex:uint = (sprite._childId * 12) / 3; _verteces.push(0, 0, 1, 0, 0,1, 0, 0,1, 0, 0,1); // placeholders _indeces.push(childVertexFirstIndex, childVertexFirstIndex+1, childVertexFirstIndex+2, childVertexFirstIndex, childVertexFirstIndex+2, childVertexFirstIndex+3); var childUVCoords:Vector.<Number> = _sprites.getUVCoords(spriteId); _uvs.push( childUVCoords[0], childUVCoords[1], childUVCoords[2], childUVCoords[3], childUVCoords[4], childUVCoords[5], childUVCoords[6], childUVCoords[7]); _updateVBOs = true;}
public function removeChild(child:LiteSprite) : void{
var childId:uint = child._childId; if ( (child._parent == this) && childId < _children.length ) { child._parent = null; _children.splice(childId, 1); // Update child id (index into array of children) for remaining children var idx:uint; for ( idx = childId; idx < _children.length; idx++ ) { _children[idx]._childId = idx; }
// Realign vertex data with updated list of children var vertexIdx:uint = childId * 12; var indexIdx:uint= childId * 6; _verteces.splice(vertexIdx, 12); _indeces.splice(indexIdx, 6); _uvs.splice(vertexIdx, 8); _updateVBOs = true; }
}
|
Step 22: Set Up the Shader
A shader is a set of commands that is uploaded directly to your video card for extremely fast rendering. In Flash 11 Stage3D, you write them in a kind of assembly language called AGAL. This shader needs only be created once, at startup. You don’t need to understand assembly language opcodes for this tutorial. Instead, simply implement the creation of a vertex program (which calculates the locations of your sprites on screen) and a fragment program (which calculates the color of each pixel) as follows.
|
01
02
03
04
05
06
07
08
09
10
11
12
13
14
15
16
17
18
19
20
21
22
23
24
25
26
27
|
protected function setupShaders() : void{
var vertexShaderAssembler:AGALMiniAssembler = new AGALMiniAssembler(); vertexShaderAssembler.assemble( Context3DProgramType.VERTEX, "dp4 op.x, va0, vc0 \n"+ // transform from stream 0 to output clipspace "dp4 op.y, va0, vc1 \n"+ // do the same for the y coordinate "mov op.z, vc2.z \n"+ // we don't need to change the z coordinate "mov op.w, vc3.w \n"+ // unused, but we need to output all data "mov v0, va1.xy \n"+ // copy UV coords from stream 1 to fragment program "mov v0.z, va0.z \n" // copy alpha from stream 0 to fragment program );
var fragmentShaderAssembler:AGALMiniAssembler = new AGALMiniAssembler(); fragmentShaderAssembler.assemble( Context3DProgramType.FRAGMENT, "tex ft0, v0, fs0 <2d,clamp,linear,mipnearest> \n"+ // sample the texture "mul ft0, ft0, v0.zzzz\n" + // multiply by the alpha transparency "mov oc, ft0 \n" // output the final pixel color );
_shader = _context3D.createProgram(); _shader.upload( vertexShaderAssembler.agalcode, fragmentShaderAssembler.agalcode );}
protected function updateTexture() : void{
_sprites.uploadTexture(_context3D); }
|
Step 23: Move the Sprites Around
Just before being rendered, each sprite’s vertex coordinates on screen will have most likely changed as the sprite moves around or rotates. The following function calculates where each vertex (corner of the geometry) needs to be. Because each quad (the square that makes up one sprite) has four vertices each, and each vertex needs an x, y and z coordinate, there are twelve values to update. As a little optimization, if the sprite is not visible we simply write zeroes into our vertex buffer to avoid doing unnecessary calculations.
|
01
02
03
04
05
06
07
08
09
10
11
12
13
14
15
16
17
18
19
20
21
22
23
24
25
26
27
28
29
30
31
32
33
34
35
36
37
38
39
40
|
protected function updateChildVertexData(sprite:LiteSprite) : void{
var childVertexIdx:uint = sprite._childId * 12; if ( sprite.visible ) { var x:Number = sprite.position.x; var y:Number = sprite.position.y; var rect:Rectangle = sprite.rect; var sinT:Number = Math.sin(sprite.rotation); var cosT:Number = Math.cos(sprite.rotation);var alpha:Number = sprite.alpha; var scaledWidth:Number = rect.width * sprite.scaleX; var scaledHeight:Number = rect.height * sprite.scaleY; var centerX:Number = scaledWidth * 0.5; var centerY:Number = scaledHeight * 0.5; _verteces[childVertexIdx] = x - (cosT * centerX) - (sinT * (scaledHeight - centerY)); _verteces[childVertexIdx+1] = y - (sinT * centerX) + (cosT * (scaledHeight - centerY));_verteces[childVertexIdx+2] = alpha; _verteces[childVertexIdx+3] = x - (cosT * centerX) + (sinT * centerY); _verteces[childVertexIdx+4] = y - (sinT * centerX) - (cosT * centerY);_verteces[childVertexIdx+5] = alpha; _verteces[childVertexIdx+6] = x + (cosT * (scaledWidth - centerX)) + (sinT * centerY); _verteces[childVertexIdx+7] = y + (sinT * (scaledWidth - centerX)) - (cosT * centerY);_verteces[childVertexIdx+8] = alpha; _verteces[childVertexIdx+9] = x + (cosT * (scaledWidth - centerX)) - (sinT * (scaledHeight - centerY)); _verteces[childVertexIdx+10] = y + (sinT * (scaledWidth - centerX)) + (cosT * (scaledHeight - centerY));_verteces[childVertexIdx+11] = alpha; }
else {
for (var i:uint = 0; i < 12; i++ ) { _verteces[childVertexIdx+i] = 0; }
}
}
|
Step 24: Draw the Geometry
Finally, continue adding to the LiteSpriteBatch.as class by implementing the drawing function. This is where we tell stage3D to render all the sprites in a single pass. First, we loop through all known children (the individual sprites) and update the verterx positions based on where they are on screen. We then tell stage3D which shader and texture to use, as well as set the blend factors for rendering.
What is a blend factor? It defines whether or not we should use transparency, and how to deal with transparent pixels on our texture. You could change the options in the setBlendFactors call to use additive blanding, for example, which looks great for particle effects like explosions, since pixels will increase the brightness on screen as they overlap. In the case of regular sprites, all we want is to draw them at the exact color as stored in our spritesheet texture and to allow transparent regions.
The final step in our draw function is to update the UV and index buffers if the batch has changed size, and to always upload the vertex data because our sprites are exected to be constantly moving. We tell stage3D which buffers to use and finally render the entire giant list of geometry as if it were a single 3D mesh, so that it gets drawn using a single, fast, drawTriangles call.
|
01
02
03
04
05
06
07
08
09
10
11
12
13
14
15
16
17
18
19
20
21
22
23
24
25
26
27
28
29
30
31
32
33
34
35
|
public function draw() : void {
var nChildren:uint = _children.length; if ( nChildren == 0 ) return; // Update vertex data with current position of children for ( var i:uint = 0; i < nChildren; i++ ) { updateChildVertexData(_children[i]); }
_context3D.setProgram(_shader); _context3D.setBlendFactors(Context3DBlendFactor.ONE, Context3DBlendFactor.ONE_MINUS_SOURCE_ALPHA); _context3D.setProgramConstantsFromMatrix(Context3DProgramType.VERTEX, 0, _parent.modelViewMatrix, true); _context3D.setTextureAt(0, _sprites._texture); if ( _updateVBOs ) { _vertexBuffer = _context3D.createVertexBuffer(_verteces.length/3, 3); _indexBuffer = _context3D.createIndexBuffer(_indeces.length); _uvBuffer = _context3D.createVertexBuffer(_uvs.length/2, 2); _indexBuffer.uploadFromVector(_indeces, 0, _indeces.length); // indices won't change _uvBuffer.uploadFromVector(_uvs, 0, _uvs.length / 2); // child UVs won't change _updateVBOs = false; }
// we want to upload the vertex data every frame _vertexBuffer.uploadFromVector(_verteces, 0, _verteces.length / 3); _context3D.setVertexBufferAt(0, _vertexBuffer, 0, Context3DVertexBufferFormat.FLOAT_3); _context3D.setVertexBufferAt(1, _uvBuffer, 0, Context3DVertexBufferFormat.FLOAT_2); _context3D.drawTriangles(_indexBuffer, 0, nChildren * 2); }
} // end class
} // end package |
Step 25: The Sprite Stage Class
The final class required by our fancy (and speedy) hardware-accelerated sprite rendering engine is the sprite stage class. This stage, much like the traditional Flash stage, holds a list of all the batches that are used for your game. In this first demo, our stage will only be using a single batch of sprites, which itself only uses a single spritesheet.
Create one last file in your project called LiteSpriteStage.as and begin by creating the class as follows:
|
01
02
03
04
05
06
07
08
09
10
11
12
13
14
15
16
17
18
19
20
21
22
23
24
25
26
27
28
29
30
31
32
33
34
35
|
// Stage3D Shoot-em-up Tutorial Part 1// by Christer Kaitila - www.mcfunkypants.com// LiteSpriteStage.as// The stage3D renderer of any number of batched geometry// meshes of multiple sprites. Handles stage3D inits, etc.// Based on example code by Chris Nuuja which is a port// of the haXe+NME bunnymark demo by Philippe Elsass// which is itself a port of Iain Lobb's original work.// Also includes code from the Starling framework.// Grateful acknowledgements to all involved.package
{
import flash.display.Stage3D; import flash.display3D.Context3D; import flash.geom.Matrix3D; import flash.geom.Rectangle;
public class LiteSpriteStage {
protected var _stage3D : Stage3D; protected var _context3D : Context3D; protected var _rect : Rectangle; protected var _batches : Vector.<LiteSpriteBatch>; protected var _modelViewMatrix : Matrix3D; public function LiteSpriteStage(stage3D:Stage3D, context3D:Context3D, rect:Rectangle) {
_stage3D = stage3D; _context3D = context3D; _batches = new Vector.<LiteSpriteBatch>; this.position = rect; }
|
Step 26: The Camera Matrix
In order to know exactly where on screen each sprite needs to go, we will track the location and size of the rendering window. During our game’s initializations (or if it changes) we create a model view matrix which is used by Stage3D to transform the internal 3D coordinates of our geometry batches to the proper on-screen locations.
|
01
02
03
04
05
06
07
08
09
10
11
12
13
14
15
16
17
18
19
20
21
22
23
24
25
26
|
public function get position() : Rectangle{
return _rect;}
public function set position(rect:Rectangle) : void{
_rect = rect; _stage3D.x = rect.x; _stage3D.y = rect.y; configureBackBuffer(rect.width, rect.height); _modelViewMatrix = new Matrix3D(); _modelViewMatrix.appendTranslation(-rect.width/2, -rect.height/2, 0); _modelViewMatrix.appendScale(2.0/rect.width, -2.0/rect.height, 1);}
internal function get modelViewMatrix() : Matrix3D{
return _modelViewMatrix;}
public function configureBackBuffer(width:uint, height:uint) : void{
_context3D.configureBackBuffer(width, height, 0, false);}
|
Step 27: Handle Batches
The final step in the creation of our Stage3D game demo is to handle the addition and removal of geometry batches as well as a loop that calls the draw function on each batch. This way, when our game’s main ENTER_FRAME event is fired, it will move the sprites around on screen via the entity manager and then tell the sprite stage system to draw itself, which in turn tells all known batches to draw.
Because this is a heavily optimized demo, there will only be one batch in use, but this will change in future tutorials as we add more eye candy.
|
01
02
03
04
05
06
07
08
09
10
11
12
13
14
15
16
17
18
19
20
21
22
23
24
25
26
27
|
public function addBatch(batch:LiteSpriteBatch) : void {
batch.parent = this; _batches.push(batch); }
public function removeBatch(batch:LiteSpriteBatch) : void {
for ( var i:uint = 0; i < _batches.length; i++ ) { if ( _batches[i] == batch ) { batch.parent = null; _batches.splice(i, 1); }
}
}
// loop through all batches // (this demo uses only one) // and tell them to draw themselves public function render() : void {
for ( var i:uint = 0; i < _batches.length; i++ ) { _batches[i].draw(); }
}
} // end class
} // end package |
Step 28: Compile and Run!
Мы почти закончили! Compile your SWF, fix any typos, and check out the graphical goodness. You should have a demo that looks like this:
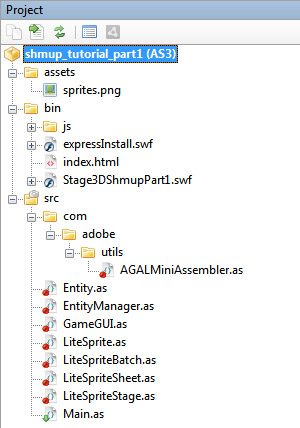
If you are having difficulties compiling, note that this project needs a class that was made by Adobe which handles the compilation of AGAL shaders, which is included in the source code .zip file download.
Просто для справки и чтобы убедиться, что вы использовали правильные имена файлов и местоположения для всего, вот как должен выглядеть ваш проект FlashDevelop:
Tutorial Complete: You Are Awesome
That’s it for tutorial one in this series! Tune in next week to watch the game slowly evolve into a great-looking, silky-smooth 60 FPS shoot-em-up. In the next part, we will implement player controls (using the keyboard to move around) and add some movement, sounds and music to the game.
I’d love to hear from you regarding this tutorial. I warmly welcome all readers to get in touch with me via twitter: @mcfunkypants or my blog mcfunkypants.com or on Google+ any time. I’m always looking for new topics to write future tutorials on, so feel free to request one. Finally, I’d love to see the games you make using this code!
Спасибо за прочтение. Увидимся на следующей неделе. Удачи и получайте удовольствие!