Одним из наиболее важных аспектов разработки сложных приложений реального времени является понимание того, что происходит с целью. Segger только что выпустил бесплатный инструмент, который дает невероятно полезный обзор и визуализацию:
Обзор системы Segger для FreeRTOS
Segger объявил об инструменте на прошлой неделе (см. Https://www.segger.com/systemview.html ). Он работает как голый металл (без ОСРВ), так и с использованием ОСРВ. Релиз V2.10 на веб-странице включает поддержку для Segger embOS . Когда я связался с Segger о возможности использовать его с FreeRTOS, они предоставили мне свой первый порт FreeRTOS (V2.11) (ОГРОМНОЕ СПАСИБО !!!!), и я смог быстро его запустить и запустить и интегрировать как с Процессор Эксперт и Kinetis SDK ? .
Segger SystemViewer основан на Segger RTT (см. « Использование терминала реального времени Segger (RTT) с Eclipse »): все, что ему нужно, — это несколько функций на цели, которые взаимодействуют с хостом через отладочное соединение Segger J-Link. Это супер быстро и дает возможность собирать практически неограниченные данные трассировки.
Руководство
Чтобы сделать использование RTT и SystemView очень простым для любых устройств Kinetis, я создал специальные компоненты Processor Expert: один для RTT и один для SystemView.
Идея хорошо работает на ARM Cortex-M4 (F). Реализация для ARM Cortex-M0 + все еще экспериментальная!
- Загрузите файлы Segger SystemView из Segger: https://www.segger.com/systemview.html.
- Загрузите и установите последние компоненты McuOnEclipse с https://sourceforge.net/projects/mcuoneclipse/files/PEx%20Components/ и установите их (см. « Выпуски McuOnEclipse на SourceForge »)
- Самый простой способ — использовать его с проектом Processor Expert (с Kinetis SDK или без него). Вы также можете включить / отключить SystemView для существующего проекта.
- Добавьте компонент SeggerSystemView в проект: он также добавит / запросит компонент SeggerRTT: компоненты Segger
 RTT и SystemView
 - В моих приложениях я использую RTT канал 0 для связи консоли / оболочки / терминала. Поэтому у меня два канала вверх / вниз: канал 0 для терминала и канал 1 для SystemView: конфигурация Segger RTT
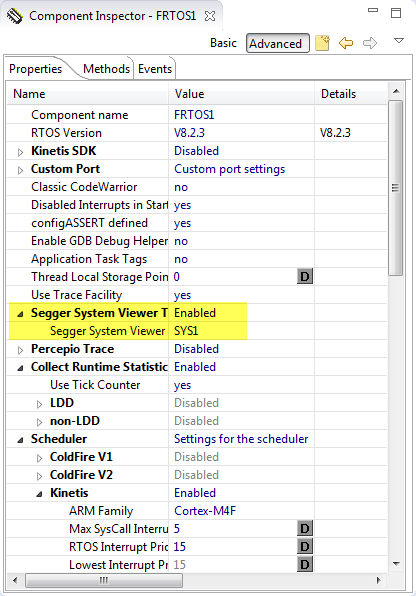
- In the SeggerSystemView component I specify the channel I would like to use (channel 1 in the example below, as I’m using channel 0 for the terminal). I can specify an application name and device identification string. The RAM Base setting specifies the lowest RAM address: Segger SystemView Settings
- Finally, in the FreeRTOS component I enable the Segger System Viewer trace. This will add the necessary trace macros to the Kernel to write all the trace data information. Segger System View Trace Setting in FreeRTOS


That’s it ?. Generate code and download it to the target as usual. To record the trace, launch the Segger System Viewer application and press ‘record’:

Recording Segger SystemView Trace Data
FreeRTOS
The Segger SystemView does not need (well: want) any information about the FreeRTOS IDLE task: any time where there is no task activity, this is marked automatically as ‘idle’. It is best if xTaskGetIdleTaskHandle() is enabled:

xTaskGetIdleTaskHandle
If not using Processor Expert, make sure that
INCLUDE_xTaskGetIdleTaskHandleis set to 1 in FreeRTOSConfig.h.
Additionally, for better task information, FreeRTOS trace macros have been extended by
tracePOST_MOVED_TASK_TO_READY_STATE#define prvAddTaskToReadyList( pxTCB ) \
traceMOVED_TASK_TO_READY_STATE( pxTCB ); \
taskRECORD_READY_PRIORITY( ( pxTCB )->uxPriority ); \
vListInsertEnd( &( pxReadyTasksLists[ ( pxTCB )->uxPriority ] ), &( ( pxTCB )->xGenericListItem ) ); \
tracePOST_MOVED_TASK_TO_READY_STATE( pxTCB )Segger System Viewer Application
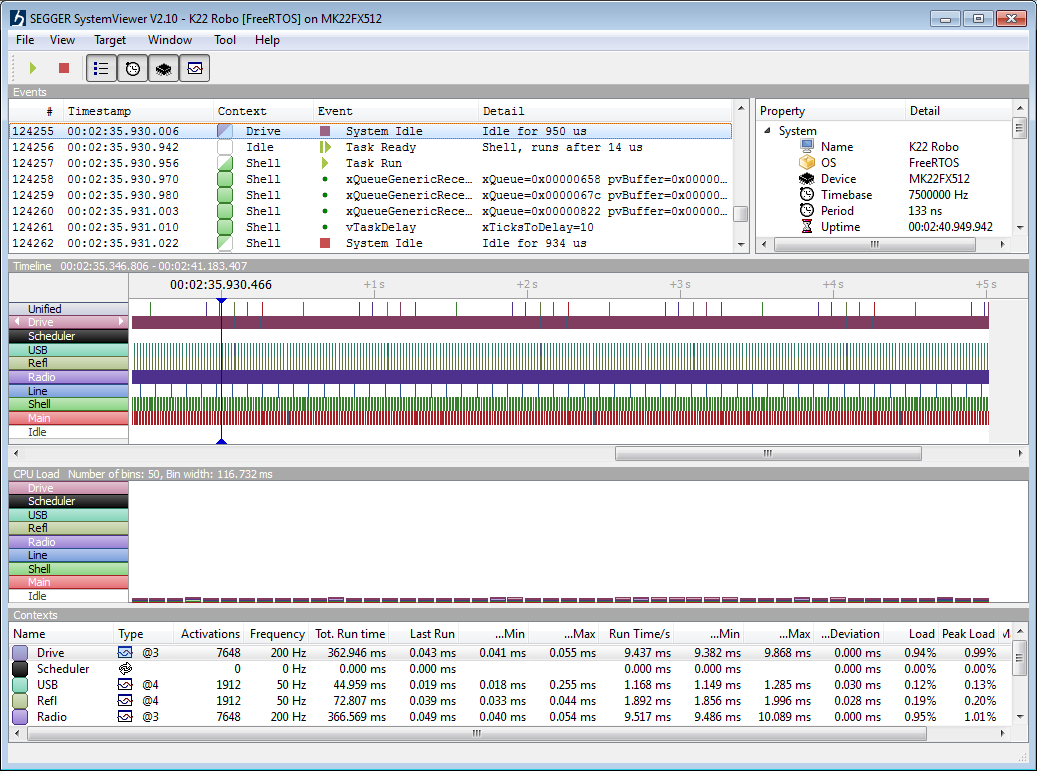
The SEGGER SystemViewer has several views which give me insights what is going on.
In the ‘Events’ all the target events with the details are listed:

Events View
In the Timeline view I see the different task running over time:

Timeline view
In the CPU load view I see the CPU load in a realtime way:

CPU Load View
And the Contexts view gives me timing/profiling information:

Contexts View
Example
To give you an example how useful that data is: below is an application which has been stalled after a while because it was blocked by the USB stack: after getting that information, I was able to implement a fix ?

Problem with USB CDC
The problem was that the USB SendDataBlock() method was waiting without a timeout as long as a transaction is going on. In the case of a USB communication problem, this results in a very long blocking time.
The solution was to enable a timeout for the send operation:

SendDataBlock USB Stack Timeout
With this, the SendDataBlock() would gracefully return for the case a transaction does not finish for whatever reason:
uint8_t CDC1_SendDataBlock(uint8_t *data, uint16_t dataSize)
{
  TMOUT1_CounterHandle timeout;
  uint8_t res = ERR_OK;

  transactionOngoing = TRUE;
  if (USB_Class_CDC_Interface_DIC_Send_Data(CONTROLLER_ID, data, dataSize)!=USB_OK) {
    transactionOngoing = FALSE;
    return ERR_FAULT;
  }
  /* wait for transaction finish */
  timeout = TMOUT1_GetCounter(50/TMOUT1_TICK_PERIOD_MS); /* set up timeout counter */
  while(transactionOngoing) { /* wait until transaction is finished */
    CDC1_RunUsbEngine();
    if (TMOUT1_CounterExpired(timeout)) {
      res = ERR_FAILED;
      break;
    }
    WAIT1_WaitOSms(5); /* wait some time */
  }
  TMOUT1_LeaveCounter(timeout); /* return timeout counter */
  return res;
}
Summary
Wow, I’m really impressed! The Segger SystemView is a true treasure for any embedded developer: it collects incredible useful data from a running system, free of charge. All what I need is a Segger J-Link or a J-Link enabled board.
I plan to release the updated Segger RTT and Segger SystemView support with the next McuOnEclipse component release. If you would like to receive the components in the current experimental state, drop me an email (see About) and I’ll help you out. Otherwise simply clone my repostory on GitHub.
Happy Viewing ?
PS: I would like to thank the company Segger for their support last week to get the Segger SystemViewer running with FreeRTOS!
LINKS
- Segger Real Time Transfer (RTT): https://www.segger.com/jlink-rtt.html
- Segger SystemView: https://www.segger.com/systemview.html
- McuOnEclipse components on SourceForge:http://mcuoneclipse.com/2014/10/21/mcuoneclipse-releases-on-sourceforge/
- Using Segger RTT with Eclipse: Using Segger Real Time Terminal (RTT) with Eclipse