Текущий пост является подтверждением концепции создания веб-приложения с использованием веб-сервера на основе Javascript. Этот технологический стек широко известен как MEAN Stack.
Чтобы сделать это возможным, мы выбрали следующие технологии
- Angular.js для разработки на стороне клиента — одностраничное приложение
- Междоменная связь между Angular.js и Node.js
- Node.js для разработки на стороне сервера
- Создание веб-сервиса на основе отдыха с помощью express.js
- База данных — MongoDb
- Node.js Расширение модуля MongoDb (mongojs)
Мы создали Proof of Concept с веб-сервером на основе Javascript, где сосредоточились на работе с NoSql (MongoDB) с основанными на javascript средами Node.js и angular.js на стороне клиента. Наш исходный код можно скачать здесь ( https://github.com/piyasde/NodeMongoDBAngular ).
Архитектура с первого взгляда
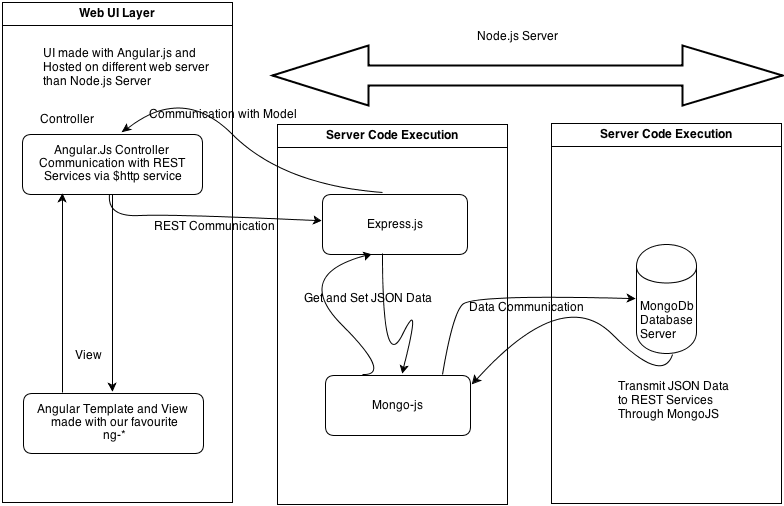
Итак, вот шаги:
Установка
A: Загрузите и установите Node.js отсюда (http://nodejs.org/download/).
B: Для разработки приложения нам нужно установить модуль mongojs для Node.js
Команда — npm install mongojs (должен быть подключен к интернету)
C: нам нужно установить express.js для node.js
Команда — npm install express (должен быть подключен к интернету)
Код конфигурации:
Теперь попробуем описать часть кода:
|
1
2
3
|
var application_root = __dirname, express = require("express"), path = require("path"); |
Здесь мы инициализировали express.js в переменных javascript в соответствии с концепцией Node.js.
|
1
|
var app = express(); |
Здесь мы инициализировали экспресс веб-сервер в переменной приложения.
|
1
2
3
|
var databaseUrl = "sampledb"; var collections = ["things"]var db = require("mongojs").connect(databaseUrl, collections); |
Здесь мы установили соединение с базой данных mongodb, используя библиотеку расширения модуля Node.js mongojs.
|
1
2
3
4
5
6
7
8
9
|
// Configapp.configure(function () { app.use(express.bodyParser()); app.use(express.methodOverride()); app.use(app.router); app.use(express.static(path.join(application_root, "public"))); app.use(express.errorHandler({ dumpExceptions: true, showStack: true }));}); |
Здесь мы сделали конфигурацию, связанную с express.js
Код службы отдыха
|
1
2
3
|
app.get('/api', function (req, res) { res.send('Our Sample API is up...');}); |
Здесь мы создали наш первый веб-сервис на основе REST и проверили, работает ли express.js.
Наш пример API будет — http://127.0.0.1:1212/api (Get Method)
|
01
02
03
04
05
06
07
08
09
10
11
12
13
14
15
16
17
18
19
20
21
|
app.get('/getangularusers', function (req, res) { res.header("Access-Control-Allow-Methods", "GET, POST"); // The above 2 lines are required for Cross Domain Communication(Allowing the methods that come as Cross // Domain Request db.things.find('', function(err, users) { // Query in MongoDB via Mongo JS Module if( err || !users) console.log("No users found"); else { res.writeHead(200, {'Content-Type': 'application/json'}); // Sending data via json str='['; users.forEach( function(user) { str = str + '{ "name" : "' + user.username + '"},' +'\n'; }); str = str.trim(); str = str.substring(0,str.length-1); str = str + ']'; res.end( str); // Prepared the jSon Array here } });}); |
Здесь мы создали еще один вызов API REST для получения всех имен пользователей из коллекции пользователей и предоставили запрос mongojs.
Наш пример API будет — http://127.0.0.1:1212/getangularusers (Get Method)
|
01
02
03
04
05
06
07
08
09
10
11
12
13
14
15
16
|
app.post('/insertangularmongouser', function (req, res){ console.log("POST: "); res.header("Access-Control-Allow-Methods", "GET, POST"); // The above 2 lines are required for Cross Domain Communication(Allowing the methods that come as // Cross Domain Request console.log(req.body); console.log(req.body.mydata); var jsonData = JSON.parse(req.body.mydata); db.things.save({email: jsonData.email, password: jsonData.password, username: jsonData.username}, function(err, saved) { // Query in MongoDB via Mongo JS Module if( err || !saved ) res.end( "User not saved"); else res.end( "User saved"); });}); |
Здесь мы сделали запрос POST для создания пользователя с помощью вызова REST.
Наш пример API будет — http://127.0.0.1:1212/insertangularmongouser (Post Method)
|
1
2
|
// Launch serverapp.listen(1212); |
Мы заставили сервер прослушивать порт 1212. Теперь запустите узел appmongodbangular.js из командной оболочки.
Часть Angular.js
Ниже приведен код в Angular Controller:
|
01
02
03
04
05
06
07
08
09
10
11
12
13
14
15
16
17
18
19
20
21
22
23
24
25
26
27
28
29
30
31
32
33
34
35
36
37
38
39
40
41
42
43
44
45
46
47
48
49
50
51
52
53
54
55
56
57
58
59
60
61
62
63
64
|
'use strict';var myApp = angular.module('myApp', []); // Taking Angular Application in Javascript Variable// Below is the code to allow cross domain request from web server through angular.jsmyApp.config(['$httpProvider', function($httpProvider) { $httpProvider.defaults.useXDomain = true; delete $httpProvider.defaults.headers.common['X-Requested-With']; }]);/* Controllers */function UserListCtrl($scope, $http, $templateCache) { var method = 'POST'; var inserturl = 'http://localhost:1212/insertangularmongouser';// URL where the Node.js server is running $scope.codeStatus = ""; $scope.save = function() { // Preparing the Json Data from the Angular Model to send in the Server. var formData = { 'username' : this.username, 'password' : this.password, 'email' : this.email }; this.username = ''; this.password = ''; this.email = ''; var jdata = 'mydata='+JSON.stringify(formData); // The data is to be string. $http({ // Accessing the Angular $http Service to send data via REST Communication to Node Server. method: method, url: inserturl, data: jdata , headers: {'Content-Type': 'application/x-www-form-urlencoded'}, cache: $templateCache }). success(function(response) { console.log("success"); // Getting Success Response in Callback $scope.codeStatus = response.data; console.log($scope.codeStatus); }). error(function(response) { console.log("error"); // Getting Error Response in Callback $scope.codeStatus = response || "Request failed"; console.log($scope.codeStatus); }); $scope.list();// Calling the list function in Angular Controller to show all current data in HTML return false; }; $scope.list = function() { $http.get(url).success(function(data) { $scope.users = data; }); // Accessing the Angular $http Service to get data via REST Communication from Node Server }; $scope.list();} |
Угловой шаблон и HTML
|
1
2
|
<html lang="en" ng-app="myApp">..... |
Мы сослались на угловое приложение в приведенном выше коде
|
1
2
|
<body ng-controller="UserListCtrl">..... |
Мы упомянули угловой контроллер в приведенном выше коде
|
1
2
3
4
5
6
7
8
9
|
Search: <input ng-model="user"><div class="span10"> <!--Body content--> <ul class="users"> <li ng-repeat="user in users | filter:user "> {{user.name}} </li> </ul></div> |
Мы использовали тег ng-repeat, чтобы взять модель данных пользователя из REST-связи и показать в HTML
|
01
02
03
04
05
06
07
08
09
10
11
12
13
|
<form name="myform" id="myform1" ng-submit="save()"> <fieldset> <legend>New User</legend> <div class="control-group"> <center><input type="text" placeholder="User…" ng-model="username" size=50 required/></center> <center><input type="text" placeholder="Password…" ng-model="password" size=50 required/></center> <center><input type="text" placeholder="Email…" ng-model="email" size=50 required/></center> </div> </fieldset> <p> <div><center><button type="submit" >Save now...</button></center></div> </p></form> |
Мы использовали тег ng-submit для отправки пользовательской модели данных из REST-связи и отправки на сервер узла для сохранения в MongoDB.
- Читатель может загрузить полный исходный код в GitHub (https://github.com/piyasde/NodeMongoDBAngular).
 Эта статья является отрывком из книги « Практическое веб-приложение с Javascript Frameworks и NoSQL ».
Технология трансформирует традиционное структурное программирование данных в неструктурное, на стороне сервера появляется работа с JavaScript.
Таким образом, эта книга представляет собой краткий обзор некоторых из этих инструментов и того, как они интегрированы … с практическими кодами.
Мы можем считать эту электронную книгу коллективной отправной точкой некоторых новых технологий в Web Framework для грядущих дней новичков…