Каждый из нас думал о том, чтобы начать писать собственные приложения для мобильных устройств. Это потому, что мобильные устройства становятся все более популярными и доступными, и теперь редко можно встретить человека, у которого нет мобильного телефона. Рынок мобильных приложений постоянно растет. Можно сказать, что он разделен на две основные области — приложения для Android и приложения для iPhone. Но с чего начать? Этот вопрос волнует многих из нас. На самом деле все не так сложно, как кажется. Сегодня я покажу вам основы разработки приложений для Android и с чего начать.
Сначала давайте посмотрим, что вам нужно для подготовки среды разработки:
- Установите JDK ( Java Development Kit ). Просто выберите последнюю версию и на втором экране выберите подходящую версию для вашей операционной системы.
- Загрузите и распакуйте Android SDK (плагин Eclipse + ADT). Просто скачайте этот огромный пакет (он размером чуть более 400 МБ) и распакуйте его в подходящее место на вашем компьютере (например, в папку c: \ dev \). Старайтесь не использовать очень длинное имя папки (это может быть «adt-bundle-windows-x86_64-20130219»). Я могу порекомендовать вам переименовать эту папку в более короткую версию: ‘adt-bundle-windows’.
- Теперь мы можем запустить наш C: \ dev \ adt-bundle-windows \ eclipse \ eclipse.exe
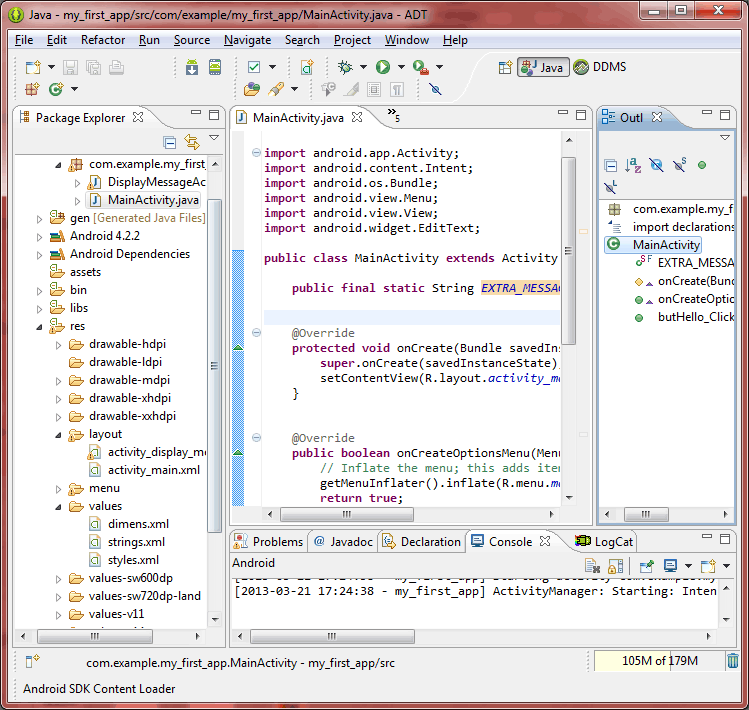
Eclipse IDE — наша основная программа для работы. Если вы когда-либо работали с MS Visual Studio (например, C # или ASP.Net), вы заметите, что интерфейс очень похож. С левой стороны мы видим проводник проекта, справа — какой-то проводник активных объектов (элементы пользовательского интерфейса, ресурсы и т. Д.), В центре — основная область (где мы можем составлять различные элементы пользовательского интерфейса поверх макетов или писать коды). Также внизу есть консоль.
Шаг 1. Создайте новый проект
Пожалуйста, нажмите «Файл -> Создать -> Android Application Project». Теперь нам нужно заполнить несколько полей: Имя приложения, Имя проекта и Имя пакета. Вы можете ввести «my_first_app» для всех трех полей. Просто потому, что это наше первое фиктивное приложение (в тестовых целях). Нам не нужно ничего настраивать на этом первом экране, нажимая Next.
На следующем экране мастера просто убедитесь, что все в порядке, и нажмите кнопку Далее.
На следующем шаге мы можем настроить значок нашего приложения, но если вам все равно — просто нажмите «Далее».
На следующем шаге нас попросят создать действие (мы должны выбрать один из вариантов, выбрать первый — «Пустое действие») и нажать «Готово».
Мы только что подготовили нашу собственную пустую заявку!
Шаг 2. Осмотреться
Теперь, пожалуйста, посмотрите вокруг. Мы должны понять несколько основных вещей об Eclipse.
1. В самом левом углу мы видим блок «Package Explorer». Он представляет структуру папок вашего проекта. Вы можете найти здесь следующие папки:
- ‘src’ — для исходных файлов ваших проектов (java-файлов)
- ‘bin’ — двоичные файлы (обычно их не нужно трогать)
- ‘res / drawable-xxx’ — есть несколько похожих папок. Все они содержат объекты изображений
- ‘res/layout’ – for layout interface files (xml files)
- ‘res/menu’ – for context menu files (xml files)
- ‘res/values’ – for various collection resources (xml files). By default, there are only three base files: dimens.xml, strings.xml and styles.xml
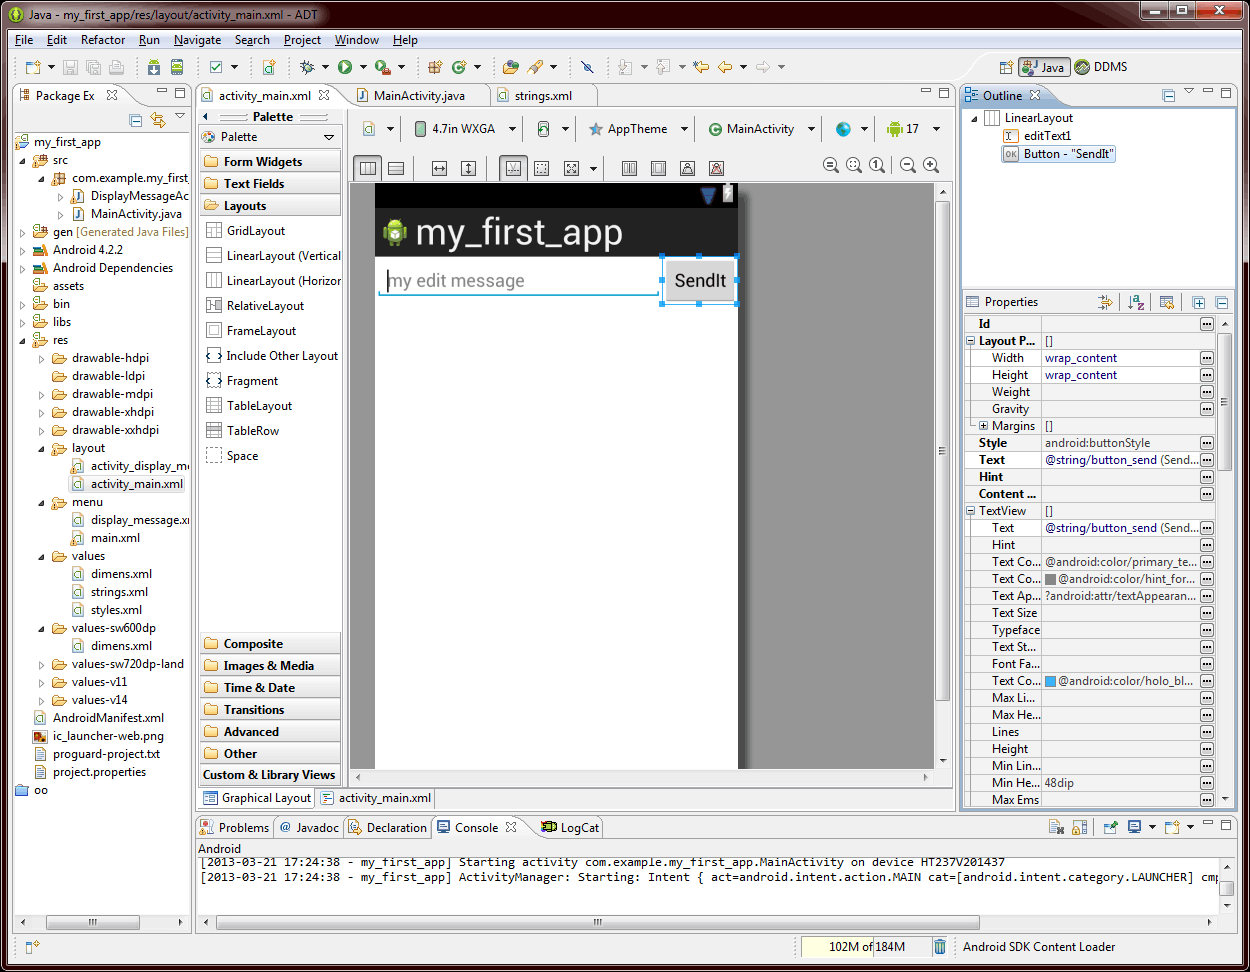
2. Now, please open the main page layout (res/layout/activity_main.xml). Double click on it. It will be opened in Layout mode.
Please pay your attention to ‘Palette’ panel. This is very useful panel, it contains a lot of various UI elements (like labels, text inputs, buttons, checkboxes, radios, images etc). All these elements are sorted by categories. If you want to place any element to your application layout, you can easily drag and drop a desired element. Just play with it – this is really easy.
3. Object properties. On the right, you can see ‘Properties’ panel. Select any element on the layout (e.g. a button or text edit element) – and you will be able to adjust it’s styles using ‘Properties’ panel.
4. Well, if you are ready to run your application – let’s do it. The best way – is to use a real device. Just because in this case you will be sure how it will work in reality, and how it will handle with touch-events. Here is what need to do:
- In the configuration with your phone should go USB cable. Please connect your phone to your computer with your USB cable. As usual, all necessary drivers will be installed automatically.
- Then, you have to enable ‘usb debugging’ mode on your phone. On my Android v 2.3.4 it is in Settings -> Applications -> Development (in case of newer version, like 4.0 and higher, it is in Settings -> Developer options). You can also enable ‘Still awake’ option (in this case your phone won’t sleep while connecting to your computer).
- Now we can back to our Eclipse, click ‘Run’ button (on toolbar), or, Run -> Run in menu (Ctrl+F11).
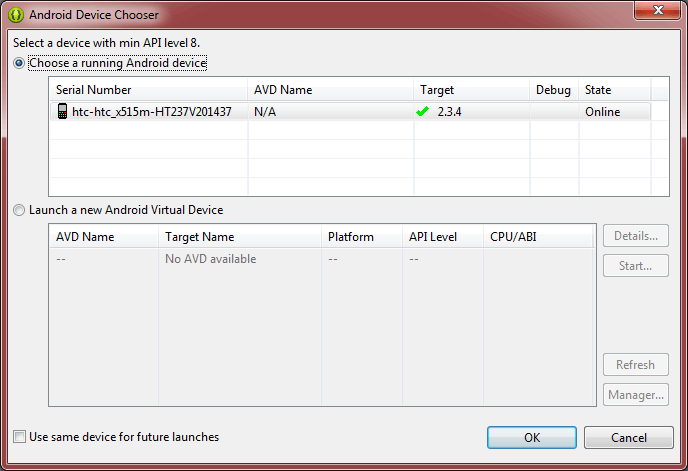
Make sure that your device is visible on this screen and it’s status is ‘Online’. After – just click ‘OK’. Your application will be installed on your phone and will be executed.
Step 3. Basic events
I think that now you want to add some interactivity to our project. Now, to complete our first lesson, I’ll show you how you can add a simple event – OnClick. To demonstrate it – let’s add two simple controls on our layout (activity_main.xml): simple edit text field (Text Fields – the first one) and button (Form Widgets – button). Let’s add ‘onclick’ event handler for our button. First, select the button, and look to Properties of this element. Scroll down the properties almost to the end. You can see here ‘On Click’ property. Click to the value field (once), and type a desired function name, as example – ‘myButton_Click’. Now, we have to implement this function.
Open ‘MainActivity.java’ file (it is inside of ‘src’ folder). This java file will be opened as usual code where we can type. By default, we can see here the most basic constructors:
package com.example.my_first_app;

import android.app.Activity;
import android.os.Bundle;
import android.view.Menu;

public class MainActivity extends Activity {

    @Override
    protected void onCreate(Bundle savedInstanceState) {
        super.onCreate(savedInstanceState);
        setContentView(R.layout.activity_main);
    }

    @Override
    public boolean onCreateOptionsMenu(Menu menu) {
        // Inflate the menu; this adds items to the action bar if it is present.
        getMenuInflater().inflate(R.menu.main, menu);
        return true;
    }

}
Even if you don’t understand java, you can easily (I hope) notice that this is a class, with two functions: onCreate and onCreateOptionsMenu. The first one will be executed in the beginning of execution, the second function is related with menu (context menu). Pay attention to the ‘onCreate’ method. Here we can see that the base method is called, and also we can see ‘setContentView’ function. As you have guessed, this function is to set the current layout (content view) for our application. Do you remember that the main layout file which we edited – activity_main.xml? The same layout is used here. Well, now, we can add our own first function, you can put it right after the ‘onCreateOptionsMenu’ function:
package com.example.my_first_app;

import android.app.Activity;
import android.os.Bundle;
import android.view.Menu;

public class MainActivity extends Activity {

    @Override
    protected void onCreate(Bundle savedInstanceState) {
        super.onCreate(savedInstanceState);
        setContentView(R.layout.activity_main);
    }

    @Override
    public boolean onCreateOptionsMenu(Menu menu) {
        // Inflate the menu; this adds items to the action bar if it is present.
        getMenuInflater().inflate(R.menu.main, menu);
        return true;
    }

    public void myButton_Click(View v){
        EditText edtext = (EditText) findViewById(R.id.editText1);
        if(edtext!=null) {
            edtext.setText("my onclick event");
        }
    }

}
The main idea of our function is to select our EditText element which we added on our layout, and set a custom text to this element.
Before you run it on your phone, you can notice that Eclipse underlined several words in our code (and marked them as errors). All because few names (View and EditText) are not visible (resolved) in this place. You can hover your mouse button over an error, and Eclipse will give you all possible solutions. And you will see that the first solution is to import missing classes. You can click to this solution to import classes, or, there is one interesting method – click Ctrl+Shift+O and all missing libraries will be imported at once.
Conclusion
We have just produced our first lesson about android development for the beginners. I hope that you like it and it is useful for you. Good luck and welcome back to our further lessons


