Управление пользователями требуется для большинства веб-приложений, но его создание не всегда является легкой задачей. Многие разработчики работают круглосуточно, чтобы гарантировать безопасность своего приложения, выискивая отдельные уязвимости для исправления. К счастью, вы можете повысить собственную эффективность, внедрив OAuth 2.0 в свое веб-приложение с помощью Spring Security и Spring Boot. Процесс становится еще проще благодаря интеграции с Okta поверх Spring Boot.
В этом руководстве вы сначала создадите веб-приложение OAuth 2.0 и сервер аутентификации, используя Spring Boot и Spring Security. После этого вы будете использовать Okta, чтобы избавиться от собственного сервера аутентификации и еще больше упростить приложение Spring Boot.
Давайте начнем!
Создайте сервер OAuth 2.0
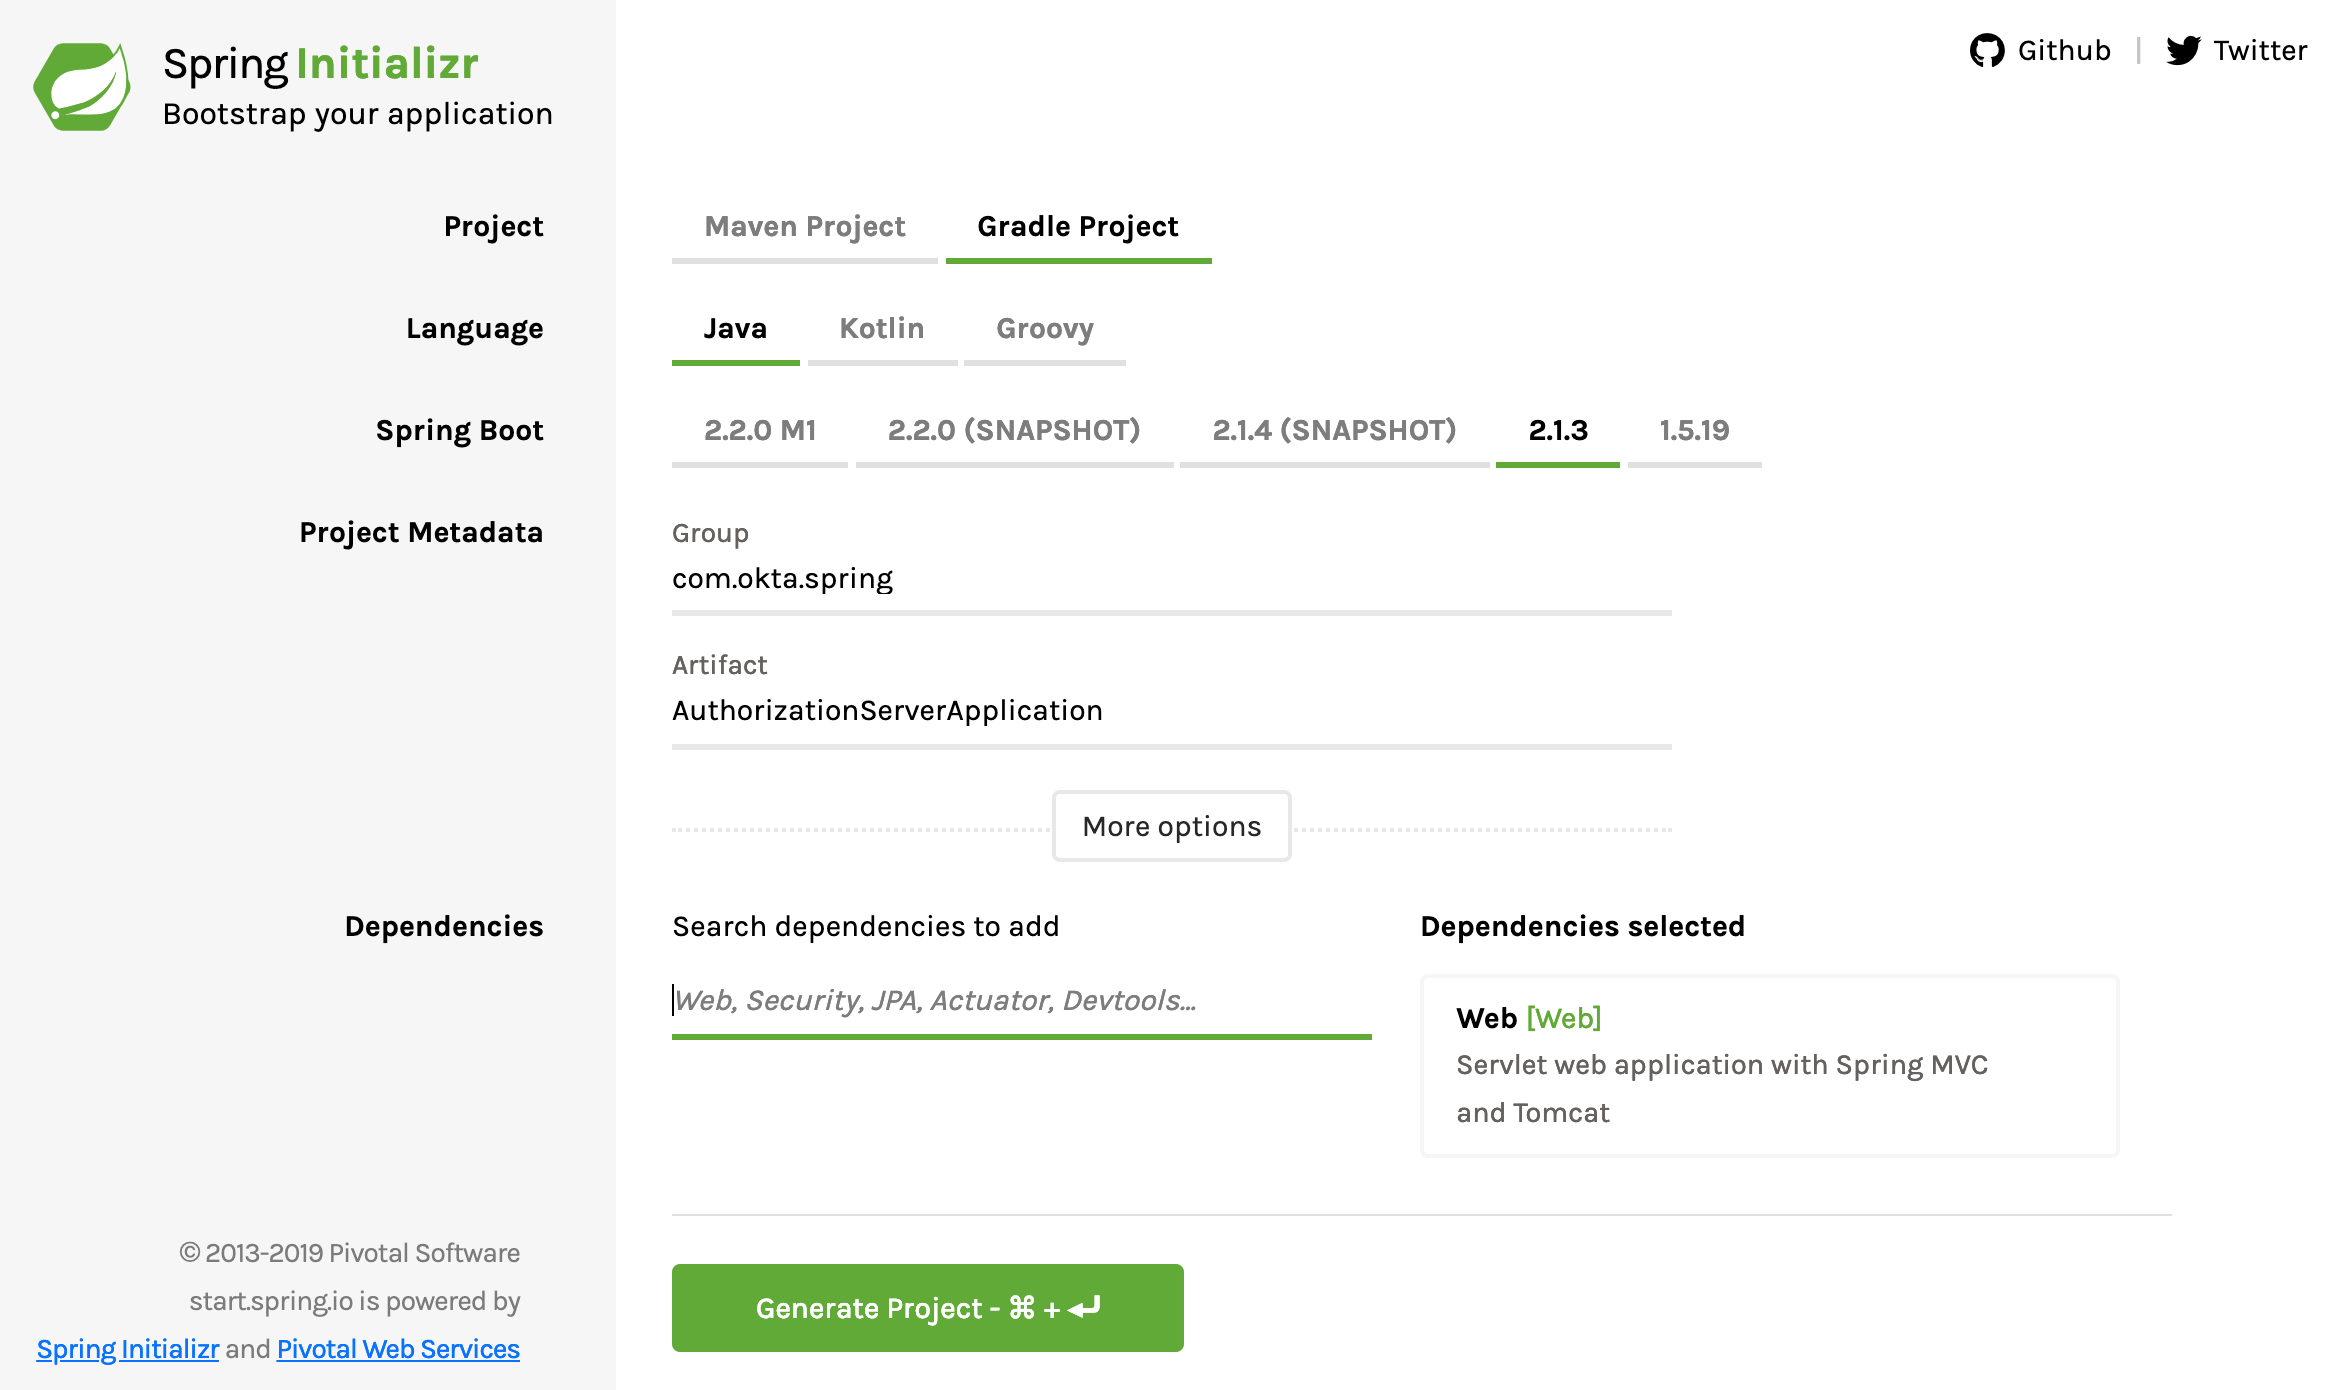
Начните с перехода к Spring Initializr и создания нового проекта со следующими настройками:
- Измените тип проекта с Maven на Gradle .
- Измените группу на com.okta.spring .
- Измените артефакт на AuthorizationServerApplication .
- Добавьте одну зависимость: Web .
Скачайте проект и скопируйте его куда-нибудь на свой жесткий диск. В этом уроке вы создадите три разных проекта, так что вы можете захотеть создать родительский каталог, что-то вроде SpringBootOAuthгде-нибудь.
Вам нужно добавить одну зависимость в build.gradle файл:
implementation 'org.springframework.security.oauth:spring-security-oauth2:2.3.3.RELEASE'Это добавляет OAuth совершенства Spring.
Обновите, src/main/resources/application.properties чтобы соответствовать:
server.port=8081
server.servlet.context-path=/auth
user.oauth.clientId=R2dpxQ3vPrtfgF72
user.oauth.clientSecret=fDw7Mpkk5czHNuSRtmhGmAGL42CaxQB9
user.oauth.redirectUris=http://localhost:8082/login/oauth2/code/
user.oauth.user.username=Andrew
user.oauth.user.password=abcd
Это устанавливает порт сервера, путь контекста сервлета и некоторые значения по умолчанию для оперативной памяти, сгенерированных ad-hoc токенов, которые сервер собирается вернуть клиенту, а также для имени пользователя и пароля нашего пользователя. В производственной среде вам потребуется немного более сложный сервер для реального сервера аутентификации без жестко запрограммированных URI перенаправления, а также имен пользователей и паролей.
Обновите AuthorizationServerApplication класс, чтобы добавить @EnableResourceServer:
package com.okta.spring.AuthorizationServerApplication;

import org.springframework.boot.SpringApplication;
import org.springframework.boot.autoconfigure.SpringBootApplication;
import org.springframework.security.oauth2.config.annotation.web.configuration.EnableResourceServer;

@SpringBootApplication
@EnableResourceServer
public class AuthorizationServerApplication {

    public static void main(String[] args) {
        SpringApplication.run(AuthorizationServerApplication.class, args);
    }
}
Создайте новый класс AuthServerConfig в том же пакете, в классе своего приложения com.okta.spring.AuthorizationServerApplication под src/main/java (теперь заведите классы Java в src/main/java/com/okta/spring/AuthorizationServerApplication). Этот класс конфигурации Spring включает и настраивает сервер авторизации OAuth.
package com.okta.spring.AuthorizationServerApplication;

import org.springframework.beans.factory.annotation.Autowired;
import org.springframework.beans.factory.annotation.Value;
import org.springframework.context.annotation.Configuration;
import org.springframework.security.crypto.bcrypt.BCryptPasswordEncoder;
import org.springframework.security.oauth2.config.annotation.configurers.ClientDetailsServiceConfigurer;
import org.springframework.security.oauth2.config.annotation.web.configuration.AuthorizationServerConfigurerAdapter;
import org.springframework.security.oauth2.config.annotation.web.configuration.EnableAuthorizationServer;
import org.springframework.security.oauth2.config.annotation.web.configurers.AuthorizationServerSecurityConfigurer;

@Configuration
@EnableAuthorizationServer
public class AuthServerConfig extends AuthorizationServerConfigurerAdapter {

    @Value("${user.oauth.clientId}")
    private String ClientID;
    @Value("${user.oauth.clientSecret}")
    private String ClientSecret;
    @Value("${user.oauth.redirectUris}")
    private String RedirectURLs;

   private final PasswordEncoder passwordEncoder;

    public AuthServerConfig(PasswordEncoder passwordEncoder) {
        this.passwordEncoder = passwordEncoder;
    }

    @Override
    public void configure(
        AuthorizationServerSecurityConfigurer oauthServer) throws Exception {
        oauthServer.tokenKeyAccess("permitAll()")
            .checkTokenAccess("isAuthenticated()");
    }

    @Override
    public void configure(ClientDetailsServiceConfigurer clients) throws Exception {
        clients.inMemory()
            .withClient(ClientID)
            .secret(passwordEncoder.encode(ClientSecret))
            .authorizedGrantTypes("authorization_code")
            .scopes("user_info")
            .autoApprove(true)
            .redirectUris(RedirectURLs);
    }
}
AuthServerConfig Класс есть класс , который будет создавать и возвращать наши JSON веб — маркер , когда клиент проверяет подлинность должным образом.
Создать SecurityConfiguration класс:
package com.okta.spring.AuthorizationServerApplication;

import org.springframework.beans.factory.annotation.Value;
import org.springframework.context.annotation.Bean;
import org.springframework.context.annotation.Configuration;
import org.springframework.core.annotation.Order;
import org.springframework.security.config.annotation.authentication.builders.AuthenticationManagerBuilder;
import org.springframework.security.config.annotation.web.builders.HttpSecurity;
import org.springframework.security.config.annotation.web.configuration.WebSecurityConfigurerAdapter;
import org.springframework.security.crypto.bcrypt.BCryptPasswordEncoder;

@Configuration
@Order(1)
public class SecurityConfiguration extends WebSecurityConfigurerAdapter {

    @Value("${user.oauth.user.username}")
    private String username;
    @Value("${user.oauth.user.password}")
    private String password;

    @Override
    protected void configure(HttpSecurity http) throws Exception {
        http.requestMatchers()
            .antMatchers("/login", "/oauth/authorize")
            .and()
            .authorizeRequests()
            .anyRequest().authenticated()
            .and()
            .formLogin().permitAll();
    }

    @Override
    protected void configure(AuthenticationManagerBuilder auth) throws Exception {
        auth.inMemoryAuthentication()
            .withUser(username)
            .password(passwordEncoder().encode(password))
            .roles("USER");
    }

    @Bean
    public BCryptPasswordEncoder passwordEncoder() {
        return new BCryptPasswordEncoder();
    }
}
SecurityConfiguration Класс есть класс , который фактически выполняет проверку подлинности запросов на сервер авторизации. Обратите внимание на верхнюю часть, где он извлекает имя пользователя и пароль из application.properties файла.
Наконец, создайте класс Java с именем UserController:
package com.okta.spring.AuthorizationServerApplication;

import org.springframework.web.bind.annotation.GetMapping;
import org.springframework.web.bind.annotation.RestController;

import java.security.Principal;

@RestController
public class UserController {

    @GetMapping("/user/me")
    public Principal user(Principal principal) {
        return principal;
    }
}
Этот файл позволяет клиентским приложениям узнать больше о пользователях, которые проходят аутентификацию на сервере.
Это ваш сервер авторизации! Не плохо. Spring Boot делает это довольно легко. Четыре файла и несколько свойств. Чуть позже вы сделаете это еще проще с Okta, но на данный момент перейдем к созданию клиентского приложения, которое вы можете использовать для тестирования сервера аутентификации.
Запустите сервер авторизации:
./gradlew bootRunПодождите немного, пока он закончит работу. Терминал должен заканчиваться примерно так:
...
2019-02-23 19:06:49.122  INFO 54333 --- [           main] o.s.b.w.embedded.tomcat.TomcatWebServer  : Tomcat started on port(s): 8081 (http) with context path '/auth  '
2019-02-23 19:06:49.128  INFO 54333 --- [           main] c.o.s.A.AuthorizationServerApplication   : Started AuthorizationServerApplication in 3.502 seconds (JVM running for 3.945)
ПРИМЕЧАНИЕ. Если вы получаете сообщение об ошибке JAXB ( java.lang.ClassNotFoundException: javax.xml.bind.JAXBException), то это потому, что вы используете Java 11. Чтобы это исправить, добавьте JAXB в свой build.gradle.
implementation 'org.glassfish.jaxb:jaxb-runtime'
Создайте свое клиентское приложение
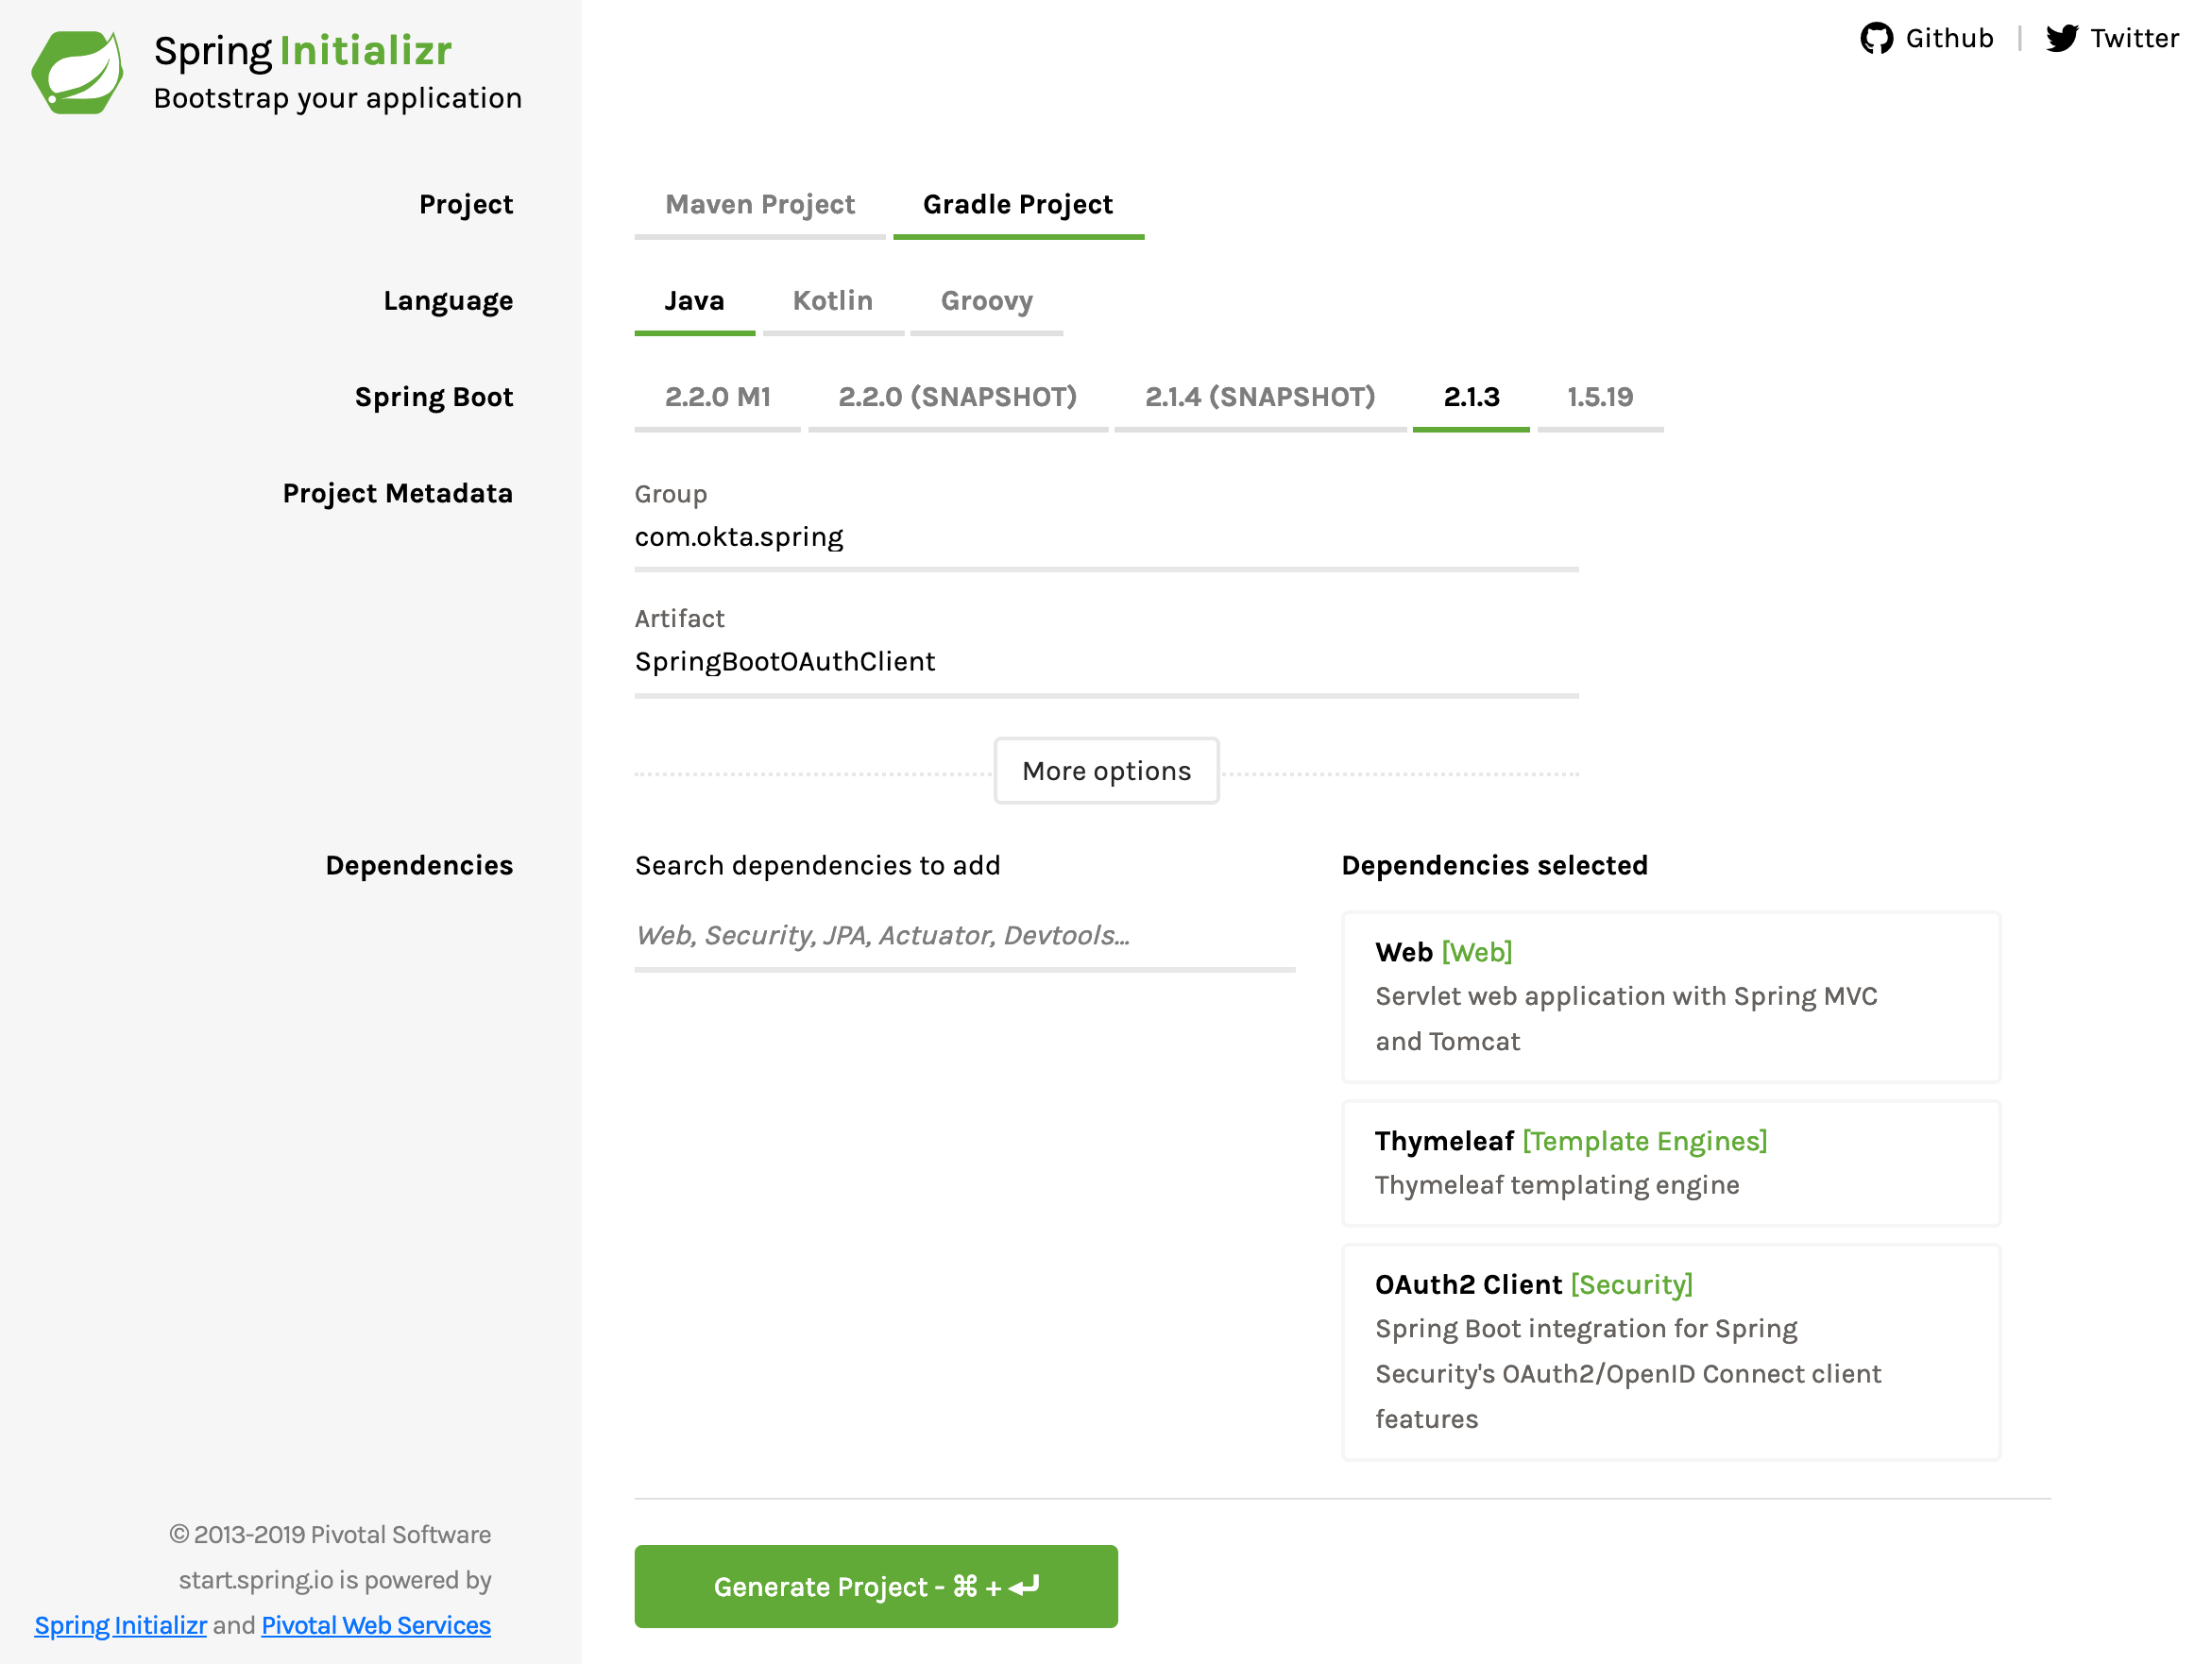
Вернуться к Весне Инициализр . Создайте новый проект со следующими настройками:
- Тип проекта должен быть Gradle (не Maven).
- Группа: com.okta.spring .
- Артефакт: SpringBootOAuthClient .
- Добавьте три зависимости: Web , Thymeleaf , OAuth2 Client .
Загрузите проект, скопируйте его в место последнего распаковывания и распакуйте его.
На этот раз вам нужно добавить следующую зависимость в ваш build.gradle файл:
implementation 'org.thymeleaf.extras:thymeleaf-extras-springsecurity5:3.0.4.RELEASE'Переименование src/main/resources/application.properties в application.yml и обновлять его в соответствии с YAML ниже:
server:
  port: 8082
  session:
    cookie:
      name: UISESSION
spring:
  thymeleaf:
    cache: false
  security:
    oauth2:
      client:
        registration:
          custom-client:
            client-id: R2dpxQ3vPrtfgF72
            client-secret: fDw7Mpkk5czHNuSRtmhGmAGL42CaxQB9
            client-name: Auth Server
            scope: user_info
            provider: custom-provider
            redirect-uri-template: http://localhost:8082/login/oauth2/code/
            client-authentication-method: basic
            authorization-grant-type: authorization_code
        provider:
          custom-provider:
            token-uri: http://localhost:8081/auth/oauth/token
            authorization-uri: http://localhost:8081/auth/oauth/authorize
            user-info-uri: http://localhost:8081/auth/user/me
            user-name-attribute: name
Notice that here, you’re configuring the clientId and clientSecret, as well as various URIs for your authentication server. These need to match the values in the other project.
Update the SpringBootOAuthClientApplication class to match:
package com.okta.spring.SpringBootOAuthClient;

import org.springframework.boot.SpringApplication;
import org.springframework.boot.autoconfigure.SpringBootApplication;

@SpringBootApplication
public class SpringBootOAuthClientApplication {

    public static void main(String[] args) {
        SpringApplication.run(SpringBootOAuthClientApplication.class, args);
    }
}
Create a new Java class called WebController:
package com.okta.spring.SpringBootOAuthClient;

import org.springframework.stereotype.Controller;
import org.springframework.ui.Model;
import org.springframework.web.bind.annotation.RequestMapping;

import java.security.Principal;

@Controller
public class WebController {

    @RequestMapping("/securedPage")
    public String securedPage(Model model, Principal principal) {
        return "securedPage";
    }

    @RequestMapping("/")
    public String index(Model model, Principal principal) {
        return "index";
    }
}
This is the controller that maps incoming requests to your Thymeleaf template files (which you’ll make in a sec).
Create another Java class named SecurityConfiguration:
package com.okta.spring.SpringBootOAuthClient;

import org.springframework.context.annotation.Configuration;
import org.springframework.security.config.annotation.web.builders.HttpSecurity;
import org.springframework.security.config.annotation.web.configuration.WebSecurityConfigurerAdapter;

@Configuration
public class SecurityConfiguration extends WebSecurityConfigurerAdapter {
    @Override
    public void configure(HttpSecurity http) throws Exception {
        http.antMatcher("/**").authorizeRequests()
            .antMatchers("/", "/login**").permitAll()
            .anyRequest().authenticated()
            .and()
            .oauth2Login();
    }
}
This class defines the Spring Security configuration for your application: allowing all requests on the home path and requiring authentication for all other routes. It also sets up the Spring Boot OAuth login flow.
The last files you need to add are the two Thymeleaf template files. A full look at Thymeleaf templating is well beyond the scope of this tutorial, but you can take a look at their website for more info.
The templates go in the src/main/resources/templates directory. You’ll notice in the controller above that they’re simply returning strings for the routes. When the Thymeleaf dependencies are included the build, Spring Boot automatically assumes you’re returning the name of the template file from the controllers, and so, the app will look in src/main/resources/templates for a file name with the returned string plus .html.
Create the home template: src/main/resources/templates/index.html:
<!DOCTYPE html>
<html lang="en">
<head>
    <meta charset="UTF-8">
    <title>Home</title>
</head>
<body>
    <h1>Spring Security SSO</h1>
    <a href="securedPage">Login</a>
</body>
</html>
And the secured template: src/main/resources/templates/securedPage.html:
<!DOCTYPE html>
<html xmlns:th="http://www.thymeleaf.org">
<head>
    <meta charset="UTF-8">
    <title>Secured Page</title>
</head>
<body>
    <h1>Secured Page</h1>
    <span th:text="${#authentication.name}"></span>
</body>
</html>
I’ll just point out this one line:
<span th:text="${#authentication.name}"></span> This is the line that will insert the name of the authenticated user. This line is why you needed the org.thymeleaf.extras:thymeleaf-extras-springsecurity5 dependency in the build.gradle file.
Start the client application:
./gradlew bootRunWait a moment for it to finish. The terminal should end with something like this:
...
2019-02-23 19:29:04.448  INFO 54893 --- [           main] o.s.b.w.embedded.tomcat.TomcatWebServer  : Tomcat started on port(s): 8082 (http) with context path ''
2019-02-23 19:29:04.453  INFO 54893 --- [           main] c.o.s.S.SpringBootOAuthClientApplication : Started SpringBootOAuthClientApplication in 3.911 seconds (JVM running for 4.403)
Test the Resource Server
Navigate in your browser of choice to your client app at http://localhost:8082/.
Click the Login link.
You’ll be directed to the login page:
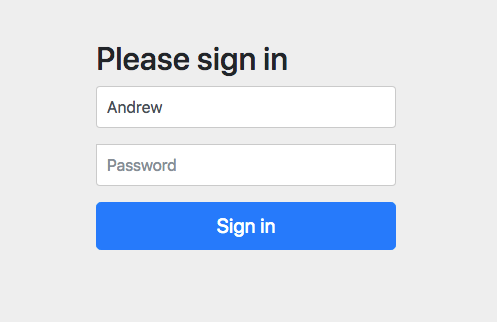
Enter username Andrew and password abcd (from the application.properties file from the authentication server).
Click Sign In and you’ll be taken to the super fancy securedPage.html template that should say “Secured Page” and “Andrew”.
Great! It works. Now you’re gonna make it even simpler.
You can stop both server and client Spring Boot apps.
Create an OpenID Connect Application
Okta is a SaaS (software-as-service) authentication and authorization provider. We provide free accounts to developers so they can develop OIDC apps with no fuss. Head over to developer.okta.com and sign up for an account. After you’ve verified your email, log in and perform the following steps:
- Go to Application > Add Application.
- Select application type Web and click Next.
- Give the app a name. I named mine “Spring Boot OAuth”.
- Under Login redirect URIs change the value to
http://localhost:8080/login/oauth2/code/okta. The rest of the default values will work. - Click Done.
Leave the page open of take note of the Client ID and Client Secret. You’ll need them in a moment.
Create a New Spring Boot App
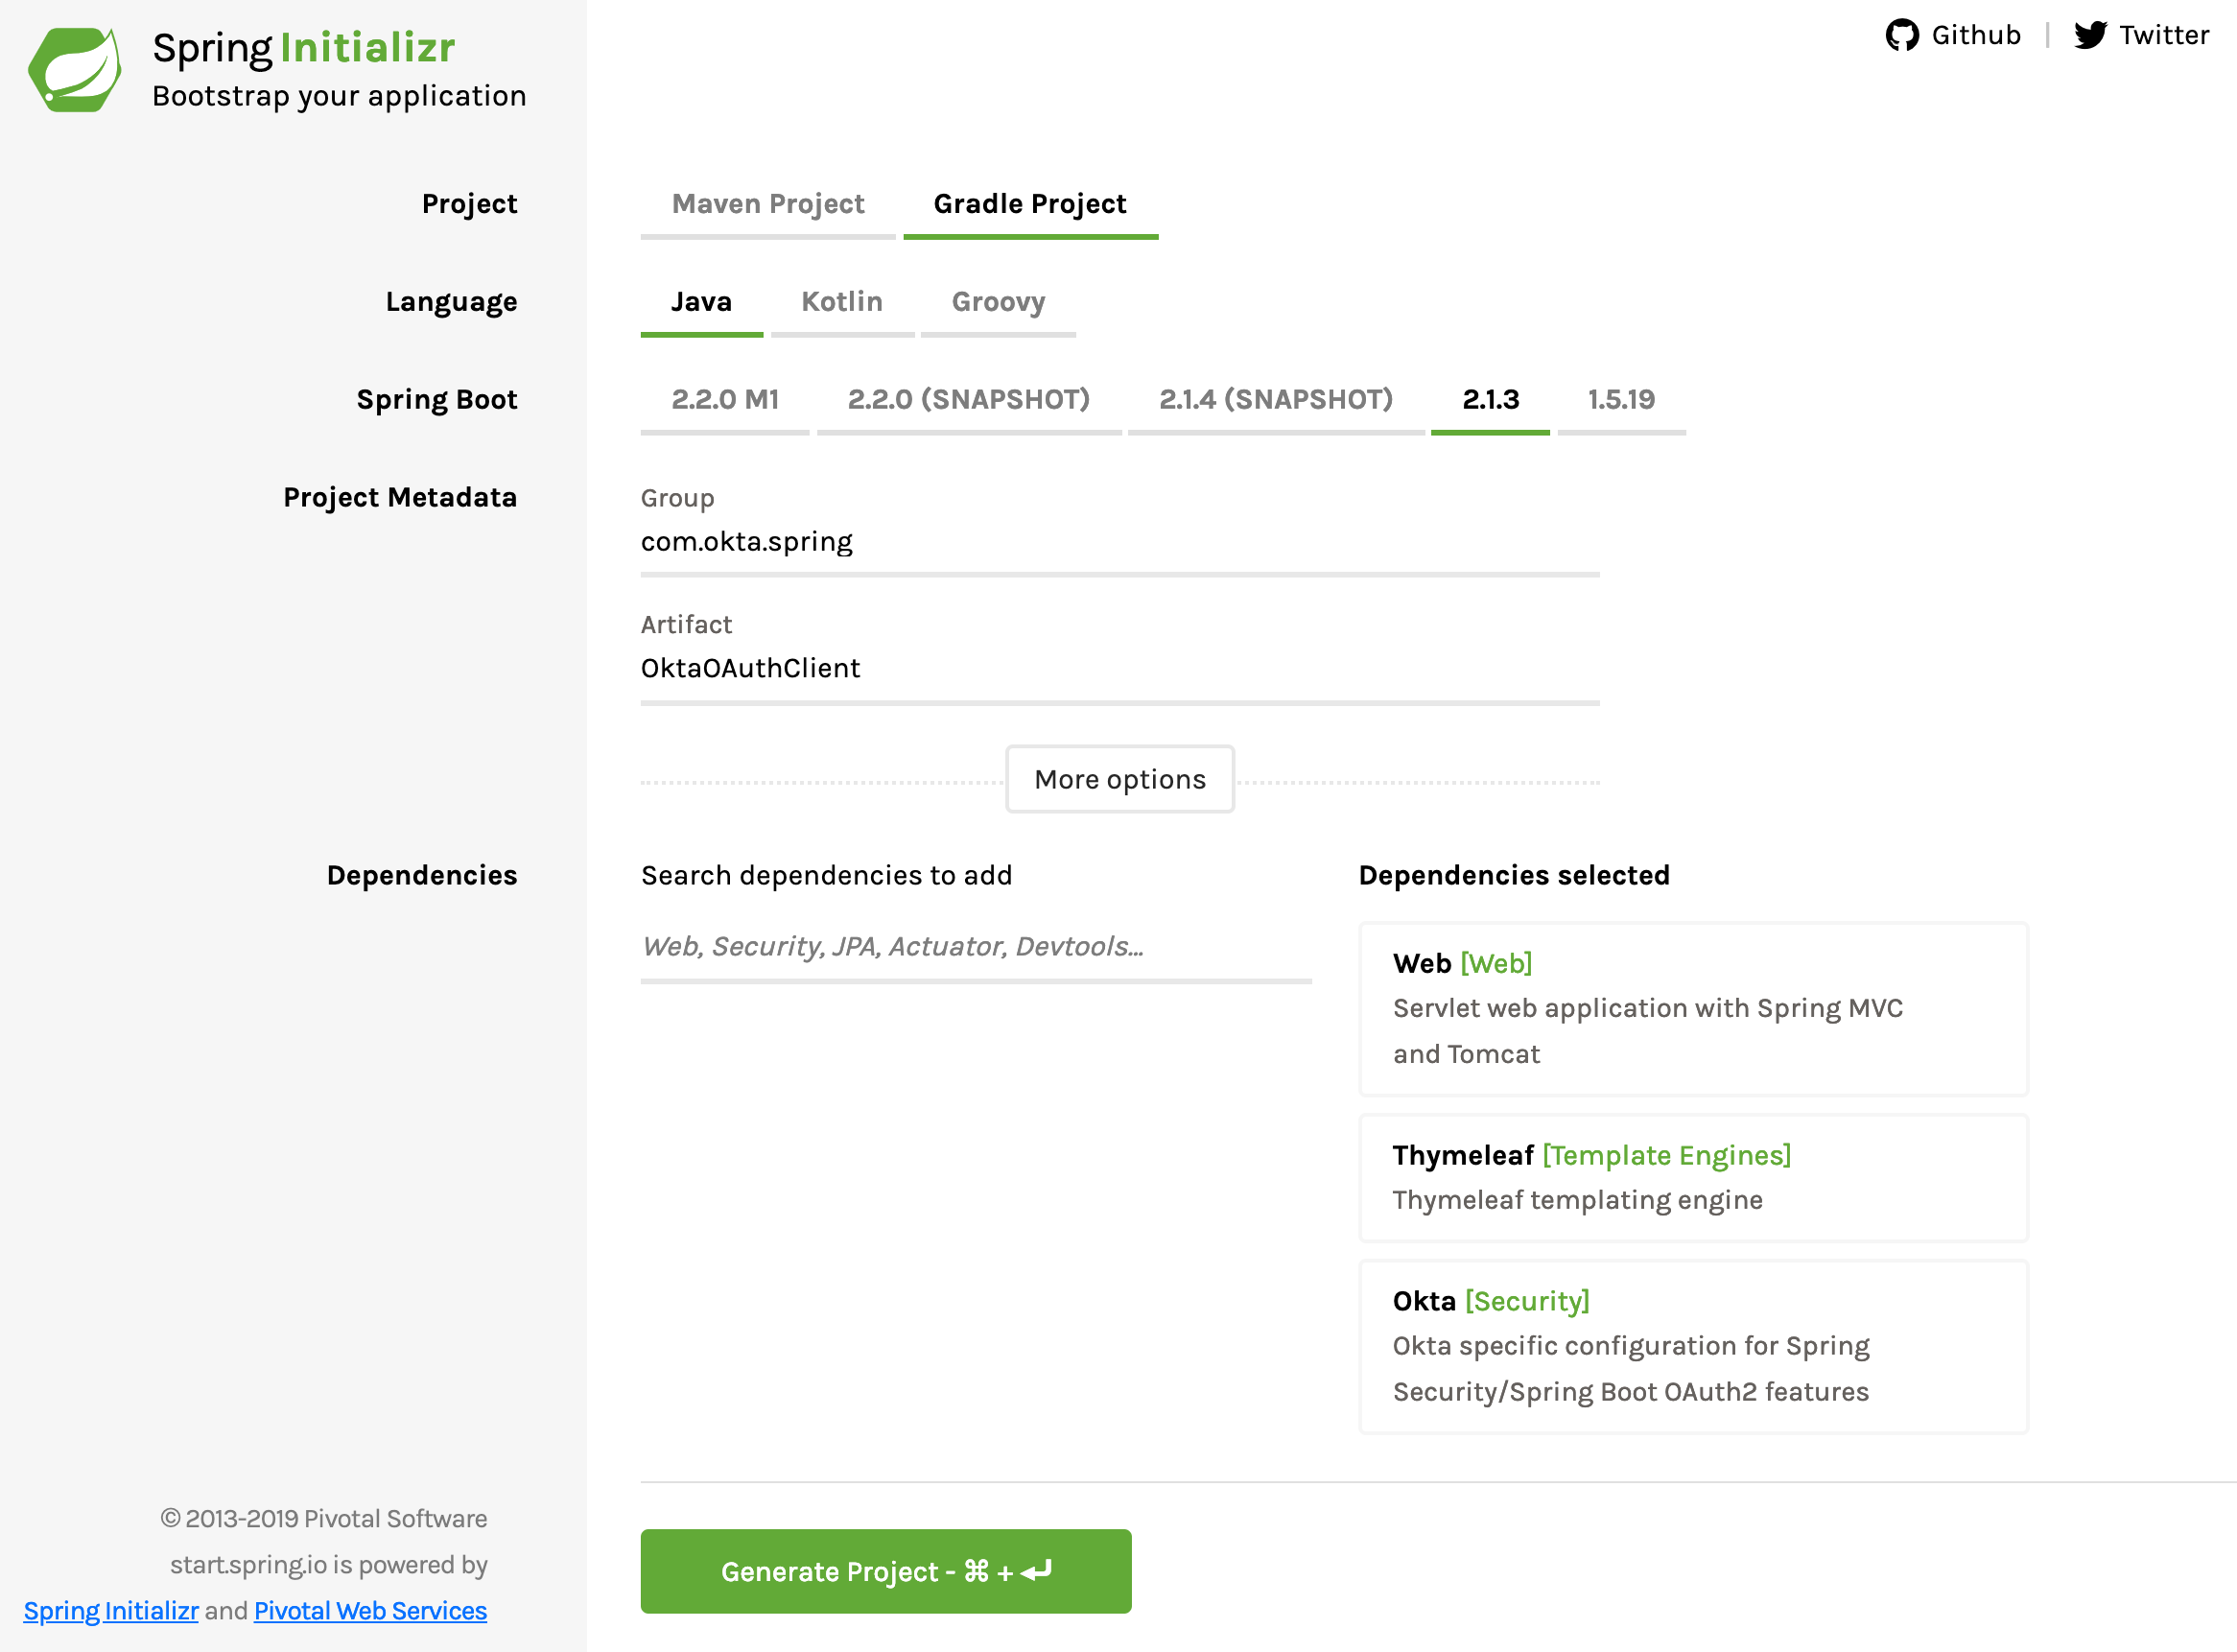
Back to the Spring Initializr one more time. Create a new project with the following settings:
- Change project type from Maven to Gradle.
- Change the Group to com.okta.spring.
- Change the Artifact to OktaOAuthClient.
- Add three dependencies: Web, Thymeleaf, Okta.
- Click Generate Project.
Copy the project and unpack it somewhere.
In the build.gradle file, add the following dependency:
implementation 'org.thymeleaf.extras:thymeleaf-extras-springsecurity5:3.0.4.RELEASE'
Also while you’re there, notice the dependency com.okta.spring:okta-spring-boot-starter:1.1.0. This is the Okta Spring Boot Starter. It’s a handy project that makes integrating Okta with Spring Boot nice and easy. For more info, take a look at the project’s GitHub.
Change the src/main/resources/application.properties to application.yml and add the following:
server:
  port: 8080
okta:
  oauth2:
    issuer: https://okta.okta.com/oauth2/default
    client-id: {yourClientId}
    client-secret: {yourClientSecret}
spring:
  thymeleaf:
    cache: false
Remember when I said you’ll need your ClientID and Client Secret above. Well, the time has come. You need to fill them into the file, as well as your Okta issuer URL. It’s gonna look something like this: dev-123456.okta.com. You can find it under API > Authorization Servers.
You also need two similar template files in the src/main/resources/templates directory. The index.htmltemplate file is exactly the same, and can be copied over if you like. The securedPage.html template file is slightly different because of the way the authentication information is returned from Okta as compared to the simple authentication server you built earlier.
Create the home template: src/main/resources/templates/index.html:
<!DOCTYPE html>
<html lang="en">
<head>
    <meta charset="UTF-8">
    <title>Home</title>
</head>
<body>
    <h1>Spring Security SSO</h1>
    <a href="securedPage">Login</a>
</body>
</html>
And the secured template: src/main/resources/templates/securedPage.html:
<!DOCTYPE html>
<html xmlns:th="http://www.thymeleaf.org">
<head>
    <meta charset="UTF-8">
    <title>Secured Page</title>
</head>
<body>
    <h1>Secured Page</h1>
    <span th:text="${#authentication.principal.attributes.name}">Joe Coder</span>
</body>
</html>
Create a Java class named WebController in the com.okta.spring.SpringBootOAuth package:
package com.okta.spring.OktaOAuthClient;

import org.springframework.stereotype.Controller;
import org.springframework.ui.Model;
import org.springframework.web.bind.annotation.RequestMapping;

import java.security.Principal;

@Controller
public class WebController {

    @RequestMapping("/securedPage")
    public String securedPage(Model model, Principal principal) {
        return "securedPage";
    }

    @RequestMapping("/")
    public String index(Model model, Principal principal) {
        return "index";
    }
}
This class simply creates two routes, one for the home route and one for the secured route. Again, Spring Boot and Thymeleaf are auto-magicking this to the two template files in src/main/resources/templates.
Finally, create another Java class names SecurityConfiguration:
package com.okta.spring.OktaOAuthClient;

import org.springframework.context.annotation.Configuration;
import org.springframework.security.config.annotation.web.builders.HttpSecurity;
import org.springframework.security.config.annotation.web.configuration.WebSecurityConfigurerAdapter;

@Configuration
public class SecurityConfiguration extends WebSecurityConfigurerAdapter {
    @Override
    public void configure(HttpSecurity http) throws Exception {
        http.antMatcher("/**").authorizeRequests()
            .antMatchers("/").permitAll()
            .anyRequest().authenticated()
            .and()
            .oauth2Login();
    }
}
That’s it! Bam!
Run the Okta-OAuth-powered client:
./gradlew bootRun
You should see a bunch of output that ends with:
...
2019-02-23 20:09:03.465  INFO 55890 --- [           main] o.s.b.w.embedded.tomcat.TomcatWebServer  : Tomcat started on port(s): 8080 (http) with context path ''
2019-02-23 20:09:03.470  INFO 55890 --- [           main] c.o.s.O.OktaOAuthClientApplication       : Started OktaOAuthClientApplication in 3.285 seconds (JVM running for 3.744)
Navigate to http://localhost:8080.
Click the Login button.
This time, you’ll be directed to the Okta login page. You may need to use an incognito browser or log out of your developer.okta.com dashboard here so that you don’t skip the login page and get directed immediately to the secured endpoint.

Log in, and you’ll see the secured page with your name!
Learn More About Spring Boot, Spring Security, and OAuth 2.0
So, that’s that. Super easy. In the previous tutorial, you looked at how to use Spring Boot and Spring Security to implement a very basic authentication server and client app. Next, you used Okta to make an even simpler client app with fully functioning SSO and OAuth authentication.
You can see the completed code for this tutorial on GitHub at oktadeveloper/okta-spring-boot-authz-server-example.
If you’re interested in learning more about Spring Boot, OAuth 2.0, and Spring Security, check out these useful tutorials:
- Get Started with Spring Boot, OAuth 2.0, and Okta
- What the Heck is OAuth?
- Get Started with Spring Security 5.0 and OIDC
- Identity, Claims, and Tokens – An OpenID Connect Primer, Part 1 of 3
- Build a Secure API with Spring Boot and GraphQL
If you have any questions about this post, please add a comment below. For more awesome content, follow @oktadev on Twitter, or subscribe to our YouTube channel!
A Quick Guide to OAuth 2.0 with Spring Security was originally published on the Okta Developer Blog on March 12, 2019.