В этой главе мы собираемся добавить функции безопасности на сервер сигнализации, который мы создали в главе «Сигнализация WebRTC». Там будет два улучшения —
- Аутентификация пользователя с использованием базы данных Redis
- Включение безопасного сокета
Во-первых, вы должны установить Redis.
-
Загрузите последнюю стабильную версию с http://redis.io/download (3,05 в моем случае)
-
Распаковать его
-
Внутри загруженной папки запустите sudo make install
-
После завершения установки запустите make test, чтобы проверить, все ли работает правильно.
Загрузите последнюю стабильную версию с http://redis.io/download (3,05 в моем случае)
Распаковать его
Внутри загруженной папки запустите sudo make install
После завершения установки запустите make test, чтобы проверить, все ли работает правильно.
Redis имеет две исполняемые команды —
-
redis-cli — интерфейс командной строки для Redis (клиентская часть)
-
redis-server — хранилище данных Redis
redis-cli — интерфейс командной строки для Redis (клиентская часть)
redis-server — хранилище данных Redis
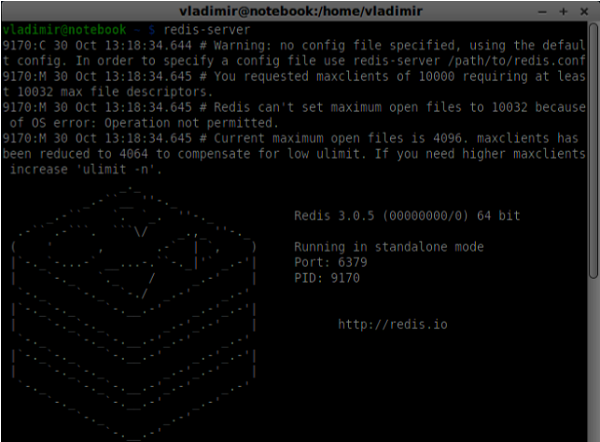
Для запуска сервера Redis введите redis-server в консоли терминала. Вы должны увидеть следующее —
Теперь откройте новое окно терминала и запустите redis-cli, чтобы открыть клиентское приложение.

По сути, Redis — это база данных ключ-значение. Чтобы создать ключ со строковым значением, вы должны использовать команду SET. Чтобы прочитать значение ключа, вы должны использовать команду GET. Давайте добавим двух пользователей и пароли для них. Ключи будут именами пользователей, а значения этих ключей будут соответствующими паролями.

Теперь мы должны изменить наш сервер сигнализации, чтобы добавить аутентификацию пользователя. Добавьте следующий код в начало файла server.js —
//require the redis library in Node.js
var redis = require("redis");

//creating the redis client object
var redisClient = redis.createClient();
В приведенном выше коде нам требуется библиотека Redis для Node.js и создание клиента Redis для нашего сервера.
Чтобы добавить аутентификацию, измените обработчик сообщений на объекте соединения —
//when a user connects to our sever
wss.on('connection', function(connection) {
   console.log("user connected");

   //when server gets a message from a connected user
   connection.on('message', function(message) {

      var data;
      //accepting only JSON messages
      try {
         data = JSON.parse(message);
      } catch (e) {
         console.log("Invalid JSON");
         data = {};
      }

      //check whether a user is authenticated
      if(data.type != "login") {

         //if user is not authenticated
         if(!connection.isAuth) {
            sendTo(connection, {
               type: "error",
               message: "You are not authenticated"
            });
            return;
         }
      }

      //switching type of the user message
      switch (data.type) {
         //when a user tries to login
         case "login":
            console.log("User logged:", data.name);
            //get password for this username from redis database

            redisClient.get(data.name, function(err, reply) {
               //check if password matches with the one stored in redis
               var loginSuccess = reply === data.password;

               //if anyone is logged in with this username or incorrect password
                  then refuse
               if(users[data.name] || !loginSuccess) {
                  sendTo(connection, {
                     type: "login",
                     success: false
                  });
               } else {
                  //save user connection on the server
                  users[data.name] = connection;
                  connection.name = data.name;
                  connection.isAuth = true;

                  sendTo(connection, {
                     type: "login",
                     success: true
                  });
               }
            });

            break;
      }
   });

}

//...
//*****other handlers*******
В приведенном выше коде, если пользователь пытается войти в систему, мы получаем от Redis свой пароль, проверяем, совпадает ли он с сохраненным, и, если он успешен, мы сохраняем его имя пользователя на сервере. Мы также добавляем флаг isAuth к соединению, чтобы проверить, аутентифицирован ли пользователь. Обратите внимание на этот код —
//check whether a user is authenticated
if(data.type != "login") {

   //if user is not authenticated
   if(!connection.isAuth) {
      sendTo(connection, {
         type: "error",
         message: "You are not authenticated"
      });

      return;
   }
}
Если неаутентифицированный пользователь пытается отправить предложение или покинуть соединение, мы просто отправляем ошибку обратно.
Следующим шагом является включение безопасного подключения к сокету. Настоятельно рекомендуется для приложений WebRTC. PKI (Инфраструктура открытых ключей) — это цифровая подпись от CA (центра сертификации). Затем пользователи проверяют, что закрытый ключ, используемый для подписи сертификата, соответствует открытому ключу сертификата CA. Для целей разработки. мы будем использовать самозаверяющий сертификат безопасности.
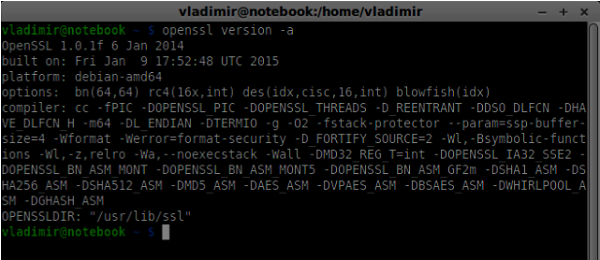
Мы будем использовать openssl. Это инструмент с открытым исходным кодом, который реализует протоколы SSL (Secure Sockets Layer) и TLS (Transport Layer Security). Он часто устанавливается по умолчанию в системах Unix. Запустите openssl версию -a, чтобы проверить, установлена ли она.
Чтобы сгенерировать открытые и закрытые ключи сертификата безопасности, вы должны выполнить следующие шаги:
-
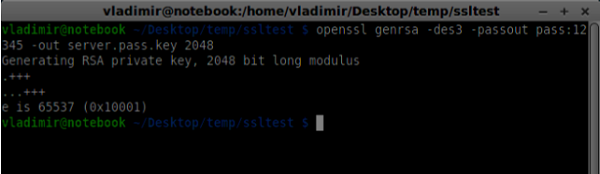
Создать временный ключ пароля сервера
Создать временный ключ пароля сервера
openssl genrsa -des3 -passout pass:x -out server.pass.key 2048
-
Создать личный ключ сервера
Создать личный ключ сервера
openssl rsa -passin pass:12345 -in server.pass.key -out server.key

-
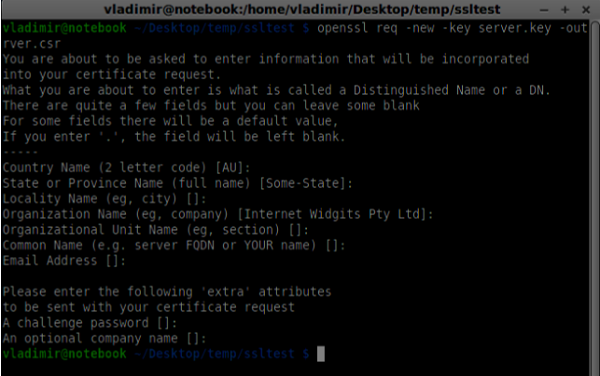
Создайте запрос на подпись. Вам будут заданы дополнительные вопросы о вашей компании. Просто нажмите кнопку «Ввод» все время.
Создайте запрос на подпись. Вам будут заданы дополнительные вопросы о вашей компании. Просто нажмите кнопку «Ввод» все время.
openssl req -new -key server.key -out server.csr
-
Создать сертификат
Создать сертификат
openssl x509 -req -days 1095 -in server.csr -signkey server.key -out server.crt
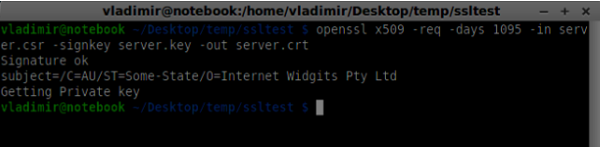
Теперь у вас есть два файла: сертификат (server.crt) и закрытый ключ (server.key). Скопируйте их в корневую папку сервера сигнализации.
Чтобы включить безопасное соединение через сокет, измените наш сервер сигнализации.
//require file system module
var fs = require('fs');
var httpServ = require('https');

//https://github.com/visionmedia/superagent/issues/205
process.env.NODE_TLS_REJECT_UNAUTHORIZED = "0";

//out secure server will bind to the port 9090
var cfg = {
   port: 9090,
   ssl_key: 'server.key',
   ssl_cert: 'server.crt'
};

//in case of http request just send back "OK"
var processRequest = function(req, res) {
   res.writeHead(200);
   res.end("OK");
};

//create our server with SSL enabled
var app = httpServ.createServer({
   key: fs.readFileSync(cfg.ssl_key),
   cert: fs.readFileSync(cfg.ssl_cert)
}, processRequest).listen(cfg.port);

//require our websocket library
var WebSocketServer = require('ws').Server;

//creating a websocket server at port 9090
var wss = new WebSocketServer({server: app});

//all connected to the server users
var users = {};

//require the redis library in Node.js
var redis = require("redis");

//creating the redis client object
var redisClient = redis.createClient();

//when a user connects to our sever
wss.on('connection', function(connection){
//...other code
В приведенном выше коде мы требуем, чтобы библиотека fs считала закрытый ключ и сертификат, создала объект cfg с портом привязки и путями для секретного ключа и сертификата. Затем мы создаем сервер HTTPS с нашими ключами вместе с сервером WebSocket на порту 9090.
Теперь откройте https: // localhost: 9090 в Opera. Вы должны увидеть следующее —
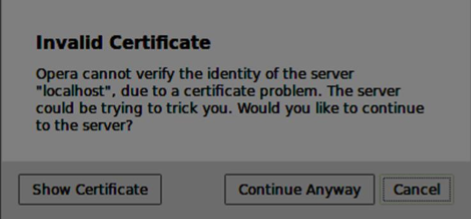
Нажмите кнопку «Все равно продолжить». Вы должны увидеть сообщение «ОК».
Чтобы протестировать наш защищенный сервер сигнализации, мы изменим приложение чата, которое мы создали в учебном пособии «WebRTC Text Demo». Нам просто нужно добавить поле пароля. Ниже приведен весь файл index.html —
<html>

   <head>
      <title>WebRTC Text Demo</title>
      <link rel = "stylesheet" href = "node_modules/bootstrap/dist/css/bootstrap.min.css"/>
   </head>

   <style>
      body {
         background: #eee;
         padding: 5% 0;
      }
   </style>

   <body>
      <div id = "loginPage" class = "container text-center">

         <div class = "row">
            <div class = "col-md-4 col-md-offset-4">
               <h2>WebRTC Text Demo. Please sign in</h2>
               <label for = "usernameInput" class = "sr-only">Login</label>
               <input type = "email" id = "usernameInput"
                  class = "form-control formgroup" placeholder = "Login"
                  required = "" autofocus = "">
               <input type = "text" id = "passwordInput"
                  class = "form-control form-group" placeholder = "Password"
                  required = "" autofocus = "">
               <button id = "loginBtn" class = "btn btn-lg btn-primary btnblock"
                  >Sign in</button>
            </div>
         </div>

      </div>

      <div id = "callPage" class = "call-page container">

         <div class = "row">
            <div class = "col-md-4 col-md-offset-4 text-center">
               <div class = "panel panel-primary">
                  <div class = "panel-heading">Text chat</div>
                  <div id = "chatarea" class = "panel-body text-left"></div>
               </div>
            </div>
         </div>

         <div class = "row text-center form-group">
            <div class = "col-md-12">
               <input id = "callToUsernameInput" type = "text"
                  placeholder = "username to call" />
               <button id = "callBtn" class = "btn-success btn">Call</button>
               <button id = "hangUpBtn" class = "btn-danger btn">Hang Up</button>
            </div>
         </div>

         <div class = "row text-center">
            <div class = "col-md-12">
               <input id = "msgInput" type = "text" placeholder = "message" />
               <button id = "sendMsgBtn" class = "btn-success btn">Send</button>
            </div>
         </div>

      </div>

      <script src = "client.js"></script>

   </body>

</html>
Нам также необходимо включить безопасное соединение через сокет в файле client.js через эту строку var conn = new WebSocket (‘wss: // localhost: 9090’); , Обратите внимание на протокол wss . Затем, кнопка входа в систему необходимо изменить, чтобы отправить пароль вместе с именем пользователя —
loginBtn.addEventListener("click", function (event) {
   name = usernameInput.value;
   var pwd = passwordInput.value;

   if (name.length > 0) {
      send({
         type: "login",
         name: name,
         password: pwd
      });
   }

});
Ниже приведен весь файл client.js —
//our username
var name;
var connectedUser;

//connecting to our signaling server
var conn = new WebSocket('wss://localhost:9090');

conn.onopen = function () {
   console.log("Connected to the signaling server");
};

//when we got a message from a signaling server
conn.onmessage = function (msg) {
   console.log("Got message", msg.data);

   var data = JSON.parse(msg.data);

   switch(data.type) {
      case "login":
         handleLogin(data.success);
         break;
      //when somebody wants to call us
      case "offer":
         handleOffer(data.offer, data.name);
         break;
      case "answer":
         handleAnswer(data.answer);
         break;
      //when a remote peer sends an ice candidate to us
      case "candidate":
         handleCandidate(data.candidate);
         break;
      case "leave":
         handleLeave();
         break;
      default:
         break;
   }
};

conn.onerror = function (err) {
   console.log("Got error", err);
};

//alias for sending JSON encoded messages
function send(message) {
   //attach the other peer username to our messages
   if (connectedUser) {
      message.name = connectedUser;
   }

   conn.send(JSON.stringify(message));
};

//******
//UI selectors block
//******

var loginPage = document.querySelector('#loginPage');
var usernameInput = document.querySelector('#usernameInput');
var passwordInput = document.querySelector('#passwordInput');
var loginBtn = document.querySelector('#loginBtn');

var callPage = document.querySelector('#callPage');
var callToUsernameInput = document.querySelector('#callToUsernameInput');
var callBtn = document.querySelector('#callBtn');
var hangUpBtn = document.querySelector('#hangUpBtn');

var msgInput = document.querySelector('#msgInput');
var sendMsgBtn = document.querySelector('#sendMsgBtn');
var chatArea = document.querySelector('#chatarea');

var yourConn;
var dataChannel;

callPage.style.display = "none";

// Login when the user clicks the button
loginBtn.addEventListener("click", function (event) {
   name = usernameInput.value;
   var pwd = passwordInput.value;

   if (name.length > 0) {
      send({
         type: "login",
         name: name,
         password: pwd
      });
   }

});

function handleLogin(success) {
   if (success === false) {
      alert("Ooops...incorrect username or password");
   } else {
      loginPage.style.display = "none";
      callPage.style.display = "block";

      //**********************
      //Starting a peer connection
      //**********************

      //using Google public stun server
      var configuration = {
         "iceServers": [{ "url": "stun:stun2.1.google.com:19302" }]
      };

      yourConn = new webkitRTCPeerConnection(configuration, {optional: [{RtpDataChannels: true}]});

      // Setup ice handling
      yourConn.onicecandidate = function (event) {
         if (event.candidate) {
            send({
               type: "candidate",
               candidate: event.candidate
            });
         }
      };

      //creating data channel
      dataChannel = yourConn.createDataChannel("channel1", {reliable:true});

      dataChannel.onerror = function (error) {
         console.log("Ooops...error:", error);
      };

      //when we receive a message from the other peer, display it on the screen
      dataChannel.onmessage = function (event) {
         chatArea.innerHTML += connectedUser + ": " + event.data + "<br />";
      };

      dataChannel.onclose = function () {
         console.log("data channel is closed");
      };
   }

};

//initiating a call
callBtn.addEventListener("click", function () {
   var callToUsername = callToUsernameInput.value;

   if (callToUsername.length > 0) {

      connectedUser = callToUsername;

      // create an offer
      yourConn.createOffer(function (offer) {
         send({
            type: "offer",
            offer: offer
         });

         yourConn.setLocalDescription(offer);

      }, function (error) {
         alert("Error when creating an offer");
      });
   }
});

//when somebody sends us an offer
function handleOffer(offer, name) {
   connectedUser = name;
   yourConn.setRemoteDescription(new RTCSessionDescription(offer));

   //create an answer to an offer
   yourConn.createAnswer(function (answer) {
      yourConn.setLocalDescription(answer);

      send({
         type: "answer",
         answer: answer
      });

   }, function (error) {
      alert("Error when creating an answer");
   });

};

//when we got an answer from a remote user
function handleAnswer(answer) {
   yourConn.setRemoteDescription(new RTCSessionDescription(answer));
};

//when we got an ice candidate from a remote user
function handleCandidate(candidate) {
   yourConn.addIceCandidate(new RTCIceCandidate(candidate));
};

//hang up
hangUpBtn.addEventListener("click", function () {

   send({
      type: "leave"
   });

   handleLeave();
});

function handleLeave() {
   connectedUser = null;
   yourConn.close();
   yourConn.onicecandidate = null;
};

//when user clicks the "send message" button
sendMsgBtn.addEventListener("click", function (event) {
   var val = msgInput.value;
   chatArea.innerHTML += name + ": " + val + "<br />";

   //sending a message to a connected peer
   dataChannel.send(val);
   msgInput.value = "";
});
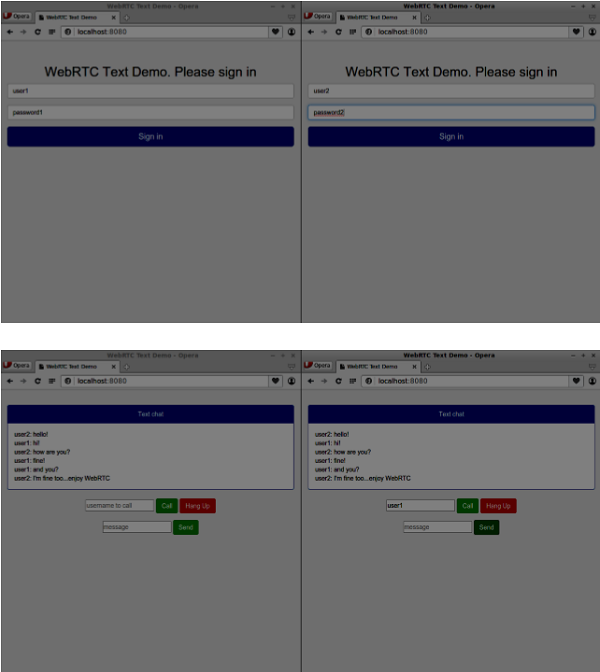
Теперь запустите наш безопасный сигнальный сервер через сервер узлов . Запустите узел static внутри модифицированной демонстрационной папки чата. Откройте localhost: 8080 в двух вкладках браузера. Попробуйте войти в систему. Помните, что только «user1» с «password1» и «user2» с «password2» могут войти в систему. Затем установите RTCPeerConnection (позвоните другому пользователю) и попробуйте отправить сообщение.
Ниже приведен полный код нашего защищенного сервера сигнализации.
//require file system module
var fs = require('fs');
var httpServ = require('https');

//https://github.com/visionmedia/superagent/issues/205
process.env.NODE_TLS_REJECT_UNAUTHORIZED = "0";

//out secure server will bind to the port 9090
var cfg = {
   port: 9090,
   ssl_key: 'server.key',
   ssl_cert: 'server.crt'
};

//in case of http request just send back "OK"
var processRequest = function(req, res){
   res.writeHead(200);
   res.end("OK");
};

//create our server with SSL enabled
var app = httpServ.createServer({
   key: fs.readFileSync(cfg.ssl_key),
   cert: fs.readFileSync(cfg.ssl_cert)
}, processRequest).listen(cfg.port);

//require our websocket library
var WebSocketServer = require('ws').Server;

//creating a websocket server at port 9090
var wss = new WebSocketServer({server: app});

//all connected to the server users
var users = {};

//require the redis library in Node.js
var redis = require("redis");

//creating the redis client object
var redisClient = redis.createClient();

//when a user connects to our sever
wss.on('connection', function(connection) {
   console.log("user connected");

   //when server gets a message from a connected user
   connection.on('message', function(message) {

      var data;
      //accepting only JSON messages
      try {
         data = JSON.parse(message);
      } catch (e) {
         console.log("Invalid JSON");
         data = {};
      }

      //check whether a user is authenticated
      if(data.type != "login") {
         //if user is not authenticated
         if(!connection.isAuth) {
            sendTo(connection, {
               type: "error",
               message: "You are not authenticated"
            });

            return;
         }
      }

      //switching type of the user message
      switch (data.type) {
         //when a user tries to login
         case "login":
            console.log("User logged:", data.name);
            //get password for this username from redis database
            redisClient.get(data.name, function(err, reply) {

               //check if password matches with the one stored in redis
               var loginSuccess = reply === data.password;

               //if anyone is logged in with this username or incorrect password
                  then refuse
               if(users[data.name] || !loginSuccess) {
                  sendTo(connection, {
                     type: "login",
                     success: false
                  });
               } else {
                  //save user connection on the server
                  users[data.name] = connection;
                  connection.name = data.name;
                  connection.isAuth = true;

                  sendTo(connection, {
                     type: "login",
                     success: true
                  });
               }
            });

            break;

         case "offer":
            //for ex. UserA wants to call UserB
            console.log("Sending offer to: ", data.name);

            //if UserB exists then send him offer details
            var conn = users[data.name];

            if(conn != null) {
               //setting that UserA connected with UserB
               connection.otherName = data.name;

               sendTo(conn, {
                  type: "offer",
                  offer: data.offer,
                  name: connection.name
               });
            }

            break;

         case "answer":
            console.log("Sending answer to: ", data.name);
            //for ex. UserB answers UserA
            var conn = users[data.name];

            if(conn != null) {
               connection.otherName = data.name;

               sendTo(conn, {
                  type: "answer",
                  answer: data.answer
               });
            }

            break;

         case "candidate":
            console.log("Sending candidate to:",data.name);
            var conn = users[data.name];

            if(conn != null) {
               sendTo(conn, {
                  type: "candidate",
                  candidate: data.candidate
               });
            }

            break;

         case "leave":
            console.log("Disconnecting from", data.name);
            var conn = users[data.name];
            conn.otherName = null;

            //notify the other user so he can disconnect his peer connection
            if(conn != null) {
               sendTo(conn, {
                  type: "leave"
               });
            }

            break;

         connection.on("close", function() {

            if(connection.name) {
               delete users[connection.name];

               if(connection.otherName) {
                  console.log("Disconnecting from ", connection.otherName);
                  var conn = users[connection.otherName];
                  conn.otherName = null;

                  if(conn != null) {
                     sendTo(conn, {
                        type: "leave"
                    });
                  }

               }
            }
         });

         default:
            sendTo(connection, {
               type: "error",
               message: "Command no found: " + data.type
            });

            break;
      }
   });

   //when user exits, for example closes a browser window
   //this may help if we are still in "offer","answer" or "candidate" state
   connection.on("close", function() {
      if(connection.name) {
         delete users[connection.name];
      }
   });

   connection.send("Hello from server");
});

function sendTo(connection, message) {
   connection.send(JSON.stringify(message));
}
Резюме
В этой главе мы добавили аутентификацию пользователя на наш сервер сигнализации. Мы также узнали, как создавать самозаверяющие SSL-сертификаты и использовать их в приложениях WebRTC.