Иногда у вас могут быть какие-то конкретные настройки, которые вы хотели бы использовать в своих собственных проектах. Поскольку вы не хотите изобретать свое собственное колесо в каждом проекте, имеет смысл абстрагировать весь шаблон в ваш собственный генератор. В этой ситуации вы можете построить свой собственный генератор Yeoman . Это положит начало вашим проектам.
В этой статье мы будем создавать генератор Yeoman для создания одностраничного приложения. Этот сгенерированный каркас содержит AngularJS и / или JQuery, SASS, Bootstrap и ‘Modernizr’. Для тестирования вы можете выбрать между мокко рамки или жасмин.
Начало настройки
Прежде всего , вам необходимо установить Node.js . Вы можете получить установку здесь . Кроме того, нам нужно будет установить Yeoman и Bower, а также генератор ( yo ) для создания генераторов. Вы можете сделать это с помощью следующих команд для npm :
npm установить -g bower
npm install -g yo
npm установить -g генератор-генератор
npm install -g yeoman / generator-mocha
и, наконец, установить GIT
Сначала создайте папку, в которой вы будете писать свой генератор. Эта папка должна называться generator-name (где name — это имя вашего генератора). Это важно, так как Yeoman использует файловую систему для поиска доступных генераторов.
mkdir generator-myapp
cd generator-myapp
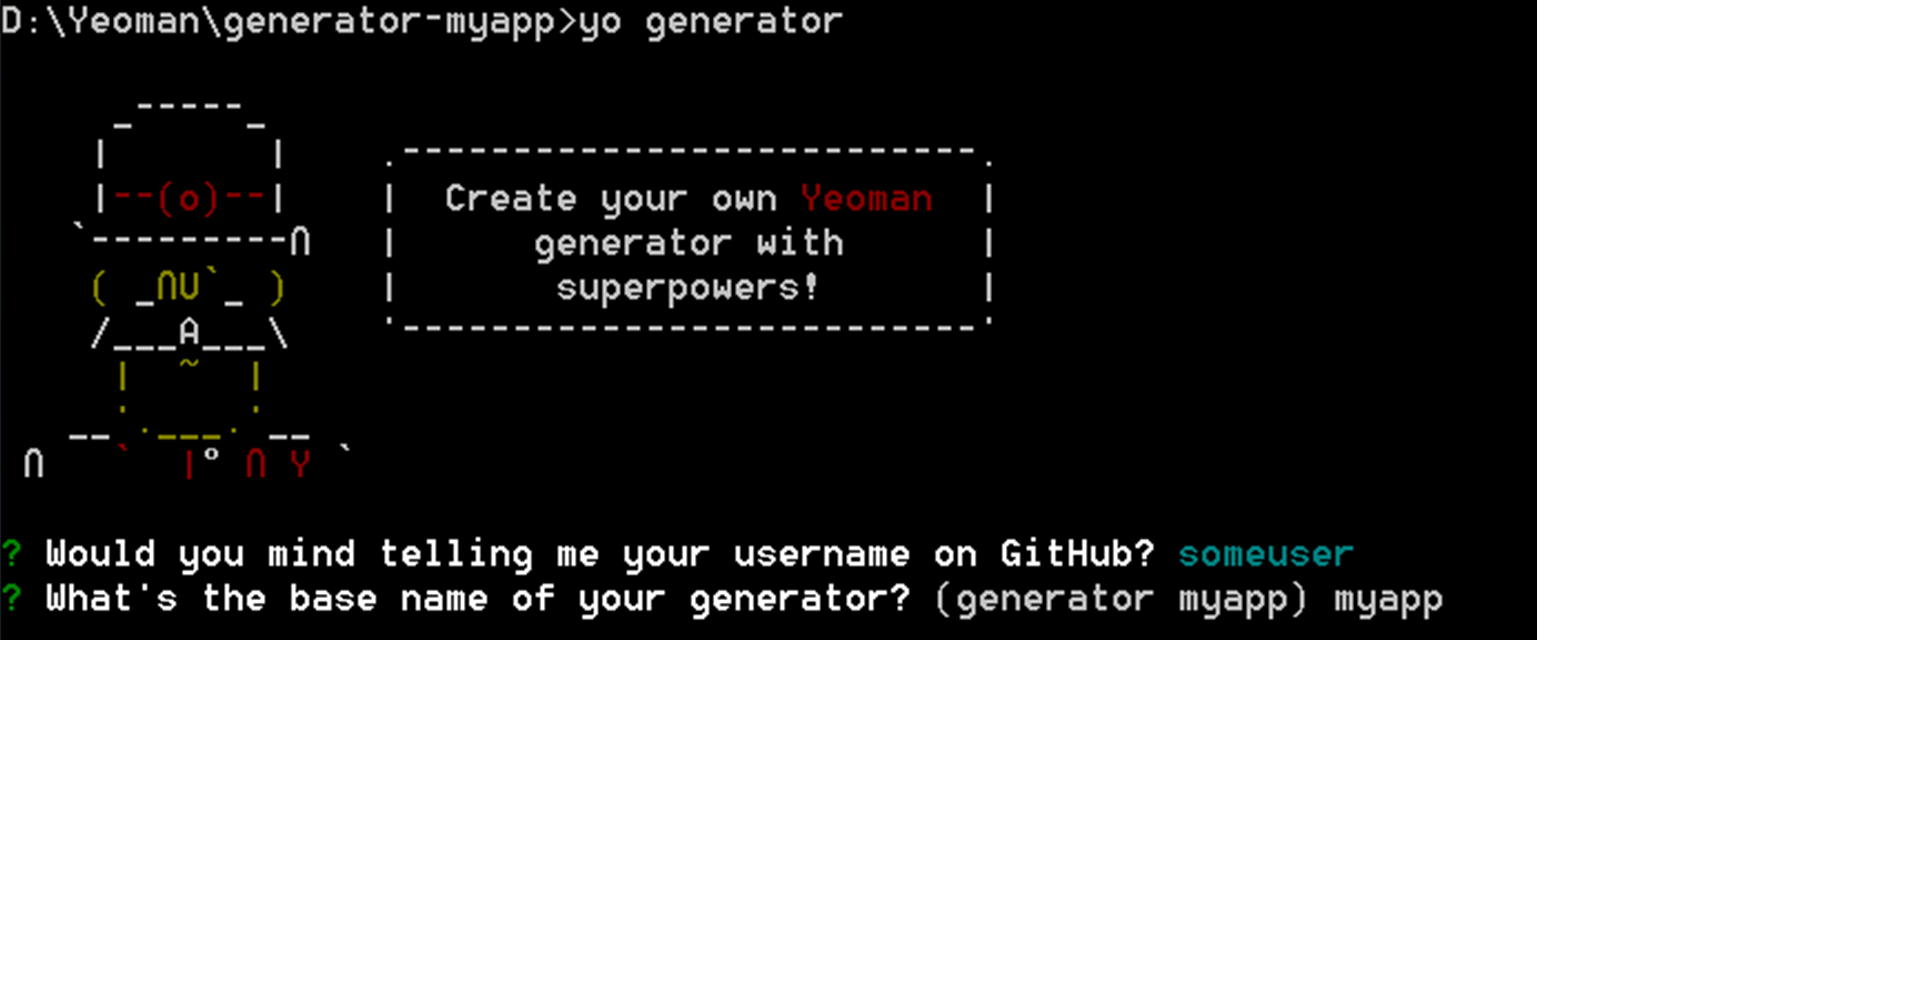
И сгенерируйте в этой папке ваш основной генератор:
йо генератор
Это запустит генератор и задаст вам несколько вопросов, таких как название проекта и ваша учетная запись GitHub. Я собираюсь назвать мой генератор: myapp .
Структура файла
Это файлы, сгенерированные командой, все это будет иметь смысл через мгновение.
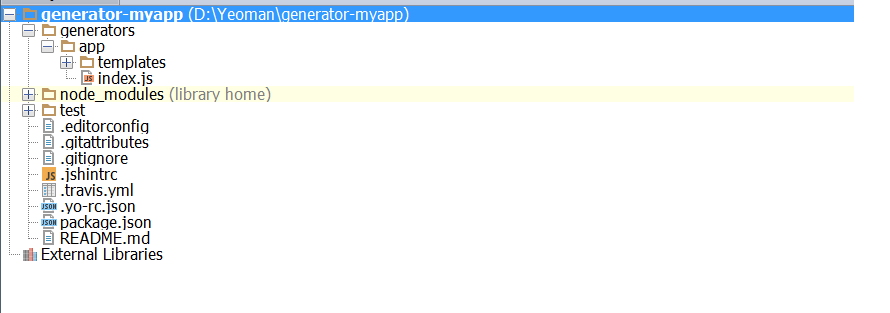
Первая пара файлов — это dotfiles для различных вещей, таких как Git и jshint, у нас есть файл package.json для самого генератора, файл readme и папка для тестов.
.Yo-rc.json очень важно , чтобы найти корень проекта.
Папка генераторов содержит каждый суб-генератор. Каждая папка имеет то же имя, что и имя суб-генератора. В нашем случае у нас есть одно (по умолчанию) приложение- генератор , которое вызывается командой: yo myapp . Каждый суб-генератор имеет файл index.js , который содержит точку входа для генератора, и папку шаблонов, которая содержит файлы шаблонов для эталонного образца (для создания фактических строительных лесов).
Тест- папка проводит тесты для генератора YEOMAN.
Теперь у вас есть готовый генератор по умолчанию. Поэтому, прежде чем изменять его для добавления наших пользовательских функций, мы протестируем этот базовый генератор. Поскольку вы разрабатываете генератор локально и еще не опубликовали его, вы должны использовать символическую ссылку на локальный модуль как глобальный модуль, используя npm. Зачем?
Это удобно для установки ваших собственных вещей, так что вы можете работать с ними и тестировать их итеративно, без необходимости постоянно перестраивать. Запустите эту команду в корневом каталоге вашего генератора (в корневой папке вы можете найти: .yo-rc.json ):
ссылка npm
Создайте новую папку в вашей файловой системе (т.е. выходную папку) для вашего приложения и протестируйте ваш генератор. Теперь вы можете создать свое собственное веб-приложение:
mkdir testmyapp
cd testmyapp
ты мой апп
Новый файл будет создан в выходной папке: testmyapp
Как написать свой генератор
Yeoman сгенерировал базовую структуру для нашего генератора, теперь мы проверим, как ее настроить и добавим наши собственные функции в генератор, выполнив следующие шаги:
- Настройка фактического объекта генератора
- Инициализация генератора
- Получение пользовательского ввода
- Варианты и аргументы
- Добавление пользовательских шаблонов
- Написать генератор конкретных файлов
- Установить нпм и бауэр
- Эшафот ваше приложение
- Модульный тест
1. Настройте фактический генератор объекта
Index.js файл должен экспортировать реальный объект генератора (MyappGenerator) , который получит в ведение Yeoman. Я собираюсь очистить все внутри фактического генератора, чтобы мы могли начать с нуля, вот как должен выглядеть файл после этого:
'use strict';
var fs = require('fs');
var path = require('path');
var yeoman = require('yeoman-generator');
var yosay = require('yosay');
var chalk = require('chalk');
var wiredep = require('wiredep');
var MyappGenerator = yeoman.generators.Base.extend({

});
module.exports = MyappGenerator;
Йоменский генератор может выходить из базового генератора. Весь этот код в index.js создает объект генератора: MyappGenerator и экспортирует его. Yeoman подберет экспортированный объект и запустит его. Он запускается сначала путем вызова метода конструктора, а затем будет проходить через все методы, которые вы создаете для этого объекта (в порядке их создания), и запускать их по одному за раз. Некоторые имена методов имеют приоритет в этом генераторе. Доступные приоритеты в порядке:
- инициализация — Ваши методы инициализации (config package.json и т. д.)
- Подсказка — где вы предлагаете пользователям варианты (где вы вызываете this.prompt ())
- настройка — сохранение настроек и настройка проекта
- дефолт
- запись — для анализа и копирования файлов-шаблонов в выходную папку.
- конфликты — где конфликты обрабатываются (используются внутри)
- install — Где выполняется установка (npm, Bower)
- end — Вызывается в последний раз, убирается, прощается и т. д.
Я обращаюсь к текущему контексту за дополнительной информацией о том, как выполняются методы и в каком контексте.
2. Инициализация генератора
Первое, что вам нужно сделать, это инициализировать ваш генератор с файлом package.json . Этот файл является манифестом модуля Node.js. Вы можете найти этот файл в корневой папке генератора (корневая папка — это место, где находится .yo-rc.json ). Файл package.json должен содержать следующее:
{
  "name": "generator-myapp",
  "version": "0.0.0",
  "description": "Scaffold out a front-end web app",
  "license": "BSD",
  "repository": "petereijgermans11/generator-myapp",
  "author": {
  "name": "",
  "email": "",
  "url": "https://github.com/petereijgermans11"
  },
  "main": "app/index.js",
  "engines": {
  "node": ">=0.10.0",
  "npm": ">=1.3"
  },
  "scripts": {
  "test": "mocha --reporter spec"
  },
  "files": [
  "app"
  ],
  "keywords": [
  "yeoman-generator",
  "web",
  "app",
  "front-end",
  "h5bp",
  "modernizr",
  "jquery",
  "angular",
  "gulp"
  ],
  "dependencies": {
  "chalk": "^1.0.0",
  "wiredep": "^2.2.2",
  "yeoman-generator": "^0.18.5",
  "yeoman-assert": "^2.0.0",
  "yosay": "^1.0.0"
  },
  "peerDependencies": {
  "yo": ">=1.0.0",
  "generator-mocha": ">=0.1.0",
  "gulp": ">=3.5.0"
  },
  "devDependencies": {
  "mocha": "*"
  }
}
Как составлен этот файл package.json, я ссылаюсь на package.json . Я использую следующие зависимости:
- мелом : для записи цветного сообщения с Йоманом
- wiredep : для добавления компонентов Bower в ваши файлы HTML / SCSS.
- Йомен-генератор см. Йоман
- yeoman-assert: утилита Assert от Yeoman
- yosay : скажите Yeoman, что сказать в консоли
Я настроил следующее:
- yo : инструмент CLI для запуска генераторов Yeoman
- генератор- мокко : генератор для тестового фреймворка мокко
- gulp : интерфейсный инструмент для сборки
И, наконец, я определил devDependency в тестовом фреймворке mocha -test.
Чтобы инициализировать файл package.json, мы добавим метод initializing в index.js:
'use strict';
var fs = require('fs');
var path = require('path');
var yeoman = require('yeoman-generator');
var yosay = require('yosay');
var chalk = require('chalk');
var wiredep = require('wiredep');
var MyappGenerator = yeoman.generators.Base.extend({
initializing: function () {
  this.pkg = require('../../package.json');
}
});
module.exports = MyappGenerator;
3. Получение пользовательского ввода
Вы можете добавлять вопросы в свой генератор, чтобы получать входные данные от пользователя. Вы можете использовать этот вход при создании окончательного проекта. У нас будут следующие вопросы в нашем генераторе:
- Хотите AngularJS или JQuery?
- Какие еще интерфейсные рамки вы бы хотели? (SASS, Bootstrap или Modernizr).
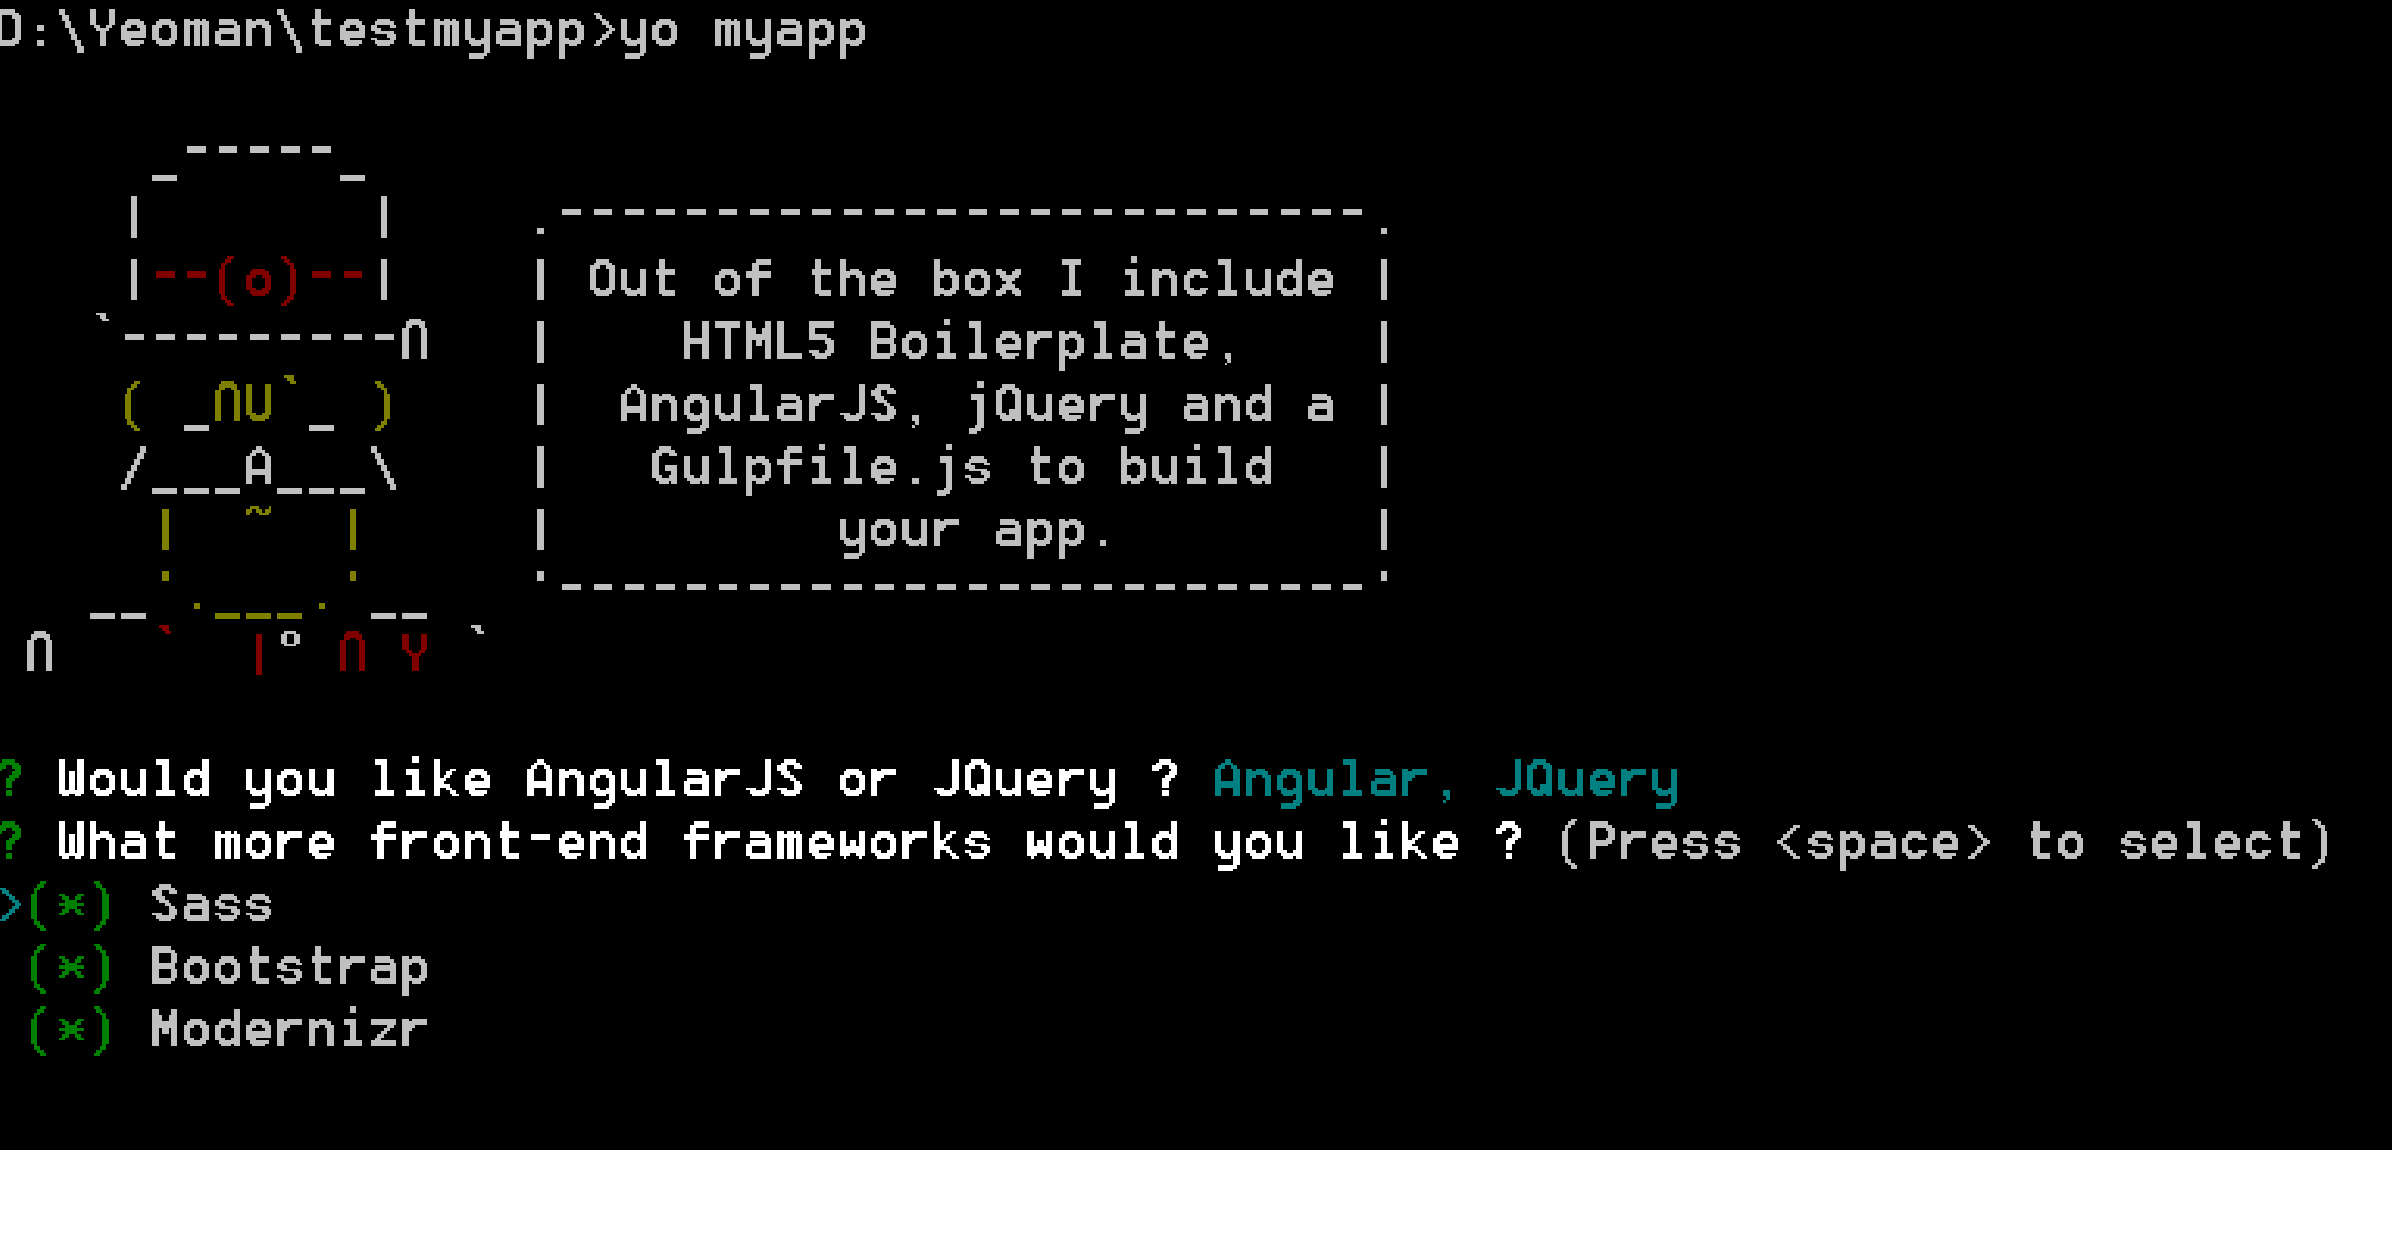
Для этого мы добавим функцию побуждения в index.js , которая запросит у пользователя эту информацию, а затем сохранит результаты в самом объекте нашего генератора (MyappGenerator):
'use strict';
var fs = require('fs');
var path = require('path');
var yeoman = require('yeoman-generator');
var yosay = require('yosay');
var chalk = require('chalk');
var wiredep = require('wiredep');
var MyappGenerator = yeoman.generators.Base.extend({
 initializing: function () {
  this.pkg = require('../../package.json');
  },

prompting: function () {
  var done = this.async();
  if (!this.options['skip-welcome-message']) {
    this.log(yosay('Out of the box I include HTML5 Boilerplate, AngularJS, jQuery                      and a Gulpfile.js to build your app.'));
  }
  var prompts = [{
     type: 'checkbox',
     name: 'mainframeworks',
     message:'Would you like AngularJS or JQuery ?',
     choices: [{
       name: 'Angular',
       value: 'includeAngular',
       checked: true
      }, {
       name: 'JQuery',
       value: 'includeJQuery',
       checked: true
      }]
    },
  {
     type: 'checkbox',
     name: 'features',
     message:'What more front-end frameworks would you like ?',
     choices: [{
       name: 'Sass',
       value: 'includeSass',
       checked: true
  }, {
      name: 'Bootstrap',
      value: 'includeBootstrap',
      checked: true
  }, {
      name: 'Modernizr',
      value: 'includeModernizr',
      checked: true
    }]
  }
];
  this.prompt(prompts, function (answers) {
    var features = answers.features;
    var mainframeworks = answers.mainframeworks;
    var hasFeature = function (feat) {
       return features.indexOf(feat) !== -1;
    };
    var hasMainframeworks = function (mainframework) {
       return mainframeworks.indexOf(mainframework) !== -1;
    };
  // manually deal with the response, get back and store the results.

    this.includeSass = hasFeature('includeSass');
    this.includeBootstrap = hasFeature('includeBootstrap');
    this.includeModernizr = hasFeature('includeModernizr');
    this.includeAngular = hasMainframeworks('includeAngular');
    this.includeJQuery = hasMainframeworks('includeJQuery');
    done();
  }.bind(this));
 }
});
module.exports = MyappGenerator;
Эта функция устанавливает готовую переменную из асинхронного метода объекта . Yeoman пытается запустить ваши методы в том порядке, в котором они определены, но если вы запустите какой-либо асинхронный код, функция завершит работу до того, как фактическая работа будет завершена, и Yeoman запустит следующую функцию раньше. Чтобы решить эту проблему, вы должны вызвать асинхронный метод, который возвращает обратный вызов. Когда обратный вызов будет выполнен, Yeoman перейдет к следующей функции.
Далее мы определили список подсказок, каждая подсказка имеет тип, имя и сообщение. Если тип не был указан, по умолчанию будет «input», который является текстовой записью.
Имея готовый массив вопросов, мы можем передать его методу prompt вместе с функцией обратного вызова. Первый параметр функции обратного вызова — это список ответов, полученных от пользователя. Затем мы прикрепляем эти ответы к нашему объекту генератора (на который ссылается ‘this’) и вызываем метод done для перехода к следующей функции в объекте генератора.
4. Варианты и аргументы
Пользователь может передать параметры генератору (index.js) из командной строки:
yo myapp —skip-install-message
В нашем случае нам бы хотелось иметь следующие варианты:
—skip-добро-сообщение
Пропускает приветствие Йомана перед отображением параметров.
—skip-установки-сообщение
Пропускает сообщение, отображаемое после завершения работы лесов и перед установкой зависимостей.
—skip-установки
Пропускает автоматическое выполнение Bower и npm после завершения строительных лесов.
—test-основа = <структура>
По умолчанию мокко . Может быть переключен на другую поддерживаемую среду тестирования, такую как жасмин .
В нашем генераторе аргументы и опции должны быть определены в методе конструктора :
var MyappGenerator = yeoman.generators.Base.extend({
constructor: function () {
 yeoman.generators.Base.apply(this, arguments);
 this.option('test-framework', {
   desc: 'Test framework to be invoked',
   type: String,
   defaults: 'mocha'
 });
 this.option('skip-welcome-message', {
   desc: 'Skips the welcome message',
   type: Boolean
 });
 this.option('skip-install', {
   desc: 'Skips the installation of dependencies',
   type: Boolean
 });
 this.option('skip-install-message', {
   desc: 'Skips the message after the installation of dependencies',
  type: Boolean
 });
},
5. Добавление пользовательских шаблонов
Все, что мне нужно сделать в этом разделе, — это создать все файлы шаблонов в папке generators / <sub-generator> / templates . Я хочу создать следующие файлы шаблонов:
- Gulpfile.js
- _package.json
- Bowerrc
- Bower.json
- Gitignore
- Gitattributes
- Jshintrc
- Editorconfig
- robots.txt
- Index.html
- Main.css
- Main.scss
- Main.js
Gulpfile.js
Я хочу использовать Gulp в качестве системы сборки . Для Gulp мне нужно определить gulpfile.js. В этом файле шаблона я использую заполнители в стиле EJS, которые будут заполнены нашим Yeoman-генератором во время выполнения.
Создайте / generator-myapp / generators / app / templates / gulpfile.js, содержащий:
/*global -$ */
'use strict';
// generated on <%= (new Date).toISOString().split('T')[0] %> using <%= pkg.name %> <%= pkg.version %>
var gulp = require('gulp');
var $ = require('gulp-load-plugins')();
var browserSync = require('browser-sync');
var reload = browserSync.reload;

gulp.task('styles', function () {<% if (includeSass) { %>
  gulp.src('app/styles/*.scss')
    .pipe($.sourcemaps.init())
    .pipe($.sass({
      outputStyle: 'expanded',
      precision: 10,
      includePaths: ['.']
    }).on('error', $.sass.logError))<% } else { %>
  return gulp.src('app/styles/*.css')
    .pipe($.sourcemaps.init())<% } %>
    .pipe($.postcss([
      require('autoprefixer-core')({browsers: ['last 1 version']})
    ]))
    .pipe($.sourcemaps.write())
    .pipe(gulp.dest('.tmp/styles'))
    .pipe(reload({stream: true}));
});

function jshint(files) {
  return function () {
    return gulp.src(files)
      .pipe(reload({stream: true, once: true}))
      .pipe($.jshint())
      .pipe($.jshint.reporter('jshint-stylish'))
      .pipe($.if(!browserSync.active, $.jshint.reporter('fail')));
  };
}

gulp.task('jshint', jshint('app/scripts/**/*.js'));
gulp.task('jshint:test', jshint('test/spec/**/*.js'));

gulp.task('html', ['styles'], function () {
  var assets = $.useref.assets({searchPath: ['.tmp', 'app', '.']});

  return gulp.src('app/*.html')
    .pipe(assets)
    .pipe($.if('*.js', $.uglify()))
    .pipe($.if('*.css', $.csso()))
    .pipe(assets.restore())
    .pipe($.useref())
    .pipe($.if('*.html', $.minifyHtml({conditionals: true, loose: true})))
    .pipe(gulp.dest('dist'));
});

gulp.task('images', function () {
  return gulp.src('app/images/**/*')
    .pipe($.if($.if.isFile, $.cache($.imagemin({
      progressive: true,
      interlaced: true,
      // don't remove IDs from SVGs, they are often used
      // as hooks for embedding and styling
      svgoPlugins: [{cleanupIDs: false}]
    }))
    .on('error', function(err){ console.log(err); this.end; })))
    .pipe(gulp.dest('dist/images'));
});

gulp.task('fonts', function () {
  return gulp.src(require('main-bower-files')({
    filter: '**/*.{eot,svg,ttf,woff,woff2}'
  }).concat('app/fonts/**/*'))
    .pipe(gulp.dest('.tmp/fonts'))
    .pipe(gulp.dest('dist/fonts'));
});

gulp.task('extras', function () {
  return gulp.src([
    'app/*.*',
    '!app/*.html'
  ], {
    dot: true
  }).pipe(gulp.dest('dist'));
});

gulp.task('clean', require('del').bind(null, ['.tmp', 'dist']));

gulp.task('serve', ['styles', 'fonts'], function () {
  browserSync({
    notify: false,
    port: 9000,
    server: {
      baseDir: ['.tmp', 'app'],
      routes: {
        '/bower_components': 'bower_components'
      }
    }
  });

  // watch for changes
  gulp.watch([
    'app/*.html',
    'app/scripts/**/*.js',
    'app/images/**/*',
    '.tmp/fonts/**/*'
  ]).on('change', reload);

  gulp.watch('app/styles/**/*.<%= includeSass ? 'scss' : 'css' %>', ['styles']);
  gulp.watch('app/fonts/**/*', ['fonts']);
  gulp.watch('bower.json', ['wiredep', 'fonts']);
});

gulp.task('serve:dist', function () {
  browserSync({
    notify: false,
    port: 9000,
    server: {
      baseDir: ['dist']
    }
  });
});

gulp.task('serve:test', function () {
  browserSync({
    notify: false,
    open: false,
    port: 9000,
    ui: false,
    server: {
      baseDir: 'test'
    }
  });

  gulp.watch([
    'test/spec/**/*.js',
  ]).on('change', reload);

  gulp.watch('test/spec/**/*.js', ['jshint:test']);
});

// inject bower components
gulp.task('wiredep', function () {
  var wiredep = require('wiredep').stream;
<% if (includeSass) { %>
  gulp.src('app/styles/*.scss')
    .pipe(wiredep({
      ignorePath: /^(\.\.\/)+/
    }))
    .pipe(gulp.dest('app/styles'));
<% } %>
  gulp.src('app/*.html')
    .pipe(wiredep({<% if (includeSass && includeBootstrap) { %>
      exclude: ['bootstrap-sass'],<% } %>
      ignorePath: /^(\.\.\/)*\.\./
    }))
    .pipe(gulp.dest('app'));
});

gulp.task('build', ['jshint', 'html', 'images', 'fonts', 'extras'], function () {
  return gulp.src('dist/**/*').pipe($.size({title: 'build', gzip: true}));
});

gulp.task('default', ['clean'], function () {
  gulp.start('build');
});
Gulpfile поддерживает следующее:
- Автопрефиксирование CSS: постпроцессор, позволяющий сделать CSS подходящим для всех браузеров.
- Скомпилируйте файлы Sass / .scss с помощью libsass
- Минимизирует все ваши .css и .js файлы и html-файлы
- Сопоставить скомпилированный CSS с исходными таблицами стилей с исходными картами
- Встроенный сервер предварительного просмотра с BrowserSync . BowerSync просматривает все файлы и обновляет подключенные браузеры, если в ваших файлах происходят изменения.
- Lint ваши сценарии через Jshint
- Оптимизация изображения
- Wire-up dependencies installed with Bower
- Inject Bower components to your HTML/SCSS files via the wiredep task.
- Use the .tmp directory mostly for compiling assets like SCSS files. It has precedence over app, so if you had an app/index.html template compiling to .tmp/index.html, your application would point to .tmp/index.html, which is what we want.
For more information on what this generator can do for you, take a look at the ‘gulp-plugins’ used in our package.json in the next section. As you might have noticed, gulp plugins (the ones that begin with gulp-) don’t have to be required. They are automatically picked up by gulp-load-plugin and available through the $ variable.
_package.json
Create the /generator-myapp/generators/app/templates/_package.json containing:
{
  "private": true,
  "engines": {
  "node": ">=0.12.0"
  },
  "devDependencies": {
  "autoprefixer-core": "^5.1.8",
  "browser-sync": "^2.2.1",
  "del": "^1.1.1",
  "gulp": "^3.8.11",
  "gulp-cache": "^0.2.8",
  "gulp-csso": "^1.0.0",
  "gulp-if": "^1.2.5",
  "gulp-imagemin": "^2.2.1",
  "gulp-jshint": "^1.9.2",
  "gulp-load-plugins": "^0.8.1",
  "gulp-minify-html": "^1.0.0",
  "gulp-postcss": "^5.0.0",<% if (includeSass) { %>
  "gulp-sass": "^2.0.0",<% } %>
  "gulp-size": "^1.2.1",
  "gulp-sourcemaps": "^1.5.0",
  "gulp-uglify": "^1.1.0",
  "gulp-useref": "^1.1.1",
  "jshint-stylish": "^1.0.1",
  "main-bower-files": "^2.5.0",
  "opn": "^1.0.1",
  "wiredep": "^2.2.2"
  }
}
Bowerrc
I use Bower as the the web package manager. The default place Bower will install its dependencies is./bower-components.
Create the /generator-myapp/generators/app/templates/bowerrc containing:
{
  "directory": "bower_components"
}
Bower.json
Packages are defined by a manifest file bower.json.
Create the /generator-myapp/generators/app/templates/bower.json containing:
{
  "name": "package",
  "version": "0.0.0",
  "dependencies": {}
}
Gitignore
Create the /generator-myapp/generators/app/templates/gitignore containing:
node_modules
dist
.tmp
.sass-cache
bower_components
test/bower_components
Gitattributes
Create the /generator-myapp/generators/app/templates/gitattributes containing:
* text=autoJshintrc
I use jshint to enable warnings in the Javascript.
Create the /generator-myapp/generators/app/templates/jshintrc containing:
{
  "browser": true,
  "node": true,
  "esnext": true,
  "bitwise": true,
  "camelcase": true,
  "curly": true,
  "eqeqeq": true,
  "immed": true,
  "indent": 2,
  "latedef": true,
  "newcap": true,
  "noarg": true,
  "quotmark": "single",
  "undef": true,
  "unused": true,
  "strict": true,
  "angular": true
}
Index.html
I want to define a single page for my scaffolding. I use EJS-styled placeholders (<% … %>) in this template file, which will be filled in by our Yeoman-generator at runtime. On the other hand I have inserted placeholders in the index.html for injecting Bower dependencies using the wiredep-plugin. These placeholders have the following syntax:
<html>
<head>
<!-- bower:css -->
<!-- endbower -->
</head>
<body>
<!-- bower:js -->
<!-- endbower -->
</body>
</html>
Create the /generator-myapp/generators/app/templates/index.html containing:
<!doctype html>
<html<% if (includeModernizr) { %> class="no-js"<% } %> lang="">
  <head>
  <meta charset="utf-8">
  <meta name="description" content="">
  <meta name="viewport" content="width=device-width, initial-scale=1">
  <title><%= appname %></title>
  <link rel="apple-touch-icon" href="apple-touch-icon.png">
  <!-- Place favicon.ico in the root directory -->
  <!-- build:css styles/vendor.css -->
  <!-- bower:css -->
  <!-- endbower -->
  <!-- endbuild -->
  <!-- build:css styles/main.css -->
  <link rel="stylesheet" href="styles/main.css">
  <!-- endbuild -->
  <% if (includeModernizr) { %>
  <!-- build:js scripts/vendor/modernizr.js -->
  <script src="/bower_components/modernizr/modernizr.js"></script>
  <!-- endbuild --><% } %>
  </head>
  <body>
  <!--[if lt IE 10]>
  <p class="browserupgrade">You are using an <strong>outdated</strong> browser. Please <a href="http://browsehappy.com/">upgrade your browser</a> to improve your experience.</p>
  <![endif]-->
  <% if (includeBootstrap) { %>
  <div class="container">
  <div class="header">
  <ul class="nav nav-pills pull-right">
  <li class="active"><a href="#">Home</a></li>
  <li><a href="#">About</a></li>
  <li><a href="#">Contact</a></li>
  </ul>
  <h3 class="text-muted"><%= appname %></h3>
  </div>
  <div class="jumbotron">
  <h1>Hello!</h1>
  <p class="lead">Gulp scaffolding app.</p>
  <p><a class="btn btn-lg btn-success" href="#">Button!</a></p>
  </div>
  <div class="row marketing">
   <div class="col-lg-6">
  <h4>HTML5 Boilerplate</h4>
  <p>HTML5 Boilerplate is a professional front-end template for building fast, robust, and adaptable web apps or sites.</p>
  <% if (includeAngular) { %>
   <h4>AngularJS</h4>
    <p>You have AngujarJS</p>
  <% } %>
   <% if (includeJQuery) { %>
    <h4>JQuery</h4>
    <p>You have JQuery</p>
   <% } %>
  <% if (includeSass) { %>
  <h4>Sass</h4>
  <p>Sass is the most mature, stable, and powerful professional grade CSS extension language in the world.</p>
  <% } %>
  <h4>Bootstrap</h4>
  <p>Sleek, intuitive, and powerful mobile first front-end framework for faster and easier web development.</p><% if (includeModernizr) { %>
  <h4>Modernizr</h4>
  <p>Modernizr is an open-source JavaScript library that helps you build the next generation of HTML5 and CSS3-powered websites.</p>
  <% } %>
  </div>
  </div>
  <div class="footer">
  <p>Footer placeholder</p>
  </div>
  </div>
  <% } else { %>
  <div class="hero-unit">
  <h1>Hello!</h1>
  <p>You now have</p>
  <ul>
  <% if (includeAngular) { %>
    <li>AngujarJS</li>
   <% } %>

   <% if (includeJQuery) { %>
    <li>JQuery</li>
   <% } %>
  <li>HTML5 Boilerplate</li><% if (includeSass) { %>
  <li>Sass</li><% } %><% if (includeModernizr) { %>
  <li>Modernizr</li><% } %>
  </ul>
  </div>
  <% } %>
  <!-- Google Analytics: change UA-XXXXX-X to be your site's ID. -->
  <script>
  (function(b,o,i,l,e,r){b.GoogleAnalyticsObject=l;b[l]||(b[l]=
  function(){(b[l].q=b[l].q||[]).push(arguments)});b[l].l=+new Date;
  e=o.createElement(i);r=o.getElementsByTagName(i)[0];
  e.src='https://www.google-analytics.com/analytics.js';
  r.parentNode.insertBefore(e,r)}(window,document,'script','ga'));
  ga('create','UA-XXXXX-X');ga('send','pageview');
  </script>
  <!-- build:js scripts/vendor.js -->
  <!-- bower:js -->
  <!-- endbower -->
  <!-- endbuild -->
  </body>
</html>
Main.css
I need to define default styling.
Create the /generator-myapp/generators/app/templates/main.css containing:
<% if (includeBootstrap) { %>.browserupgrade {
  margin: 0.2em 0;
  background: #ccc;
  color: #000;
  padding: 0.2em 0;
}
/* Space out content a bit */
body {
  padding-top: 20px;
  padding-bottom: 20px;
}
/* Everything but the jumbotron gets side spacing for mobile first views */
.header,
.marketing,
.footer {
  padding-left: 15px;
  padding-right: 15px;
}
/* Custom page header */
.header {
  border-bottom: 1px solid #e5e5e5;
}
/* Make the masthead heading the same height as the navigation */
.header h3 {
  margin-top: 0;
  margin-bottom: 0;
  line-height: 40px;
  padding-bottom: 19px;
}
/* Custom page footer */
.footer {
  padding-top: 19px;
  color: #777;
  border-top: 1px solid #e5e5e5;
}
.container-narrow > hr {
  margin: 30px 0;
}
/* Main marketing message and sign up button */
.jumbotron {
  text-align: center;
  border-bottom: 1px solid #e5e5e5;
}
.jumbotron .btn {
  font-size: 21px;
  padding: 14px 24px;
}
/* Supporting marketing content */
.marketing {
  margin: 40px 0;
}
.marketing p + h4 {
  margin-top: 28px;
}
/* Responsive: Portrait tablets and up */
@media screen and (min-width: 768px) {
  .container {
  max-width: 730px;
  }
  /* Remove the padding we set earlier */
  .header,
  .marketing,
  .footer {
  padding-left: 0;
  padding-right: 0;
  }
  /* Space out the masthead */
  .header {
  margin-bottom: 30px;
  }
  /* Remove the bottom border on the jumbotron for visual effect */
  .jumbotron {
  border-bottom: 0;
  }
}<% } else { %>body {
  background: #fafafa;
  font-family: "Helvetica Neue", Helvetica, Arial, sans-serif;
  color: #333;
}
.hero-unit {
  margin: 50px auto 0 auto;
  width: 300px;
  font-size: 18px;
  font-weight: 200;
  line-height: 30px;
  background-color: #eee;
  border-radius: 6px;
  padding: 60px;
}
.hero-unit h1 {
  font-size: 60px;
  line-height: 1;
  letter-spacing: -1px;
}
.browserupgrade {
  margin: 0.2em 0;
  background: #ccc;
  color: #000;
  padding: 0.2em 0;
}<% } %>
Main.scss
When I want to support SASS, I need a file containing scss for my styling.
Create the /generator-myapp/generators/app/templates/main.scss containing:
<% if (includeBootstrap) { %>$icon-font-path: '../fonts/';
// bower:scss
// endbower
.browserupgrade {
  margin: 0.2em 0;
  background: #ccc;
  color: #000;
  padding: 0.2em 0;
}
/* Space out content a bit */
body {
  padding-top: 20px;
  padding-bottom: 20px;
}
/* Everything but the jumbotron gets side spacing for mobile first views */
.header,
.marketing,
.footer {
  padding-left: 15px;
  padding-right: 15px;
}
/* Custom page header */
.header {
  border-bottom: 1px solid #e5e5e5;
  /* Make the masthead heading the same height as the navigation */
  h3 {
  margin-top: 0;
  margin-bottom: 0;
  line-height: 40px;
  padding-bottom: 19px;
  }
}
/* Custom page footer */
.footer {
  padding-top: 19px;
  color: #777;
  border-top: 1px solid #e5e5e5;
}
.container-narrow > hr {
  margin: 30px 0;
}
/* Main marketing message and sign up button */
.jumbotron {
  text-align: center;
  border-bottom: 1px solid #e5e5e5;
  .btn {
  font-size: 21px;
  padding: 14px 24px;
  }
}
/* Supporting marketing content */
.marketing {
  margin: 40px 0;
  p + h4 {
  margin-top: 28px;
  }
}
/* Responsive: Portrait tablets and up */
@media screen and (min-width: 768px) {
  .container {
  max-width: 730px;
  }
  /* Remove the padding we set earlier */
  .header,
  .marketing,
  .footer {
  padding-left: 0;
  padding-right: 0;
  }
  /* Space out the masthead */
  .header {
  margin-bottom: 30px;
  }
  /* Remove the bottom border on the jumbotron for visual effect */
  .jumbotron {
  border-bottom: 0;
  }
}<% } else { %>// bower:scss
// endbower
body {
  background: #fafafa;
  font-family: 'Helvetica Neue', Helvetica, Arial, sans-serif;
  color: #333;
}
.hero-unit {
  margin: 50px auto 0 auto;
  width: 300px;
  font-size: 18px;
  font-weight: 200;
  line-height: 30px;
  background-color: #eee;
  border-radius: 6px;
  padding: 60px;
  h1 {
  font-size: 60px;
  line-height: 1;
  letter-spacing: -1px;
  }
}
.browserupgrade {
  margin: 0.2em 0;
  background: #ccc;
  color: #000;
  padding: 0.2em 0;
}<% } %>
Main.js
Create the /generator-myapp/generators/app/templates/main.js containing:
/* jshint devel:true */
console.log('Hello!');
Robot.txt
Create an empty /generator-myapp/generators/app/templates/robot.txt
6. Write the generator specific files
In this section I finally parse and copy the templates from ‘/generator-myapp/generators/app/templates/’ to the outputfolder. The outputfolder is the folder where the user want to generate his scaffolding.
These actions are performed in the the ‘writing method’ in the index.js file. The index.js should contain the following:
var MyappGenerator = yeoman.generators.Base.extend({
writing: {
    gulpfile: function () {
      this.template('gulpfile.js');
    },

    packageJSON: function () {
      this.template('_package.json', 'package.json');
    },

    git: function () {
   this.fs.copy(
        this.templatePath('gitignore'),
        this.destinationPath('.gitignore')
      );
  this.fs.copy(
        this.templatePath('gitattributes'),
        this.destinationPath('.gitattributes')
      );
    },

    bower: function () {
      var bower = {
        name: this._.slugify(this.appname),
        private: true,
        dependencies: {}
      };

      if (this.includeBootstrap) {
        var bs = 'bootstrap' + (this.includeSass ? '-sass' : '');
        bower.dependencies[bs] = '~3.3.1';
      }

      if (this.includeModernizr) {
        bower.dependencies.modernizr = '~2.8.1';
      }

  if (this.includeAngular) {
    bower.dependencies.angular = '~1.3.15';
  }

  if (this.includeJQuery) {
    bower.dependencies.jquery = '~2.1.1';
  }

    this.fs.copy(
        this.templatePath('bowerrc'),
        this.destinationPath('.bowerrc')
      );
      this.write('bower.json', JSON.stringify(bower, null, 2));
    },

    jshint: function () {
      this.fs.copy(
        this.templatePath('jshintrc'),
        this.destinationPath('.jshintrc')
      );
    },


    h5bp: function () {
    this.fs.copy(
        this.templatePath('favicon.ico'),
        this.destinationPath('app/favicon.ico')
      );
  this.fs.copy(
        this.templatePath('apple-touch-icon.png'),
        this.destinationPath('app/apple-touch-icon.png')
      );
  this.fs.copy(
        this.templatePath('robots.txt'),
        this.destinationPath('app/robots.txt')
      );
    },

    mainStylesheet: function () {
      var css = 'main';

      if (this.includeSass) {
        css += '.scss';
      } else {
        css += '.css';
      }

  this.copy(css, 'app/styles/' + css);
    },

    writeIndex: function () {
      this.indexFile = this.src.read('index.html');
      this.indexFile = this.engine(this.indexFile, this);

      // wire Bootstrap plugins
      if (this.includeBootstrap) {
        var bs = '/bower_components/';

        if (this.includeSass) {
          bs += 'bootstrap-sass/assets/javascripts/bootstrap/';
        } else {
          bs += 'bootstrap/js/';
        }

        this.indexFile = this.appendScripts(this.indexFile, 'scripts/plugins.js', [
          bs + 'affix.js',
          bs + 'alert.js',
          bs + 'dropdown.js',
          bs + 'tooltip.js',
          bs + 'modal.js',
          bs + 'transition.js',
          bs + 'button.js',
          bs + 'popover.js',
          bs + 'carousel.js',
          bs + 'scrollspy.js',
          bs + 'collapse.js',
          bs + 'tab.js'
        ]);
      }

      this.indexFile = this.appendFiles({
        html: this.indexFile,
        fileType: 'js',
        optimizedPath: 'scripts/main.js',
        sourceFileList: ['scripts/main.js']
      });

      this.write('app/index.html', this.indexFile);
    },

    app: function () {

    this.copy('main.js', 'app/scripts/main.js');
    }
  },
This ‘writing’ method supports the following:
- gulpfile: parse the gulpfile.js and copy it to the outputfolder
- packageJSON : copy package.json to the outputfolder
- bower: add dependencies to the bower.json and copy it to the outputfolder
- mainStylesheet : copy the desired stylesheet
- writeIndex: wire the bootstrapplugins and the main.js at the end of the index.html.
- app: copy the main.js file
7. Install npm and bower
Once you’ve run your generators, you’ll often want to run npm and Bower to install any additional dependencies your generators require. In our generator (index.js) the installation of the dependencies should be defined in the install method:
install: function () {
    var howToInstall =
      '\nAfter running ' +
      chalk.yellow.bold('npm install & bower install') +
      ', inject your' +
      '\nfront end dependencies by running ' +
      chalk.yellow.bold('gulp wiredep') +
      '.';

    if (this.options['skip-install']) {
      this.log(howToInstall);
      return;
    }

    this.installDependencies({
      skipMessage: this.options['skip-install-message'],
      skipInstall: this.options['skip-install']
    });

    this.on('end', function () {
      var bowerJson = this.dest.readJSON('bower.json');

      // wire Bower packages to .html
      wiredep({
        bowerJson: bowerJson,
        directory: 'bower_components',
        exclude: ['bootstrap-sass', 'bootstrap.js'],
        ignorePath: /^(\.\.\/)*\.\./,
        src: 'app/index.html'
      });

      if (this.includeSass) {
        // wire Bower packages to .scss
        wiredep({
          bowerJson: bowerJson,
          directory: 'bower_components',
          ignorePath: /^(\.\.\/)+/,
          src: 'app/styles/*.scss'
        });
      }

      // ideally we should use composeWith, but we're invoking it here
      // because generator-mocha is changing the working directory
      // https://github.com/yeoman/generator-mocha/issues/28
      this.invoke(this.options['test-framework'], {
        options: {
          'skip-message': this.options['skip-install-message'],
          'skip-install': this.options['skip-install']
        }
      });
    }.bind(this));
  }
This install method supports the following:
- call installDependencies() to run both npm and Bower
- after the installation, I use the ‘end-queue’, to wire the Bower packages in the index.html en main.scss.
- and last but not least I install the desired test-framework. The default is the mocha-testframework.
8. Scaffold your app
After all these work, run this command in your generators root directory (the root folder is where you can find the:.yo-rc.json).
npm link
Make a new folder on your filesystem and scaffold your very own web app:
mkdir testmyapp
cd testmyapp
yo myapp
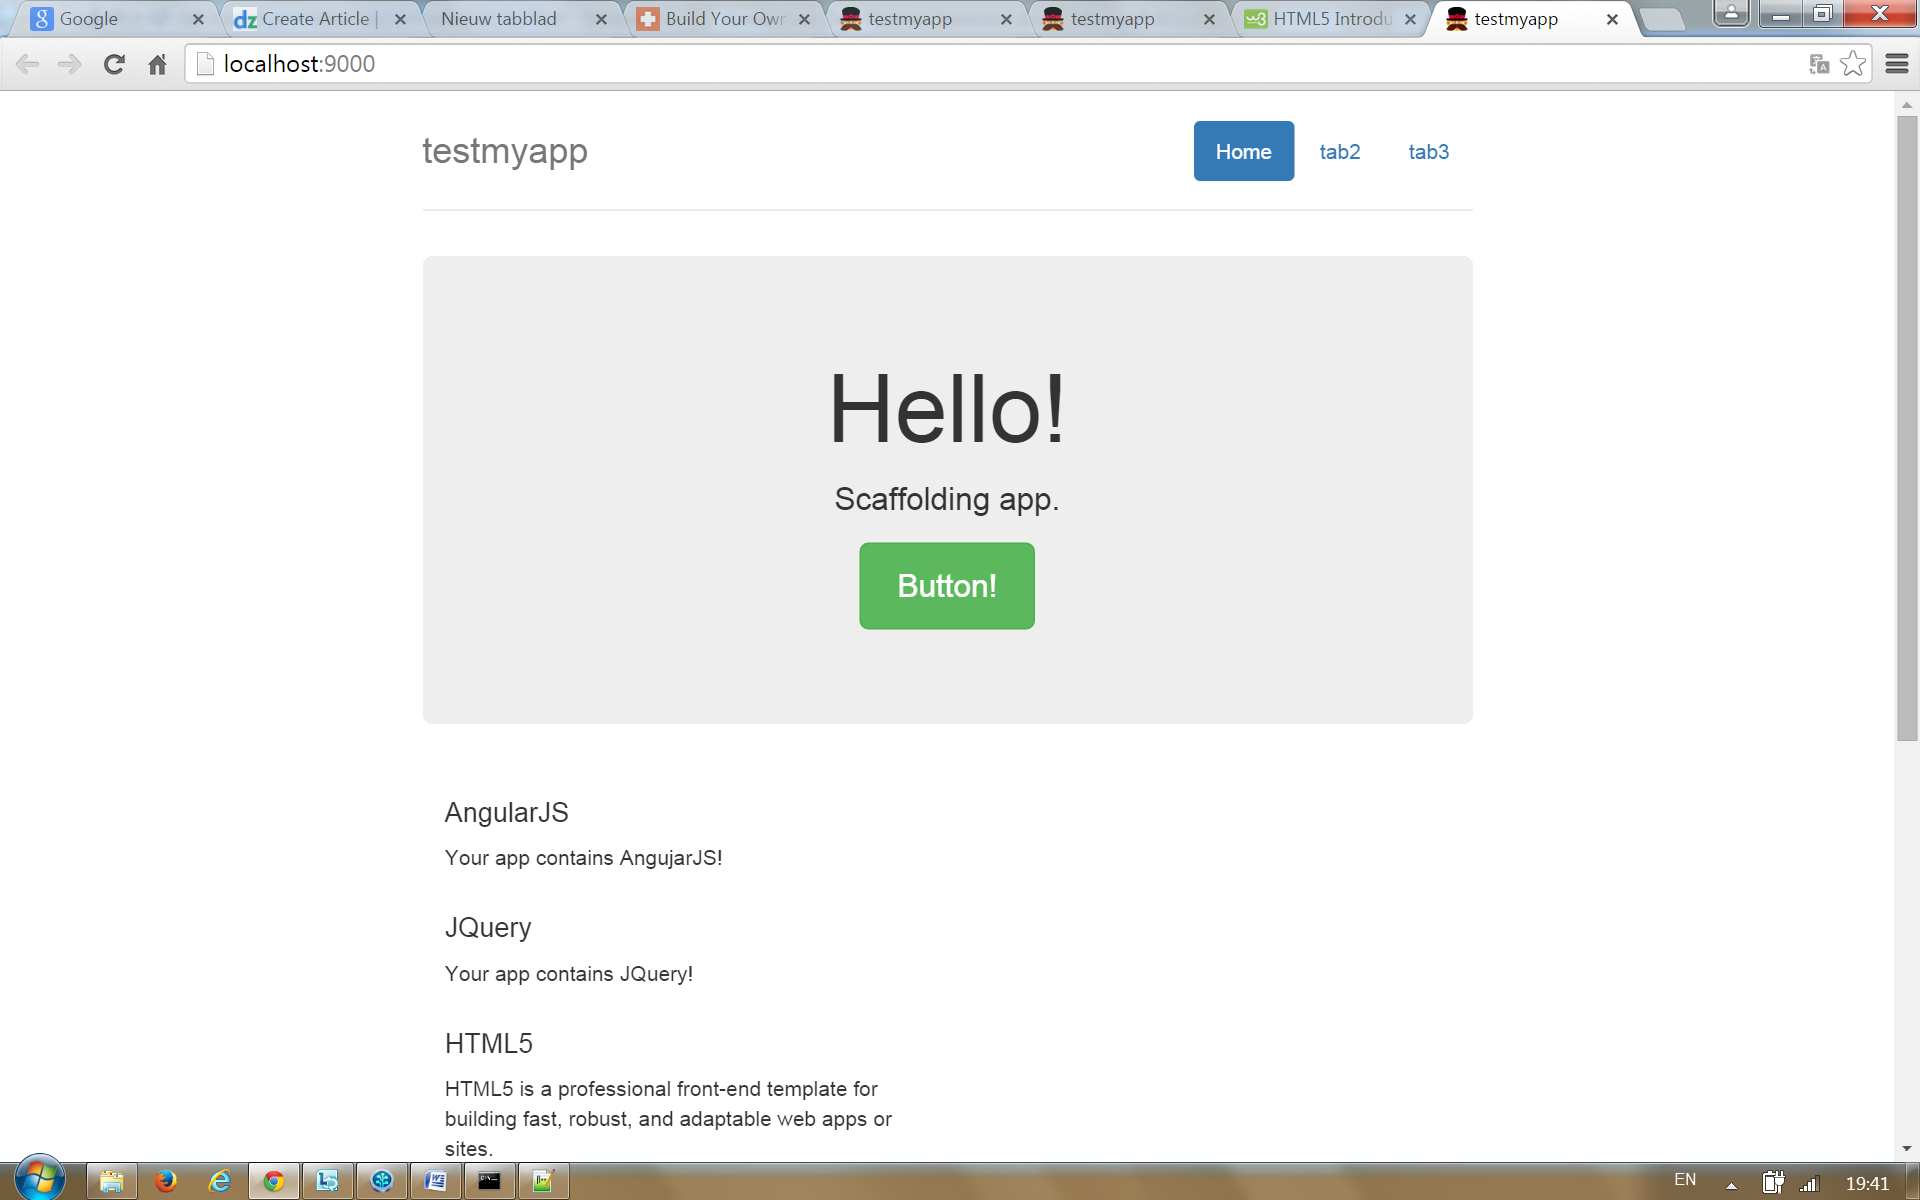
A new scaffolding will be generated in the outputfolder: testmyapp and the dependencies are installed.
To start developing, run:
npm install -g gulp
gulp serve
This will fire up a local web server, open http://localhost:9000in your default browse. The browser reloaded automatically when you changes one of your html/js//css-files.
To make a production-ready build of the app, run:
gulp
9. Unittest
To test your app, run:
gulp serve:test
Conclusion
In this article, we covered a lot of the common features but there are still more features to check out. There is a bit of boilerplate required when building a generator, but you have to build it once and then you’re able to use it throughout all your applications.
Yeoman is a great tool designed for front-end web developers. It helps you kick-start new projects and is a very powerful addition to every front-end developer’s arsenal.
This is all about building your own Yeoman generator.
Cheerz,
Peter Eijgermans
I committed the whole project to github or here .
Related topics