Устали от старомодных анимированных рождественских открыток, в которых Санта-Клаус смеется, а в небе летают сани с кучей деревьев и сверкающими огнями?
В этом году у тебя нет оправданий. Я собираюсь показать вам, как создать виртуальную клавиатуру, которая играет на Jingle Bells. Вы даже сможете расширить концепцию и добавить больше песен и нот на пианино.
Для этого я буду использовать комбинацию Tweenlite , Flex SDK , Flash IDE и Flash Develop .
Шаг 1: Новый файл
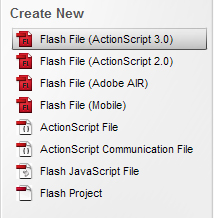
Запустите Adobe Flash и создайте файл ActionScript 3 Flash.
Шаг 2: Свойства
Откройте свойства и установите FPS равным 30, а размер сцены — 600 x 380 пикселей.

Шаг 3: Слой 1
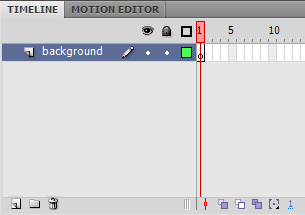
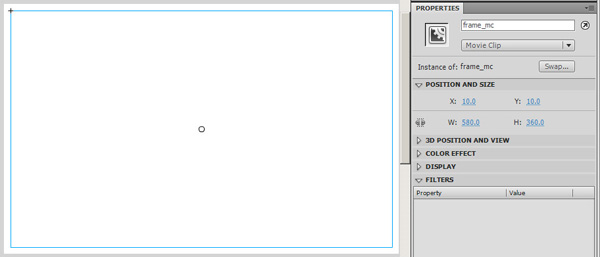
Переименуйте слой 1 как «фон» и создайте белый прямоугольник размером 580×360. Преобразуйте его в символ мувиклипа с именем frame_mc и установите его положение в x: 10 y: 10.
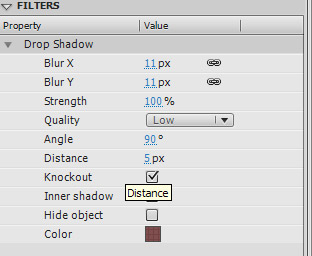
Шаг 4: тень
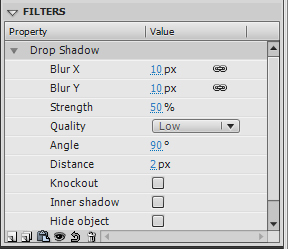
Добавьте фильтр тени со следующими параметрами:
Шаг 5: Уровень клавиатуры
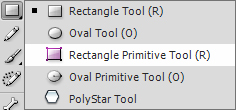
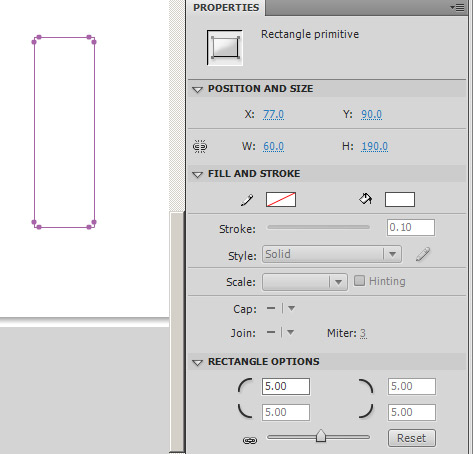
Добавьте новый слой под названием «клавиатура», создайте примитивный прямоугольник 60×190 с радиусом угла 5 пикселей и без обводки. Сделайте его символом мувиклипа и назовите его «keybase_mc».
Шаг 6: Отражение и свечение
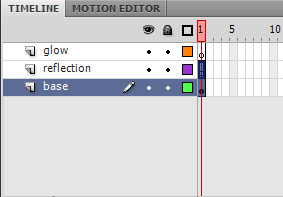
Нажмите F8 и создайте новый мувиклип под названием «key_mc». Создайте еще два слоя внутри key_mc (помимо уже существующего с keybase_mc). Назовите их: «отражение» и «свечение». Скопируйте рамку во вновь созданные слои.
Шаг 7: свечение
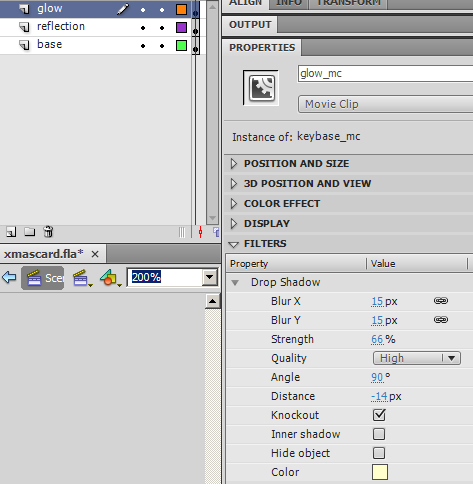
ПРИМЕЧАНИЕ: я изменил цвета frame_mc на некоторое время, чтобы я мог видеть изменения на клавишах. Выберите мувиклип в слое свечения, назовите его «glow_mc», откройте фильтры и отредактируйте их в соответствии с изображением ниже:
Шаг 8: refle_mc
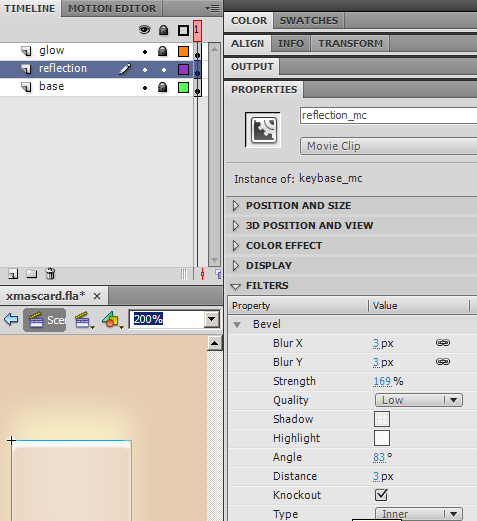
Выберите мувиклип в слое отражения, назовите его «mirror_mc», откройте фильтры и отредактируйте их в соответствии с изображением ниже:
Шаг 9: base_mc
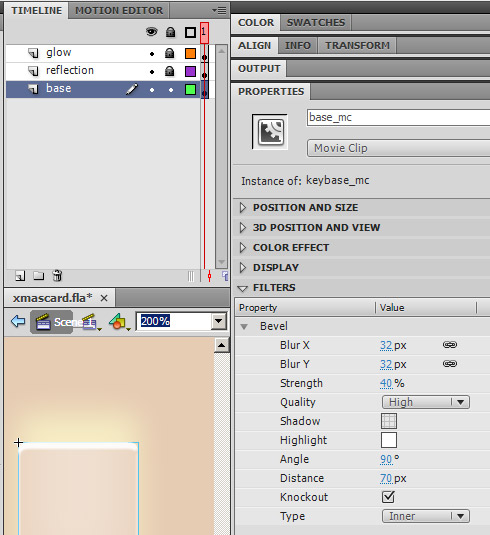
Теперь выберите мувиклип в базовом слое, назовите его «base_mc», откройте фильтры и отредактируйте их в соответствии с изображением ниже:
Шаг 10: Ключ
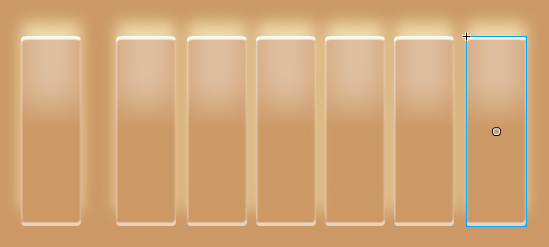
Скопируйте и вставьте ключ, пока не получите 7 экземпляров. Расположите их равномерно по всей сцене.
Шаг 11: Выровняйте
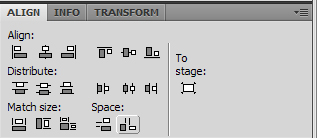
Откройте инструмент выравнивания и щелкните значок «горизонтальный интервал».
Шаг 12: Примечания

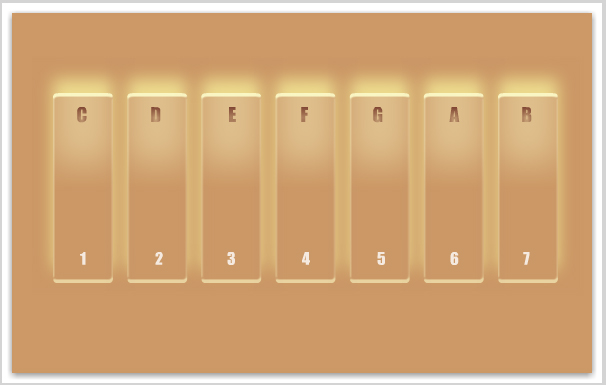
Создайте новый слой, назовите его «заметки». Затем запишите CDEFGAB на клавишах, добавьте текст в новый мувиклип. Откройте фильтры мувиклипа и отредактируйте их, как показано на рисунке ниже:
Шаг 13: Числа
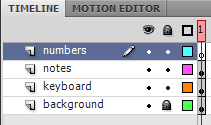
Создайте новый слой, назовите его «номера». Напишите числа от 1 до 7, это будут цифры, которые вы нажмете на клавиатуре, чтобы выделить клавишу ecard.
Шаг 14: Flex SDK Path
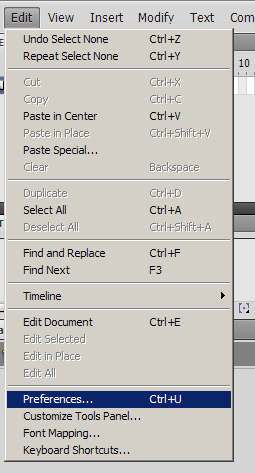
Перейдите в меню «Редактирование»> «Установки»> «ActionScript»> «Параметры ActionScript 3.0» и найдите путь к Flex SDK (он понадобится вам для встраивания файлов непосредственно в код).
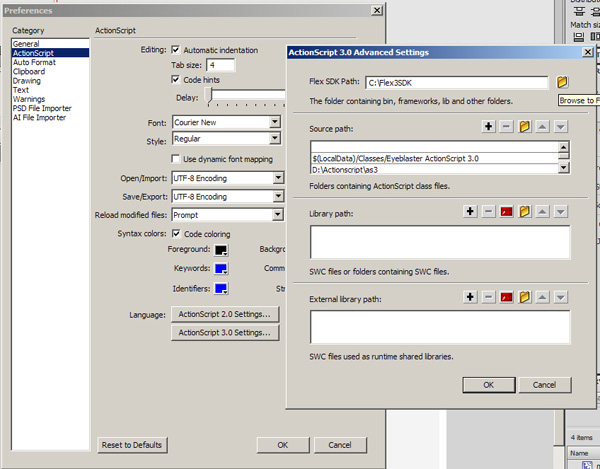
Шаг 15: Разработка Flash
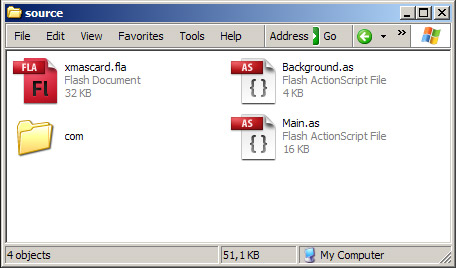
Откройте Flash Develop (я просто использую это, потому что он мне нравится гораздо больше, чем обычный редактор ActionScript из Flash IDE при написании пакетов) и создаю 2 пустых файла as3. Назовите их «Main.as» и «Background.as», сохраните их в той же папке, что и ваш .fla.
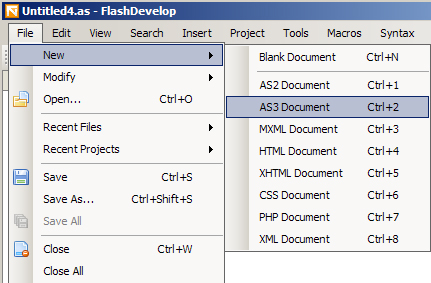
Шаг 16: Класс документа
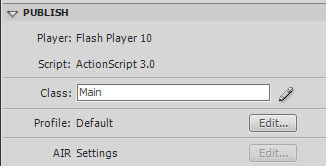
Внутри Flash IDE установите Main.as в качестве класса Document.
Шаг 17: Кнопка автозапуска
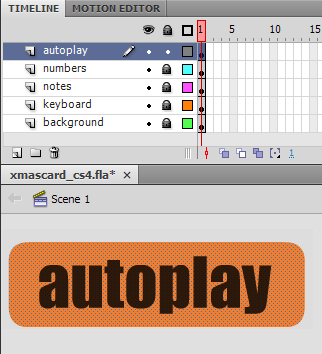
Создайте мувиклип с автовоспроизведением и назовите его «autoplay_mc». Это будет кнопка автозапуска.
Шаг 18: Снежинки
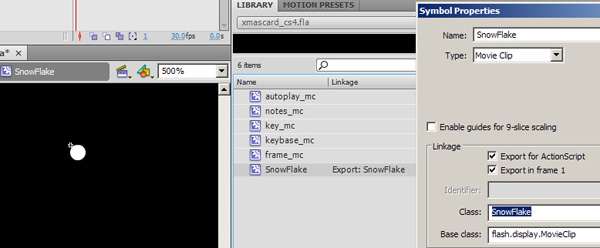
Чтобы создать падающие снежинки, создайте новый мувиклип, нарисуйте маленький белый кружок внутри и добавьте идентификатор связи «SnowFlake».
Шаг 19: Main.as
Во Flash Develop откройте Main.as, определите класс Main, расширяющий мувиклип, и создайте функцию с именем Main.
Начните с импорта этих классов в ваш пакет:
|
01
02
03
04
05
06
07
08
09
10
11
12
|
import flash.display.MovieClip;
import flash.events.Event;
import flash.events.MouseEvent;
import flash.events.TimerEvent;
import flash.display.StageScaleMode;
import flash.events.KeyboardEvent;
import flash.utils.Timer;
import com.greensock.TweenLite;
import com.greensock.easing.*;
import Background;
import Snow;
import flash.media.Sound;
|
Шаг 20: переменные
Внутри вашего класса определите эти переменные:
|
01
02
03
04
05
06
07
08
09
10
11
12
13
14
15
16
17
18
19
20
21
22
23
24
25
26
27
28
29
30
31
32
33
34
35
36
37
38
39
40
41
42
43
44
45
46
47
48
49
50
51
52
53
54
55
56
57
58
59
60
|
//this will be our background
private var _background:Background;
//this will be our snow storm
private var snow:Snow;
//->notes
//Embeding this way requires FLEX SDK -> alternative method is to add these sounds to your library and add a linkage ID to them.
[Embed(source=»assets/A.mp3″)]
private var A:Class;
private var a:Sound = new A() as Sound;
[Embed(source=»assets/B.mp3″)]
private var B:Class;
private var b:Sound = new B() as Sound;
[Embed(source=»assets/C.mp3″)]
private var C:Class;
private var c:Sound = new C() as Sound;
[Embed(source=»assets/D.mp3″)]
private var D:Class;
private var d:Sound = new D() as Sound;
[Embed(source = «assets/E.mp3»)]
private var E:Class;
private var e:Sound = new E() as Sound;
[Embed(source=»assets/F.mp3″)]
private var F:Class;
private var f:Sound = new F() as Sound;
[Embed(source=»assets/G.mp3″)]
private var G:Class;
private var g:Sound = new G() as Sound;
//Storing the notes in an array will make it easier to link to the keyboard
private var notes:Array = [c,d,e,f,g,a,b]
//Note sequence for the music
private var noteSequence:Array = [f, f, f,
f, f, f,
f, a, d, e, f,
g, g, g,
g, g, e, e,
d, b, a, f, d, c]
//Current note that is playing
private var curnote:Number = 0
//Sequence of delay that the music needs to have between the notes
private var noteDelay:Array = [100, 100 , 300,
100, 100 ,300,
100, 100, 100,100,200,
100, 100, 200,
90, 100, 90,100,
100, 120, 120, 120, 120, 300]
//Timer to play the music
private var tunetimer:Timer = new Timer(noteDelay[0]);
|
Шаг 21: Главный ()
Основная функция
|
1
2
3
4
|
//Main function waits for the the maintimeline to be added to stage
public function Main():void{
addEventListener(Event.ADDED_TO_STAGE, addedToStage);
}
|
Шаг 22: Инициализация
После добавления на сцену мы инициализируем фон и виртуальную клавиатуру:
|
1
2
3
4
5
6
|
//when added to stage we can set a stage scale mode, the background and the start the virtual piano
private function addedToStage(e:Event):void {
stage.scaleMode = StageScaleMode.NO_SCALE;
addBackground();
startMachine();
}
|
Шаг 23: Фоновые эффекты
Давайте разберемся с движущимся фоном и снегом:
|
1
|
//adds the background private function addBackground():void { _background = new Background(150,150);
|
Шаг 24: Виртуальная клавиатура
Инициализация виртуальной клавиатуры
|
01
02
03
04
05
06
07
08
09
10
11
12
13
14
15
16
17
18
19
|
private function startMachine(e:MouseEvent = null):void {
//associates the keyboard events
stage.addEventListener(KeyboardEvent.KEY_DOWN, onkeyDown)
stage.addEventListener(KeyboardEvent.KEY_UP, onkeyUp)
//associates an autoplay method to the autoplay button
autoplay_mc.addEventListener(MouseEvent.CLICK, startAutoPlay);
autoplay_mc.buttonMode = true;
//associates the notes to the keys
var i:int = 0
while (i < 7) {
this[«key»+i].note = notes[i]
i++
}
//makes the highlight of the keys disappear
lowlightKeys();
}
|
Шаг 25: выделите
Нам нужно создать функцию для удаления подсветки с клавиш:
|
1
2
3
4
5
6
7
|
private function lowlightKeys() {
var i:int = 0
while (i < 7) {
TweenLite.to(this[«key» + i].glow_mc, 0.5,{alpha:0} );
i++
}
}
|
Шаг 26: Ключевые события
Теперь давайте обработаем события Key up и Key down:
|
01
02
03
04
05
06
07
08
09
10
11
12
13
14
15
16
17
18
19
20
21
22
23
24
25
26
27
28
29
30
31
32
33
34
35
36
37
38
39
40
41
42
43
44
45
46
47
48
49
50
51
52
53
54
55
56
|
private function onkeyDown(e:KeyboardEvent):void {
var i:int=0
switch(e.keyCode) {
case 49: //keycode for 1
i=0
break;
case 50: //keycode for 2
i=1
break;
case 51: //keycode for 3
i=2
break;
case 52: //keycode for 4
i=3
break;
case 53: //keycode for 5
i=4
break;
case 54: //keycode for 6
i=5
break;
case 55: //keycode for 7
i=6
break;
}
notes[i].play();
TweenLite.to(this[«key» + i].glow_mc, 0.5,{alpha:1} );
}
private function onkeyUp(e:KeyboardEvent):void {
var i:int=0
switch(e.keyCode) {
case 49:
i=0
break;
case 50:
i=1
break;
case 51:
i=2
break;
case 52:
i=3
break;
case 53:
i=4
break;
case 54:
i=5
break;
case 55:
i=6
break;
}
TweenLite.to(this[«key» + i].glow_mc, 0.5,{alpha:0} );
}
|
Шаг 27: Функции автозапуска
Как запустить и остановить автоигру
|
01
02
03
04
05
06
07
08
09
10
|
private function startAutoPlay(e:MouseEvent = null) {
curnote = 0;
tunetimer.delay = noteDelay[curnote] * 3 //this increases the delay set previously
tunetimer.addEventListener(TimerEvent.TIMER, autoPlayTune) //adds a listener to the timer event for everytime the timer is triggered
tunetimer.start() //starts the timer
}
private function stopAutoPlay(e:MouseEvent = null) {
tunetimer.stop() //stops timer
tunetimer.removeEventListener(TimerEvent.TIMER, autoPlayTune) //removes the event
}
|
Шаг 28: Обновление
Обновление виртуальной клавиатуры вместе с музыкой
|
01
02
03
04
05
06
07
08
09
10
11
12
13
14
15
|
private function updateMachine():void {
lowlightKeys();
var i:int = 0
while (i < 7) {
if (this[«key» + i].note == noteSequence[curnote]) {
TweenLite.to(this[«key» + i].glow_mc, 0.5,{alpha:1} );
}
i++
}
curnote++ //goes to next note
if (curnote > noteSequence.length) {
curnote = 0;
stopAutoPlay();
}
}
|
Шаг 29: Полный код
Вот полный код Main.as
|
1
|
package{ import flash.display.MovieClip;
|
Шаг 30: Фоновый класс
Теперь перейдем к фоновому классу. Начнем с импорта этих классов.
|
01
02
03
04
05
06
07
08
09
10
11
12
13
14
15
16
|
import flash.display.Shape;
import flash.events.Event;
import flash.display.Sprite;
import flash.display.MovieClip;
import flash.display.Bitmap;
import flash.display.BitmapData;
import flash.display.BlendMode;
import flash.geom.ColorTransform;
import flash.geom.Rectangle;
import flash.geom.Point;
import flash.geom.Matrix;
import flash.filters.ColorMatrixFilter;
import flash.display.GradientType;
import flash.display.Graphics;
import flash.display.InterpolationMethod;
import flash.display.SpreadMethod;
|
Шаг 31: Переменные
.. затем определение переменных:
|
01
02
03
04
05
06
07
08
09
10
11
12
13
14
15
16
17
18
19
20
21
22
23
24
25
|
//Noise
private var dir:Array
private var point:Point
private var bd:BitmapData;
private var bmp:Bitmap;
private var bdmultiply:BitmapData;
private var bms:Sprite;
private var rect:Rectangle
private var cmf:ColorMatrixFilter;
private var w:Number
private var h:Number
//Linear Gradient Fill
private var gshape:Shape
private var gmetrics:Rectangle
private var gmatrix:Matrix
private var gtype:String
private var gspread:String
private var ginterpolation:String
private var gcolours:Array
private var galphas:Array
private var gratios:Array
//Solid Fill
private var sshape:Shape
|
Шаг 32: Начальная функция
Вот начальная функция:
|
01
02
03
04
05
06
07
08
09
10
11
12
13
14
15
16
17
18
19
20
|
public function Background($width:Number=100, $height:Number=100)
{
w = $width
h = $height
rect = new Rectangle(0, 0, w, h);
point = new Point(0, 0);
dir = [new Point(1, 262), new Point(400, 262)];
//this one is just to give a solid background to the whole stage
initBackgroundSolid();
//this will control the bightness contrast and saturation of the noise
initColorMatrix();
//there will be two noise backgrounds this will initiate them
initBackgroundNoise();
//a gradient is added so we dont get noisiated.. (get it? too much noise gets you noisiated? haha…hmmm)
initBackgroundGradient();
}
|
Шаг 33: initColorMatrix ()
Эта функция будет контролировать яркость контраста и насыщенность шума, это очень мощный фильтр.
|
1
2
3
4
5
6
|
private function initColorMatrix():void {
cmf = new ColorMatrixFilter([2, 0, 0, 0, -20, //red
0, 2, 0, 0, -20, //green
0, 0, 2, 0, -20, //blue
0, 0, 0, 1, -20 ]);
}
|
Шаг 34: Сплошной цвет фона
Это только для того, чтобы дать солидный фон всей сцене.
|
1
2
3
4
5
6
7
|
private function initBackgroundSolid():void {
sshape = new Shape();
sshape.graphics.beginFill(0x170a02,1)
sshape.graphics.drawRect( 0, 0, w, h );
sshape.graphics.endFill();
addChild(sshape)
}
|
Шаг 35: Шумы
Шумы:
|
01
02
03
04
05
06
07
08
09
10
11
12
13
14
15
16
17
|
private function initBackgroundNoise():void {
//first noise
bd = new BitmapData(w, h, false, 0 );
bmp = new Bitmap(bd);
bmp.smoothing = true;
addChild(bmp);
//second noise that overlaps the first noise through an overlay blend mode
bdmultiply = new BitmapData(w, h, false, 0 );
bms = new Sprite();
bms.addChild(new Bitmap(bdmultiply))
addChild(bms)
bms.blendMode = «overlay»;
//renders the background so that the noise seems to be moving
addEventListener(Event.ENTER_FRAME, renderBG);
}
|
Шаг 36: Маска
Вот маска градиента:
|
01
02
03
04
05
06
07
08
09
10
11
12
13
14
15
16
17
18
19
20
21
22
23
24
|
private function initBackgroundGradient() {
//this is a basic gradient box with alpha and rotated 90º so that it starts from top-bottom instead of left-right
gshape = new Shape();
gmetrics = new Rectangle();
gmatrix = new Matrix();
gtype = GradientType.LINEAR;
gspread = SpreadMethod.PAD;
ginterpolation = InterpolationMethod.LINEAR_RGB;
gcolours = [ 0x170a02, 0x170a02 ];
galphas = [ 0, 1 ];
gratios = [ 0, 255 ];
gmatrix.createGradientBox(w, h,(Math.PI/180)*90 );
gshape.graphics.clear();
gshape.graphics.beginGradientFill(gtype, gcolours, galphas, gratios, gmatrix, gspread, ginterpolation );
gshape.graphics.drawRect( 0, 0, w, h );
gshape.graphics.endFill();
addChild(gshape)
}
|
Шаг 37: Рендеринг
Время рендера!
|
01
02
03
04
05
06
07
08
09
10
11
12
13
14
15
16
17
18
19
|
private function renderBG(event:Event):void {
//updates noise direction
dir[0].x-= 1.5
dir[0].y-= 0 //these are here for you to play with
dir[1].x-= 0 //these are here for you to play with
dir[1].y -= 0 //these are here for you to play with
//defines the first background bitmap to have a perlin noise
bd.perlinNoise(w, h, 2, 10, false, true, 7, true, dir);
//coloring time (play with these values)
bd.colorTransform(rect, new ColorTransform(1, 0.7, 0.5));
//aplies the brigthness contrast and saturation modifications made earlier
bd.applyFilter(bd, rect, point, cmf)
//the other perlin noise
bdmultiply.perlinNoise(w, h, 3, 21, false, true, 7, true, dir)
//the other perlin noise collors
bdmultiply.colorTransform(rect, new ColorTransform(1, 0.6, 0.4));
}
|
Шаг 38: Завершите Фоновый класс
Вот весь базовый класс:
|
001
002
003
004
005
006
007
008
009
010
011
012
013
014
015
016
017
018
019
020
021
022
023
024
025
026
027
028
029
030
031
032
033
034
035
036
037
038
039
040
041
042
043
044
045
046
047
048
049
050
051
052
053
054
055
056
057
058
059
060
061
062
063
064
065
066
067
068
069
070
071
072
073
074
075
076
077
078
079
080
081
082
083
084
085
086
087
088
089
090
091
092
093
094
095
096
097
098
099
100
101
102
103
104
105
106
107
108
109
110
111
112
113
114
115
116
117
118
119
120
121
122
123
124
125
126
127
128
|
package
{
import flash.display.Shape;
import flash.events.Event;
import flash.display.Sprite;
import flash.display.MovieClip;
import flash.display.Bitmap;
import flash.display.BitmapData;
import flash.display.BlendMode;
import flash.geom.ColorTransform;
import flash.geom.Rectangle;
import flash.geom.Point;
import flash.geom.Matrix;
import flash.filters.ColorMatrixFilter;
import flash.display.GradientType;
import flash.display.Graphics;
import flash.display.InterpolationMethod;
import flash.display.SpreadMethod;
public class Background extends MovieClip
{
private var dir:Array
private var point:Point
private var bd:BitmapData;
private var bmp:Bitmap;
private var bdmultiply:BitmapData;
private var bms:Sprite;
private var rect:Rectangle
private var cmf:ColorMatrixFilter;
private var w:Number
private var h:Number
private var gshape:Shape
private var gmetrics:Rectangle
private var gmatrix:Matrix
private var gtype:String
private var gspread:String
private var ginterpolation:String
private var gcolours:Array
private var galphas:Array
private var gratios:Array
private var sshape:Shape
public function Background($width:Number=100, $height:Number=100)
{
w = $width
h = $height
rect = new Rectangle(0, 0, w, h);
point = new Point(0, 0);
dir = [new Point(1, 262), new Point(400, 262)];
initBackgroundSolid();
initColorMatrix();
initBackgroundNoise();
initBackgroundGradient();
}
private function initColorMatrix():void {
cmf = new ColorMatrixFilter([2, 0, 0, 0, -20, //red
0, 2, 0, 0, -20, //green
0, 0, 2, 0, -20, //blue
0, 0, 0, 1, -20 ]);
}
private function initBackgroundSolid():void {
sshape = new Shape();
sshape.graphics.beginFill(0x170a02,1)
sshape.graphics.drawRect( 0, 0, w, h );
sshape.graphics.endFill();
addChild(sshape)
}
private function initBackgroundNoise():void {
bd = new BitmapData(w, h, false, 0 );
bmp = new Bitmap(bd);
bmp.smoothing = true;
addChild(bmp);
bdmultiply = new BitmapData(w, h, false, 0 );
bms = new Sprite();
bms.addChild(new Bitmap(bdmultiply))
addChild(bms)
bms.blendMode = «overlay»;
addEventListener(Event.ENTER_FRAME, renderBG);
}
private function initBackgroundGradient() {
gshape = new Shape();
gmetrics = new Rectangle();
gmatrix = new Matrix();
gtype = GradientType.LINEAR;
gspread = SpreadMethod.PAD;
ginterpolation = InterpolationMethod.LINEAR_RGB;
gcolours = [ 0x170a02, 0x170a02 ];
galphas = [ 0, 1 ];
gratios = [ 0, 255 ];
gmatrix.createGradientBox(w, h,(Math.PI/180)*90 );
gshape.graphics.clear();
gshape.graphics.beginGradientFill(gtype, gcolours, galphas, gratios, gmatrix, gspread, ginterpolation );
gshape.graphics.drawRect( 0, 0, w, h );
gshape.graphics.endFill();
addChild(gshape)
}
private function renderBG(event:Event):void {
dir[0].x-= 1.5
dir[0].y-= 0
dir[1].x-= 0
dir[1].y -= 0
bd.perlinNoise(w, h, 2, 10, false, true, 7, true, dir);
bd.colorTransform(rect, new ColorTransform(1, 0.7, 0.5));
bd.applyFilter(bd, rect, point, cmf)
bdmultiply.perlinNoise(w, h, 3, 21, false, true, 7, true, dir)
bdmultiply.colorTransform(rect, new ColorTransform(1, 0.6, 0.4));
}
}
}
|
Шаг 39: Снег
Класс Snow не мой, он был написан Троем Гарднером , я просто адаптировал его с временной шкалы к пакету, поэтому я не комментирую код. Создайте «Snow.as» и скопируйте этот код внутрь.
|
01
02
03
04
05
06
07
08
09
10
11
12
13
14
15
16
17
18
19
20
21
22
23
24
25
26
27
28
29
30
31
32
33
34
35
36
37
38
39
40
41
42
43
44
45
46
47
48
49
50
51
52
53
54
55
56
57
58
59
60
61
62
63
64
65
66
67
68
69
70
71
72
73
74
75
76
77
78
79
80
|
package
{
import flash.display.MovieClip;
import flash.events.Event;
import flash.utils.Dictionary;
public class Snow extends MovieClip
{
var snowflakes:Array = new Array();
var snowflakeProps:Dictionary= new Dictionary(true);
var max_snowsize:Number = .04;
// pixels
var snowflakesCnt:Number = 150;
var oheight:Number;
var owidth:Number;
public function Snow($width,$height):void {
owidth = $width;
oheight = $height;
// quantity
for (var i:int=0; i<snowflakesCnt; i++) {
var t:MovieClip = new SnowFlake();//
t.name = «snowflake»+i;
t.alpha = 20+Math.random()*60;
tx = -(owidth/2)+Math.random()*(1.5*owidth);
ty = -(oheight/2)+Math.random()*(1.5*oheight);
t.scaleX = t.scaleY=.5+Math.random()*(max_snowsize*10);
var o:Object = new Object();
ok = 1+Math.random()*2;
o.wind = -1.5+Math.random()*(1.4*3);
snowflakeProps[t] = o;
addChild(t);
snowflakes.push(t);
}
addEventListener(Event.ENTER_FRAME,snowFlakeMover)
}
private function shakeUp():void{
for (var i:int=0; i<snowflakes.length; i++) {
var t:MovieClip = snowflakes[i] as MovieClip;
tx = -(owidth/2)+Math.random()*(1.5*owidth);
ty = -(oheight/2)+Math.random()*(1.5*oheight);
}
}
private function snowFlakeMover(evt:Event):void {
var dO:MovieClip;
var o :Object;
if(visible && parent.visible){
for (var i:int = 0; i < snowflakes.length; i++) {
dO = snowflakes[i] as MovieClip;
o = snowflakeProps[dO];
dO.y += ok;
dO.x += o.wind;
if (dO.y>oheight+10) {
dO.y = -20;
}
if (dO.x>owidth+20) {
dO.x = -(owidth/2)+Math.random()*(1.5*owidth);
dO.y = -20;
} else if (dO.x<-20) {
dO.x= -(owidth/2)+Math.random()*(1.5*owidth);
dO.y = -20;
}
}
}
}
}
}
|
Вывод
Мои музыкальные навыки не самые лучшие, музыка может звучать немного странно. О, хорошо, с этим уроком вы теперь сможете создавать свои собственные песни с большим количеством нот и разных тонов :). Надеюсь, вам понравился этот урок, вы найдете комментированный код и обе версии cs4 и cs3 в zip-файле. Спасибо за прочтение!

