В этом уроке я рассмотрел, как использовать printf (), и этот урок настолько универсален, что работает для любого процессора / микроконтроллера. Эта гибкость объясняется тем, что я использую Processor Expert. В случае, если Processor Expert не должен использоваться, тогда необходимы некоторые настройки. Здесь я покажу, что нужно для printf()работы с платой FRDM-KL25Z. Для этого я использую UART0, подключенный к OpenSDA USB CDC .
Создание проекта
Я создаю новый голый проект. Здесь нет ничего особенного, кроме того, что нужно выбрать «UART»:
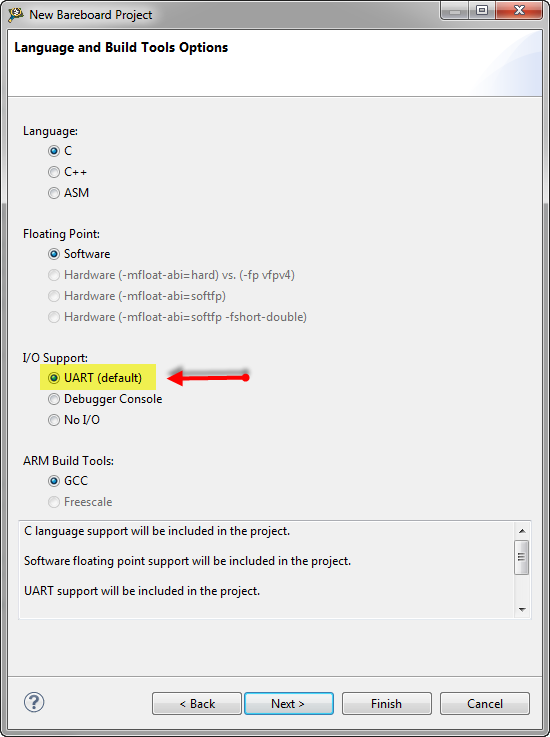
UART установлен для новых настроек проекта
Поддержка UART низкого уровня
Как объясняется в этом уроке I, мне нужна поддержка UART низкого уровня. CodeWarrior поставляется с необходимыми файлами для TWR-KL25Z в «\ MCU \ ARM_GCC_Support \ UART \ TWR-KL25Z128»:
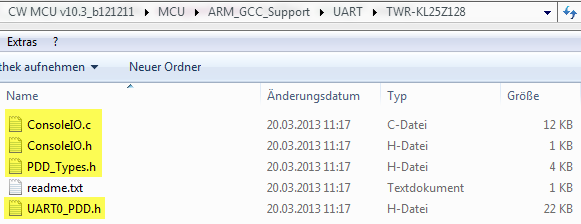
Файлы поддержки UART низкого уровня
Я копирую эти файлы в свой проект:
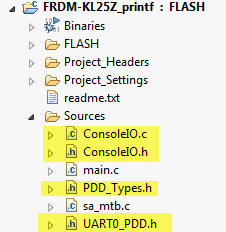
Скопированные файлы поддержки UART низкого уровня
TWR-KL25Z использует UART0 с PTA14 / PTA15, в то время как FRDM-KL25Z использует UART0, но PTA1 / PTA2. Поэтому мне нужно изменить настройки контактов.
Для этого я отключаю в ConsoleIO.c, в ConsoleIO_Init () настройки платы Tower и добавляю мои изменения для использования PTA1 / PTA2:
void ConsoleIO_Init()
{
    InitClock();

    /* SIM_SCGC4: UART0=1 */
    SIM_SCGC4 |= SIM_SCGC4_UART0_MASK;
#if 0 /* TWR version: PTA14, PTA15 */
    /* PORTA_PCR15: ISF=0,MUX=3 */
    PORTA_PCR15 = (uint32_t)((PORTA_PCR15 & (uint32_t)~(uint32_t)(
                 PORT_PCR_ISF_MASK |
                 PORT_PCR_MUX(0x04)
                )) | (uint32_t)(
                 PORT_PCR_MUX(0x03)
                ));
    /* PORTA_PCR14: ISF=0,MUX=3 */
    PORTA_PCR14 = (uint32_t)((PORTA_PCR14 & (uint32_t)~(uint32_t)(
                 PORT_PCR_ISF_MASK |
                 PORT_PCR_MUX(0x04)
                )) | (uint32_t)(
                 PORT_PCR_MUX(0x03)
                ));
#else /* FRDM-KL25Z: PTA1/PTA2 */
      /* PORTA_PCR1: ISF=0,MUX=2 */
      PORTA_PCR1 = (uint32_t)((PORTA_PCR1 & (uint32_t)~0x01000500UL) | (uint32_t)0x0200UL);
      /* PORTA_PCR2: ISF=0,MUX=2 */
      PORTA_PCR2 = (uint32_t)((PORTA_PCR2 & (uint32_t)~0x01000500UL) | (uint32_t)0x0200UL);
#endif
    UART0_PDD_EnableTransmitter(UART0_BASE_PTR, PDD_DISABLE); /* Disable transmitter. */
    UART0_PDD_EnableReceiver(UART0_BASE_PTR, PDD_DISABLE); /* Disable receiver. */
    /* UART0_C1: LOOPS=0,DOZEEN=0,RSRC=0,M=0,WAKE=0,ILT=0,PE=0,PT=0 */
    UART0_C1 = 0x00U;                    /*  Set the C1 register */
    /* UART0_C3: R8T9=0,R9T8=0,TXDIR=0,TXINV=0,ORIE=0,NEIE=0,FEIE=0,PEIE=0 */
    UART0_C3 = 0x00U;                    /*  Set the C3 register */
    /* UART0_S2: LBKDIF=0,RXEDGIF=0,MSBF=0,RXINV=0,RWUID=0,BRK13=0,LBKDE=0,RAF=0 */
    UART0_S2 = 0x00U;                    /*  Set the S2 register */
    UART0_PDD_SetClockSource(UART0_BASE_PTR, UART0_PDD_PLL_FLL_CLOCK);
    UART0_PDD_SetBaudRate(UART0_BASE_PTR, 313U); /* Set the baud rate register. */
    UART0_PDD_SetOversamplingRatio(UART0_BASE_PTR, 3U);
    UART0_PDD_EnableSamplingOnBothEdges(UART0_BASE_PTR, PDD_ENABLE);
    UART0_PDD_EnableTransmitter(UART0_BASE_PTR, PDD_ENABLE); /* Enable transmitter */
    UART0_PDD_EnableReceiver(UART0_BASE_PTR, PDD_ENABLE); /* Enable receiver */
}
To use different UART/port settings, the easiest way is to use a Processor Expert project as explained in this tutorial.
 To use different UART/port settings, the easiest way is to use a Processor Expert project as explained in
 Example Code
For testing, I print a ‘hello world’ from the main() in main.c:
/*
 * main implementation: use this 'C' sample to create your own application
 *
 */

#include "derivative.h" /* include peripheral declarations */
#include
#include "ConsoleIO.h"

int main(void)
{
    int counter = 0;

    ConsoleIO_Init();
    for(;;) {
        counter++;
        printf("Hello world!\r\n");
    }
    return 0;
}
 Do not forget to include the correct header files, and to call ConsoleIO_Init()!
That’s it! Build, download and hopefully you see the messages printed to the console  .
.
Project on GitHub
For reference, I have committed the CodeWarrior project and sources on GitHub here.
Happy Printing