В университете у нас есть несколько проектов с подключением к Интернету. Да, есть шумиха вокруг IoT, и, на мой взгляд, многие ложные представления о том, что это может или должно быть. Во всяком случае, для этих проектов во многих случаях используются платы Raspberry Pi , и я также использую плату модели R от Raspy. Я очень доволен Raspy, но я хотел изучить различные варианты, поэтому я заказал плату RIoT две недели назад. Когда я смотрел на нее в первый раз, я думал, что эта плата может быть лучше (хотя и больше), чем плата Raspberry Pi: больше USB, больше GPIO, карта micro-SD, больше вычислительной мощности:

Бунт Правления
Итак, на этой неделе вышел новый Raspberry Pi B + : больше USB, больше GPIO, но такая же вычислительная мощность, как у стандартной модели B.
Бунт Правления
Так что же это за бунт? Это плата с поддержкой Linux или Android, с процессором Freescale i.MX 6Solo (ARM A9 с тактовой частотой 1 ГГц), 1 ГБ оперативной памяти DDR3 и 4 ГБ встроенной флэш-памяти. Таким образом, по сравнению с Raspberry Pi (модель B), это намного больше лошадиных сил. Плата поставляется с 4 разъемами USB, Ethernet и USB, в то время как один USB предназначен для отладки (интересно с OpenSDA, но я не смог заставить его работать, и я видел другие сообщения, которые еще не поддерживаются). Хотя на этой доске много вещей, цена (~ 85 швейцарских франков) выше, чем цена на малину (~ 30 швейцарских франков) или BeagleBone Black (~ 65 швейцарских франков). Также размер платы намного больше (см. Этот пост ).
Начиная
Я не пишу подробное руководство в этом посте, так как уже есть несколько хороших источников. Вместо этого я указываю на эти другие учебники и добавляю свой опыт и комментарии.
Распаковка
Доска пришла в маленькой карточной коробке с маленькой карточкой для заметок, указывающей на www.riotboard.org . На этом сайте должны размещаться руководства, листы данных и так далее. Однако эта страница выглядела как портал для входа на страницу element14, что сбивало с толку. Я ожидал, что сайт .org будет содержать всю информацию, но на самом деле это все элемент14? Рядом с платой есть кабель mini-USB. Но нет блока питания и кабеля HDMI для подключения к монитору. В руководстве по быстрому запуску упоминается источник питания 5 В, необходимый для 4 А (да!). Что ж, оказалось, что 1,5 А делает это. Я думаю, что 4 Amp с большим количеством вещей, подключенных к плате (USB, Ethernet, камера, …). Во всяком случае, я собрал блок питания, кабель HDMI и экран HDMI, мышь, чтобы начать работу.
Учебники
На сайте element14 размещено несколько постов и учебных пособий. Я рекомендую начать с этого: http://www.element14.com/community/community/designcenter/single-board-computers/riotboard//blog/2014/01/24/publishing-my-first-android-app -он-riotboard
Это происходит путем подключения платы и отображения Android на мониторе. Здесь у меня возникла первая проблема: мой монитор ничего не показывал! На плате только маленький светодиод, ничего не мигает, поэтому я сначала подумал, что моя плата не работает, или я сделал что-то не так. В отчаянии я попробовал другой (меньший) монитор, и вуаля, это сработало, и появился экран запуска Android:

Запуск Android (ура!)
Хорошо, дата / время были неправильными, и доска попросила «Подключить зарядное устройство» (????). Во всяком случае, он что-то делал :-).
In that tutorial I followed to download and install the Android SDK. I did *not* downgrade my Java version (I have 1.7.0_60 on my Windows 7 64-bit machine). Best of the Android SDK: it is all Eclipse, and I love that :-).
Android SDK
The next part is about making the first steps with the Android SDK and installing the needed packages:http://www.element14.com/community/community/designcenter/single-board-computers/riotboard//blog/2014/02/08/part-2-writing-an-android-app
? To use the board for application writing and debugging over USB, it needs to be in ‘developer mode’. How to get there is not described in above tutorial: You have to tap seven times on the build number (seehttp://www.androidcentral.com/how-enable-developer-settings-android-42).
After fixing the developer mode, the board still did not show up properly in my Eclipse and Windows 7 64-bit. The Windows device manager showed the board, but has not installed the drivers:

RIOT driver in device manager
Some clues are discussed inhttp://www.element14.com/community/thread/31859/l/riotboard-usb-driver-for-windows-eclipse. The point is that the Google ATD drivers need to be downloaded with the package manager:
But it still might be (at least for my machine) that they are not installed. So I needed to manually install them. Make sure you have in the Android Package manager the Google USB Drivers downloaded:
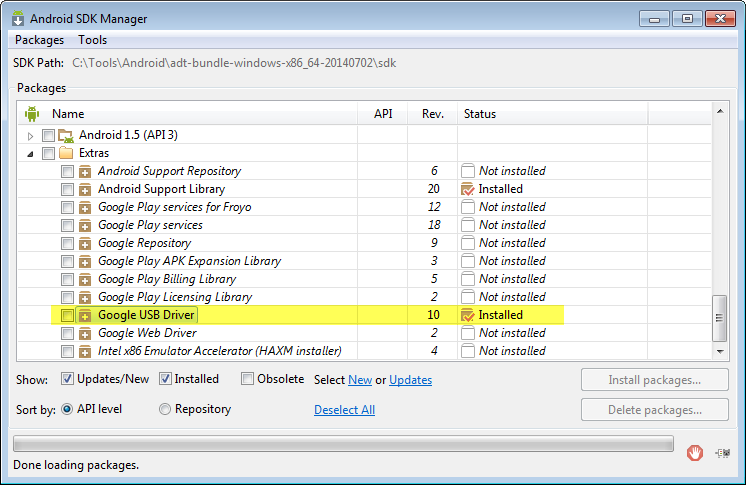
Google USB Drivers
Then go to the Windows device manager, and update the drivers for the RIoT board:

Right Click to update drivers
Then (important!) use the ‘Browse my computer for driver software:

Browse computer for driver software
Browse to the installation files downloaded before with the package manager. For me this is
C:\Tools\Android\adt-bundle-windows-x86_64-20140702\sdk\extras\google\usb_driver
Your path might be similar, check where you have the Android SDK downloaded.

Browse to the installation files
Then confirm to install drivers:

Confirmation to install drivers
Finally, the drivers are installed:

Drivers installed
Now, the drivers are installed and it looks good in the Windows Device Manager:

Android Composite ADB Interface
Restarting Eclipse, and with this the device shows up:

Device shows up
With this, I’m ready to develop an Android application for that board :-).
Summary
While the RIoT Board is advertised as ‘IoT’ (Internet of Things) board (Slogan: “Revolutionizing the Internet of Things”), it is not more ‘IoT’ than any other board with Ethernet connectivity. While it has a lot of CPU power, it does not come anything I would expect for a real IoT board: there is no WiFi, no Bluetooth, no BLE or any other transceiver. No interface (apart of the pin header) which would let it interface to the real time (RTOS) world. And the board should be much smaller so I could it put into a small enclosure, at least the size of the new Raspy B+. Apart of that, it is a very solid (although rather expensive) board. I like the easy way of getting Android running on it. And as I wanted to learn more about using Android, this let me feel that with this board I can explore more of that world.
Next…
So what’s next? I want to write an application for Android and the board, and there is already a tutorial I want to follow here. I want to add serial connection, a camera, I want to add WiFi, and I want to interface with any of the FRDM boards. Might take a while, but I feel that could be an interesting journey ?