В этой статье описывается, как создать приложение для определения особенностей лица с помощью API-интерфейса обнаружения лица (Firebase ML Kit) и Android Things. Идея этой статьи взята из проекта Google под названием «Цветок выражения вещей Android». Эта идея проекта заключается в определении характеристик лица (или классификации лиц) с использованием машинного зрения на основе Firebase ML Kit. Более того, этот проект отображает характеристики лица с помощью ЖК-дисплея. дисплей и некоторые смайлики.
Чтобы построить этот проект, вам понадобится:
- Raspberry Pi
- Малиновая камера
- ЖК-дисплей (SSD1306)
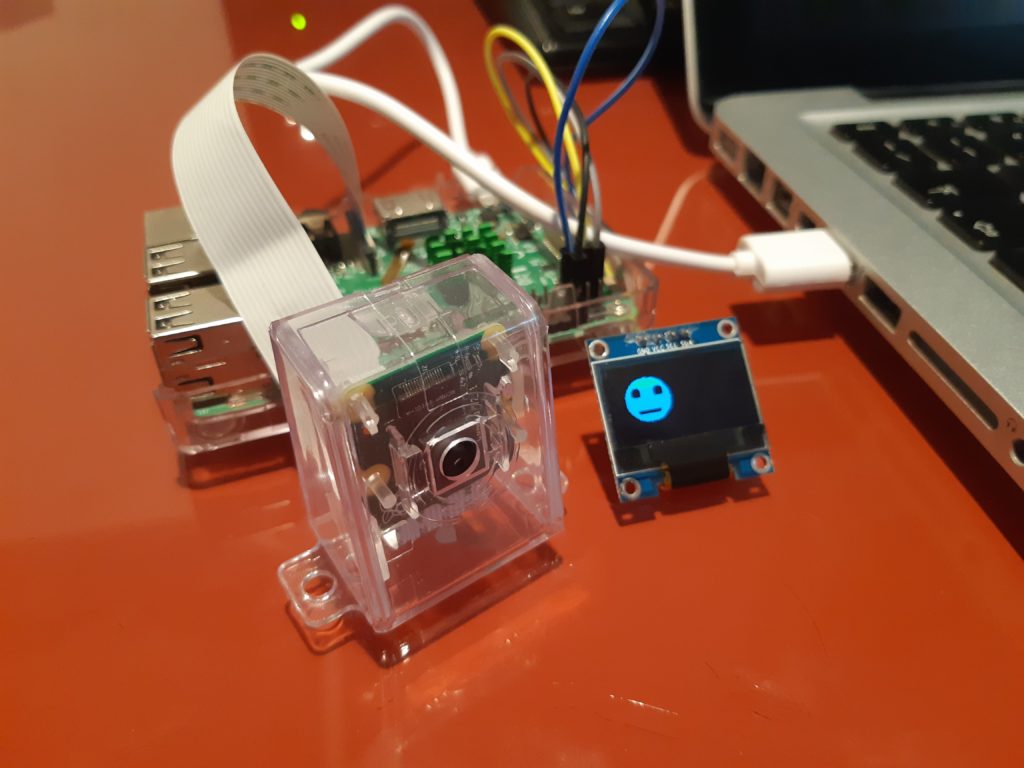
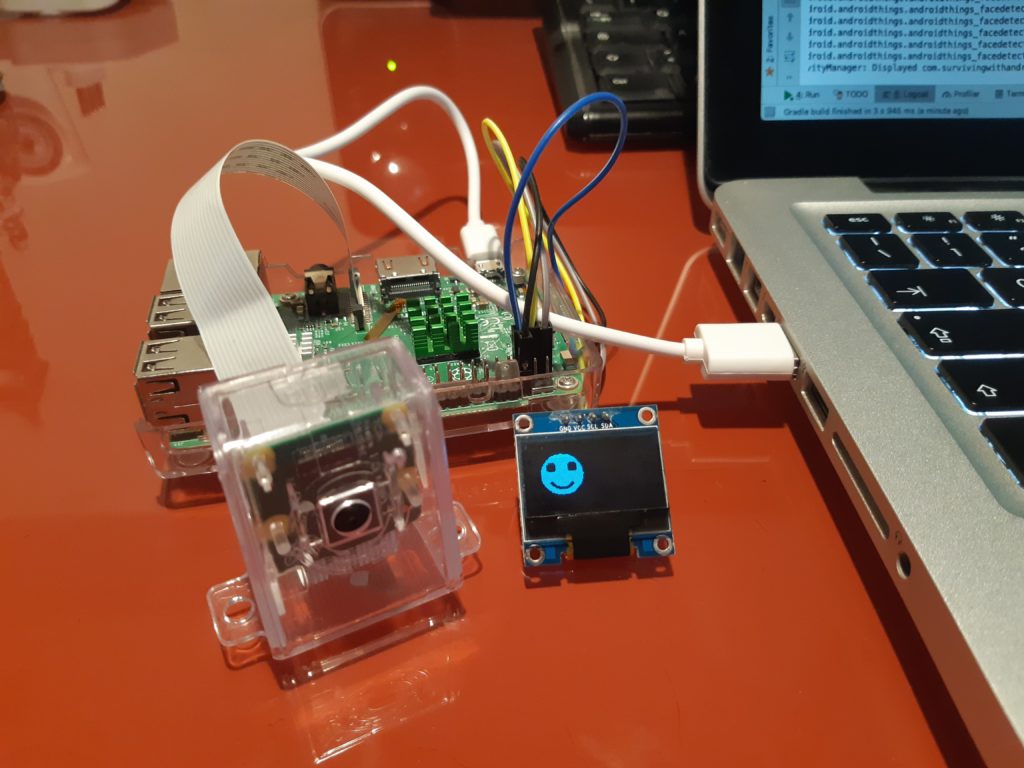
Окончательный результат показан здесь:
Загрузите исходный код Android Things
Введение в Firebase ML Kit
Firebase ML Kit — это мобильный SDK, который помогает нам экспериментировать с технологиями машинного обучения. Tensorflow и CloudVision упрощают разработку мобильных приложений, использующих машинное обучение. В любом случае, модели машинного обучения, которые стоят позади, требуют времени и усилий. Firebase ML Kit — это попытка Google облегчить использование машинного обучения и сделать его более доступным для людей, которые мало знают о технологиях машинного обучения, предоставляя предварительно обученные модели, которые можно использовать при разработке приложений Android и Android Things.
В этой статье описывается, как реализовать приложение Android Things для машинного зрения, которое распознает черты лица.
Он покажет, насколько легко добавить возможности машинного обучения в приложение Android Things, не зная много о машинном обучении и не создавая и не оптимизируя модель машинного обучения.
Что такое API обнаружения лиц в Firebase ML Kit?
Использование Firebase ML Kit API обнаружения лиц позволяет обнаруживать лица на снимке или с помощью камеры. В этом проекте Android Things мы будем использовать камеру, подключенную к Raspberry Pi. Более того, как только лицо обнаружено, мы можем обнаружить такие особенности лица, как поворот лица, размер и т. Д. Более того, используя API Обнаружения Лица, мы можем углубиться в извлечении анализа лица:
- Ориентир : точка интереса лица, такая как левые глаза, правые глаза, основание носа и т. Д.
- Контур : это точки, которые следуют за формой лица
- Классификация : это способность определять конкретную характеристику лица. Например, можно определить, является ли один глаз закрытым или открытым, или лицо улыбается.
Кроме того, используя API обнаружения лиц, можно отслеживать лица в видеопоследовательности. Как видите, это очень интересные функции, которые открывают новый сценарий в разработке приложений.
В этом проекте, как указано выше, мы будем использовать классификацию лиц для представления характеристики лица на ЖК-дисплее. Для этого приложение будет использовать эти изображения для представления характеристик лица:

Нейтральное лицо

Правый глаз закрыт

Улыбающееся лицо

Левый глаз закрыт
Как использовать API распознавания лиц
Теперь, когда мы знаем, что такое API распознавания лиц, пришло время начать его использовать для создания приложения Android Things.
Before implementing our app, it is necessary to configure a new project using the Firebase Console. This is a very simple step. In the end, you will get a JSON file to download that must be added to your Android Things project.
Set Up Firebase ML Kit
Once the project is configured, it is necessary to configure the Face detection API and add the right dependencies in our project:
dependencies {
    implementation 'com.google.firebase:firebase-ml-vision:18.0.2'
    implementation 'com.google.firebase:firebase-ml-vision-face-model:17.0.2'
}
Next, let us add these lines in our Manifest.xml :
<uses-permission
     android:name="android.permission.CAMERA"/>
<uses-permission
     android:name="android.permission.WRITE_EXTERNAL_STORAGE" />
<meta-data
     android:name="com.google.firebase.ml.vision.DEPENDENCIES"
     android:value="face" />
How to Use Face Classification to Detect Face Characteristics
It is time to start using the Firebase ML kit and, in more detail, the Face Detection API in this Android Things app. There are two steps to follow in order to detect face characteristics like smile, left or right eye closed, and so on. These steps are shown below:
- Use the camera to capture the picture
- Pass the image capture to the Firebase MK Kit to detect the face
By now, we can suppose that the image is captured somehow and we can focus our attention on how to use Firebase ML Kit (Face Detection API) to detect face characteristics.
Configuring Face Detection API
Before applying a face detection process to an image, it is necessary to initialize the Firebase ML Kit and configure the Face Detection API. In the MainActivity and in more details in the onCreatemethod, add this line:
FirebaseApp.initializeApp(this);To configure the Face detector, it is necessary to use FirebaseVisionFaceDetectorOptions (more info here) in this way:
 FirebaseVisionFaceDetectorOptions options =
                new FirebaseVisionFaceDetectorOptions.Builder();
Next, it is necessary to add the configuration options:
FirebaseVisionFaceDetectorOptions options =
         new FirebaseVisionFaceDetectorOptions.Builder()
.setClassificationMode(FirebaseVisionFaceDetectorOptions.ALL_CLASSIFICATIONS)
.enableTracking()
.build();
The Android Things app is interested in the face classification, as stated before, so we enable this configuration. Moreover, by default, the face detection will use a FAST_MODE (enabled by default).
Finally:
FirebaseVisionFaceDetector detector = FirebaseVision.getInstance().getVisionFaceDetector(options);
Once the detector is ready and correctly configured, we can start detecting face characteristics (or face classification) using a captured image:
 firebaseImage = FirebaseVisionImage.fromBitmap(displayBitmap);
 result = detector
    .detectInImage(firebaseImage)
    .addOnSuccessListener(new
      OnSuccessListener<List<FirebaseVisionFace>>() {
       @Override
       public void onSuccess(List<FirebaseVisionFace> faces) {
         for (FirebaseVisionFace face : faces) {
           Log.d(TAG, "****************************");
           Log.d(TAG, "face ["+face+"]");
           Log.d(TAG, "Smiling Prob ["+face.getSmilingProbability()+"]");
           Log.d(TAG, "Left eye open ["+face.getLeftEyeOpenProbability()+"]");
           Log.d(TAG, "Right eye open ["+face.getRightEyeOpenProbability()+"]");
                    checkFaceExpression(face);
         }
      }
});
There are some aspects to notice:
- Using the
displayBitmap, we get thefirebaseImagethat is the image where we want to detect face characteristics. - The app invokes the method
detectInImageto start detecting the face (the app uses the face classification) - The app adds a listener to get notified when the facial characteristics are available
- For each face detected, the app gets the probability
- Finally, using the probability retrieved before the Android Things app controls the LCD display showing the emoticon
The method checkFaceExpression classified the face determining the facial characteristics. In the end, it notifies the result to the caller (as we will see later):
private void checkFaceExpression(FirebaseVisionFace face) {
if (face.getSmilingProbability() > 0.5) {
Log.d(TAG, "**** Smiling ***");
listener.onSuccess(FACE_STATUS.SMILING);
}
if (face.getLeftEyeOpenProbability() < 0.2 &&
face.getLeftEyeOpenProbability() != -1 &&
face.getRightEyeOpenProbability() > 0.5) {
Log.d(TAG, "Right Open..");
listener.onSuccess(FACE_STATUS.RIGHT_EYE_OPEN_LEFT_CLOSE)
}
if (face.getRightEyeOpenProbability() < 0.2 &&
face.getRightEyeOpenProbability() != -1 &&
face.getLeftEyeOpenProbability() > 0.5) {
Log.d(TAG, "Left Open..");
listener.onSuccess(FACE_STATUS.LEFT_EYE_OPEN_RIGHT_CLOSE);
}
listener.onSuccess(FACE_STATUS.LEFT_OPEN_RIGHT_OPEN);
}
How to Capture the Image Using Camera in Android Things
By now, we have supposed to have already captured the image. This paragraph shows how to do it using a camera connected to the Raspberry Pi. This process is quite simple, and it is the same we use when we implement an Android app. It is possible to break this process in these steps:
- Open the camera
- Create a capture session
- Handle the image
Open the Camera
In this step, the Android Things app initializes the camera. Before using the camera, it is necessary to add the right permission to the Manifest.xml :
<uses-permission android:name="android.permission.CAMERA"/>Moreover, let us create a new class that will handle all the details related to the face detection and call it FaceDetector.java and its constructor is:
 public FaceDetector(Context ctx, ImageView img, Looper looper) {
   this.ctx = ctx;
   this.img = img;
   this.looper = looper;
 }
We will see later the role of ImageView. Next, check if the camera is present and open it:
private void openCamera(CameraManager camManager) {
  try {
   String[] camIds = camManager.getCameraIdList();
   if (camIds.length < 1) {
     Log.e(TAG, "Camera not available");
     listener.onError();
     return;
   }

  camManager.openCamera(camIds[0],
      new CameraDevice.StateCallback() {
        @Override
        public void onOpened(@NonNull CameraDevice camera) {
          Log.i(TAG, "Camera opened");
          startCamera(camera);
        }
        @Override
        public void onDisconnected(@NonNull CameraDevice camera)
         {}
        @Override
        public void onError(@NonNull CameraDevice camera, int error) {
         Log.e(TAG, "Error ["+error+"]");
         listener.onError();
        }
      },
      backgroundHandler);
  }
  catch(CameraAccessException cae) {
    cae.printStackTrace();
    listener.onError();
  }
}
Where:
CameraManager cameraManager = (CameraManager) ctx.getSystemService(Context.CAMERA_SERVICE);
The code is quite simple; it is necessary to implement a listener to get notified when the camera is opened or some errors occur. That’s all.
Create a Capture Session
The next step is creating a capture session so that the Android Things app can capture the image. Let us add a new method:
private void startCamera(CameraDevice cameraDevice) {
    try {
     final CaptureRequest.Builder requestBuilder = cameraDevice.createCaptureRequest(CameraDevice.TEMPLATE_PREVIEW);
            requestBuilder.addTarget(mImageReader.getSurface());
            cameraDevice.createCaptureSession(Collections.singletonList(mImageReader.getSurface()),
                    new CameraCaptureSession.StateCallback() {
                        @Override
                        public void onConfigured(@NonNull CameraCaptureSession session) {
                            Log.i(TAG, "Camera configured..");
                            CaptureRequest request = requestBuilder.build();
                            try {                               session.setRepeatingRequest(request, null, backgroundHandler);
                            }
                            catch (CameraAccessException cae) {
                                Log.e(TAG, "Camera session error");
                                cae.printStackTrace();
                            }
                        }

                        @Override
                        public void onConfigureFailed(@NonNull CameraCaptureSession session) {

                        }
                    },
            backgroundHandler);
        }
        catch (CameraAccessException cae) {
            Log.e(TAG, "Camera Access Error");
            cae.printStackTrace();
            listener.onError();
        }

    }
In this method, the Android Things app starts a capturing session, and this app gets notified when the image is captured.
Handle the Image
The last step is to handle the image captured. This image will be sent to the Firebase ML Kit to get the facial characteristics. To this purpose, it is necessary to implement a callback method:
 @Override
 public void onImageAvailable(ImageReader reader) {
   //Log.i(TAG, "Image Ready..");
   Image image = reader.acquireLatestImage();
   // We have to convert the image before
   // use it in Firebase ML Kit
   ...
}
That’s all. The image is ready and the camera has captured it so that we can start detecting face characteristics.
Here are some other useful resources:
-
Master IoT Tensorflow: How to make a smart Android Things project using TensorFlow Machine Learning
-
4 external displays to use with Android Things: TM1637, Max7219, SSD1306, LCD 1602, LCD 2004
-
How to Deploy OpenCV on Raspberry Pi enabling machine vision
Displaying Face-Detected Characteristics Using Android Things and LCD
In this step, we will show how to display face characteristics retrieved by Firebase ML Kit. In this project, Raspberry Pi is connected to an LCD display (SSD1306) that will show the facial characteristics. In this way, the Android Things app can control devices using the face detected.
Before starting, it is useful to show how to connect Raspberry Pi to SSD1306:
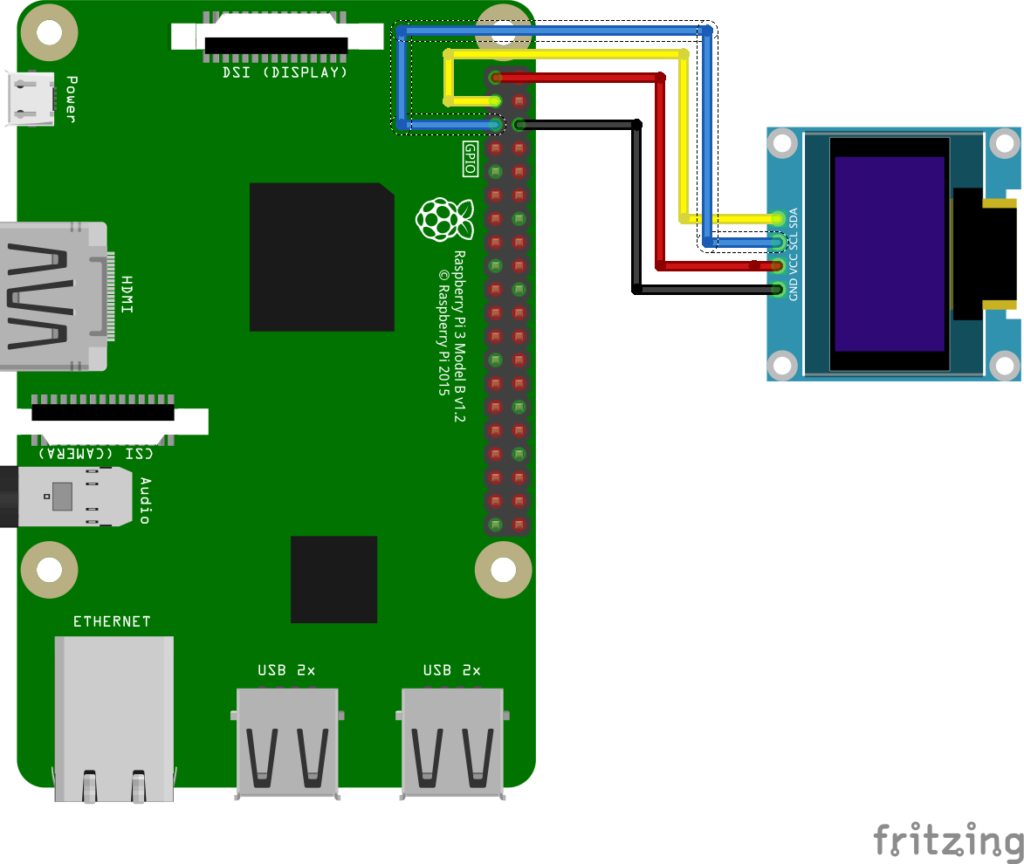
As you can notice, the connection is very simple. To handle the LCD display, it is necessary to add the right driver to our Android Things project. In the build.gradle add this line:
implementation 'com.google.android.things.contrib:driver-ssd1306:1.1'To handle all the details related to the LCD, let us create a new class called DisplayManager. The purpose of this class is showing the right image according to the face characteristics detected. We can represent these different characteristics using four different images as described previously. These images must be in the drawable (nodpi).
In order to show this image according to the face characteristics detected, we will add this method to this class:
public void setImage(Resources res, int resId) {
  display.clearPixels();
  Bitmap bmp = BitmapFactory.decodeResource(res, resId);
  BitmapHelper.setBmpData(display, 0,0, bmp, true);
  try {
    display.show();
  }
  catch (IOException ioe) {
    ioe.printStackTrace();
  }
}
Final Step
In this last step, we will glue everything so that the app will work correctly. To do it, it is necessary to add a listener so that the MainActivity will be notified when the facial characteristics are detected. Let us define the listener to the FaceDetector:
 public interface CameraListener {
   public void onError();
   public void onSuccess(FACE_STATUS status);
 }
Where:
 // Face status
 enum FACE_STATUS {
    SMILING,
    LEFT_EYE_OPEN_RIGHT_CLOSE,
    RIGHT_EYE_OPEN_LEFT_CLOSE,
    LEFT_OPEN_RIGHT_OPEN
 }
Now, in the MainActivity, we will implement the listener:
 FaceDetector fc = new FaceDetector(this, img, getMainLooper());
 fc.setListener(new FaceDetector.CameraListener() {
    @Override
    public void onError() {
      // Handle error
    }
    @Override
    public void onSuccess(FaceDetector.FACE_STATUS status) {
       Log.d(TAG, "Face ["+status+"]");
       switch (status) {
         case SMILING:
           display.setImage(getResources(),
 R.drawable.smiling_face);
           break;
         case LEFT_EYE_OPEN_RIGHT_CLOSE:
             display.setImage(getResources(), R.drawable.right_eyes_closed);
            break;
         case RIGHT_EYE_OPEN_LEFT_CLOSE:
             display.setImage(getResources(), R.drawable.left_eyes_closed);
             break;
         default:
            display.setImage(getResources(), R.drawable.neutral_face);
         }
     }
 });
Creating the App UI
If you want to create the UI of the Android Things app, you have to add the layout:
<?xml version="1.0" encoding="utf-8"?>
<android.support.constraint.ConstraintLayout xmlns:android="http://schemas.android.com/apk/res/android"
    xmlns:app="http://schemas.android.com/apk/res-auto"
    xmlns:tools="http://schemas.android.com/tools"
    android:layout_width="match_parent"
    android:layout_height="match_parent"
    tools:context=".MainActivity">
  <ImageView android:layout_height="wrap_content"
    android:layout_width="wrap_content"
    android:id="@+id/img" />

</android.support.constraint.ConstraintLayout>
Final Considerations
At the end of this article, you hopefully gained knowledge about how to use the Firebase ML Kit with Android Things. We have explored how to detect face characteristics using machine learning. Firebase ML Kit offers the possibility to test and use machine learning without knowing much about it and without spending time and effort in building ML models. Using the Face Detection Kit API, you can easily build an Android Things app that detects face characteristics.