Еще одна область, которая будет совершенно чужды разработчикам XNA (если вы не углубляетесь в Silverlight или веб-программирование), заключается в том, что в действительности у вас никогда не должно быть кода, обновляющего экран напрямую.
В XNA это неизбежно просто потому, что XNA — это единственная вещь, которая обращается к экрану и имеет полный контроль над всем, однако тот же принцип можно применять и к играм XNA, просто чтобы упростить и централизовать, откуда берется вся информация при ее представлении на экран. Экран, потерянный еще? Хорошо, давайте продолжим.
То, что мы говорим о шаблоне проектирования под названием MVVM, другие существуют, и все они основаны на одной и той же приблизительной идее (MVC, MVP и т. Д.), Диаграмма ниже призвана помочь визуально представить это ( изображение предоставлено статьей Джона Папы о Visual Studio журнал тут ):
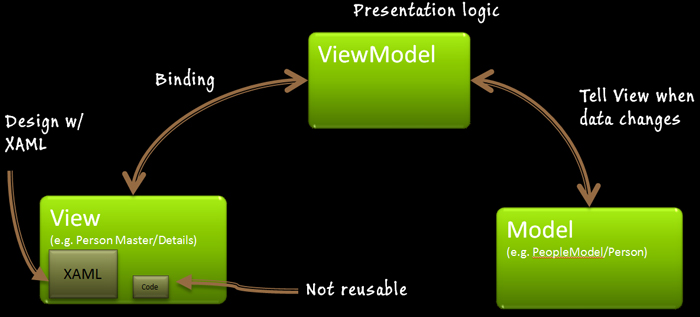
Поскольку на диаграмме показано, что представление (или экран) не зависит от остальной части проекта, просто получение информации, необходимой для управления пользовательским интерфейсом, из ViewModel (набор настроек), остальные части приложения, которым необходимо обновить информацию, просто обновляют. ViewModel также (в нашем случае игра).
Такое разделение означает, что мы не можем нарушить (за исключением редких случаев) отображение нашего приложения или игры, а также означает, что мы можем передать финальную презентацию экрана дизайнеру, чтобы обработать наш экран в соответствии с согласованным набором информации приложения / игры. будет работать с.
Все gobbledegook, хорошо, я предлагаю прочитать образец следующих статей:
Фундаментальный MVVM Джона ПапаПонимание паттерна MVVM Лорана Бюньона (моего героя MVVM
)
Глубокое погружение MVVM также Лорана Бюньона (он также является автором MVVM light для Windows Phone)
Инструментарий MVVM Light: Soup To Nuts Джесси Либерти
Зачем мне это поднимать? Как часть этой статьи, мы стремимся еще больше упростить и выделить разделы нашей игры, чтобы упростить поддержку и добавить степень контроля, пока мы используем Silverlight, один из самых больших Преимущества Silverlight заключаются в его возможностях связывания данных, что означает, что вам не нужно (но вы можете делать это, если хотите) вручную обновлять каждый элемент управления на экране значениями из вашего приложения / игры, экран предназначен для прослушивания этих значений и автоматически обновляется соответствующим образом, включая анимацию и другие интересные вещи!
Как обычно полный исходный код этой главы можно найти здесь, на Codeplex :
(Пожалуйста, извините разделы кода XAML здесь, только что узнал, что наша подсветка синтаксиса не поддерживает XAML, так что терпите меня, пока я пытаюсь найти лучшую работу. В настоящее время я смотрю на развитый SyntaxHighlighter, который предположительно будет поддерживать XAML, но это только WordPress, так что понадобится немного магии)
Следуйте вместе с серией здесь:
Часть 1 — Обзор
Часть 2 — Начало работы
Часть 3 — Добавление первого
элемента управления Часть 4 — Каркасы MVVM и Nuget (здесь)
Часть 5 — Элементы управления
Часть 6 — Добавление анимации
Часть 7 — Другой подход
Кроме того, на канале 9 ведется аналогичная серия видео, если вы предпочитаете видео!![]()
Фреймворк, мне не нужны никакие вонючие рамки
Теперь вы можете делать все это вручную, используя интерфейс iNotifyPropertyChanged в своем коде, чтобы разобраться во всем этом, но гораздо проще использовать надежную среду, чтобы выполнить большую часть основной работы за нас, мой выбор — инфраструктура MVVM Light для Windows Phone, который является одновременно легким и обеспечивает функциональность MVVM (держу пари, что Лорану потребовалось целых 5 секунд, чтобы придумать это имя ![]() ), а теперь, когда Windows Phone SDK 7.1 также поддерживает NuGet в Express Edition, это всего лишь несколько щелчков мышью.
), а теперь, когда Windows Phone SDK 7.1 также поддерживает NuGet в Express Edition, это всего лишь несколько щелчков мышью.
Откройте проект SilverXNA в Visual Studio Express и щелкните правой кнопкой мыши папку ссылок в основном проекте SilverXNA:

Если вы не получаете опцию «Управление пакетами NuGet», то, скорее всего, у вас не установлены последние инструменты (вам нужна версия RTM или выше).
Выберите опцию NuGet, и вам будет представлен менеджер пакетов NuGet, отсюда вы можете искать и устанавливать новые пакеты или видеть, есть ли какие-либо обновления для существующих установленных. Это действительно бесценный инструмент, который является отличным дополнением к экспресс-инструментам. К сожалению, в Интернете нет библиотеки обзоров пакетов NuGet (о которой я знаю), поэтому вам придется полагаться на поиск или чтение ваших любимых пакетов в Интернете, но полная информация о каждом пакете доступна через менеджер пакетов.

Ищите MVVM, и вы должны увидеть список выше с пакетом, который нам нужен, в самом верху (как вы можете видеть, есть множество других пакетов MVVM, так что если вы хотите попробовать несколько других, то смело экспериментируйте с тем, что хорошо для вас), сейчас просто нажмите установить в пакете MVVVM Light.
Когда он будет установлен, вы увидите, что он сделал несколько вещей, он установил и добавил ссылки на легкие библиотеки MVVM, а также добавил некоторые файлы шаблонов для использования. Если бы были какие-либо зависимости от других пакетов, то они также были бы установлены одним нажатием кнопки, просто!
Итак, на скриншоте слева вы можете увидеть:

Библиотеки MVVM Light для WP7 7.1
Новая папка с некоторыми файлами шаблонов
. App.XAML также был обновлен с новой конфигурацией
NuGet может делать поразительные вещи с пакетами, так что это действительно то, за чем нужно следить.
Обычно пакеты также поставляются с файлом ReadMe, чтобы помочь с любыми дополнительными задачами настройки, которые необходимы для запуска и запуска, но в настоящее время отсутствуют в MVVM light, но не волнуйтесь, я знаю, что делаю ……
Новый взгляд на старое лицо
Короче говоря, это то, как MVVM Light работает на Windows Phone (это не совсем то же самое для всех платформ).
У вас есть страница и соответствующая ViewModel для этой страницы, которые работают вместе для безопасного представления информации на экране. Помимо того, что у вас есть ViewModelLocator, это скрытая панель соединений, которая объединяет все, в более сложных случаях она также предоставляет возможность подключать различные источники данных для ваших моделей из центрального расположения, обеспечивая еще один уровень абстракции.
Это все слова на данный момент, и сейчас я собираюсь только перейти к простым вещам, чтобы все стало понятнее, чтобы увидеть продвинутые вещи в MVVM, я предлагаю просмотреть материал, упомянутый ранее, они действительно фантастические.
У вас могут быть Модели, чтобы также описывать ваши данные, но в данном случае это слишком, но в действительности наша игра — это наша модель и движок, управляющий тем, что отправляется на экран в SilverXNA IMHO.
Достаточно этого позволяет что-то сделать. если мы проанализируем то, что мы в настоящее время используем в качестве данных для отправки информации на экран в нашем Gamepage.XAML.cs (помня, что из-за подхода MVVM / Silverlight, сохранение значений в нашем коде позади, как правило, не очень хорошая идея, потому что его нельзя использовать повторно ) есть несколько вещей (ну, на самом деле, много, но мы все еще придерживаемся маленьких шагов, вы можете поэкспериментировать позже), которые мы могли бы сделать с удалением, а именно:
Атрибут Level — используется , чтобы увидеть , что наш текущий уровень и сохраняется информация о состоянии игрока
значения для рисования оставшегося времени на экран
значение для игроков оценки
Значения технического обслуживания для того, как долго должен пройти до того , как игрок должен быть предупреждено время истощается
Это основные вещи, которые мы хотим рассмотреть на этом занятии, есть несколько других (большинство из них действительно), о которых страница не должна знать, но мы оставим их пока.
Итак, давайте добавим GameViewModel для нашей GamePage, просто щелкните правой кнопкой мыши на папке «ViewModel» и выберите «Add -> New Item», нажмите на ветку «Silverlight для Windows Phone» в дереве слева и выберите «MVVMViewModel (WP7»). ) », Затем назовите его« GameViewModel.cs »

Если шаблоны проекта не отображаются в браузере «Добавить новый элемент», вы можете получить их со страницы кодового сплетения MVVMLight , иначе вы можете просто скопировать файл «MainViewModel.cs» и переименовать его в «GameViewModel.cs» (помня также переименовать классы и методы внутри, так как VS Express не делает это для вас, как полная версия студии)
Когда вы это сделаете, откройте его, и оно должно выглядеть примерно так:
using GalaSoft.MvvmLight;

namespace SilverXNA.ViewModel
{
	///
	/// This class contains properties that a View can data bind to.
	///
	/// Use the <strong>mvvminpc</strong> snippet to add bindable properties to this ViewModel.
	///
	///
	/// You can also use Blend to data bind with the tool's support.
	///
	///
	/// See http://www.galasoft.ch/mvvm/getstarted
	///
	///
	public class GameViewModel : ViewModelBase
	{
		///
		/// Initializes a new instance of the GameViewModel class.
		///
		public GameViewModel()
		{
			////if (IsInDesignMode)
			////{
			////    // Code runs in Blend --> create design time data.
			////}
			////else
			////{
			////    // Code runs "for real": Connect to service, etc...
			////}
		}

		////public override void Cleanup()
		////{
		////    // Clean own resources if needed

		////    base.Cleanup();
		////}
	}
}
(если вы скопировали MainViewModel.cs, то у вас может не быть функции очистки, но не беспокойтесь, поскольку мы не будем использовать это на этот раз)
Как вы можете видеть, здесь не так много времени, но мы скоро быстро это изменим. Сразу после функции «очистки» (да, я знаю, что она закомментирована, оставьте ее в покое), начните вводить «mvvminpc», и вы должны увидеть следующее:
![]()
MVVM также поставляется с кучей фрагментов кода, чтобы упростить построение нашей модели представления (посмотрите, почему мне нравится этот парень Лоран), дважды нажмите вкладку и вырвитесь на экран, и это будет замечательное новое полноценное свойство. для MVVM:
///
/// The  property's name.
///
public const string MyPropertyPropertyName = "MyProperty";

private bool _myProperty = false;

///
/// Gets the MyProperty property.
/// TODO Update documentation:
/// Changes to that property's value raise the PropertyChanged event.
/// This property's value is broadcasted by the Messenger's default instance when it changes.
///
public bool MyProperty
{
	get
	{
		return _myProperty;
	}

	set
	{
		if (_myProperty == value)
		{
			return;
		}

		var oldValue = _myProperty;
		_myProperty = value;

		// Remove one of the two calls below
		throw new NotImplementedException();

		// Update bindings, no broadcast
		RaisePropertyChanged(MyPropertyPropertyName);

		// Update bindings and broadcast change using GalaSoft.MvvmLight.Messenging
		RaisePropertyChanged(MyPropertyPropertyName, oldValue, value, true);
	}
}
Кроме того, не только это, но и эти фрагменты также полностью подключены, что позволяет вам перемещаться по необходимым значениям, и он заполняет остальную часть фрагмента кода для вас, поэтому наберите следующее в этом точном порядке, отложите мышь и продолжайте: клавиатура (всегда держите руку и ноги в дороге)
Введите «GameLevel» и нажмите «Tab» — это общедоступное имя свойства.
«Level» и нажмите стрелку вправо — это тип свойства, в этом случае оно не распознается, но мы исправим это позже, мы должны использовать клавиша со стрелкой вправо, потому что нажатие на вкладку приведет к тому, что intellisense создаст что-то, lol
Введите «_gameLevel» и нажмите «tab» — это частное имя для свойства.
Наконец, у нас есть выбор, поскольку существует два варианта того, как MVVM уведомляет Silverlight о Изменения в значениях, либо через простое уведомление, либо через широковещательную рассылку. Слишком много, чтобы пройти здесь, поэтому сейчас просто удалите строку «NotImplemented» (мера безопасности, чтобы убедиться, что вы проверяете это) и вторую строку «RaisePropertyChanged», которая говорит об обмене сообщениями.
Чтобы закончить, щелкните правой кнопкой мыши на красном волнистом поле для Типа уровня и разрешите ссылку.
Таким образом, вы должны остаться со следующим:
///
/// The  property's name.
///
public const string GameLevelPropertyName = "GameLevel";

private Level _gameLevel = null;

///
/// Gets the GameLevel property.
/// TODO Update documentation:
/// Changes to that property's value raise the PropertyChanged event.
/// This property's value is broadcasted by the Messenger's default instance when it changes.
///
public Level GameLevel
{
	get
	{
		return _gameLevel;
	}

	set
	{
		if (_gameLevel == value)
		{
			return;
		}

		var oldValue = _gameLevel;
		_gameLevel = value;

		// Update bindings, no broadcast
		RaisePropertyChanged(GameLevelPropertyName);
	}
}
Далее нам нужно добавить остальные свойства лечения, которые нам нужны:
Feel free to add them yourself or just copy the entire GameViewModel.cs from download package mentioned at the start of the chapter.(don’t forget to resolve any missing references, like TimeSpan)
Now to add some additional features which will aid our end design for the page and show off a bit of what MVVM can do for you with Data Binding. The first one we’ll add is a new Property to display the GameTime as a string, you can just show the TimeSpan value as test however with you get days, hours, minutes, seconds and milliseconds it can look a little busy. You may ask “Well why not just fix up the existing property to output a string?”, simple answer the XNA game outputs a TimeSpan and we don’t want to mess with that, plus it’s best not to try and mess with the core properties, bit of a standards thing.
There are other ways of doing the next bit in Silverlight by using Converters but this is just my preferred way, if you want to look up converters then check out this article here (Converters are for transforming data for presentation in XAML)
So add the following cut down property:
	///
	/// The  property's name.
	///
	public const string GameTimeStringPropertyName = "GameTimeString";

	///
	/// Gets the GameTimeString property.
	/// TODO Update documentation:
	/// Changes to that property's value raise the PropertyChanged event.
	/// This property's value is broadcasted by the Messenger's default instance when it changes.
	///
	public String GameTimeString
	{
	    get
	    {
	        return _gameTime.Minutes.ToString("00") + ":" + _gameTime.Seconds.ToString("00");
	    }
	}
This just pushes out the shortened version of the time that the game was using previously.
Next little graphical thing we want to add is a property for the Colour of the text of the Score, if you remember in the XNA game, once the game time gets below 30 seconds it will start flashing red, we want to replicate this again in an MVVM way so we will also provide binding for the colour of the text, so just add the following property as well:
///
/// The  property's name.
///
public const string GameTimeDisplayColorPropertyName = "GameTimeDisplayColor";

private SolidColorBrush _gameTimeDisplayColor = new SolidColorBrush(Colors.Yellow);

///
/// Gets the GameTimeDisplayColor property.
/// TODO Update documentation:
/// Changes to that property's value raise the PropertyChanged event.
/// This property's value is broadcasted by the Messenger's default instance when it changes.
///
public SolidColorBrush GameTimeDisplayColor
{
	get
	{
		return _gameTimeDisplayColor;
	}

	set
	{
		if (_gameTimeDisplayColor == value)
		{
			return;
		}

		var oldValue = _gameTimeDisplayColor;
		_gameTimeDisplayColor = value;

		// Update bindings, no broadcast
		RaisePropertyChanged(GameTimeDisplayColorPropertyName);
	}
}
As before you’ll need to fix the reference for the SolidColorBrush this time.
To finish up in the ViewModel now we just want to add the capability to update the colour of the Time text if we are below the warning threshold and we also want it to flash every other second, to this end (and to save on memory) we’ll declare the two colours we want to flash between (Yellow and Red) and then update the core property for the GameTime to set the colour and update the screen, so first add the following two variables to the top of the View Model Class:
SolidColorBrush YellowBrush = new SolidColorBrush(Colors.Yellow);
SolidColorBrush RedBrush = new SolidColorBrush(Colors.Red);
Then edit the Property for GameTime and replace it with the following:
///
/// The  property's name.
///
public const string GameTimePropertyName = "GameTime";

private TimeSpan _gameTime = new TimeSpan();

///
/// Gets the GameTime property.
/// TODO Update documentation:
/// Changes to that property's value raise the PropertyChanged event.
/// This property's value is broadcasted by the Messenger's default instance when it changes.
///
public TimeSpan GameTime
{
	get
	{
		return _gameTime;
	}

	set
	{
		if (_gameTime == value)
		{
			return;
		}

		var oldValue = _gameTime;
		_gameTime = value;

		// Update bindings, no broadcast
		RaisePropertyChanged(GameTimePropertyName);
		RaisePropertyChanged(GameTimeStringPropertyName);

		if (GameLevel.TimeRemaining > WarningTime ||
			GameLevel.ReachedExit ||
			(int)GameLevel.TimeRemaining.TotalSeconds % 2 == 0)
		{
			GameTimeDisplayColor = YellowBrush;
		}
		else
		{
			GameTimeDisplayColor = RedBrush;
		}
	}
}
So from this when the GameTime is updated in the ViewModel, it ensures Silverlight knows that both this value and the GameTimeString values have been updated (to update Data Binding) and then we also force an update of the Game Time Colour when needed.
So that’s it for the GameViewModel.cs, for anyone skipping the line just pickup the full class from the downloadable project.
In search for an answer
Now you can wire up your views (the individual pages) direct up to a view model but this is not very efficient as each page calling a viewmodel would instantiate a new version of that class plus it can cause your pages to load slower, the answer to this is to use a View Model Locator which acts like a singleton class fro accessing viewmodels, if you go that much further with MVVM you can also use the locator for dependency injections and a lot of other cool things, but the best thing is that all pages are wired up the same way and just point at the locator which in the end makes maintenance and debugging a lot easier (if you watch Laurent’s videos you will also learn about blendability which is crucial when designing with Silverlight).
If you want to see more about View Model locators, try out this article on WindowsPhoneGeek which appeared recently or go back and watch Laurent’s videos again.
For now we are just going to add our View Model to the existing View Model Locator and wire it together, nothing fancy.
So open up the ViewModelLocator.cs and add the following three things:
///
/// Gets the Main property which defines the main viewmodel.
///
[System.Diagnostics.CodeAnalysis.SuppressMessage("Microsoft.Performance",
	"CA1822:MarkMembersAsStatic",
	Justification = "This non-static member is needed for data binding purposes.")]
public GameViewModel Game
{
	get
	{
		return _game;
	}
}
_game = new GameViewModel();
(if you don’t do this you will just get null exceptions when using it, like I accidentally di while putting this sample together ![]() )
)
Now there are plus sides and downsides to that last section, in reality what we should be doing is only instantiating the GameViewModel when it is first called in the exposed property to comply with proper singleton design patterns, but we are keeping things simple here, plus as this is a game we need that data there as the game starts anyway to get things moving. In other models where your would use an IoC container and dependency injection there are other practices as well, Laurent goes over this in detail in his Deep Dive session.
Ok, so now we have our backend done it’s time to wire up our front end and then we will finish off with tidying up the game code to hook it all up together:
Readying the ship for launch
This section becomes a lot easier from all the grunt work above, we will just point the page at our GameViewModel through the ViewModelLocator and then data bind values to properties in that View model.
So first off open up the GameView.XAML and add this section to the end of the list of namespace declarations:
DataContext="{Binding Game, Source={StaticResource Locator}}
So that the finished header of our GamePage.XAML looks like this:
<phone:PhoneApplicationPage x:Class="SlXnaApp1.GamePage"
    xmlns="http://schemas.microsoft.com/winfx/2006/xaml/presentation"
    xmlns:x="http://schemas.microsoft.com/winfx/2006/xaml"
    xmlns:phone="clr-namespace:Microsoft.Phone.Controls;assembly=Microsoft.Phone"
    xmlns:shell="clr-namespace:Microsoft.Phone.Shell;assembly=Microsoft.Phone"
    xmlns:d="http://schemas.microsoft.com/expression/blend/2008"
    xmlns:mc="http://schemas.openxmlformats.org/markup-compatibility/2006"
    FontFamily="{StaticResource PhoneFontFamilyNormal}"
    FontSize="{StaticResource PhoneFontSizeNormal}"
    Foreground="{StaticResource PhoneForegroundBrush}"
    SupportedOrientations="Landscape" Orientation="Landscape"
    mc:Ignorable="d" d:DesignHeight="480" d:DesignWidth="800"
    shell:SystemTray.IsVisible="False"
	DataContext="{Binding Game, Source={StaticResource Locator}}">
This data binds the data context (the source of information for the page or control) to our GameViewModel, so that when i ask for a property it knows where to look for it. You can set a data context at a control level if you wish overriding the default page context but that gets quite messy so you would only do it if you really had to.
With that done we’ll change what we are currently displaying so it makes more sense from a design perspective, currently we have two textblocks which XNA is writing custom values to, supplying both the label and the value for the information we need to display (Time : 01:59), now that we are working with a proper data model we no longer have that, XNA is just supplying the raw data which is the time.
So from a design perspective we need we actually want one textblock to display the name for the value and then a separate textblock to display the value, this becomes crucial when you want to add multi-lingual support to our game because it’s easier to translate the text of the label than try and inject a language in to the string XNA was presenting before.
You can do this manually though Blend (remembering to save your progress in Visual Studio before switching over) if you wish and follow through the previous steps to add a new column marker to the grid and then add two additional textblocks for “TimeValue” and “ScoreValue” into the next column and setting the text values appropriately for the original labels (setting the Grid Colum value to 1 for each of the new textblocks and the correct row value), which I’d recommend you try yourself just to get some practice in.
For the quick of heart and to not make this post longer than it needs to be, here’s the resulting XAML for the display that you are aiming for, just use it for comparison if you can:
<Grid x:Name="ContentPanel">
	<Grid.ColumnDefinitions>
		<ColumnDefinition Width="0.1*"/>
		<ColumnDefinition Width="0.9*"/>
	</Grid.ColumnDefinitions>
	<Grid.RowDefinitions>
		<RowDefinition Height="0.083*"/>
		<RowDefinition Height="0.917*"/>
	</Grid.RowDefinitions>
	<TextBlock x:Name="TimeLabel" Text="Time Left: " Foreground="Yellow"
		TextWrapping="Wrap" Margin="12,12,20,0" d:LayoutOverrides="Width, Height"/>
	<TextBlock x:Name="TimeValue" Foreground="Yellow" TextWrapping="Wrap" Margin="12,12,20,0"
		d:LayoutOverrides="Width, Height" Grid.Column="1"/>
	<TextBlock x:Name="ScoreLabel" Text="Score: " HorizontalAlignment="Left" TextWrapping="Wrap"
		Margin="12,12,0,0" d:LayoutOverrides="Height" Foreground="Yellow" Grid.Row="1"/>
	<TextBlock x:Name="ScoreValue" HorizontalAlignment="Left" TextWrapping="Wrap" Margin="12,12,0,0"
		Foreground="Yellow" Grid.Row="1" d:LayoutOverrides="Height" Grid.Column="1"/>
</Grid>
Do not worry about the spacing or order of the properties in the XAML as it’s not that important, just ensure you have all the relevant bits, so now we have 4 text boxes, the labels are set to display the correct text for the value field places next to it in the adjacent column.
Now we need to bind our value boxes to our data model, this is easiest to do in Visual Studio, so if you are still in Blend simply save the page you are working on and switch back to it, if you are prompted on returning to Visual Studio to reload pages then do so.
Now open up the GamePage.XAML in the editor. If you haven’t already I’d suggest configuring VS to only open the code editor in full code view and the designer is a bit of a pain and makes the page take longer to load, to do this just open “Tools –Options” in the menu and then find the “Always Open document in full XAML view” setting under the branch “Text Editor –> XAML –> Miscellaneous” (as documented in this article which is fine for both VS2008 and VS2010)
In practice it is always best to use Blend for it’s design GUI to add controls, build pages, set properties and build animations, leave code editing to VS as it is much better at it and has superior intellisense support.
scroll down to the XAML described above and we can start adding the data binding, we can of course do this graphically in Blend but I find it much easier to do in XAML (my personal view of course, Laurent’s videos do show both ways), here we are going to add (or edit if you didn’t blank the fields earlier) the Text properties for the two VALUE textblocks, simply add/edit the following property into the Textblock for GameTimeValue:
Text="{Binding GameTimeString}"
What we are saying here is that the value that should be presented in the Text for this control (it can be the Content property in some controls) is provided by the GameTimeString property in out GameViewModel as specified by the page DataContext (hopefully that sounded right).
now the beauty of Data Binging is that it can work for any property (except for the name of the control and a few other choice parameters crucial to it’s operation), so if you remember in the GameViewModel we also provided a property for the Colour of the Time values, the binding statement for this would be:
Foreground="{Binding GameTimeDisplayColor}"
Hence setting the foreground (text) colour of the textblock to what the GameViewModel GameTimeDisplayColor property told it to be, remember we also put logic in to change / flash the colour when time was running short and thanks to data binding we do not need to put any fancy animations or states in to make that happen, it all comes from the View model.
The final XAML section after fixing up the Score Value and also setting the foreground of the Time Label (just so both the text and value flash together reusing the same property to set the colour) looks like this:
<Grid x:Name="ContentPanel">
	<Grid.ColumnDefinitions>
		<ColumnDefinition Width="0.1*"/>
		<ColumnDefinition Width="0.9*"/>
	</Grid.ColumnDefinitions>
	<Grid.RowDefinitions>
		<RowDefinition Height="0.083*"/>
		<RowDefinition Height="0.917*"/>
	</Grid.RowDefinitions>
	<TextBlock x:Name="TimeLabel" Text="Time Left: "
		Foreground="{Binding GameTimeDisplayColor}"
		TextWrapping="Wrap" Margin="12,12,20,0"
		d:LayoutOverrides="Width, Height"/>
	<TextBlock x:Name="TimeValue" Text="{Binding GameTimeString}"
		Foreground="{Binding GameTimeDisplayColor}"
		TextWrapping="Wrap" Margin="12,12,20,0"
		d:LayoutOverrides="Width, Height" Grid.Column="1"/>
	<TextBlock x:Name="ScoreLabel" Text="Score: "
		HorizontalAlignment="Left" TextWrapping="Wrap"
		Margin="12,12,0,0" d:LayoutOverrides="Height"
		Foreground="Yellow" Grid.Row="1"/>
	<TextBlock x:Name="ScoreValue" Text="{Binding GameScore}"
		HorizontalAlignment="Left" TextWrapping="Wrap"
		Margin="12,12,0,0" Foreground="Yellow" Grid.Row="1"
		d:LayoutOverrides="Height" Grid.Column="1"/>
</Grid>
Now to whip the game in to shape
Now comes the fuzzy part of this chapter in the SilverXNA series, if i were building this from scratch I could build the view model as a core part of the functionality, it’s recommended to do this as it makes tombstoning and logic that much easier to track and debug but as we are consuming an existing project and trying to keep support fro the other platforms at a premium were have to work around it a bit.
Truth be told it’s not as bad as all that, it simply means where the game would normally output data to the screen we simply update the view model with the new data but in an XNA way of doing things this means every frame ant not just when the value has changed, granted the view model recognises this any only update the Silverlight page when the value does change but it should be better than that.
We also have to account for places where the data is consumed locally at present to point that back to the view model so information is all coming from the same place.
Right, first off let ensure the Code behind for our page knows about the view model we have attached to the display page (The display page and code behind are linked in subtle ways which are geared around information passing from the code to the display page, sometimes getting information out of the display page can take some trickiness, not always just sometimes), so add a variable for the view model to the beginning of the Gamepage.XAML.cs class:
While we are looking at properties, lets also clean up and remove those variables that we have moved to the GameViewModel, granted this is not a usual practice but as this is a tutorial it will ensure that we don’t miss anything later, delete the following (or at the least comment them out):
// When the time remaining is less than the warning time, it blinks on the hud
private static readonly TimeSpan WarningTime = TimeSpan.FromSeconds(30);

private Level level;
Next we need to grab the reference for the GameViewModel from the display page as the page is launched so we can use it in the rest of our code behind,, so add the following to the constructor, I find it’s best to place it near the top before any timers or other activity:
Now even though it’s in the constructor, the data model wont be populated yet until the page has at least loaded when the binding take place, so ensure you are not trying to do anything with it until then, it’s here as a reference once things have got going. If you need anything in the viewmodel as the game starts then put it in the View model itself.
With all that now in place we just need to update and calls to the original code that was consuming the moved items and REMOVE the Draw Hud call, why?, because it’s now completely handled by Silverlight and the View model, we have shifted that whole portion out of the game code for the SilverXNA project.
| From |
|
||
| To |
|
Next just delete (or comment out) all references and calls to the “DrawHud()” and “DrawShadowedString()” functions as we are no longer doing that.
And finally (the bit i don’t like at the mo but it’s necessary) we need to update the viewmodel with the new values for the Time Remaining and Score of the player so that the screen will be updated, so add the following to the”onUpdate” function right after the “vm.GameLevel.Update” call (has to update the level first so the values will be right):
vm.GameTime = vm.GameLevel.TimeRemaining;
vm.GameScore = vm.GameLevel.Score;
In reality if we were to do it this way we should use MVVM Commands but that’s a reach to try and explain that here, preferably (like I stated) it should be part of the game itself to update this centrally by that would break our multi-platform solution.
And were done, if you run the project now you should notice ABSOLUTLY NO DIFFERENCE WHATSOEVER.
Brilliant
Why did I bother
I can imagine if you followed this chapter through step by step you will be asking yourself that very question, why go through all that change for no visible difference?
the answer simply is because 1: that’s how you should do it in the first place and I’m just showing you (in your head) how each piece of the puzzle translates across. 2: the value of implementing this becomes very apparent as we progress in this series adding in additional functionality that Silverlight provides for a fraction of the cost of doing it in XNA. 3: I might be on a sadistic streak but hopefully you will come round to my way of thinking.
MVVM is purely optional and if you wish you can ignore this chapter and just move on, but I recommend learning it because even if you don’t use here you will find value in how you design games and apps in the future and the experience of using MVVM makes you think harder about how your game is architected