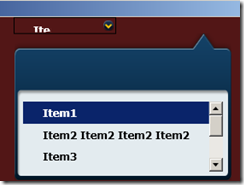
Пару дней назад мой друг попросил некоторой помощи в создании обложки элемента управления ComboBox WPF, у него была особая потребность в том, чтобы выпадающий список элементов управления должен был быть выровнен по правой стороне ComboBox и должен был расширяться. в левом направлении (вместо обычного внешнего вида, который имеет противоположное поведение: он привязан к левой стороне элемента управления и расширяется вправо).
Я попросил его создать очень простой тестовый проект, содержащий элемент управления и его текущую обложку, и передать его мне, это картина того, что он получил в то время.
Я должен признать, что я не очень хороший дизайнер и не эксперт в области графики, поэтому я получил базовый шаблон управления, извлекающий его с помощью Blend, и я посмотрел на него, вот фрагмент исходного XAML из шаблона:
<ControlTemplate TargetType="{x:Type ComboBox}">
    <Grid x:Name="MainGrid" SnapsToDevicePixels="true">
        <Grid.ColumnDefinitions>
            <ColumnDefinition Width="*"/>
            <ColumnDefinition MinWidth="{DynamicResource {x:Static SystemParameters.VerticalScrollBarWidthKey}}" Width="0"/>
        </Grid.ColumnDefinitions>
        <Popup x:Name="PART_Popup" AllowsTransparency="true" Grid.ColumnSpan="2" IsOpen="{Binding IsDropDownOpen, RelativeSource={RelativeSource TemplatedParent}}" Margin="1" PopupAnimation="{DynamicResource {x:Static SystemParameters.ComboBoxPopupAnimationKey}}" Placement="Bottom">
            <Microsoft_Windows_Themes:SystemDropShadowChrome x:Name="Shdw" Color="Transparent" MaxHeight="{TemplateBinding MaxDropDownHeight}" MinWidth="{Binding ActualWidth, ElementName=MainGrid}">
                <Border x:Name="DropDownBorder" BorderBrush="{DynamicResource {x:Static SystemColors.WindowFrameBrushKey}}" BorderThickness="1" Background="{DynamicResource {x:Static SystemColors.WindowBrushKey}}">
                    <ScrollViewer CanContentScroll="true">
                        <ItemsPresenter KeyboardNavigation.DirectionalNavigation="Contained" SnapsToDevicePixels="{TemplateBinding SnapsToDevicePixels}"/>
                    </ScrollViewer>
                </Border>
            </Microsoft_Windows_Themes:SystemDropShadowChrome>
        </Popup>
        <ToggleButton BorderBrush="{TemplateBinding BorderBrush}" Background="{TemplateBinding Background}" Grid.ColumnSpan="2" IsChecked="{Binding IsDropDownOpen, Mode=TwoWay, RelativeSource={RelativeSource TemplatedParent}}" Style="{StaticResource ComboBoxReadonlyToggleButton2}"/>
        <ContentPresenter ContentTemplate="{TemplateBinding SelectionBoxItemTemplate}" ContentTemplateSelector="{TemplateBinding ItemTemplateSelector}" Content="{TemplateBinding SelectionBoxItem}" ContentStringFormat="{TemplateBinding SelectionBoxItemStringFormat}" HorizontalAlignment="{TemplateBinding HorizontalContentAlignment}" IsHitTestVisible="false" Margin="{TemplateBinding Padding}" SnapsToDevicePixels="{TemplateBinding SnapsToDevicePixels}" VerticalAlignment="{TemplateBinding VerticalContentAlignment}"/>
    </Grid>
    <ControlTemplate.Triggers>
        <Trigger Property="HasDropShadow" SourceName="PART_Popup" Value="true">
            <Setter Property="Margin" TargetName="Shdw" Value="0,0,5,5"/>
            <Setter Property="Color" TargetName="Shdw" Value="#71000000"/>
        </Trigger>
        <Trigger Property="HasItems" Value="false">
            <Setter Property="Height" TargetName="DropDownBorder" Value="95"/>
        </Trigger>
        <Trigger Property="IsEnabled" Value="false">
            <Setter Property="Foreground" Value="{DynamicResource {x:Static SystemColors.GrayTextBrushKey}}"/>
            <Setter Property="Background" Value="#FFF4F4F4"/>
        </Trigger>
        <Trigger Property="IsGrouping" Value="true">
            <Setter Property="ScrollViewer.CanContentScroll" Value="false"/>
        </Trigger>
    </ControlTemplate.Triggers>
</ControlTemplate>
Получается, что основная часть шаблона WPF ComboBox состоит из 3 элементов:
- ведущий контента для самого элемента управления.
- хром для выпадающей кнопки.
- и всплывающее окно, представляющее выпадающее меню.
Чтобы добиться того, что ему нужно, то есть выровнять всплывающее окно с правой стороны предъявителя контента и позволить ему развернуться влево, я подумал, что нужно воздействовать на свойство HorizontalOffset всплывающего элемента управления. Зная ширину раскрывающегося элемента управления и ведущего элемента управления с некоторой базовой математикой, мы можем получить новое горизонтальное смещение, в котором размещается раскрывающийся список. Слава Богу, HorizontalOffset является свойством зависимости, поэтому он поддерживает связывание (и мульти связывание тоже, что мне действительно нужно). Итак, я написал быстрый MultiValueConverter:
public class PopupHOffsetValueConverter : IMultiValueConverter
{
    #region IMultiValueConverter Members

    public object Convert(object[] values, Type targetType, object parameter, System.Globalization.CultureInfo culture)
    {
        try
        {
            double popupWidth = (double) values[0];
            double controlWidth = (double) values[1];
            return -(popupWidth - controlWidth);
        }
        catch
        {
            return 0;
        }
    }

    public object[] ConvertBack(object value, Type[] targetTypes, object parameter, System.Globalization.CultureInfo culture)
    {
        throw new NotImplementedException();
    }

    #endregion
}
И изменил стиль, чтобы использовать его так:
01	...
02	<Grid x:Name="MainGrid" SnapsToDevicePixels="true">
03	    <Grid.Resources>
04	        <WpfApplication1:PopupHOffsetValueConverter x:Key="vc" />
05	    </Grid.Resources>
06	    <Grid.ColumnDefinitions>
07	        <ColumnDefinition Width="*"/>
08	        <ColumnDefinition MinWidth="{DynamicResource {x:Static SystemParameters.VerticalScrollBarWidthKey}}" Width="0"/>
09	    </Grid.ColumnDefinitions>
10	    <Popup x:Name="PART_Popup" AllowsTransparency="true" Grid.ColumnSpan="2" IsOpen="{Binding IsDropDownOpen, RelativeSource={RelativeSource TemplatedParent}}" Margin="1" PopupAnimation="{DynamicResource {x:Static SystemParameters.ComboBoxPopupAnimationKey}}" Placement="Bottom">
11	        <Popup.HorizontalOffset>
12	            <MultiBinding Converter="{StaticResource vc}">
13	                <Binding ElementName="Shdw" Path="ActualWidth" />
14	                <Binding ElementName="MainGrid" Path="ActualWidth" />
15	            </MultiBinding>
16	        </Popup.HorizontalOffset>
17	        <Microsoft_Windows_Themes:SystemDropShadowChrome x:Name="Shdw" Color="Transparent" MaxHeight="{TemplateBinding MaxDropDownHeight}" MinWidth="{Binding ActualWidth, ElementName=MainGrid}">
18	            <Border x:Name="DropDownBorder" BorderBrush="{DynamicResource {x:Static SystemColors.WindowFrameBrushKey}}" BorderThickness="1" Background="{DynamicResource {x:Static SystemColors.WindowBrushKey}}">
19	                <ScrollViewer CanContentScroll="true">
20	                    <ItemsPresenter KeyboardNavigation.DirectionalNavigation="Contained" SnapsToDevicePixels="{TemplateBinding SnapsToDevicePixels}"/>
21	                </ScrollViewer>
22	            </Border>
23	        </Microsoft_Windows_Themes:SystemDropShadowChrome>
24	    </Popup>
25	    <ToggleButton BorderBrush="{TemplateBinding BorderBrush}" Background="{TemplateBinding Background}" Grid.ColumnSpan="2" IsChecked="{Binding IsDropDownOpen, Mode=TwoWay, RelativeSource={RelativeSource TemplatedParent}}" Style="{StaticResource ComboBoxReadonlyToggleButton}"/>
26	    <ContentPresenter ContentTemplate="{TemplateBinding SelectionBoxItemTemplate}" ContentTemplateSelector="{TemplateBinding ItemTemplateSelector}" Content="{TemplateBinding SelectionBoxItem}" ContentStringFormat="{TemplateBinding SelectionBoxItemStringFormat}" HorizontalAlignment="{TemplateBinding HorizontalContentAlignment}" IsHitTestVisible="false" Margin="{TemplateBinding Padding}" SnapsToDevicePixels="{TemplateBinding SnapsToDevicePixels}" VerticalAlignment="{TemplateBinding VerticalContentAlignment}"/>
27	</Grid>
28	...
Интересные моменты:
- Строки 3-5 — объявление MultiBinding ValueConverter.
- Строки 11-16 — обязательное действие.
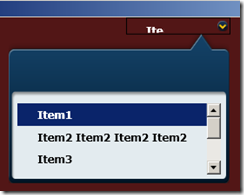
И это фактический результат на его частично снятом контроле:
Довольно просто, когда я понял, как это сделать, WPF действительно чрезвычайно мощный и гибкий, когда дело доходит до управления скинами.

