В этой серии руководств мы создадим приложение для симулятора полета с использованием ShiVa3D Suite. Чтобы создать это приложение, мы рассмотрим все темы, необходимые для создания 3D-игр, образовательных приложений и новых 3D-приложений. Этот урок, часть 3 серии, будет посвящен программированию функций симулятора.
Также доступно в этой серии:
- Создайте приложение 3D Flight Simulator для iOS и Android — теоретический обзор
- Создание приложения 3D Flight Simulator для iOS и Android — Создание среды
- Создать приложение 3D Flight Simulator для iOS и Android — Программирование симулятора
- Создайте приложение 3D Flight Simulator для iOS и Android — Project Export
Введите код для MainAI
Прежде чем вводить код для MainAI, давайте сначала познакомимся с основными понятиями Handler и Function в среде Shiva3D. (это следует за справочной документацией редактора Shiva3D).
- Обработчик — это метод обработки определенного события, например, отправленный пользователем или игровым движком.
- Функция — это «закрытый» метод, который доступен через другие функции или обработчики.
Двумя важными обработчиками являются onInit и onEnterFrame. Это встроенные обработчики, другими словами, они всегда существуют и вызываются игровым движком по мере необходимости. По умолчанию встроенный обработчик не имеет операторов в своем теле.
Обработчик onInit вызывается один раз при запуске приложения. Здесь вы должны выполнить необходимые задачи инициализации. Обработчик onEnterFrame вызывается в каждом кадре игры. В симуляторе onEnterFrame вызывает различные другие функции для конкретных задач, таких как перемещение плоскости вперед.
Следующие три обработчика, которые также являются встроенными обработчиками, работают совместно:
- Обработчик onTouchSequenceBegin уведомляет приложение о начале сенсорных событий.
- Обработчик onTouchSequenceChange предоставляет подробную информацию о количестве касаний на экране пользователем и координатах каждого касания.
- Обработчик onTouchSequenceEnd уведомляет приложение о завершении события касания.
Чтобы эти обработчики сенсорных событий работали, мультитач должен быть включен в приложении через input.enableMultiTouch (). Это делается в обработчике onInit.
В симуляторе, помимо встроенных обработчиков, у нас также есть несколько пользовательских обработчиков.
- onRestart — это точка входа, когда необходимо перезапустить приложение. На экране отображается описательное сообщение, уведомляющее пользователя о перезапуске приложения. Затем он помещает в очередь событие для вызова обработчика onRequestRestart, приведенного ниже, для фактического перезапуска приложения.
- Обработчик onRequestRestart перезапускает приложение.
- onManeuverRequest — это обработчик событий, вызываемый кнопками HUD на экранах. Он интерпретирует входной параметр как один из вверх, вниз, влево или вправо, а затем вызывает соответствующую функцию, чтобы начать маневр.
Обсудив обработчики в симуляторе, краткое описание функций приведено ниже.
- Функция displayMessage отображает сообщение на экране. Сообщение передается в качестве входного параметра.
- Функция сброса сбрасывает переменные, используемые в обработчике onTouchSequenceChange.
- Функция startBanking запускает маневренный поворот влево или вправо.
- Функция startPitching запускает маневр высоты тона вверх или вниз.
- Функция банка выполняет особую последовательность маневрирования разворота в каждом кадре.
- Функция тангажа выполняет особую последовательность маневрирования тангажа в каждом кадре.
- Функция перемещения перемещает плоскость в каждом кадре.
Для получения подробной информации о каждом из методов, пожалуйста, смотрите комментарии в определениях методов.
Ниже приведен список глобальных переменных, используемых функциями и обработчиками в нашем коде.
- counter — это переменная, используемая для отслеживания последовательности движений во время маневров тангажа или разворота.
- dP — это константа, определяющая скорость изменения угла наклона, в основном используемая в функции pitch ().
- dR — это константа, которая определяет скорость изменения угла крена и рыскания, в основном используется в функции bank ().
- prevTouchCount хранит количество касаний экрана, полученных ранее, и необходимо для сравнения этой переменной с текущим числом касаний экрана, полученных в обработчике события onTouchSequenceChange.
- prevX0 и prevY0 используются в обработчике события onTouchSequenceChange для определения направления движения большого пальца пользователя.
- V является постоянной величиной и представляет скорость самолета.
- yg хранит вращение плоскости вокруг глобальной оси Y.
- isAppRestarting — логическое значение. Значение true, когда инициируется операция перезапуска приложения.
- isBanking является логическим значением. Он устанавливается в значение «истина», когда самолет начинает совершать маневр с поворотом.
- isBankingLeft является логическим значением. Устанавливается в true, когда самолет начинает совершать поворот влево.
- isBThresholdReached — логическое значение. Устанавливается в значение true, если плоскость в данный момент совершает поворот наклона и достигла максимального абсолютного значения угла наклона (влево или вправо).
- isPitching является логическим. Значение устанавливается в true, когда самолет начинает совершать маневр на поле.
- isPitchingUp является логическим значением. Он устанавливается в значение true, когда самолет начинает совершать маневренный шаг вверх.
- isPThresholdReached — логическое значение. Значение true, когда самолет в данный момент выполняет маневр тангажа и достигает максимального абсолютного значения угла тангажа (вверх или вниз).
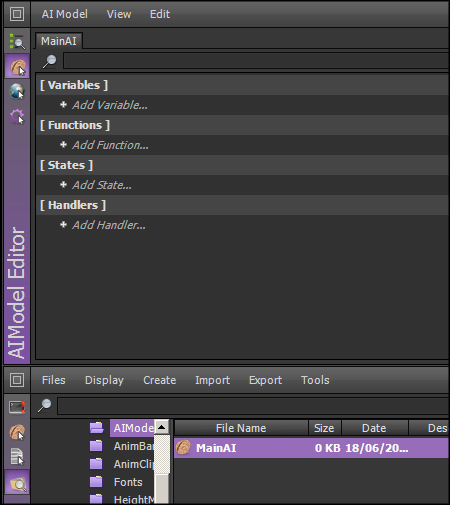
Теперь мы готовы ввести код. Откройте редактор AIModel. В папке Data Explorer AIModel дважды щелкните MainAI. MainAI теперь загружается в AIModel Editor, как показано ниже:
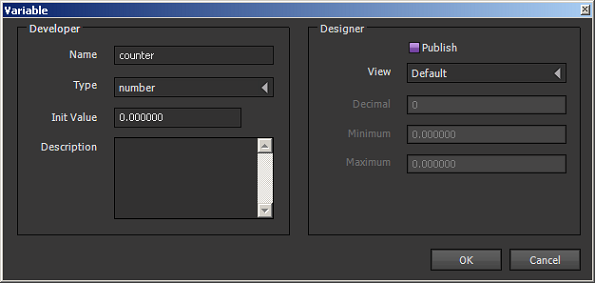
В разделе «Переменные» нажмите «Добавить переменную». В диалоговом окне «Переменная» назовите переменный счетчик, выберите его тип в качестве числа и установите значение инициализации равным 0, как показано ниже (Для числовых типов, даже если вы введете значение инициализации 0, значение будет отображаться как число с плавающей запятой, то есть с десятичными знаками).
Нажмите OK, чтобы создать переменную. Аналогичным образом создайте другие переменные.
- Имя: дП
- Тип: номер
- Начальное значение: 0,040
- Имя: д.р.
- Тип: номер
- Начальное значение: 0,050
- Имя: prevTouchCount
- Тип: номер
- Начальное значение: 0
- Имя: prevX0
- Тип: номер
- Начальное значение: 0
- Имя: prevY0
- Тип: номер
- Начальное значение: 0
- Имя: V
- Тип: номер
- Начальное значение: 0,25
- Имя: YG
- Тип: номер
- Начальное значение: 0
- Имя: isAppRestarting
- Тип: логическое значение
- Значение инициализации: false
- Имя: isBanking
- Тип: логическое значение
- Значение инициализации: false
- Имя: isBankingLeft
- Тип: логическое значение
- Значение инициализации: false
- Имя: isBThresholdReached
- Тип: логическое значение
- Значение инициализации: false
- Имя: isPitching
- Тип: логическое значение
- Значение инициализации: false
- Имя: isPitchingUp
- Тип: логическое значение
- Значение инициализации: false
- Имя: isPThresholdReached
- Тип: логическое значение
- Значение инициализации: false
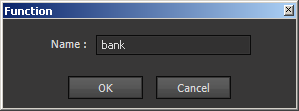
Теперь, когда все переменные созданы, мы создадим функции для симулятора. В разделе «Функции редактора AIModel» нажмите «Добавить функцию». В диалоговом окне введите имя как «банк».
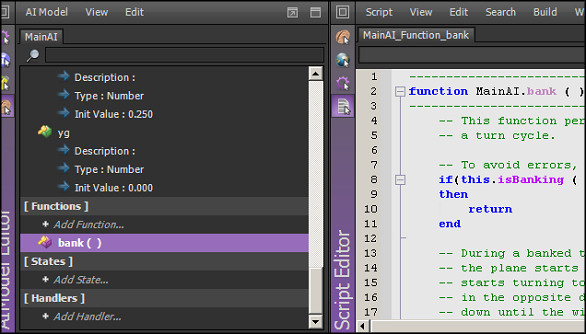
Откройте редактор AIModel и редактор сценариев одновременно. Дважды щелкните вновь созданную функцию bank() в редакторе AIModel. В редакторе сценариев будет отображен скелетный код функции.
Скопируйте следующее и вставьте его в редактор скриптов. Нажмите Ctrl + S, чтобы сохранить.
|
001
002
003
004
005
006
007
008
009
010
011
012
013
014
+015
016
+017
018
019
020
021
022
023
024
025
026
027
028
029
+030
031
032
033
034
035
036
037
038
039
040
041
042
043
044
045
046
047
048
049
050
051
052
053
054
+055
056
057
058
059
060
061
062
063
064
065
066
067
068
069
070
071
072
073
074
075
076
077
078
079
080
081
082
083
084
085
086
087
088
089
090
091
092
093
094
095
096
097
098
099
100
101
102
103
104
105
106
107
108
109
110
111
112
113
114
115
116
117
118
119
120
121
122
123
124
125
126
127
128
129
130
131
132
|
———————————————————————————
function MainAI.bank ( )
———————————————————————————
— This function performs the banked turn.
— a turn cycle.
— To avoid errors, return immediately unless isBanking is true.
if(this.isBanking ( ) == false)
then
return
end
— During a banked turn to left, the roll angle starts increasing, ie, the left wing of
— the plane starts going down and the right wing starts going up.
— starts turning to left.
— in the opposite direction, ie, the left wing starts going up and the right wing starts going
— down until the wings become parallel to the surface again.
— initially increase the roll in small increments as many times as the value of threshold variable
— below.
— in the same increments as many times as threshold.
— the surface again as it started.
local threshold = 55
local increment = 1
— Get a handle to the camera (ie, the plane we are simulating).
local lCamera = application.getCurrentUserActiveCamera ( )
— Get rotation of the camera with respect to local coordinates.
local X, Y, Z = object.getRotation ( lCamera, object.kLocalSpace )
— Get rotation of the camera with respect to global coordinates.
local Xg, Yg, Zg = object.getRotation ( lCamera, object.kGlobalSpace )
if(not this.isBThresholdReached ( ))
then
— This is the first half of the turn maneuver, eg, if turning left, the left wing is going down
— and the right wing is going up.
— Increment the counter
this.counter (this.counter()+increment )
— Have we reached the max roll angle?
if(this.counter () > threshold)
then
— If so, set the global boolean variable isBThresholdReached to true so that the second
— half could start
this.isBThresholdReached (true )
return
end
if(this.isBankingLeft ( ))
— Not yet reached the max roll angle and we are turning left.
then
— Rotate the camera around the global y axis to turn left.
object.setRotation ( lCamera, Xg, Yg+(1.5*this.dR()), Zg, object.kGlobalSpace )
— Rotate the camera around the local z axis to roll (bank).
object.setRotation ( lCamera, X, Y, Z+(2*this.dR()), object.kLocalSpace )
— Display message to user.
this.displayMessage («Banking left» )
— Move the camera in global coordinates.
this.move ( )
else
— Not yet reached the max roll angle and we are turning right.
— Rotate the camera around the global y axis to turn right.
object.setRotation ( lCamera, Xg, Yg-(1.5*this.dR()), Zg, object.kGlobalSpace )
— Rotate the camera around the local z axis to roll (bank).
object.setRotation ( lCamera, X, Y, Z-(2*this.dR()), object.kLocalSpace )
— Display message to user.
this.displayMessage («Banking right» )
— Move the camera in global coordinates.
this.move ( )
end
else
— We must have reached the max roll angle and this is the second half of the turn maneuver, eg,
— if turning left, the left wing is going up and the right wing is going down.
— Decrement the counter
this.counter (this.counter()-increment)
— Have we reached 0 yet?
if(this.counter () <= 0)
then
— If so, the turn has been completed.
this.counter (0)
this.isBanking (false )
this.displayMessage («» )
this.isBThresholdReached (false )
— Set rotation so that plane is parallel to surface.
object.setRotation ( lCamera, 0, Yg, 0, object.kGlobalSpace )
return
end
if(this.isBankingLeft ( ))
— Turn has not been completed yet and we are in second half of a left turn.
then
— Rotate camera in global coordinates so that it continues to turn to left around the
— global y axis.
— to smoothly bring back both wings to a parallel position to surface.
object.setRotation ( lCamera, Xg-(Xg/this.counter()), Yg+(0.25*this.dR()), Zg-(Zg/this.counter()), object.kGlobalSpace )
— Display message to user.
this.displayMessage («Banking left» )
— Move the camera in global coordinates.
this.move ( )
else
— Turn has not been completed yet and we are in second half of a right turn.
— Rotate camera in global coordinates so that it continues to turn to right around the
— global y axis.
— to smoothly bring back both wings to a parallel position to surface.
object.setRotation ( lCamera, Xg-(Xg/this.counter()), Yg-(0.25*this.dR()), Zg-(Zg/this.counter()), object.kGlobalSpace )
— Display message to user.
this.displayMessage («Banking right» )
— Move the camera in global coordinates.
this.move ( )
end
end
———————————————————————————
end
———————————————————————————
|
Аналогичным образом создайте каждую из следующих функций в редакторе AIModel, скопируйте и вставьте соответствующий код в редактор скриптов. Нажмите Ctrl + S, чтобы сохранить после создания каждой функции.
displayMessage
|
01
02
03
04
05
06
07
08
09
10
11
12
13
14
15
16
17
|
———————————————————————————
function MainAI.displayMessage (messageToDisplay )
———————————————————————————
— This function is used to display a message in the HUD named Hud.disp.
— particular HUD is created as a label.
— variable messageToDisplay.
— Get a handle to HUD.
local lComp = hud.getComponent (application.getCurrentUser ( ) , «HUD.disp» )
if(lComp)
then
— Set text of the label.
hud.setLabelText (lComp, messageToDisplay )
end
———————————————————————————
end
———————————————————————————
|
переехать
|
01
02
03
04
05
06
07
08
09
10
11
12
13
14
15
16
17
18
19
20
21
22
23
24
25
26
27
28
29
30
31
32
33
34
35
36
37
38
39
40
41
42
|
———————————————————————————
function MainAI.move (d)
———————————————————————————
— This function defines position of the plane in global coordinates.
— executed at every frame of the simulation.
— Get a handle to the camera (ie, the plane we are simulating).
local lCamera = application.getCurrentUserActiveCamera ( )
— Get rotation of the camera with respect to global coordinates.
local Xg, Yg, Zg = object.getRotation ( lCamera, object.kGlobalSpace )
— Get current global coordinates of the camera.
local tx,ty,tz = object.getTranslation ( lCamera, object.kGlobalSpace)
— Determine increment of the motion along the global x coordinate.
— absolute value of the velocity.
local Tx = (-1)*this.V() * math.sin(Yg)
— Initialize increment of the motion along the global y coordinate.
local Ty = 0
— Determine increment of the motion along the global z coordinate.
local Tz = (-1)*this.V() * math.cos(Yg)
— If plane is changing altitude, adjust the motion along the global y coordinate.
— there is no change, ie Ty=0.
if(d==»up»)
then
Ty = this.dP ( )
elseif(d==»down»)
then
Ty = -1*this.dP ( )
end
— Define new position of the plane in global coordinates.
object.setTranslation ( lCamera, tx+Tx, ty+Ty, tz+Tz, object.kGlobalSpace )
return tx, tz
———————————————————————————
end
———————————————————————————
|
подача
|
001
002
003
004
005
006
007
008
009
010
011
012
013
014
+015
016
+017
018
019
020
021
022
023
024
025
026
027
028
029
+030
031
032
033
034
035
036
037
038
039
040
041
042
043
044
045
046
047
048
049
050
051
052
053
054
+055
056
057
058
059
060
061
062
063
064
065
066
067
068
069
070
071
072
073
074
075
076
077
078
079
080
081
082
083
084
085
086
087
088
089
090
091
092
093
094
095
096
097
098
099
100
101
102
103
104
105
106
107
108
109
110
111
112
113
114
115
116
117
118
119
120
121
122
123
124
125
126
127
128
129
|
———————————————————————————
function MainAI.pitch ( )
———————————————————————————
— This function is executed at each frame of the simulation during a pitch maneuver.
— To avoid errors, return immediately unless isBanking is true.
if(this.isPitching ( )==false)
then
return
end
— When the plane starts pitching up, its nose starts going up, ie the pitch angle starts
— increasing.
— angle is reached, the nose of the plane starts going down, ie the pitch angle starts
— decreasing.
— ie the plane becomes parallel to the surface, the pitch maneuver will end and the plane will
— stop going further up.
—
— To simulate this behavior, we will initially increase the pitch in small increments as many times
— as the value of threshold variable below.
— the pitch angle in the same increments as many times as threshold.
— parallel to the surface again as it started.
local threshold = 15
local increment = 0.25
— Get a handle to the camera (ie, the plane we are simulating).
local lCamera = application.getCurrentUserActiveCamera ( )
— Get rotation of the camera with respect to local coordinates.
local X, Y, Z = object.getRotation ( lCamera, object.kLocalSpace )
— Get rotation of the camera with respect to global coordinates.
local Xg, Yg, Zg = object.getRotation ( lCamera, object.kGlobalSpace )
— Get current global coordinates of the camera.
local tx,ty,tz = object.getTranslation ( lCamera, object.kGlobalSpace)
if(not this.isPThresholdReached ( ))
then
— This is the first half of the pitch maneuver, eg, if pitching up, the nose goes up.
— Increment the counter.
this.counter (this.counter()+increment )
— Have we reached the max pitch angle?
if(this.counter () > threshold)
then
— If so, set the global boolean variable isPThresholdReached to true so that the second
— half could start
this.isPThresholdReached (true )
return
end
if(this.isPitchingUp ( ))
— Not yet reached the max pitch angle and we are moving up.
then
— Rotate the plane around its local x axis to increase the pitch angle.
object.setRotation ( lCamera, X+this.dP(), Y, Z, object.kLocalSpace )
— Display message to user.
this.displayMessage («Pitching up»)
— Call the move function to increase altitude of the plane.
this.move («up» )
else
— Not yet reached the max pitch angle and we are moving down.
— Rotate the plane around its local x axis to decrease the pitch angle.
object.setRotation ( lCamera, X-this.dP(), Y, Z, object.kLocalSpace )
— Display message to user.
this.displayMessage («Pitching down»)
— Call the move function to decrease altitude of the plane.
this.move («down» )
end
else
— We must have reached the max pitch angle and this is the second half of the pitch maneuver, eg,
— if pitching up, the nose is going up.
— Decrement the counter
this.counter (this.counter()-increment)
— Have we reached 0 yet?
if(this.counter () <= 0)
then
— If so, the maneuver has been completed.
this.counter (0)
this.displayMessage («» )
this.isPitching (false )
this.isPThresholdReached (false )
— In global space, the plane must be parallel to surface.
— of the plane, ie, its angle around the y axis.
— around the x and z axes should be 0.
object.setRotation ( lCamera, 0, this.yg(), 0, object.kGlobalSpace )
return
end
if(this.isPitchingUp ( ))
— Maneuver has not been completed yet and we are in second half of a ‘pitch up’.
then
— Compensate angles with respect to global x and z axes to smoothly bring back plane to
— a parallel position to surface.
object.setRotation ( lCamera, Xg-(Xg/this.counter()), this.yg(), Zg-(Zg/this.counter()), object.kGlobalSpace )
— Display message to user.
this.displayMessage (string.format ( «Pitching up %2i»,ty ))
— Call the move function to increase altitude of the plane.
this.move («up» )
else
— Compensate angles with respect to global x and z axes to smoothly bring back plane to
— a parallel position to surface.
object.setRotation ( lCamera, Xg-(Xg/this.counter()), this.yg(), Zg-(Zg/this.counter()), object.kGlobalSpace )
— Display message to user.
this.displayMessage (string.format ( «Pitching down %2i»,ty ))
— Call the move function to decrease altitude of the plane.
this.move («down» )
end
end
———————————————————————————
end
———————————————————————————
|
сброс настроек
|
01
02
03
04
05
06
07
08
09
10
|
———————————————————————————
function MainAI.reset ( )
———————————————————————————
— Set to zero the variables used in onTouchSequenceChange handler.
this.prevTouchCount (0)
this.prevX0 (0)
this.prevY0 (0)
———————————————————————————
end
———————————————————————————
|
startBanking
|
01
02
03
04
05
06
07
08
09
10
11
12
13
14
15
16
17
18
19
|
———————————————————————————
function MainAI.startBanking (direction)
———————————————————————————
— This function is called when a turn cycle starts.
— either left or right.
— Set the global boolean variable isBanking true to indicate that turn cycle has started.
this.isBanking ( true)
— Set value of the global boolean variable isBankingLeft according to direction.
if(direction==»left»)
then
this.isBankingLeft ( true)
else
this.isBankingLeft ( false)
end
———————————————————————————
end
———————————————————————————
|
startPitching
|
01
02
03
04
05
06
07
08
09
10
11
12
13
14
15
16
17
18
19
20
21
22
23
24
25
26
|
———————————————————————————
function MainAI.startPitching (direction)
———————————————————————————
— This function is called when a pitch cycle starts.
— either up or down.
— Set the global boolean variable isPitching true to indicate that pitch cycle has started.
this.isPitching ( true)
— Set value of the global boolean variable isPitchingUp according to direction.
if(direction==»up»)
then
this.isPitchingUp ( true)
else
this.isPitchingUp ( false)
end
— Obtain the current rotation, just before pitch maneuver starts, around the global y axis and
— store it in global variable yg.
— maneuver.
local lCamera = application.getCurrentUserActiveCamera ( )
local Xg, Yg, Zg = object.getRotation ( lCamera, object.kGlobalSpace )
this.yg(Yg)
———————————————————————————
end
———————————————————————————
|
Создав функции, теперь мы создадим обработчики. В редакторе AIModel в разделе «Обработчики» нажмите «Добавить обработчик». В меню выберите Custom:
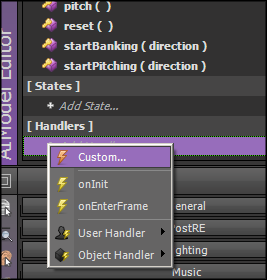
В текстовое поле введите ManeuverRequest. Из-за предшествующего ‘on’ имя обработчика будет onManeuverRequest:

В редакторе сценариев скопируйте и вставьте следующее для кода обработчика onManeuverRequest. Обязательно сохраните код с помощью Ctrl + S:
|
01
02
03
04
05
06
07
08
09
10
11
12
13
14
15
16
17
18
19
20
21
22
23
24
25
26
27
28
29
30
31
32
33
34
|
———————————————————————————
function MainAI.onManeuverRequest ( d )
———————————————————————————
— This handler is called by the HUD buttons on the screens.
— as one of up, down, left or right and then calls the appropriate function to start the maneuver.
if(this.isBanking ( ))
then
return
end
if(this.isPitching ( ))
then
return
end
if(d==»L»)
then
this.startBanking ( «left» )
return
elseif(d==»R»)
then
this.startBanking ( «right» )
return
elseif(d==»U»)
then
this.startPitching ( «up» )
return
elseif(d==»D»)
then
this.startPitching ( «down» )
return
end
———————————————————————————
end
———————————————————————————
|
Аналогичным образом создайте каждый из следующих пользовательских обработчиков в редакторе AIModel, скопируйте и вставьте соответствующий код в редактор сценариев. Нажмите Ctrl + S, чтобы сохранить после создания каждого обработчика.
onRequestRestart
|
1
2
3
4
5
6
7
8
|
———————————————————————————
function MainAI.onRequestRestart ( )
———————————————————————————
— This function restarts the application.
application.restart ( )
———————————————————————————
end
———————————————————————————
|
onRestart
|
01
02
03
04
05
06
07
08
09
10
11
12
13
14
15
16
17
18
|
———————————————————————————
function MainAI.onRestart ( )
———————————————————————————
— This function requests restart of the application.
— needs to restart the application.
— First, set a global variable that application is about to restart.
this.isAppRestarting(true)
— Display an informational message to user for notification.
this.displayMessage («Simulation restarting» )
— Queue an event to call function onRequestRestart() after a 1 second delay.
— onRequestRestart function makes a system call to restart the application.
this.postEvent (1,»onRequestRestart» )
———————————————————————————
end
———————————————————————————
|
Мы создадим еще несколько обработчиков. Тем не менее, это встроенные обработчики в Shiva3D, а не пользовательские обработчики. В разделе «Обработчики» нажмите «Добавить обработчик» и выберите «Ввести» в меню.
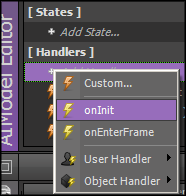
Скопируйте и вставьте следующий код для обработчика onInit в редактор скриптов. Сохраните код с помощью Ctrl + S.
|
01
02
03
04
05
06
07
08
09
10
11
12
13
14
15
16
17
18
19
20
21
22
23
24
25
26
27
28
29
30
31
32
33
34
35
36
37
38
39
40
41
42
43
44
45
46
47
48
49
50
51
52
53
54
55
56
57
58
59
60
61
62
63
64
65
66
67
68
69
70
71
72
73
74
75
76
77
78
79
80
81
82
83
84
|
———————————————————————————
function MainAI.onInit ( )
———————————————————————————
— Define Scene1 as the current user scene
application.setCurrentUserScene («Scene1»)
— According to Wikipedia (http://en.wikipedia.org/wiki/Viewport), viewport
— is defined as ‘the 2D rectangle used to project the 3D scene to the position of a virtual camera.’
— We rotate the view 90 degrees (http://www.stonetrip.com/developer/doc/api/application-kOptionViewportRotation)
— so that the simulation is best viewed by rotating the mobile device -90 degrees, ie
— its left side faces downward.
— near the device’s top and the right thumb will be near the device’s bottom.
application.setOption ( application.kOptionViewportRotation,3 )
— Get a handle to the default camera.
local lCamera = application.getCurrentUserActiveCamera ( )
— The camera will capture the pilot’s view of the simulation from the cockpit.
— is the position of the plane.
— point, camera is positioned 50 units above the z-axis, and its distance from the
— y-axis is 2050 units.
object.setTranslation ( lCamera, 0, 50, 2050, object.kGlobalSpace )
— We adjust the global and local rotations so that they are all zero.
— is facing toward the y-axis.
object.setRotation ( lCamera, 0,0,0, object.kGlobalSpace )
object.setRotation ( lCamera, 0,0,0, object.kLocalSpace )
— We enable the multi-touch input on the application.
— screen touch events for pitch and turn maneuvers as well as restarting the simulation.
input.enableMultiTouch ( this.getUser ( ), true )
— We create a HUD (head up display) for the application and name it as Hud.disp.
local lUser = application.getCurrentUser ( )
local lComp = hud.newComponent (lUser, hud.kComponentTypeLabel,»HUD.disp» )
— This particular HUD named HUD.disp is a label and will be used to display various messages
— to user during the simulation, while turning, pitching and restarting the simulation.
if ( lComp ~= nil )
then
— Set the position and size of the label.
hud.setComponentPosition (lComp, 50, 10 )
hud.setComponentSize (lComp, 100, 10 )
— Define background and border colors of the label.
— passed as 0, which defines the respective element (background or border color) to be
— completely transparent.
hud.setComponentBackgroundColor (lComp, 0, 0, 0, 0 )
hud.setComponentBorderColor (lComp, 0, 0, 0, 0 )
— Make sure the label visible.
hud.setComponentVisible (lComp, true )
— The setComponentZOrder() function defines how the label is situated in the front.
— parameter should be between 0 and 255, and larger the parameter is the component is placed
— further in the foreground.
hud.setComponentZOrder (lComp, 255 )
— Initially, the label is empty, ie, there is no message to display to user.
hud.setLabelText (lComp, «» )
— Define default font to be font of the label.
hud.setDefaultFont (lUser, «DefaultFont» )
— Define height of the label text as a percentage of the height of the label itself.
— this to be 100%.
hud.setLabelTextHeight (lComp, 100 )
— Align the text at the center of the label.
hud.setLabelTextAlignment (lComp, hud.kAlignCenter, hud.kAlignCenter )
end
— This is the other HUD we use in the simulator and it represents the five buttons atop the
— screen.
— instance of the template and name the instance ‘buttons’ as well.
hud.newTemplateInstance ( this.getUser ( ), «buttons»,»buttons» )
— Call the reset() function to reset several global variables used in the application.
this.reset()
———————————————————————————
end
———————————————————————————
|
Теперь мы создадим обработчик onEnterFrame. В разделе «Обработчики» нажмите «Добавить обработчик» и выберите onEnterFrame в меню.
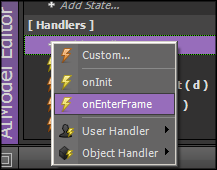
Скопируйте и вставьте следующий код для обработчика onEnterFrame в редактор сценариев. Сохраните код с помощью Ctrl + S.
|
01
02
03
04
05
06
07
08
09
10
11
12
13
14
15
16
17
18
19
20
21
22
23
24
25
26
27
28
29
30
31
32
33
34
35
36
37
38
39
40
|
———————————————————————————
function MainAI.onEnterFrame ( )
———————————————————————————
— This handler is called every frame.
— If the plane is currently performing a roll or pitch maneuver, return.
— or pitch() functions will perform the necessary logic.
if(this.isBanking ( ))
then
this.bank ( )
return
elseif(this.isPitching ( ))
then
this.pitch()
return
end
— The plane is not currently performing a roll or pitch maneuver.
— plane in global coordinates.
local tx,tz = this.move ( )
— If plane is out of bounds, ie, boundaries of the terrain has been reached, we need to display
— an informational message and restart the simulation.
— isAppRestarting is true then the application is already restarting.
— request a restart.
if(this.isAppRestarting()==false)
then
— Check if plane is out of bounds.
if(tz < -1900 or tz > 2100 or math.abs(tx) > 1900)
then
— Display an informational message.
this.displayMessage («Out of bounds» )
— Queue an event to call function onRestart() after a 1 second delay.
this.postEvent (1,»onRestart» )
end
end
———————————————————————————
end
———————————————————————————
|
Осталось еще три обработчика: onTouchSequenceBegin, onTouchSequenceChange и onTouchSequenceEnd, которые являются пользовательскими обработчиками. В разделе «Обработчики» нажмите «Добавить обработчик». В меню выберите User Handler -> onTouchSequenceBegin.

Аналогичным образом создайте два других обработчика, onTouchSequenceChange и onTouchSequenceEnd. Теперь в редакторе AIModel дважды щелкните обработчик onTouchSequenceBegin. Скопируйте и вставьте следующий код в редактор сценариев для соответствующего кода.
|
01
02
03
04
05
06
07
08
09
10
|
———————————————————————————
function MainAI.onTouchSequenceBegin ( )
———————————————————————————
— This handler notifies our application that the touch events have started.
— call reset() function to reset values of several variables used in
— onTouchSequenceChange() handler.
this.reset ( )
———————————————————————————
end
———————————————————————————
|
Аналогичным образом скопируйте и вставьте следующий код для onTouchSequenceChange и onTouchSequenceEnd соответственно.
|
001
002
003
004
005
006
007
008
009
010
011
012
013
014
+015
016
+017
018
019
020
021
022
023
024
025
026
027
028
029
+030
031
032
033
034
035
036
037
038
039
040
041
042
043
044
045
046
047
048
049
050
051
052
053
054
+055
056
057
058
059
060
061
062
063
064
065
066
067
068
069
070
071
072
073
074
075
076
077
078
079
080
081
082
083
084
085
086
087
088
089
090
091
092
093
094
095
096
097
098
099
100
101
102
103
104
105
106
107
108
109
|
———————————————————————————
function MainAI.onTouchSequenceChange ( nTaps0, nX0, nY0, nTaps1, nX1, nY1, nTaps2, nX2, nY2, nTaps3, nX3, nY3, nTaps4, nX4, nY4 )
———————————————————————————
— This handler is called in conjunction with onTouchSequenceBegin and onTouchSequenceEnd.
— provides detailed information on the number of ‘taps’ (touches) and the coordinates of each tap.
— We will use this handler to receive input from the user for banked turn, pitch and restart
— requests.
— independent of how those button handlers are implemented.)
— If the plane currently executing a banked turn or pitch maneuver or if the application is
— restarting do not take any further action;
if(this.isBanking ( ) or this.isPitching ( ) or this.isAppRestarting ( ))
then
return
end
— Let us first explain the parameters in the event handler.
— If there is only one tap on the screen, nTaps0 is 1 and nTapsi = -1, i = 1,…,4
— If there are only two taps on the screen, nTaps0, nTaps1 are 1 and nTapsi = -1, i = 2,…,4
— If there are only three taps on the screen, nTaps0, nTaps1 and nTaps2 are 1 and nTapsi = -1, i = 3, 4
— …
— Depending on number of taps, nXi, nYi give the coordinates of the corresponding tap.
— if there are two taps, (nX0, nY0) and (nX1, nY1) are the coordinates of the first and second
— taps.
— to the onTouchSequenceChange.
— ie, nTaps0, nTaps1 are 1 and nTapsi = -1, i = 2,…,4.
— the screen.
— will provide (nX0, nY0) for the unique motion of one of your thumbs and similarly for (nX1, nY1).
local touchCount = 0
if(nTaps0 > 0) then touchCount = 1 end
if(nTaps1 > 0) then touchCount = 2 end
if(nTaps2 > 0) then touchCount = 3 end
if(nTaps3 > 0) then touchCount = 4 end
if(nTaps4 > 0) then touchCount = 5 end
— We are interested in only single touch and double touch events.
— event, this will be interpreted as user is moving one thumb on the screen for a banked turn or
— pitch maneuver.
— The variable touchCount stores number of taps.
— taps we had received in the previous call to onTouchSequenceChange.
— current numbers of taps are equal then we continue processing the information.
if ( touchCount == this.prevTouchCount())
then
if ( touchCount == 1 )
then
— This is a single touch event.
— maneuver or a pitch maneuver.
— If user is moving a thumb from left to right of the screen, this must be a bank turn to right.
— If user is moving a thumb from right to left of the screen, this must be a bank turn to left.
— If user is moving a thumb top down, this must be a pitch request down.
— If user is moving a thumb bottom up, this must be a pitch request up.
— Note that the 2-dimensional screen coordinates are such that the y axis is vertical,
— with increasing values from bottom up and the x axis is horizontal, with increasing values from
— left to right.
if(math.abs(nX0-this.prevX0()) > math.abs(nY0-this.prevY0()))
— This must be a banked turn maneuver because the motion of user’s thumb along x axis
— is greater than that of y axis (more horizontal motion than vertical).
then
if(nX0 > this.prevX0())
— thumb is moving to right
then
this.startBanking ( «right» )
elseif(nX0 < this.prevX0())
— thumb is moving to left
then
this.startBanking ( «left» )
end
elseif(math.abs(nX0-this.prevX0()) < math.abs(nY0-this.prevY0()))
— This must be a pitch maneuver because the motion of user’s thumb along y axis
— is greater than that of x axis (more vertical motion than horizontal).
then
if(nY0 > this.prevY0())
— thumb is moving up
then
this.startPitching ( «up» )
elseif(nY0 < this.prevY0())
— thumb is moving down
then
this.startPitching ( «down» )
end
end
elseif(touchCount == 2)
— This could be a restart request.
— double touch count.
— between the y-coordinates of the two tap events.
— -1 <= nYi <= 1, i=0,1.
— between nY0 and nY1 is 0.2, ie 10% of the entire length of the 2-dimensional Y coordinate.
— (By experiment, if the double touch event is fired by a single thumb then the touch points
— on the y-axis will be less apart.)
then
if(math.abs (nY0 — nY1) > 0.2 and this.isAppRestarting()==false)
then
this.sendEvent ( «onRestart» )
end
end
end
— Store the touchCount and nY0 in prevTouchCount and prevY0, respectively, to be used in the
— next call to onTouchSequenceChange.
this.prevTouchCount (touchCount)
this.prevX0 (nX0)
this.prevY0 (nY0)
———————————————————————————
end
———————————————————————————
|
onTouchSequenceEnd
|
01
02
03
04
05
06
07
08
09
10
|
———————————————————————————
function MainAI.onTouchSequenceEnd ( )
———————————————————————————
— onTouchSequenceEnd handler notifies our application when the touch event ends.
— call reset() function to reset values of several variables used in
— onTouchSequenceChange() handler.
this.reset ( )
———————————————————————————
end
———————————————————————————
|
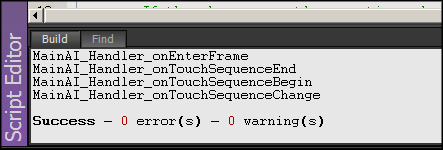
Создав весь код, который нам нужен, щелкните внутри Script Editor и нажмите F7 для компиляции. Вы должны увидеть 0 ошибок и 0 предупреждений, как показано ниже.
Создать кнопки управления
Есть несколько других элементов пользовательского интерфейса, которые нам нужно создать, прежде чем мы начнем играть в симулятор. Это кнопки, отображаемые в верхней части экрана. Мы создадим эти кнопки и подключим их к некоторым ранее созданным обработчикам событий с помощью редактора HUD. Мы будем следовать трем основным шагам:
- Используя редактор HUD, мы создадим шаблон, который состоит из кнопок. Этот шаг состоит из двух подразделов:
- Для каждой кнопки определите действие, которое должно произойти, то есть событие, которое должно сработать. Когда кнопка нажата, укажите обработчик события для обработки этого события.
- Создайте каждую кнопку, укажите ее визуальные атрибуты и свяжите ее с соответствующим созданным действием.
- Затем мы добавим созданный шаблон кнопок в игру Simulator.
- Наконец, в нашем коде мы будем инициировать экземпляр шаблона кнопок. Это уже сделано в обработчике onInit (см. Выше раздел «Ввод кода для MainAI»). Обратите внимание, что обработчик onInit успешно скомпилирован, когда мы создали код, хотя шаблон, на который он ссылался, в то время не существовал. Это связано с тем, что на шаблон ссылается его имя, а компилятор проверяет только правильный синтаксис вызова, а не существование шаблона с указанным именем. Однако, если бы мы попытались запустить код без реально существующего шаблона, мы получили бы ошибку времени выполнения.
Создать шаблон кнопок
Воспользуйтесь редактором HUD. В меню HUD выберите Создать.
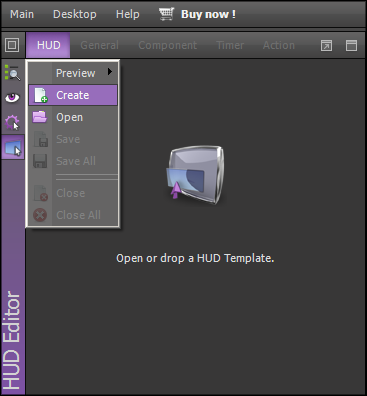
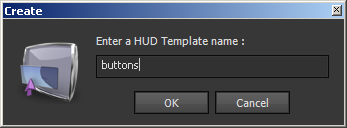
Назовите кнопки шаблона.
Щелкните правой кнопкой мыши на Действия, выберите Добавить действие.
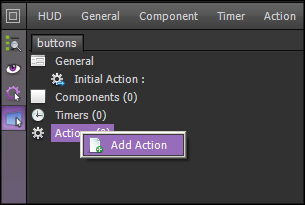
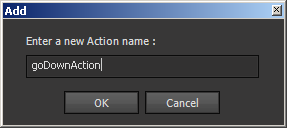
Назовите действие goDownAction.
Щелкните правой кнопкой мыши на goDownAction и выберите команду «Добавить команду».
В диалоговом окне «Команда действий» выберите
- Тип команды: SendEventToUser
- Пользователь: RuntimeValue CurrentUser
- AIModel: Строка MainAI
- Событие: String onManeuverRequest
- Вызовите параметр0: строка D
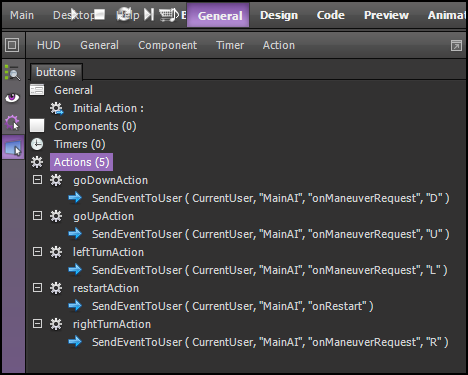
Нажмите ОК Вы должны увидеть следующее в HUD Editor.
Подобно вышеописанному, создайте действия goUpAction, leftTurnAction и rightTurnAction, с единственным отличием, являющимся значением Call Parameter0. Вы должны использовать строковые значения U, L и R для goUpAction, leftTurnAction и rightTurnAction, соответственно.
Последнее действие, которое нам нужно создать, это restartAction. Это создается аналогично приведенному выше, за исключением тех случаев, когда Событие является onRestart и отсутствуют параметры Call.
Со всеми созданными действиями вы должны увидеть следующее в HUD Editor.
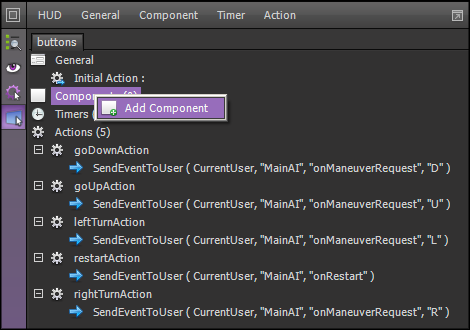
Теперь мы создадим компоненты кнопки для использования этих действий. Щелкните правой кнопкой мыши Компоненты и выберите Добавить компонент.
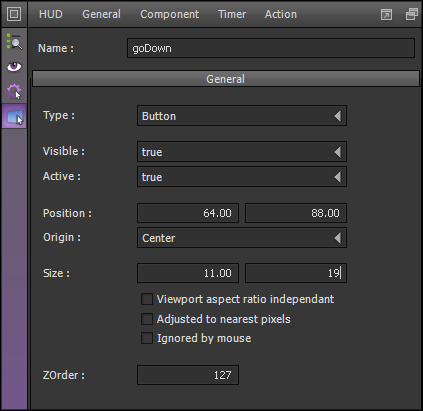
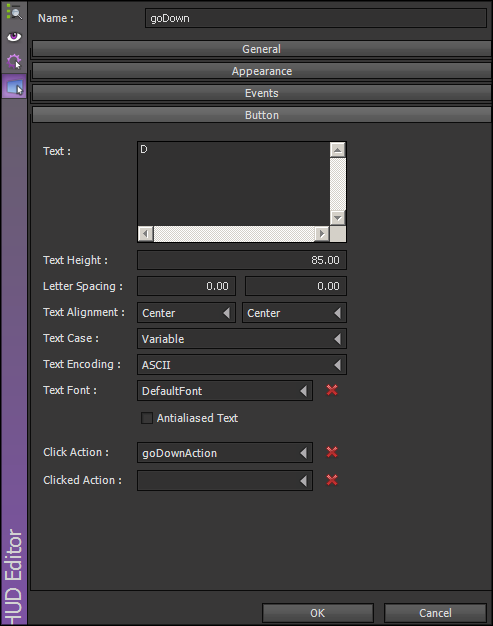
Назовите компонент goDown. В разделе «Общие» выберите тип кнопки. Установите положение как 64 и 88. Установите размер как 11 и 19. Не изменяйте другие варианты.
Выберите раздел Внешний вид. Установите форму равной RoundRectangle. В BackTexture выберите top_crop. Пусть Opacity будет 100. Измените значения ForeColor и BorderColor, как показано ниже.
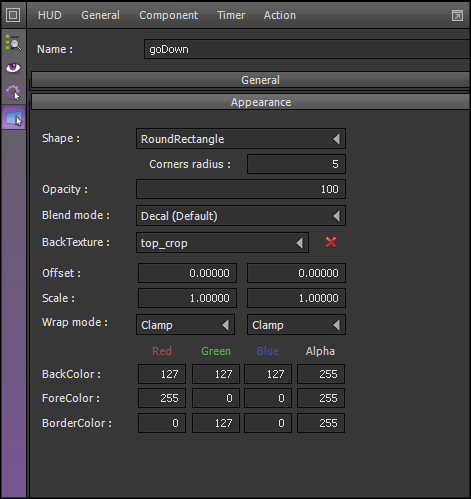
Примечание: установка непрозрачности на 100 делает кнопку полупрозрачной. Мы также позволили top_crop.jpg быть фоновым изображением для кнопки. Это и полупрозрачность кнопки создают эффект смешивания для кнопки и неба.
Выберите раздел «Кнопка». Введите D в области Текст. Сделайте следующие изменения и нажмите ОК.
- Высота текста: 85
- Выравнивание текста: Центр Центр
- Нажмите Действие: goDownAction.
Повторите шаги выше, чтобы создать следующие компоненты (кнопки).
- Название: goUp
- Общий раздел
- Тип: Кнопка
- Положение: 36 и 88
- Размер: 11 и 19
- Внешний вид раздела:
- Shape RoundRectangle
- Непрозрачность 100
- BackTexture: top_crop
- BackColor: 127 127 127
- ForeColor R: 255 G: 0 B: 0
- BorderColor: R: 0 G: 127 B: 0
- Раздел кнопки:
- Текст: U
- Высота текста: 85
- Выравнивание текста: Центр Центр
- Нажмите Действие: goUpAction
- Имя: leftTurn
- Общий раздел
- Тип: Кнопка
- Положение: 7 и 88
- Размер: 11 и 19
- Внешний вид раздела:
- Shape RoundRectangle
- Непрозрачность 100
- BackTexture: top_crop
- BackColor: 127 127 127
- ForeColor R: 255 G: 0 B: 0
- BorderColor: R: 0 G: 127 B: 0
- Раздел кнопки:
- Текст: L
- Высота текста: 85
- Выравнивание текста: Центр Центр
- Нажмите Действие: leftTurnAction
- Имя: rightTurn
- Общий раздел
- Тип: Кнопка
- Положение: 93 и 88
- Размер: 11 и 19
- Внешний вид раздела:
- Shape RoundRectangle
- Непрозрачность 100
- BackTexture: top_crop
- BackColor: 127 127 127
- ForeColor R: 255 G: 0 B: 0
- BorderColor: R: 0 G: 127 B: 0
- Раздел кнопки:
- Текст: R
- Высота текста: 85
- Выравнивание текста: Центр Центр
- Нажмите Действие: rightTurnAction
- Название: перезагрузка
- Общий раздел
- Тип: Кнопка
- Положение: 50 и 88
- Размер: 11 и 19
- Внешний вид раздела:
- Shape RoundRectangle
- Непрозрачность 100
- BackTexture: top_crop
- BackColor: 127 127 127
- ForeColor R: 255 G: 255 B: 0
- BorderColor: R: 255 G: 255 B: 0
- Раздел кнопки:
- Текст: Re
- Высота текста: 85
- Выравнивание текста: Центр Центр
- Нажмите Действие: перезагрузите действие
Добавить шаблон кнопки в симулятор
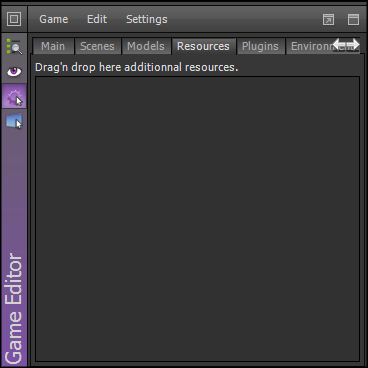
Теперь нам нужно добавить вновь созданный шаблон кнопок в симулятор. Откройте редактор игр и проводник данных. В проводнике данных в папке «Игры» дважды щелкните «Симулятор». Игра загружается в редакторе игр. Выберите вкладку «Ресурсы» в редакторе игр. Вы должны увидеть, что он пуст.
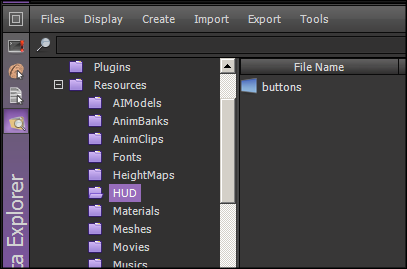
В проводнике данных откройте папку HUD в папке «Ресурсы». Вы увидите, что вновь созданный шаблон кнопок находится там.
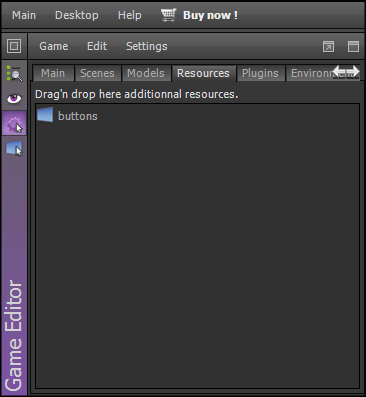
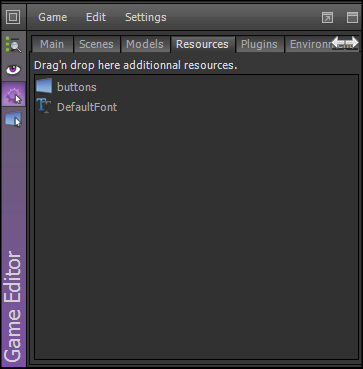
Теперь перетащите кнопки из папки HUD на вкладку «Ресурсы» в редакторе игр.
Добавить шрифт по умолчанию
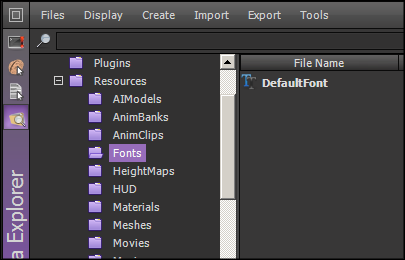
Нам нужно добавить в симулятор игры шрифт. Шрифт необходим, потому что мы отображаем текстовые сообщения на экране, а также кнопки управления содержат текст. ShiVa Editor предоставляет шрифт по умолчанию, которого должно быть достаточно для наших целей. Когда вкладка «Ресурсы» в редакторе игр открыта, в «Проводнике данных» откройте папку «Шрифты» в папке «Ресурсы». Вы должны увидеть DefaultFont.
Перетащите DefaultFont из папки «Шрифты» на вкладку «Ресурсы» в редакторе игр.
Модульное тестирование
Все должно быть готово для проведения юнит-теста. В меню верхнего уровня Shiva Editor выберите Preview.

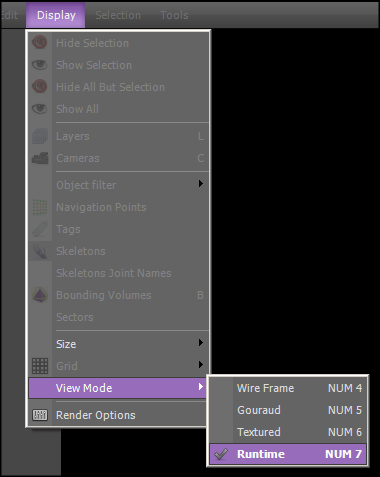
В меню дисплея выберите Режим просмотра -> Время выполнения.
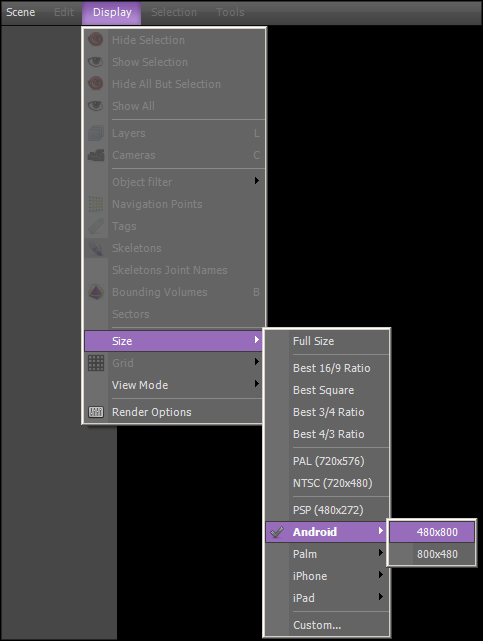
В меню дисплея выберите Размер -> Android -> 480×800. (Вы можете выбрать другие размеры дисплея; например, 480×800.)
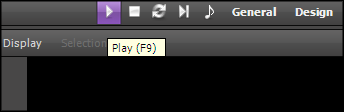
В верхнем меню нажмите на кнопку запуска (или просто нажмите F9), чтобы начать игру в симулятор.
Вы должны увидеть, что Симулятор запустится, как показано ниже.

Примечание. Если в любой момент предварительного просмотра необходимо внести изменения, остановите игру, нажав кнопку «Стоп». После внесения изменений нажмите кнопку «Перезагрузка», а затем снова нажмите кнопку «Пуск». Кнопки остановки и перезапуска показаны ниже.

Заключительные замечания
Часть 3 продолжалась с добавлением кода и модульного тестирования конечного продукта. В части 4, последней части серии, мы экспортируем приложение из редактора ShiVa и импортируем в ShiVa Authoring Tool. Затем мы объясним, как преобразовать приложение в исполняемый файл для конкретной платформы с помощью ShiVa Authoring Tool.Мы рассмотрим платформы Android, iPad и iPhone. Мы предоставим изображения симулятора с реальных устройств, используемых для тестирования, телефона Motorola Droid с ОС Android 2.2, iPad2 с iOS 4.3 и iPod Touch с iOS 4.3. Наконец, в «Заключительных замечаниях» мы дадим выводы из серии.