Это вторая часть игрового мини-сериала «Сапер». В этом руководстве вы узнаете, как полностью реализовать клиентскую часть приложения. Мы будем использовать собственное приложение iOS, которое подключается к веб-серверам, анализирует данные и отображает взаимодействие с пользовательским интерфейсом.
Обзор проекта
Minesweeper Flag — многопользовательская настольная игра, в которую играют два противника. Обычно синий или красный цвет назначается каждому игроку. Доска состоит из 256 равных квадратов, и каждая доска имеет 51 мин, расположенных в совершенно случайных положениях.
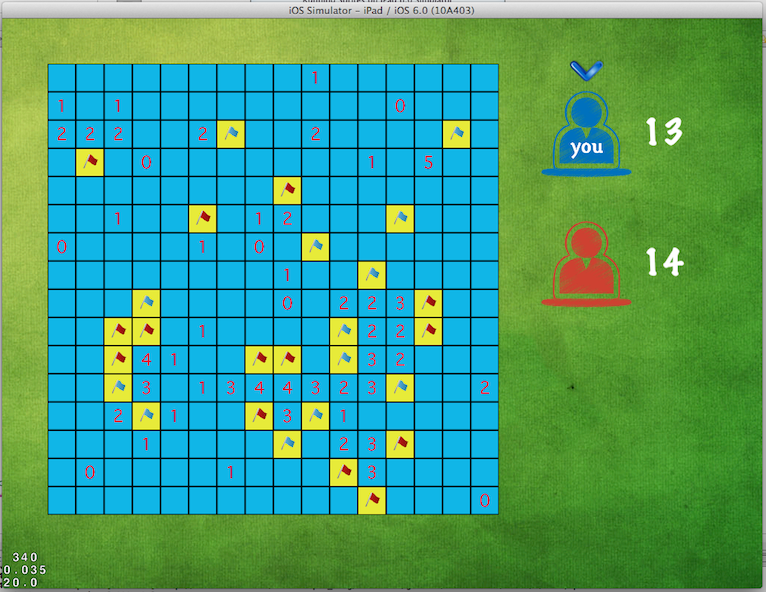
Предварительный просмотр финального эффекта
Обзор части 1
Перед началом второй части серии убедитесь, что первая часть полностью протестирована и реализована .
Шаг 1: Установка Cocos 2D
Первым шагом является загрузка и установка игрового движка Cocos 2D . Для этого урока мы использовали Cocos 2D версию 2.
После загрузки вам необходимо установить его и интегрировать с Xcode. Распакуйте загруженный ранее файл, и вы увидите файл с именем install-templates.sh. Откройте окно терминала и запустите этот файл, используя следующую команду
|
1
|
./install-templates -f.
|
Шаг 2: Создайте новый проект
Используя XCode, создайте новый проект: Файл -> Новый -> Проект .
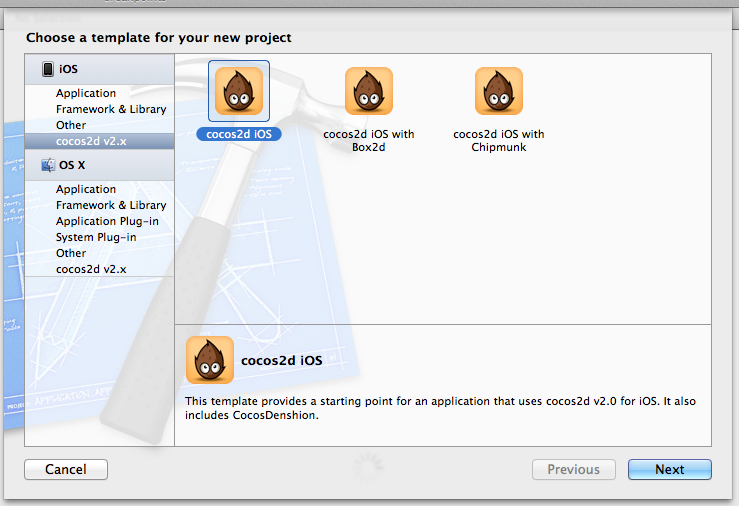
Выберите Cocos2d v2.x в левом боковом меню и Cocos2d iOS в правом.
Шаг 3. Настройка параметров проекта
Дайте вашему проекту имя и идентификатор компании. Для этого урока мы используем семейство устройств iPad.
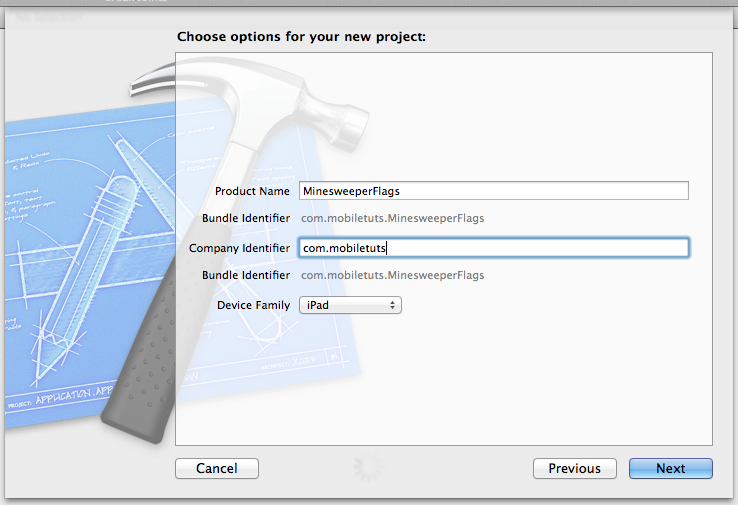
Шаг 4. Проверьте настройки
Если все правильно, вы должны увидеть окно, похожее на следующее:
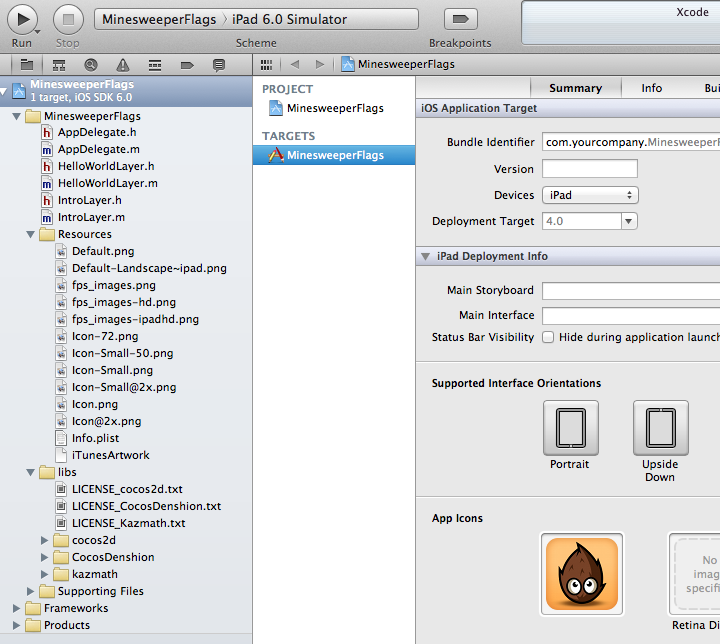
Шаг 5: Добавить новые классы
Теперь вам нужно добавить два новых класса Objective-c . Для этого зайдите в пункт меню Файл -> Создать -> Файл .
Добавьте следующие классы:
- LoadingScene : этот класс будет служить экраном загрузки для пользователя, пока он / она ждет, когда другой игрок присоединится к игре.
- GameScene : это основной класс игры; где основная логика запрограммирована.
Шаг 6: добавление файлов ресурсов
Для правильного запуска игры вы должны добавить файлы ресурсов в свой проект. Здесь вы можете скачать используемые файлы ресурсов. Затем скопируйте их в папку ресурсов.
Шаг 7: Создайте класс HelloWorldLayer
Измените заголовочный файл HelloWorldLayer следующим образом:
|
01
02
03
04
05
06
07
08
09
10
11
12
13
14
15
16
17
18
|
#import <GameKit/GameKit.h>
#import «cocos2d.h»
@interface HelloWorldLayer : CCLayer {}
@property (nonatomic, retain) NSURLConnection* connectionConnectGame;
@property (nonatomic,retain) NSMutableData* responseData;
@property (nonatomic,retain) NSString* URL;
@property (nonatomic) int playerID;
@property (nonatomic,retain) NSString* playerIDString;
@property (nonatomic) BOOL launchFlag;
@property (nonatomic,retain) NSString* gameID;
@property (nonatomic,retain) NSString* turnID;
+(CCScene *) scene;
-(void) connectTheWebService:(NSString*)id;
@end
|
Измените файл реализации HelloWorldLayer следующим образом:
|
1
|
#import «HelloWorldLayer.h» #import «GameScene.h» #import «LoadingScene.h» #import «cocos2d.h» #import «AppDelegate.h» #pragma mark — HelloWorldLayer @implementation HelloWorldLayer @synthesize connectionConnectGame = _connectionConnectGame;
|
Шаг 8: создайте класс LoadingScene
Измените свой заголовочный файл LoadingScene на следующее:
|
01
02
03
04
05
06
07
08
09
10
11
12
13
14
15
16
17
|
#import «cocos2d.h»
@interface LoadingScene : CCLayer <UIGestureRecognizerDelegate>{ }
@property (nonatomic, retain) NSURLConnection *connectionConnectGame;
@property (nonatomic,retain) NSMutableData* responseData;
@property (nonatomic,retain) NSString* gameID;
@property (nonatomic,retain) NSString* playerID;
@property (nonatomic) BOOL launchFlag;
@property (nonatomic,retain) NSString* URL;
+(CCScene *) scene;
+(id) initializeWithPlayerID:(NSString*) playerid andWithGameID:(NSString*) gameid;
-(id) initializeInternalDataWithPlayerID:(NSString*) playerid andWithGameID:(NSString*) gameid;
-(void) connectTheWebService:(NSString*)id;
@end
|
Измените ваш файл реализации LoadingScene следующим образом:
|
001
002
003
004
005
006
007
008
009
010
011
012
013
014
015
016
017
018
019
020
021
022
023
024
025
026
027
028
029
030
031
032
033
034
035
036
037
038
039
040
041
042
043
044
045
046
047
048
049
050
051
052
053
054
055
056
057
058
059
060
061
062
063
064
065
066
067
068
069
070
071
072
073
074
075
076
077
078
079
080
081
082
083
084
085
086
087
088
089
090
091
092
093
094
095
096
097
098
099
100
101
102
103
104
105
106
107
|
#import «LoadingScene.h»
#import «GameScene.h»
@implementation LoadingScene
@synthesize responseData = _responseData;
@synthesize connectionConnectGame = _connectionConnectGame;
@synthesize gameID = _gameID;
@synthesize playerID = _playerID;
@synthesize launchFlag = _launchFlag;
@synthesize URL = _URL;
+(CCScene *) scene{
CCScene *scene = [CCScene node];
LoadingScene *layer = [LoadingScene node];
[scene addChild: layer];
return scene;
}
-(id) init{
if( (self=[super init] )) {}
return self;
}
// Custom initializer
+(id) initializeWithPlayerID:(NSString*) playerid andWithGameID:(NSString*) gameid {
return [[[self alloc] initializeInternalDataWithPlayerID:playerid andWithGameID:gameid] autorelease];
}
-(id) initializeInternalDataWithPlayerID:(NSString*) playerid andWithGameID:(NSString*) gameid {
self = [super init];
if (self) {
CGSize _size = [[CCDirector sharedDirector] winSize];
_gameID = [[NSString alloc] init];
[self setLaunchFlag:FALSE];
[self setPlayerID:playerid];
[self setGameID:gameid];
CCSprite* background = [CCSprite spriteWithFile:@»background.jpg»];
background.position = ccp(_size.width/2,_size.height/2);
[self addChild:background];
CCLabelTTF* label = [CCLabelTTF labelWithString:@»Loading…» fontName:@»Marker Felt» fontSize:40];
label.position = ccp(_size.width/2, _size.height/2);
[self addChild:label];
CCLabelTTF* label2 = [CCLabelTTF labelWithString:@»Waiting for another player» fontName:@»Marker Felt» fontSize:25];
label2.position = ccp(_size.width/2, _size.height — _size.height/1.80);
[self addChild:label2];
[self setResponseData:[NSMutableData data]];
// CHANGE IT ACCORDINGLY
[self setURL:@»http://10.0.6.178:8080/Minesweeper_Flag/resources/generic/player2Available/»];
[self schedule:@selector(update:) interval:2];
}
return self;
}
-(void) update:(ccTime) dt{
[self connectTheWebService:_gameID];
}
-(void) connectTheWebService:(NSString*)id{
NSURLRequest *request = [NSURLRequest requestWithURL:[NSURL URLWithString:[[_URL autorelease] stringByAppendingString:id] ]];
_connectionConnectGame = [[NSURLConnection alloc] initWithRequest:request delegate:self];
}
— (void)connection:(NSURLConnection *)connection didReceiveResponse:(NSURLResponse *)response {
[_responseData setLength:0];
}
— (void)connection:(NSURLConnection *)connection didReceiveData:(NSData *)data {
[_responseData appendData:data];
}
— (void)connection:(NSURLConnection *)connection didFailWithError:(NSError *)error {
NSLog(@»Connection failed: %@», [error description]);
}
— (void)connectionDidFinishLoading:(NSURLConnection *)connection {
NSString* responseString = [[NSString alloc] initWithData:_responseData encoding:NSUTF8StringEncoding];
if ([responseString isEqualToString:@»nulo»]) {
[self setLaunchFlag:FALSE];
}else {
[self setLaunchFlag:TRUE];
}
if (_launchFlag){
GameScene* scene = [[GameScene alloc] initializeInternalDataWithPlayerID:_playerID andWithGameID:_gameID andWithTurnID:_playerID] ;
[[CCDirector sharedDirector] replaceScene:scene];
} else { [self schedule:@selector(update:) interval:2];
}
-(void)dealloc {
[super dealloc];
}
@end
|
Шаг 9: Создайте класс GameScene
Измените заголовочный файл GameScene на следующий:
|
01
02
03
04
05
06
07
08
09
10
11
12
13
14
15
16
17
18
19
20
21
22
23
24
25
26
27
28
29
30
31
32
33
34
35
36
37
38
39
40
|
#import «cocos2d.h»
@interface GameScene : CCLayer <UIGestureRecognizerDelegate> {
NSString* turn;
}
@property (nonatomic) int gameGridSize, initialSpriteXXPosition, initialSpriteYYPosition, deslocamentoNoEixoXX, deslocamentoNoEixoYY, tamanhoSprite, playerBlueScore, playerRedScore, lastSpriteTouch;
@property (nonatomic, retain) NSMutableArray *spritesMutableArray;
@property (nonatomic,retain) NSMutableArray* touchedLocations;
@property (nonatomic) CGSize size;
@property (nonatomic) CGPoint initialSpritePositon;
@property (nonatomic, retain) CCSprite* sprites;
@property (nonatomic) int spritePositionInGrid;
@property (nonatomic) int webServerResult;
@property (nonatomic, strong) NSMutableData *responseData;
@property (nonatomic, strong) NSString *resourceImage;
@property (nonatomic, retain) CCSprite* playerBlueSprite;
@property (nonatomic, retain) CCSprite* playerRedSprite;
@property (nonatomic, retain) CCSprite* playerTurnSprite;
@property (nonatomic, retain) CCSprite* youArrow;
@property (nonatomic,retain) CCLabelTTF* playerBlueLabel;
@property (nonatomic,retain) CCLabelTTF* playerRedLabel;
@property (nonatomic,retain) NSString* gameID;
@property (nonatomic,retain) NSString* userID;
@property (nonatomic,retain) NSString* colorPlayer;
@property (nonatomic,retain) CCSprite* positionTouchedSprite;
@property (nonatomic,retain) NSString* turn;
@property (nonatomic, retain) NSMutableString* gameBoardInfoS;
+(CCScene *) scene;
-(void)getMinesAtPosition:(int)pos;
-(void)drawGameBoard;
-(void)setInitialAppValues;
-(void)setArrowonTheRightPlayer;
+(id) initializeWithPlayerID:(NSString*) playerid andWithGameID:(NSString*) gameid andWithTurnID:(NSString*) turnid;
-(id) initializeInternalDataWithPlayerID:(NSString*) playerid andWithGameID:(NSString*) gameid andWithTurnID:(NSString*) turnid;
@end
|
Измените свой файл реализации GameScene на следующее:
|
1
|
#import «GameScene.h» #import «cocos2d.h» #import «LoadingScene.h» @implementation GameScene @synthesize spritesMutableArray = _spritesMutableArray;
|
Шаг 10: собери и запусти игру
После того, как вы включите вышеупомянутый код, следующим шагом будет создание и тестирование приложения. Используйте ярлык cmd + b . Если все в порядке, вы должны увидеть симулятор iPad и запустить игру.
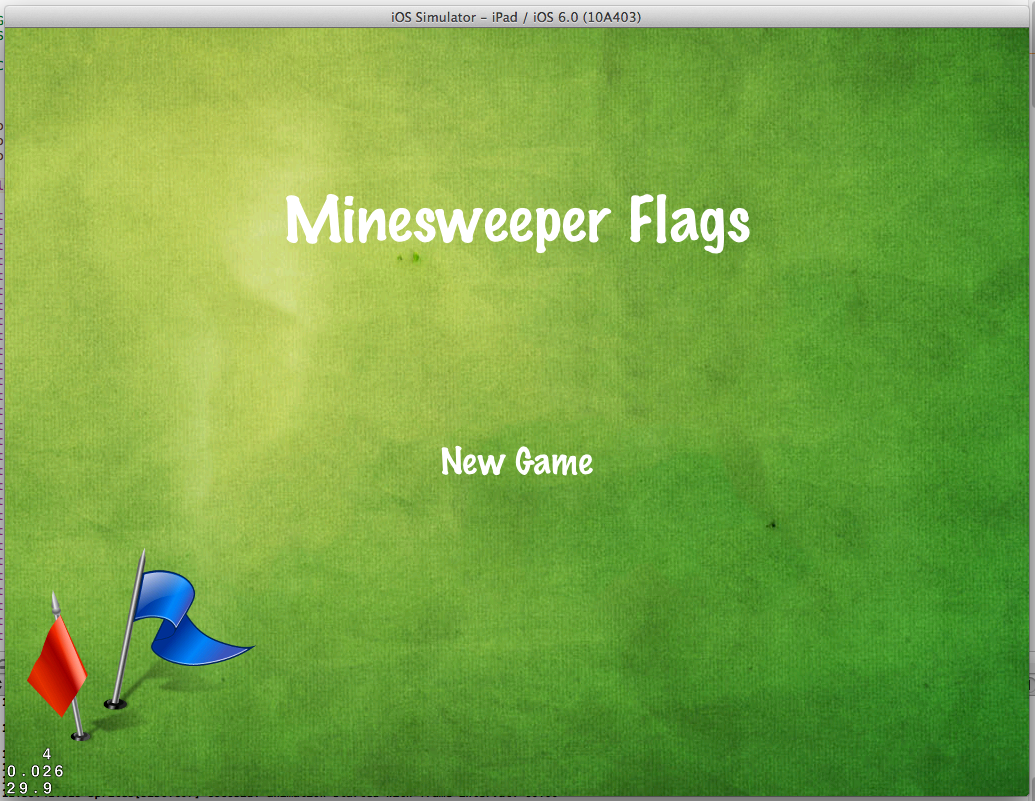
Шаг 11: наслаждайся игрой
На этом заключительном этапе цель состоит в том, чтобы наслаждаться игрой. Так как игра для двоих, лучший способ играть в нее с другом!
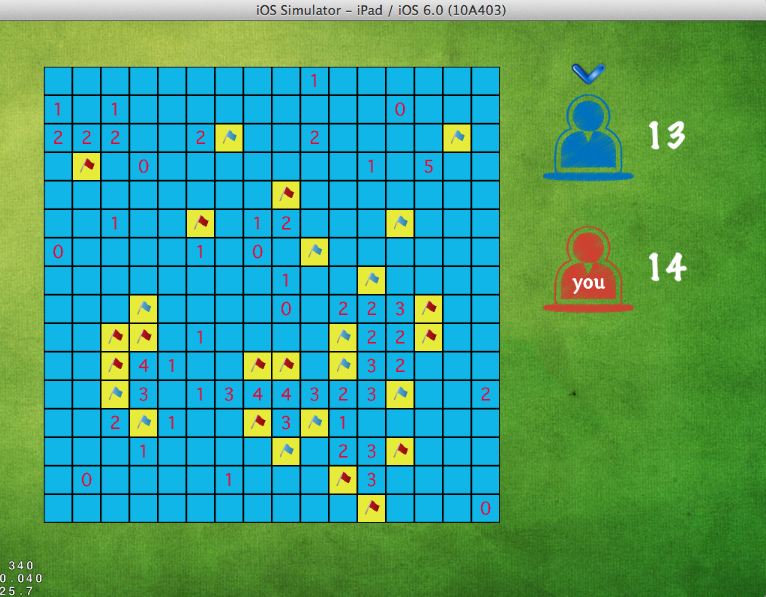
На следующих экранах мы видим финальную игровую доску, хотя видение двух игроков (синего и красного). Стрелка над аватаром игрока указывает текущий ход игрока; игрок, который в настоящее время играет.
Синяя игровая доска:

Красный игрок игрового поля:
Шаг 12: Выводы
На этом завершается вторая часть того, как создать игру Minesweeper Flag, используя как серверный, так и клиентский код. К настоящему времени у вас должно быть достаточно знаний, чтобы создать простую игру Cocos2D с использованием того же игрового движка. Если у вас есть какие-либо вопросы или комментарии, пожалуйста, не стесняйтесь оставлять их в разделе комментариев здесь.