вступление
Мне всегда нравится использовать своего рода полупрозрачное фоновое изображение на экранах моего приложения, что делает его более профессиональным, чем простой однотонный экран — уловка, которую я узнал от своего коллеги из MVP Марка Монстра в самые первые годы Разработка Windows Phone . Теперь, когда я пытаюсь изучить некоторые разработки Xamarin , я хочу сделать то же самое, но оказывается, что это работает немного иначе, чем я привык.
Настройка основного приложения
Я создал портативное приложение Xamarin Forms «BackGroundImageDemo», но когда вы создаете новое приложение Xamarin Forms с использованием новейших шаблонов в Xamarin 3.9, вы получаете приложение, которое использует формы, но без XAML. Я живу и мечтал о XAML в течение последних 5 лет, и мне это не совсем нравится, поэтому начнем с внесения следующих изменений:
1. Обновите все пакеты NuGet — это даст вам (на момент написания этой статьи) пакеты форм 1.3.2
2. Добавьте StartPage.Xaml в BackGroundImageDemo (Portable)
<?xml version="1.0" encoding="utf-8" ?>
<ContentPage xmlns="http://xamarin.com/schemas/2014/forms"
             xmlns:x="http://schemas.microsoft.com/winfx/2009/xaml"
             x:Class="BackGroundImageDemo.StartPage">
<Label Text="Hello world from XAML" VerticalOptions="Center"
         HorizontalOptions="Center" FontSize="30" />
</ContentPage>
3. Внесите некоторые изменения в файл App.cs в BackGroundImageDemo (Portable), чтобы он использовал страницу XAML:
namespace BackGroundImageDemo
{
  public class App : Application
  {
    public App()
    {
      // The root page of your application
      MainPage = new StartPage();
    }

    // stuff omitted
  }
}
И когда вы запускаете это, например, на Windows Phone, это выглядит так:
 Добавление фоновой картинки
Теперь предположим, что я хочу создать приложение, связанное с астрономией, — тогда я мог бы использовать эту прекрасную картину Юпитера, которую я назвал из Википедии , в качестве фонового изображения:
У него хороший прозрачный фон, так что подойдет. И угадайте, что класс ContentPage имеет хороший атрибут BackgroundImage, так что мы почти закончили, верно?
As per instructions found on the Xamarin developer pages, images will need to be:
- For Windows Phone, in the root
- For Android, in the Resources/drawable folder
- For iOS, in Resources folder
In addition, you must set the right build properties for this image:
- For Windows Phone, set “Build Action” to “Content” (this is default) and “Copy to Output Directory” to “Copy if newer”
- For Android, this is “AndroidResource” and “Do not copy”
- For iOS, this is “BundleResource” and “Do not copy”
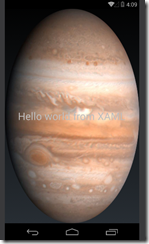
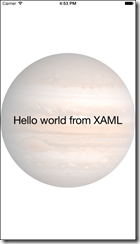
So I copy Jupiter.png three times in all folders (yeah I know, there are smarter ways to do that, that’s not the point here) addBackgroundImage=’’Jupiter.png” to the ContentPage tag and… the result, as we can see on the to the right, is not quite what we hoped for. On Android, Jupiter is looking like a giant Easter egg. Windows Phone gives the same display. On the Cupertino side, we get a different but equally undesirable effect.
RelativeLayout to the rescue
Using RelativeLayout and constraint expressions, we can more or less achieve the same result as Windows XAML’s “Uniform”.
<?xml version="1.0" encoding="utf-8" ?>
<ContentPage xmlns="http://xamarin.com/schemas/2014/forms"
             xmlns:x="http://schemas.microsoft.com/winfx/2009/xaml"
             x:Class="BackGroundImageDemo.StartPage" >
  <RelativeLayout>
    <Image Source="Jupiter.png" Opacity="0.3"
                RelativeLayout.WidthConstraint=
                  "{ConstraintExpression Type=RelativeToParent, Property=Width}"
                RelativeLayout.HeightConstraint=
                  "{ConstraintExpression Type=RelativeToParent, Property=Height}"/>
    <Grid RelativeLayout.WidthConstraint=
              "{ConstraintExpression Type=RelativeToParent, Property=Width}"
            RelativeLayout.HeightConstraint=
              "{ConstraintExpression Type=RelativeToParent, Property=Height}">

      <Label Text="Hello world from XAML" VerticalOptions="Center"
         HorizontalOptions="Center" FontSize="30"/>
    </Grid>
  </RelativeLayout>
</ContentPage>
All elements within a RelativeLayout will essentially be drawn on top of each other, unless you specify a BoundsConstraint. I don’t do that here, so essentially every object will drawn from 0,0. By setting width and height of the RelativeLayout’s children to essentially the width and height of the RelativeLayout itself, is will automatically stretch to fill the screen. And thus the image ends up in the middle, as does the Grid with the actual UI in it. Just make sure you put the image Image first and the Grid second, or else the image will appear over your text.
I also added Opacity = “0.3” to make the image translucent and not so bright that it actually wipes out your UI. The exactly value of the opacity is a matter of taste and you will need to determine how it affects the readability of the actual UI on a real device. Also, you might consider editing the image in Paint.Net or the like and set its to 0.3 opacity hard coded in the image, I guess that would save the device some work.
Anyway, net result:
Demo solution, as always, can be downloaded here.
