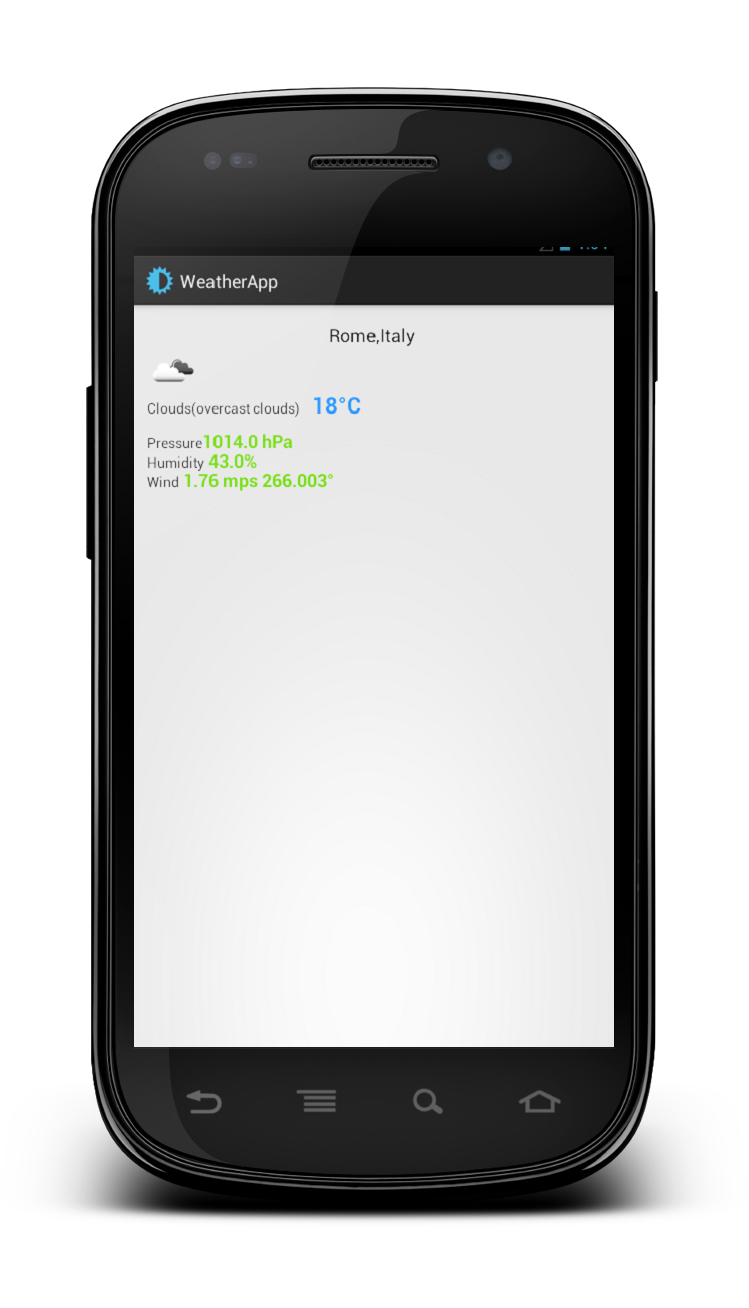
В этом посте я хочу описать, как создать приложение погоды, которое предоставляет текущую информацию о погоде. Это приложение будет использовать JSON, HTTP-соединение и AsyncTask для получения этой информации. В качестве поставщика погоды я буду использовать OpenWeatherMap — бесплатную службу погоды, которая предоставляет действительно интересный API-интерфейс, очень простой в использовании. Я проведу вас через шаги, необходимые для создания рабочей приложение. Для получения дополнительной информации об API вы можете посетить веб-сайт OpenWeatherMap . Я покажу вам окончательный результат, чтобы вы могли иметь представление о том, что мы будем делать в этом посте.
Информация о текущей погоде — HTTP-запрос и JSON-ответ
OpenWeatherMap предлагает несколько API для получения информации о погоде. Мы хотим использовать тот, который дает нам текущую информацию о погоде. URL, чтобы позвонить, чтобы получить эту информацию:
|
1
|
http://api.openweathermap.org/data/2.5/weather?q=city,country |
Давайте предположим, что мы хотим знать погоду в Риме, IT. Используя наш браузер, мы можем получить:
Как мы видим, у нас есть ответ JSON. Форматирование ответа у нас есть
|
01
02
03
04
05
06
07
08
09
10
11
12
13
14
15
16
17
18
19
20
21
22
|
{ "coord":{"lon":12.4958,"lat":41.903}, "sys":{"country":"Italy","sunrise":1369107818,"sunset":1369160979}, "weather":[{ "id":802,"main":"Clouds","description":"scattered clouds", "icon":"03d"}], "base":"global stations", "main":{ "temp":290.38, "humidity":68, "pressure":1015, "temp_min":287.04, "temp_max":293.71}, "wind":{ "speed":1.75, "deg":290.002}, "clouds":{"all":32}, "dt":1369122932, "id":3169070, "name":"Rome", "cod":200} |
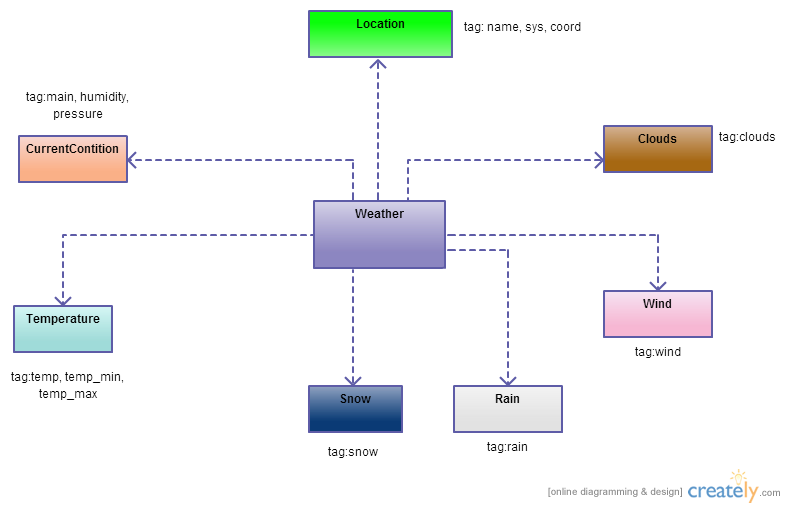
Поэтому первое, что нам нужно сделать, — это создать нашу модель данных, чтобы мы могли проанализировать ответ и преобразовать его в классы Java. Анализируя ответ, мы имеем различные «основные» теги, которые мы можем использовать как класс в Java:
- координ (объект)
- sys (объект)
- погода (массив)
- основной (объект)
- ветер (объект)
- имя: (строка)
Ответ довольно прост, и мы можем преобразовать его вручную. Диаграмма классов UML для модели показана ниже:
JSON Weather Parser
После того, как мы создали нашу модель, мы должны проанализировать ее. Мы можем создать определенный класс, который обрабатывает эту задачу. Сначала мы должны создать «корневой» объект, который получает в качестве входных данных всю строку, содержащую весь ответ JSON:
|
1
2
|
// We create out JSONObject from the dataJSONObject jObj = new JSONObject(data); |
Затем мы начинаем анализ каждого фрагмента ответа:
|
01
02
03
04
05
06
07
08
09
10
11
12
13
|
// We start extracting the infoLocation loc = new Location();JSONObject coordObj = getObject("coord", jObj);loc.setLatitude(getFloat("lat", coordObj));loc.setLongitude(getFloat("lon", coordObj));JSONObject sysObj = getObject("sys", jObj);loc.setCountry(getString("country", sysObj));loc.setSunrise(getInt("sunrise", sysObj));loc.setSunset(getInt("sunset", sysObj));loc.setCity(getString("name", jObj));weather.location = loc; |
В строке 4,8 мы создаем два «подчиненных» объекта ( ordinObj и sysObj ), имеющих в качестве родителя jObj, как это ясно из ответа JSON. Как мы видим, мы используем некоторые вспомогательные методы для получения значений String, int и float:
|
01
02
03
04
05
06
07
08
09
10
11
12
13
14
15
16
|
private static JSONObject getObject(String tagName, JSONObject jObj) throws JSONException { JSONObject subObj = jObj.getJSONObject(tagName); return subObj;}private static String getString(String tagName, JSONObject jObj) throws JSONException { return jObj.getString(tagName);}private static float getFloat(String tagName, JSONObject jObj) throws JSONException { return (float) jObj.getDouble(tagName);}private static int getInt(String tagName, JSONObject jObj) throws JSONException { return jObj.getInt(tagName);} |
И тогда мы наконец разбираем информацию о погоде. Мы должны помнить, что тег погоды — это массив, поэтому мы должны обращаться с ним по-другому
|
01
02
03
04
05
06
07
08
09
10
11
12
13
14
15
16
17
18
19
20
21
22
23
24
25
|
// We get weather info (This is an array)JSONArray jArr = jObj.getJSONArray("weather");// We use only the first valueJSONObject JSONWeather = jArr.getJSONObject(0);weather.currentCondition.setWeatherId(getInt("id", JSONWeather));weather.currentCondition.setDescr(getString("description", JSONWeather));weather.currentCondition.setCondition(getString("main", JSONWeather));weather.currentCondition.setIcon(getString("icon", JSONWeather));JSONObject mainObj = getObject("main", jObj);weather.currentCondition.setHumidity(getInt("humidity", mainObj));weather.currentCondition.setPressure(getInt("pressure", mainObj));weather.temperature.setMaxTemp(getFloat("temp_max", mainObj));weather.temperature.setMinTemp(getFloat("temp_min", mainObj));weather.temperature.setTemp(getFloat("temp", mainObj));// WindJSONObject wObj = getObject("wind", jObj);weather.wind.setSpeed(getFloat("speed", wObj));weather.wind.setDeg(getFloat("deg", wObj));// CloudsJSONObject cObj = getObject("clouds", jObj);weather.clouds.setPerc(getInt("all", cObj)); |
В конце у нас есть класс Weather, заполненный полученными данными.
HTTP-запрос и ответ
Теперь мы должны обмениваться информацией с удаленным сервером по протоколу HTTP. Мы должны отправить информацию, а затем прочитать ответ. Мы обсуждали эту тему в предыдущем посте ( Android HTTP-клиент: GET, POST, Download, Upload, Multipart Request ), поэтому мы не будем описывать это снова, мы просто покажем код:
|
01
02
03
04
05
06
07
08
09
10
11
12
13
14
15
16
17
18
19
20
21
22
23
24
25
26
27
28
29
30
31
32
33
34
35
36
37
38
39
40
41
42
43
44
45
46
47
48
49
50
51
52
53
54
55
56
57
58
59
60
61
62
63
64
65
66
67
68
69
70
71
72
|
public class WeatherHttpClient { public String getWeatherData(String location) { HttpURLConnection con = null ; InputStream is = null; try { con = (HttpURLConnection) ( new URL(BASE_URL + location)).openConnection(); con.setRequestMethod("GET"); con.setDoInput(true); con.setDoOutput(true); con.connect(); // Let's read the response StringBuffer buffer = new StringBuffer(); is = con.getInputStream(); BufferedReader br = new BufferedReader(new InputStreamReader(is)); String line = null; while ( (line = br.readLine()) != null ) buffer.append(line + "\r\n"); is.close(); con.disconnect(); return buffer.toString(); } catch(Throwable t) { t.printStackTrace(); } finally { try { is.close(); } catch(Throwable t) {} try { con.disconnect(); } catch(Throwable t) {} } return null; } public byte[] getImage(String code) { HttpURLConnection con = null ; InputStream is = null; try { con = (HttpURLConnection) ( new URL(IMG_URL + code)).openConnection(); con.setRequestMethod("GET"); con.setDoInput(true); con.setDoOutput(true); con.connect(); // Let's read the response is = con.getInputStream(); byte[] buffer = new byte[1024]; ByteArrayOutputStream baos = new ByteArrayOutputStream(); while ( is.read(buffer) != -1) baos.write(buffer); return baos.toByteArray(); } catch(Throwable t) { t.printStackTrace(); } finally { try { is.close(); } catch(Throwable t) {} try { con.disconnect(); } catch(Throwable t) {} } return null; }} |
Погода приложение
Наконец, пришло время для нашей деятельности. Макет очень прост и, конечно, это просто скелет, который нужно улучшить, если вы хотите иметь производственное приложение.
|
001
002
003
004
005
006
007
008
009
010
011
012
013
014
015
016
017
018
019
020
021
022
023
024
025
026
027
028
029
030
031
032
033
034
035
036
037
038
039
040
041
042
043
044
045
046
047
048
049
050
051
052
053
054
055
056
057
058
059
060
061
062
063
064
065
066
067
068
069
070
071
072
073
074
075
076
077
078
079
080
081
082
083
084
085
086
087
088
089
090
091
092
093
094
095
096
097
098
099
100
101
102
|
android:layout_width="match_parent" android:layout_height="match_parent" android:paddingBottom="@dimen/activity_vertical_margin" android:paddingLeft="@dimen/activity_horizontal_margin" android:paddingRight="@dimen/activity_horizontal_margin" android:paddingTop="@dimen/activity_vertical_margin" tools:context=".MainActivity" > <TextView android:id="@+id/cityText" style="?android:attr/textAppearanceMedium" android:layout_width="wrap_content" android:layout_height="wrap_content" android:layout_centerHorizontal="true" /> <ImageView android:id="@+id/condIcon" android:layout_width="wrap_content" android:layout_height="wrap_content" android:layout_alignParentLeft="true" android:layout_below="@id/cityText" /> <TextView android:id="@+id/condDescr" android:layout_width="wrap_content" android:layout_height="wrap_content" android:layout_below="@id/condIcon" android:layout_alignLeft="@id/condIcon" /> <TextView android:id="@+id/temp" style="@style/tempStyle" android:layout_width="wrap_content" android:layout_height="wrap_content" android:layout_marginLeft="12dp" android:layout_alignBaseline="@id/condDescr" android:layout_toRightOf="@id/condDescr"/> <TextView android:id="@+id/pressLab" android:layout_width="wrap_content" android:layout_height="wrap_content" android:layout_alignParentLeft="true" android:layout_below="@id/condDescr" android:text="Pressure" android:layout_marginTop="15dp" /> <TextView android:id="@+id/press" android:layout_width="wrap_content" android:layout_height="wrap_content" android:layout_alignBaseline="@id/pressLab" android:layout_toRightOf="@id/pressLab" style="@style/valData"/> <TextView android:id="@+id/humLab" android:layout_width="wrap_content" android:layout_height="wrap_content" android:layout_alignParentLeft="true" android:layout_below="@id/pressLab" android:text="Humidity" /> <TextView android:id="@+id/hum" android:layout_width="wrap_content" android:layout_height="wrap_content" android:layout_alignBaseline="@id/humLab" android:layout_toRightOf="@id/humLab" android:layout_marginLeft="4dp" style="@style/valData"/> <TextView android:id="@+id/windLab" android:layout_width="wrap_content" android:layout_height="wrap_content" android:layout_alignParentLeft="true" android:layout_below="@id/humLab" android:text="Wind" /> <TextView android:id="@+id/windSpeed" android:layout_width="wrap_content" android:layout_height="wrap_content" android:layout_alignBaseline="@id/windLab" android:layout_toRightOf="@id/windLab" android:layout_marginLeft="4dp" style="@style/valData" /> <TextView android:id="@+id/windDeg" android:layout_width="wrap_content" android:layout_height="wrap_content" android:layout_alignBaseline="@id/windLab" android:layout_toRightOf="@id/windSpeed" android:layout_marginLeft="4dp" style="@style/valData"/></RelativeLayout> |
В методе onCreate мы просто получаем ссылку на Views внутри макета, чтобы мы могли заполнить их позже после завершения запроса.
|
01
02
03
04
05
06
07
08
09
10
11
12
13
14
15
16
17
18
|
@Overrideprotected void onCreate(Bundle savedInstanceState) { super.onCreate(savedInstanceState); setContentView(R.layout.activity_main); String city = "Rome,IT"; cityText = (TextView) findViewById(R.id.cityText); condDescr = (TextView) findViewById(R.id.condDescr); temp = (TextView) findViewById(R.id.temp); hum = (TextView) findViewById(R.id.hum); press = (TextView) findViewById(R.id.press); windSpeed = (TextView) findViewById(R.id.windSpeed); windDeg = (TextView) findViewById(R.id.windDeg); imgView = (ImageView) findViewById(R.id.condIcon); JSONWeatherTask task = new JSONWeatherTask(); task.execute(new String[]{city});} |
и мы запускаем AsyncTask, потому что, как мы уже знаем, сетевые операции отнимают много времени, поэтому мы можем запустить их в главном потоке, иначе у нас может возникнуть проблема ANR. JSONWeatherTask очень прост
|
01
02
03
04
05
06
07
08
09
10
11
12
13
14
15
16
|
protected Weather doInBackground(String... params) { Weather weather = new Weather(); String data = ( (new WeatherHttpClient()).getWeatherData(params[0])); try { weather = JSONWeatherParser.getWeather(data); // Let's retrieve the icon weather.iconData = ( (new WeatherHttpClient()).getImage(weather.currentCondition.getIcon())); } catch (JSONException e) { e.printStackTrace(); } return weather; } |
В строке 3 мы делаем HTTP-запрос, а затем анализируем его в строке 6. В строке 9 мы получаем значок, который показывает погодные условия.
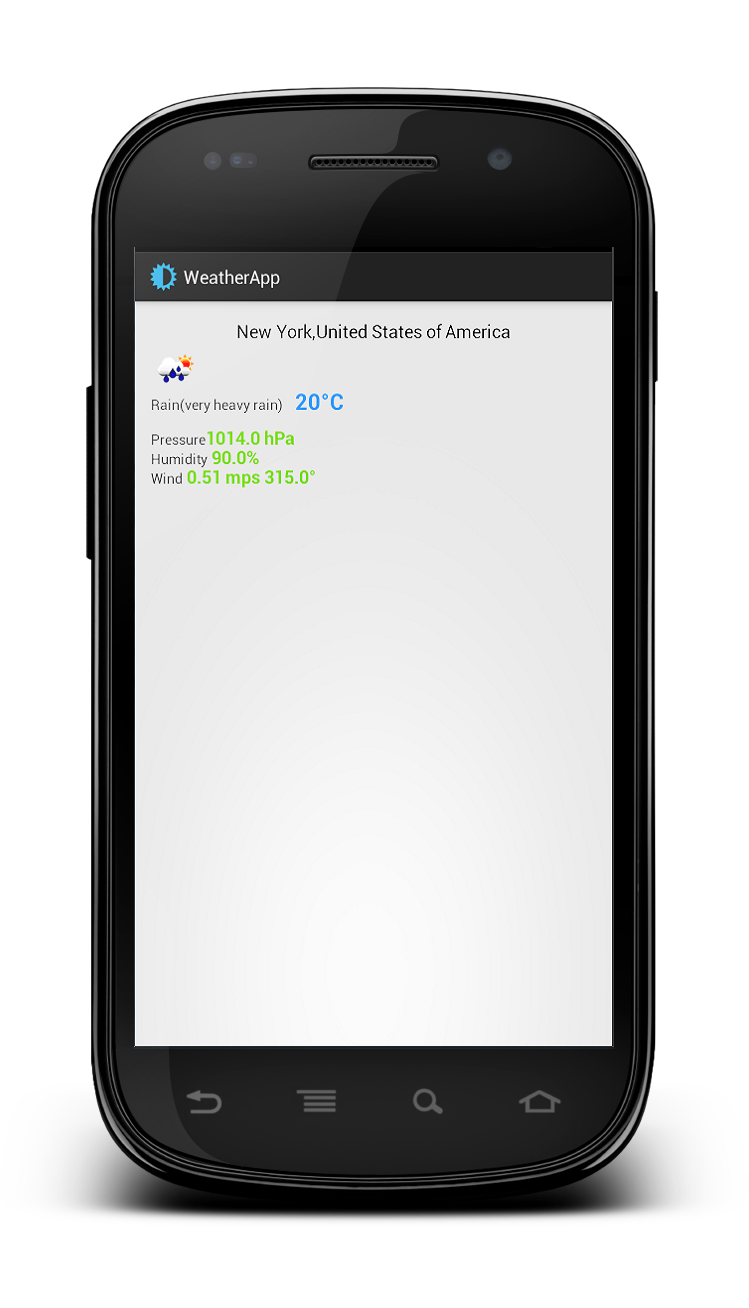
Запустив код мы имеем:
Исходный код доступен @github .


