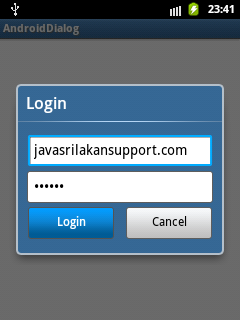
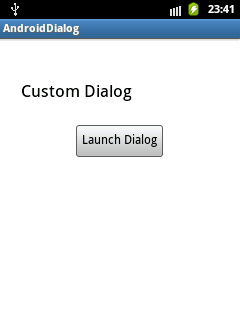
В этом уроке я собираюсь описать, как создать Android Custom Dialg.
Android-диалог
Создать Android-проект AndroidDialog ; Файл -> Новый -> Android Project
Android-макет
activity_android_dialog.xml
|
01
02
03
04
05
06
07
08
09
10
11
12
13
14
15
16
17
18
19
20
21
22
23
24
25
26
|
android:layout_width='match_parent' android:layout_height='match_parent' > <Button android:id='@+id/btn_launch' android:layout_width='wrap_content' android:layout_height='wrap_content' android:layout_alignParentTop='true' android:layout_centerHorizontal='true' android:layout_marginTop='115dp' android:text='Launch Dialog' /> <TextView android:id='@+id/textView1' android:layout_width='wrap_content' android:layout_height='wrap_content' android:layout_alignParentLeft='true' android:layout_alignParentTop='true' android:layout_marginLeft='28dp' android:layout_marginTop='54dp' android:text='@string/app_desc' android:textAppearance='?android:attr/textAppearanceLarge' /> </RelativeLayout> |
Макет диалога
dialog_layout.xml
|
01
02
03
04
05
06
07
08
09
10
11
12
13
14
15
16
17
18
19
20
21
22
23
24
25
26
27
28
29
30
31
32
33
34
35
36
37
38
39
40
41
42
43
44
45
46
|
<?xml version='1.0' encoding='utf-8'?> android:layout_width='fill_parent' android:layout_height='fill_parent' android:orientation='vertical' android:padding='10sp' > <EditText android:id='@+id/txt_name' android:layout_width='fill_parent' android:layout_height='wrap_content' android:hint='@string/dialog_uname' android:singleLine='true' > <requestFocus /> </EditText> <EditText android:id='@+id/password' android:layout_width='match_parent' android:layout_height='wrap_content' android:ems='10' android:inputType='textPassword' > </EditText> <RelativeLayout android:layout_width='match_parent' android:layout_height='wrap_content' > <Button android:id='@+id/btn_login' android:layout_width='120dp' android:layout_height='wrap_content' android:text='@string/dialog_submit' /> <Button android:id='@+id/btn_cancel' android:layout_width='120dp' android:layout_height='wrap_content' android:layout_alignParentTop='true' android:layout_marginLeft='10dp' android:layout_toRightOf='@+id/btn_login' android:text='@string/dialog_cancel' /> </RelativeLayout></LinearLayout> |
AndroidDialog Активность
Переопределите методы onCreateDialog (int id) и onPrepareDialog (int id, Dialog dialog) и добавьте следующий код, который создаст ваш собственный Android Android Dialog.
|
01
02
03
04
05
06
07
08
09
10
11
12
13
14
15
16
17
18
19
20
21
22
23
24
25
26
27
28
29
30
31
32
33
34
35
36
37
38
39
40
41
42
43
44
45
46
47
48
49
50
51
52
53
54
55
56
57
58
59
60
61
62
63
64
65
66
67
68
69
70
71
72
73
74
75
76
77
78
79
80
81
82
83
84
85
86
87
88
89
90
91
|
import android.os.Bundle;import android.view.LayoutInflater;import android.view.View;import android.widget.Button;import android.widget.EditText;import android.widget.Toast;import android.app.Activity;import android.app.AlertDialog;import android.app.Dialog;public class AndroidDialog extends Activity { final private static int DIALOG_LOGIN = 1; @Override public void onCreate(Bundle savedInstanceState) { super.onCreate(savedInstanceState); setContentView(R.layout.activity_android_dialog); Button launch_button = (Button) findViewById(R.id.btn_launch); launch_button.setOnClickListener(new View.OnClickListener() { @Override public void onClick(View v) { showDialog(DIALOG_LOGIN); } }); } @Override protected Dialog onCreateDialog(int id) { AlertDialog dialogDetails = null; switch (id) { case DIALOG_LOGIN: LayoutInflater inflater = LayoutInflater.from(this); View dialogview = inflater.inflate(R.layout.dialog_layout, null); AlertDialog.Builder dialogbuilder = new AlertDialog.Builder(this); dialogbuilder.setTitle('Login'); dialogbuilder.setView(dialogview); dialogDetails = dialogbuilder.create(); break; } return dialogDetails; } @Override protected void onPrepareDialog(int id, Dialog dialog) { switch (id) { case DIALOG_LOGIN: final AlertDialog alertDialog = (AlertDialog) dialog; Button loginbutton = (Button) alertDialog .findViewById(R.id.btn_login); Button cancelbutton = (Button) alertDialog .findViewById(R.id.btn_cancel); final EditText userName = (EditText) alertDialog .findViewById(R.id.txt_name); final EditText password = (EditText) alertDialog .findViewById(R.id.password); loginbutton.setOnClickListener(new View.OnClickListener() { @Override public void onClick(View v) { alertDialog.dismiss(); Toast.makeText( AndroidDialog.this, 'User Name : ' + userName.getText().toString() + ' Password : ' + password.getText().toString(), Toast.LENGTH_LONG).show(); } }); cancelbutton.setOnClickListener(new View.OnClickListener() { @Override public void onClick(View v) { alertDialog.dismiss(); } }); break; } }} |
Приятного кодирования и не забудьте поделиться!
Ссылка: Android Dialog — Android Custom Dialog от нашего партнера JCG Чатуры Вийесингхе в блоге поддержки Шри-Ланки на Java .

