Давайте разберемся с «Spring Rich Client» 1.0.0 (SpringRC). Хотя пришло время дать обзор всей архитектуры, я не буду делать это здесь, потому что я новичок в Spring и SpringRC. Итак, мы просто рассмотрим шаги, как мы запускаем вещи.
Запускать
Прежде всего мы хотим включить лицензионное приглашение при первом запуске. Если он в чистом текстовом формате, окружите лицензию с помощью <pre> licenseText </ pre>, сохраните ее в classpath как /path/license.txt и выполните следующие действия:
- Добавьте исходный код в LifecycleAdvisor.
private final Log logger = LogFactory.getLog(getClass()); private static final String SHOW_WIZARD_KEY = "setupWizard.show"; private Settings settings; @Override public void onPreStartup() { boolean showDialog = true; if (settings.contains(SHOW_WIZARD_KEY)) { showDialog = settings.getBoolean(SHOW_WIZARD_KEY); } if (showDialog && getApplication().getApplicationContext().containsBean("setupWizard")) { SetupWizard setupWizard = (SetupWizard) getApplication().getApplicationContext().getBean( "setupWizard", SetupWizard.class); setupWizard.execute(); settings.setBoolean(SHOW_WIZARD_KEY, false); try { settings.save(); } catch (IOException ex) { logger.error("Can't save state.", ex); } } } public void setSettings(Settings set) { settings = set; } - Добавьте следующий текст в application-context.xml
<bean id="setupWizard" class="org.springframework.richclient.application.setup.SetupWizard">
    <property name="licenseTextLocation" value="/path/license.txt" />
</bean>
<bean id="xmlInternalSettings"
      class="org.springframework.richclient.settings.xml.XmlSettingsFactory"
      factory-bean="settingsManager"
      factory-method="getInternalSettings">
</bean>
<bean id="settingsManager" class="org.springframework.richclient.settings.SettingsManager">
        <property name="settingsFactory">
            <bean class="org.springframework.richclient.settings.xml.XmlSettingsFactory"/>
        </property>
</bean>
И вставьте <property name = ”settings” ref = ”xmlInternalSettings” /> в список свойств bean-компонента lifecycleAdvisor.
- В качестве последнего шага вы должны заполнить текст сообщения для этого мастера в файле message.properties:
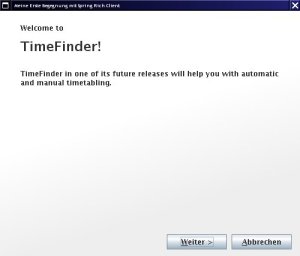
setup.intro.welcomeTo = Добро пожаловать в
setup.intro.title = TimeFinder!
setup.intro.description = TimeFinder в одном из своих будущих выпусков поможет вам с автоматическим и ручным расписанием.
setup.cancel.title = Отмена установки
setup.cancel.message = Вы действительно хотите выйти из приложения?
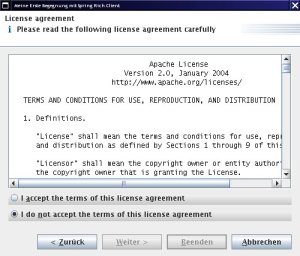
acceptLicenseCommand.label = Я & принимаю условия этого лицензионного соглашения
doNotAcceptLicenseCommand.label = Я принимаю условия этого лицензионного соглашения
setup.license.title = Лицензионное соглашение
setup.license.description = Пожалуйста, внимательно прочитайте следующее лицензионное соглашение
Большая часть приведенного выше XML-кода необходима для добавления нового экземпляра настроек, который будет создан из диспетчера настроек.
… Перемена …
Кто-нибудь из вас знает, как я могу сделать это на Java, а не в уродливом XML? Ну, я мог бы создать фабрику непосредственно в LifecycleAdvisor, но как я могу сделать это внедрение зависимости в Java (с Spring)?
… Хорошо, пойдем дальше …
Этот объект настроек затем становится доступным в LifecycleAdvisor из-за метода setSettings и его необходимо сохранить, если этот мастер снова будет запрошен при следующем запуске. Настройки xml будут записаны в currentPath / settings / internal.settings.xml.
Используемый SetupWizard происходит от AbstractWizard. Этот абстрактный класс можно использовать для любых других мастеров: просто добавьте одну или несколько AbstractWizardPages в мастер и посмотрите эту документацию . Вот результат:

Еще одна интересная функция — показывать индикатор на экране-заставке. Это было очень просто: добавить (или заменить существующий) bean-компонент в файл startup-context.xml:
<bean id="splashScreen" class="org.springframework.richclient.application.splash.ProgressSplashScreen" scope="prototype">
        <property name="imageResourcePath" value="/de/peterk/springr/ui/images/splash-screen.png" />
        <property name="showProgressLabel" value="true" />
</bean>
Теперь я сделал отвратительный взлом. Я хочу изменить цвета индикатора выполнения. Но только на индикатор выполнения при запуске, поэтому мы должны вернуть следующий код:
Color myYellow = new Color(255, 225, 100);
Color myGreen = new Color(120, 208, 60);
UIManager.put("ProgressBar.selectionForeground", myYellow);
UIManager.put("ProgressBar.selectionBackground", myGreen);
UIManager.put("ProgressBar.foreground", myGreen);
UIManager.put("ProgressBar.background", myYellow);
UIManager.put("ProgressBar.border", new LineBorderUIResource(myYellow));
Чтобы отменить эти изменения, обратитесь к методу LifecycleAdvisor.onPreWindowOpen (см. Раздел «Ресурсы», я не буду публиковать его здесь — он слишком глуп ;-))
Вот результат:
Просмотры …
Надеюсь, я смогу создать следующую запись в блоге о платформе стыковки MyDoggy и интеграции в SpringRC. Теперь это работает как шарм — попробуйте! (см. ресурсы).
Сегодня я покажу, что вы можете применить ко всем «менеджерам компонентов», которые интегрированы в SpringRC.
First: there is one application per virtual machine. But there could be one or more ApplicationPages (JFrames) with several views (center, north, south, …). In our case (MyDoggy) there is only one ApplicationPage.
Normally you want to have more than one component per start-up page. To change this add the following xml to the application-context.xml:
<bean id="aLotOfViews" class="org.springframework.richclient.application.support.MultiViewPageDescriptor">
        <property name="viewDescriptors">
            <list>
                <value>view2</value>
                <value>initialView</value>
            </list>
        </property>
</bean>
And change the startingPageId in the lifecycleAdvisor bean to aLotOfViews. With the upcoming MyDoggy 1.5.0 enabled we can get this nice layout, which will be automatically saved(!):
… and more!
If you want to use custom components: just add them! I created a custom component with the open source Matisse GUI builder integrated in NetBeans. Here is the code how you can put this component into SpringRC:
public class CalculatorView extends AbstractView {
    protected JComponent createControl() {
        JPanel panel = getComponentFactory().createPanel(new BorderLayout());
        panel.add(new CalculatorPanel()/*created with Matisse*/, BorderLayout.CENTER);
        return panel;
    }}
To add this view to the startingPage do (aLofOfViews already references to this bean, so no changes are necessary there):
<bean id="view2" class="de.timefinder.core.ui.mydoggy.MyDoggyViewDescriptor">
        <property name="viewClass" value="de.timefinder.core.ui.CalculatorView" />
</bean>
One thing you have to know is: How to translate keys within this ‘external’ CalculatorView?
In Matisse do:
- Click the button, where you want to translate the text
- Then — in the property panel on the right side — click on the […] button
- Select “Resource Bundle” instead of “Plain Text”
- Use the messages.properties file for the bundle name
- Insert the appropriate key (defined in messages.properties)
- Use the following line to get the value (click on the “Format…” button) Application.instance().getApplicationContext().getMessage(”{key}”, null, null)
For all of the following components it is easier: do 1, 2, 3 and insert the key! This could be the new slogan for Matisse 
Now some more I18N. For example you want to display: “Result of $number!” you should use the following line in message.properties:
calculatorPanel.title=Result of {0} !
and get the formatted string via
Application.instance().getApplicationContext().getMessage("calculatorPanel.title", new Object[]{result}, null);
Another small point could be the ugly output of the standard java 1.4 Logger. We will now change the two-lined logging output into a one-lined. Actually this is a one-liner if you look for yourself into the resource section for the TFFormatter class:
java.util.logging.Logger.getLogger("de.timefinder").getParent().getHandlers()[0].setFormatter(new TFFormatter());
Tasks
In Swing you can use the Swing ProgressMonitor, but in SpringRC you should use the integrated ProgressMonitor to indicate the current progress of a task in the bottom right corner of the page:
With the factorial view of my example you can calculate, yes, factorials. I tried “50 000″ and the calculation took nearly the same time as adding the number to the JTextArea …
So, use the ProgressMonitor in combination with the SwingWorker (I grabbed it from jdesktop, because the SpringRC’s Swingworker uses a FutureResult class and I couldn’t find it!? Where is an “edu.oswego”-jar?)
Now you can use the following code to execute a long running task:
ApplicationWindow aw = Application.instance().getActiveWindow();
final ProgressMonitor pm = aw.getStatusBar().getProgressMonitor();
String str = actx.getMessage("calculatorPanel.startTask", null, null);
pm.taskStarted(str, -1);
SwingWorker sw = new SwingWorker() {
        BigInteger resultLong = BigInteger.ONE;
        //protected Object construct() in SpringRC's SwingWorker!
        protected Object doInBackground() {
            // now my long task and the progress indication
            for (int i = 2; i <= fac && !pm.isCanceled(); i++) {
                pm.worked(100 * i / fac);
                resultLong = resultLong.multiply(BigInteger.valueOf(i));
            }
            return resultLong;
        }
        //protected void finished()
        @Override
        protected void done() {
            // all of the following code will be called on the Event Dispatching Thread
            if (pm.isCanceled()) {
                output.setText("Canceled");
            } else {
                output.setText(resultLong.toString());
            }
            pm.done();
        }
    };
    //sw.start();
    //sw.clear(); // reuse would be possible with SpringRC's SwingWorker!
    sw.execute();
Conclusion
SpringRC offers us — as client-side-programmers — a bunch of powerful utilities to build our application fast and scaleable. Some parts are well documented; some parts not. But I think with relaunching the project in October ‘08 (hopefully!) as Spring Desktop it will get a lot of support from even more users and maybe from the company SpringSource itself. Hopefully then the documentation will be better…
The most important point for me is that SpringRC is ‘only’ a sweat jar collection and not a layer between me and Swing.
Another point is that SpringRC uses dependency injection and NetBeans RCP uses the service locator approach e.g.
SomeInterfaceImpl impl = Lookup.lookup(SomeInterface.class).
instead of the setter injection in the very first example for SpringRC.
For others this could be one more argument against NetBeans RCP (not for me …)
Resources
- Another older, but very good tutorial is located here.
- Maybe it is interesting to know: in the updated version of the book Spring — A Developer’s Notebook the last chapter 9 is about the Spring Rich Client Project (author was Keith Donald).
- Here you can find part 1.
- Here you can download the project without the jars included in the SpringRC’s download (It is a NetBeans 6.1 project, so you can simply copy all jars of SpringRC into the lib folder and open the project with NetBeans. Then resolve references via right click or change the references directly; in nbproject/project.properties).


