Определение проблемы
Представьте, что вы использовали несколько СУБД в течение последних десяти лет, и внутри миллионы записей, причем информация продолжает поступать каждую минуту. И однажды вам нужно было организовать сложный процесс поиска информации по этим данным с помощью полноценной поисковой системы предприятия, такой как Apache Solr. Для этого вам необходимо разработать некоторый процесс ETL, который сможет преобразовывать ваши данные во внутренние документы Solr. Вы, очевидно, хотите распространить его и сделать отказоустойчивым (вы не хотите потерять даже ряд информации). И последнее требование, которое делает все более интересным — вы хотите нулевую нагрузку на поддержку. Все должно выйти из коробки! Слишком сложно? Точно нет! Давайте посмотрим, как с этим справиться Solr, Spark и Zookeeper вместе.
Почему Спарк? Он распространяется, он не заставляет вас использовать модель программирования MapReduce (как это делает Hadoop), и, наконец, у него есть механизм отработки отказа, поддерживаемый Zookeeper.
Итак, мы представили наш набор инструментов, теперь пришло время заставить его работать. Начнем с Solr и Zookeeper. Исторически Solr был просто универсальным поисковым движком, построенным на основе Apache Lucene, но начиная с версии 4.x он поставляется с распределенной поддержкой поиска, известной как SolrCloud, которая обеспечивает дополнительную отказоустойчивость, делегируя управление кластерами Zookeeper. Spark также может использовать Zookeeper для восстановления после сбоев в режиме кластера.
подготовка
Во-первых, давайте подготовим простое приложение, которое будет эмулировать нашу долгосрочную задачу импорта данных. Мы отправим это приложение в Spark и попробуем смоделировать сбой узла / процесса, пока оно отправляет простые документы в Solr. Наша цель — не допустить потери документов из-за сбоев.
Приложения Spark — это просто архивы Java, содержащие все зависимости проекта. Документация рекомендует использовать инструменты управления проектами sbt или Maven с соответствующими плагинами:
Мы сделаем нашу заявку с Maven. Для этого нам нужно добавить зависимость к SolrJ ( http://mvnrepository.com/artifact/org.apache.solr/solr-solrj ) и поместить фиктивный класс с простым кодом, подобным этому:
 package com.example;

import org.apache.solr.client.solrj.SolrServer;
import org.apache.solr.client.solrj.impl.HttpSolrServer;
import org.apache.solr.common.SolrInputDocument;

import java.util.ArrayList;
import java.util.List;

public class Executor {

 public static void main(String[] args) {
     String solrServerURL = "http://localhost:8983/solr";
     int offset = 0;
     int delay = 1;

     for (String arg : args) {
         if (arg.startsWith("offset=")) {
             // This offset is needed to avoid sending several documents with the
             // same id. In spite of the fact that Solr can handle such documents,
             // we don't want to have any intersections. If we run 4 tasks like this
             // one, then we need check if all 4000 documents are indexed.
             offset = Integer.parseInt(arg.split("=")[1]);
         } else if (arg.startsWith("delay")) {
             delay = Integer.parseInt(arg.split("=")[1]);
         } else if (arg.startsWith("solr_server")) {
             solrServerURL = arg.split("=")[1];
         }
     }

     SolrServer solrServer = new HttpSolrServer(solrServerURL);
     List<SolrInputDocument> docs = new ArrayList<SolrInputDocument>();

     for (int i = 1; i <= offset + 1000; i ++) {
         SolrInputDocument document = new SolrInputDocument();
         document.addField("docid", String.valueOf(i));
         docs.add(document);

         // Add documents to Solr by batches with a size equal to 100
         try {
             if (i % 100 == 0) {
                 solrServer.add(docs);
                 docs = new ArrayList<SolrInputDocument>();
             }
         } catch (Exception e) {
             // TODO: Proper exception handling
         }

         // Artificial delay to prolongate total time
         try {
             Thread.sleep(delay);
         } catch (InterruptedException e) {
             // Nothing to do
         }
     }

     // Finally commit documents and free resources
     try {
         solrServer.commit();
     } catch (Exception e) {
         // TODO: Proper exception handling
     } finally {
         solrServer.shutdown();
     }
 }

}
Этот код генерирует входные документы Solr с единственным полем «id» и отправляет их на сервер с помощью клиента Java под названием SolrJ. Поле «id» должно быть уникальным в контексте индекса Solr, и, тем не менее, Solr не является исключительной ситуацией для обработки двух документов с одинаковым идентификатором, нам необходимо подсчитать каждый документ, отправленный на сервер, чтобы убедиться, что ни один документ не потерян. Хорошо, давайте создадим его, и теперь у нас есть «Uber» JAR со всеми зависимостями.
Развертывание SolrCloud
Следующий шаг. Теперь мы собираемся скачать и распаковать дистрибутив SolrCloud. Загрузки находятся на странице http://lucene.apache.org/solr/downloads.html . Я взял 4.10.2 версию. Мы будем использовать встроенный пример в нашем практическом руководстве, давайте клонируем его папку, чтобы создать четыре независимых рабочих пространства:
 my_device:~ Root$ cd ~/solr-4.10.2/
my_device:solr-4.10.2 Root$ cp -r example example2
my_device:solr-4.10.2 Root$ cp -r example exampleB
my_device:solr-4.10.2 Root$ cp -r example example2B
Хорошо, теперь разверните первый экземпляр:
 my_device:example Root$ export SOLR_INSTANCE=~/solr-4.10.2/example
my_device:example Root$ java -Djetty.port=8983 -Djetty.home=$SOLR_INSTANCE  -Dsolr.solr.home=$SOLR_INSTANCE/solr -Dbootstrap_confdir=$SOLR_INSTANCE/solr/collection1/conf -Dcollection.configName=myconf -DzkRun -DzkHost=localhost:9983,localhost:8574,localhost:9900,localhost:9500 -DnumShards=2 -jar $SOLR_INSTANCE/start.jar
И продолжайте развертывание, соответственно изменяя параметры jetty.port (8983, 7574, 8900, 8500) и SOLR_INSTANCE (пример, пример2, примерВ, пример2В). Вы можете отправить все эти команды в фоновый режим, используя приложение «&», или запустить их отдельно в четырех консолях. Вот:
-
jetty.port, jetty.home — Solr из примера использует встроенный сервер Jetty под капотом, поэтому нам просто нужно указать правильный порт для привязки и рабочую папку
-
solr.solr.home — домашний каталог для всех файлов Solr (свойства, индексные файлы и т. д.)
-
bootstrap_confdir — начальная конфигурация загрузки, которая будет загружена в ZooKeeper
-
collection.configName — устанавливает имя для конфигурации ZooKeeper
-
zkRun — говорит запустить встроенный ZooKeeper
-
zkHost — указывает все узлы, подходящие для размещения ZooKeeper
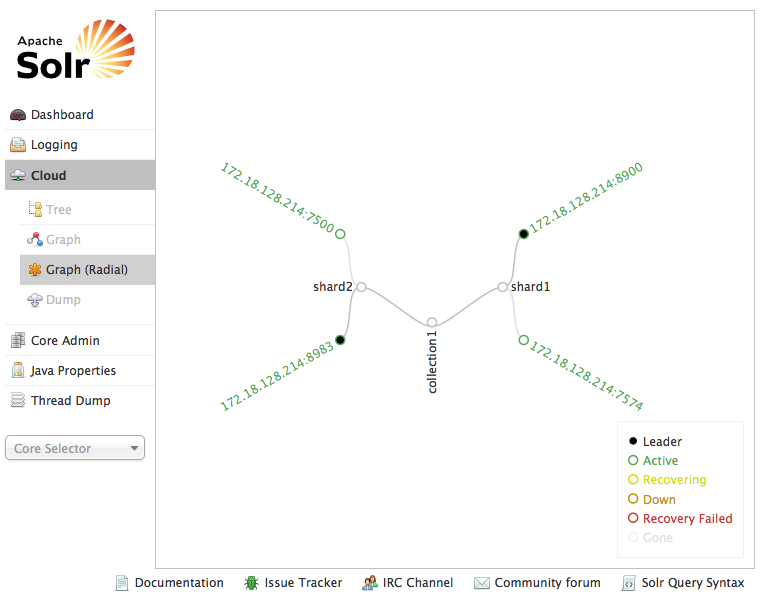
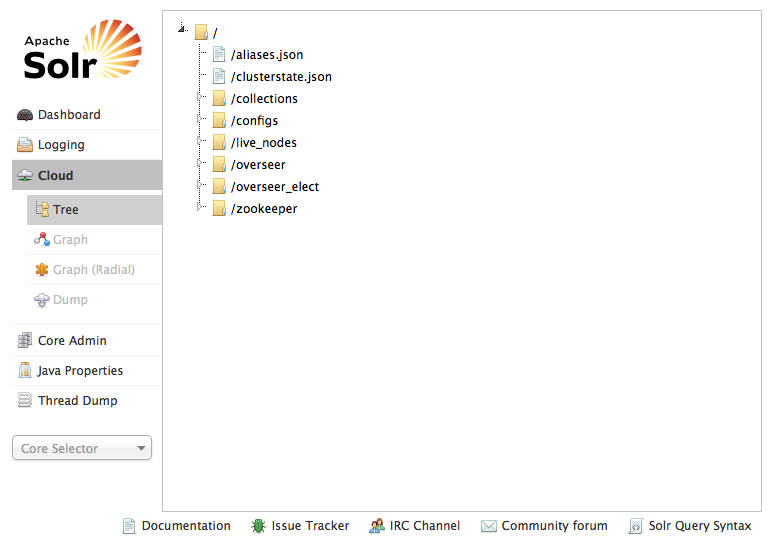
Когда все будет сделано, мы получим два осколка и две копии SolrCloud. Также мы сказали Solr запустить встроенный ZooKeeper и загрузить туда его конфигурацию. Вы можете проверить состояние Solr, сведения об облаке и данные ZooKeeper, перейдя на страницу администрирования Solr, расположенную по ссылке http: // localhost: port / solr (рис. 1 и 2).
Рис. 1 — график SolrCloud
Pic. 2 – Zookeeper tree
Spark deployment
Now, it’s Spark turn. Spark can be downloaded fromhttps://spark.apache.org/downloads.html. There are several pre-built versions available for download for your convenience. When it’s done, unpack an archive and clone it — one instance will became a leader or master node, second one will became spare or standby node. Let’s name these folders accordingly:
 my_device:~ Root$ tar -xzvf spark-1.1.1-bin-hadoop2.4.tgz
my_device:~ Root$ mv spark-1.1.1-bin-hadoop2.4 spark-leader
my_device:~ Root$ cp spark-leader spark-standby
Alright, then we need to configure our Spark nodes. In order to do this, copy or rename existing template:
my_device:~ Root$ cd spark-leader/conf
my_device:~ Root$ cp spark-env.sh.template spark-env.sh
And reduce it’s content to:
export SPARK_MASTER_IP="localhost"
export SPARK_MASTER_PORT=1101
export SPARK_DAEMON_JAVA_OPTS="-Dspark.deploy.recoveryMode=ZOOKEEPER -Dspark.deploy.zookeeper.url=localhost:9983,localhost:8574,localhost:9900,localhost:9500"
export SPARK_PID_DIR="/tmp/spark-leader"
export SPARK_MASTER_WEBUI_PORT=6661
export SPARK_WORKER_PORT=1102
export SPARK_WORKER_MEMORY=512m
export SPARK_LOCAL_DIRS="./data"
export SPARK_WORKER_DIR="./work"
What is this all about? Well, every option is described in the original template, we’ll only pay an attention to the following variables:
-
SPARK_DAEMON_JAVA_OPTS — we told Spark to use Zookeeper for recovery and pointed to Zookeeper cluster
-
SPARK_PID_DIR — there’s a dir where Spark will keep process ids, we will need it in order to simulate node failure
Сделайте то же самое для запасного узла:
export SPARK_MASTER_IP="localhost"
export SPARK_MASTER_PORT=2101
export SPARK_DAEMON_JAVA_OPTS="-Dspark.deploy.recoveryMode=ZOOKEEPER -Dspark.deploy.zookeeper.url=localhost:9983,localhost:8574,localhost:9900,localhost:9500"
export SPARK_PID_DIR="/tmp/spark-standby"
export SPARK_MASTER_WEBUI_PORT=7661
export SPARK_WORKER_PORT=2102
export SPARK_WORKER_MEMORY=512m
export SPARK_LOCAL_DIRS="./data"
export SPARK_WORKER_DIR="./work"
Вот и все, теперь пришло время развернуть кластер Spark. Я написал простой скрипт для достижения этой цели:
 #!/bin/bash

rm -rf /tmp/spark-leader
rm -rf /tmp/spark-standby

bash spark-leader/sbin/start-master.sh
bash spark-standby/sbin/start-master.sh

SPARK_WORKER_INSTANCES=4
SPARK_WORKER_WEBUI_PORT=8661
for ((i=0; i<$SPARK_WORKER_INSTANCES; i++)); do
 bash spark-leader/sbin/start-slave.sh $(( $i + 1 ))  spark://localhost:1101 --webui-port $(( $SPARK_WORKER_WEBUI_PORT + $i ))
done
This script first cleans tmp directories, then runs two master nodes and finally starts four worker nodes. What are these master and worker nodes? Worker nodes are executors, they can only run assigned tasks, and master nodes are Spark coordinators, they orchestrate Spark cluster and assign tasks to available workers. If everything is fine, in a minute after the script is run we’ll be able to see following page by addressing to http://locahost:6661:
Pic. 3 – Spark master web UI
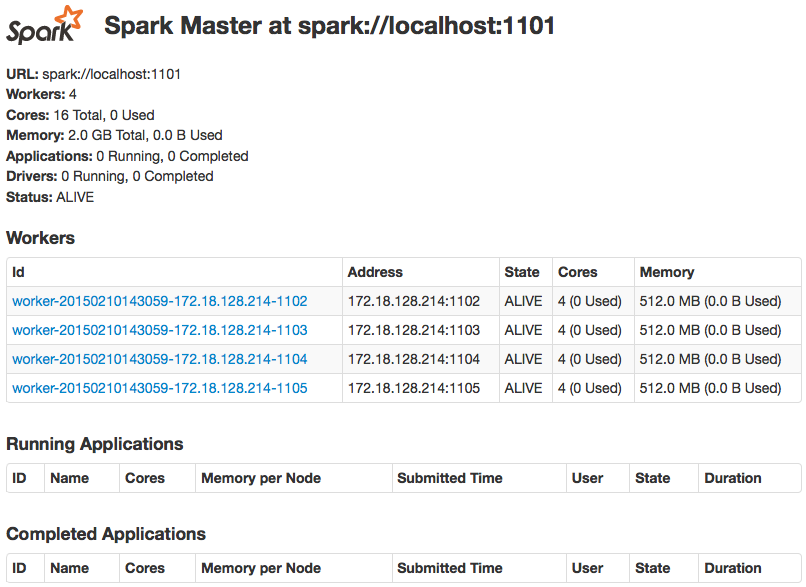
In the picture 3 we can see Spark master with four connected worker nodes. If we go to another node (http://localhost:7661), we’ll see similar screen, but without any worker nodes connected (that’s because we sent them to spark://localhost:1101).
Testing
So, we deployed Solr, Zookeeper and Spark clusters, and we have an assembled application, let’s submit it and experiment with failover!
my_device:~ Root$ spark-leader/bin/spark-submit --class com.example.Executor --master spark://localhost:1101 --deploy-mode cluster --supervise --executor-memory 512m --total-executor-cores 4 path-to-application.jar offset=0 solr_server=http://localhost:8983/solr &
What do these command mean? First of all, we use spark-submit script to submit our tasks. Second, we point to an executable class within our jar. Further we tell Spark how to submit the tasks (or drivers in terminology of Spark):
-
—deploy-mode cluster – from documentation “Whether to deploy your driver on the worker nodes (cluster) or locally as an external client (client) (default: client)”
-
—supervise – specify this flag to make sure that the driver is automatically restarted if it fails with non-zero exit code. This’s exactly what we’re looking for – in case if Spark worker node is terminated, Spark cluster will just restart it on any free worker node.
What about the rest of the arguments? Well, one of them is obviously just path to our jar. And the others two are arguments that are sent to our executable class. Solr server url is an endpoint where to send Solr documents. And the last one – offset – we need it, as it was told, to avoid sending several documents with the same id.
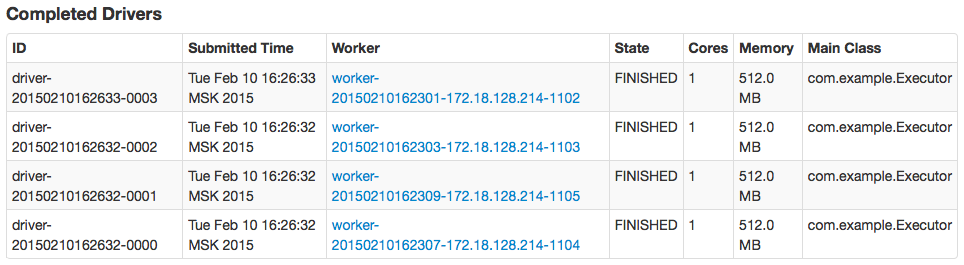
Run this command four times increasing offset by thousand. If everything is fine, we’ll get four completed tasks and four thousand documents in Solr (see pictures 4 and 5).
Pic. 4 – finished drivers in Spark master web UI
Pic. 5 – Match all query in Solr web UI
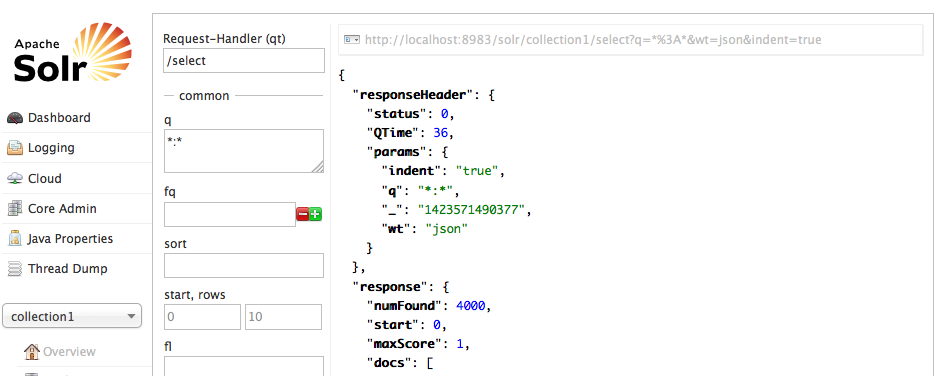
What next? Remember we introduced “delay” command line argument in our code? We need it now to manipulate total execution time causing some artificial processing delay. During the first run we minimized it to default 1 ms, because we needed this run only to collect our control data. During the second run we’ll extend this value up to 180 ms (total execution time will be at least 3 minutes) — this will give us enough time to simulate node failure. In the end we’ll compare control data with test data. But first we need to find out leader node PID:
my_device:~ Root$ cd /tmp/spark-leader
my_device:~ Root$ cat spark-Root-org.apache.spark.deploy.master.Master-1.pid
38073
my_device:~ Root$
Ok, this number – 38073 – is our leader node PID. And let’s find out our worker nodes ids:
my_device:~ Root$ jps
38145 Master
38073 Master
38016 start.jar
38014 start.jar
38015 start.jar
38865 Jps
38013 start.jar
38385 Worker
38325 Worker
38265 Worker
38205 Worker
my_device:~ Root$
We’ll choose one of the workers as well as leader node and terminate them, but first we need to purge Solr and run our modified submit commands (again, four times):
my_device:~ Root$ curl http://localhost:8983/solr/update --data '<delete><query>*:*</query></delete>' -H 'Content-type:text/xml; charset=utf-8'
my_device:~ Root$ curl http://localhost:8983/solr/update --data '<commit/>' -H 'Content-type:text/xml; charset=utf-8'
my_device:~ Root$ spark-leader/bin/spark-submit --class com.example.Executor --master spark://localhost:1101 --deploy-mode cluster --supervise --executor-memory 512m --total-executor-cores 4 path-to-application.jar offset=0 delay=180 solr_server=http://localhost:8983/solr &
Ready? Lets simulate nodes failure:
my_device:~ Root$ kill -9 38385
my_device:~ Root$ kill -9 38073
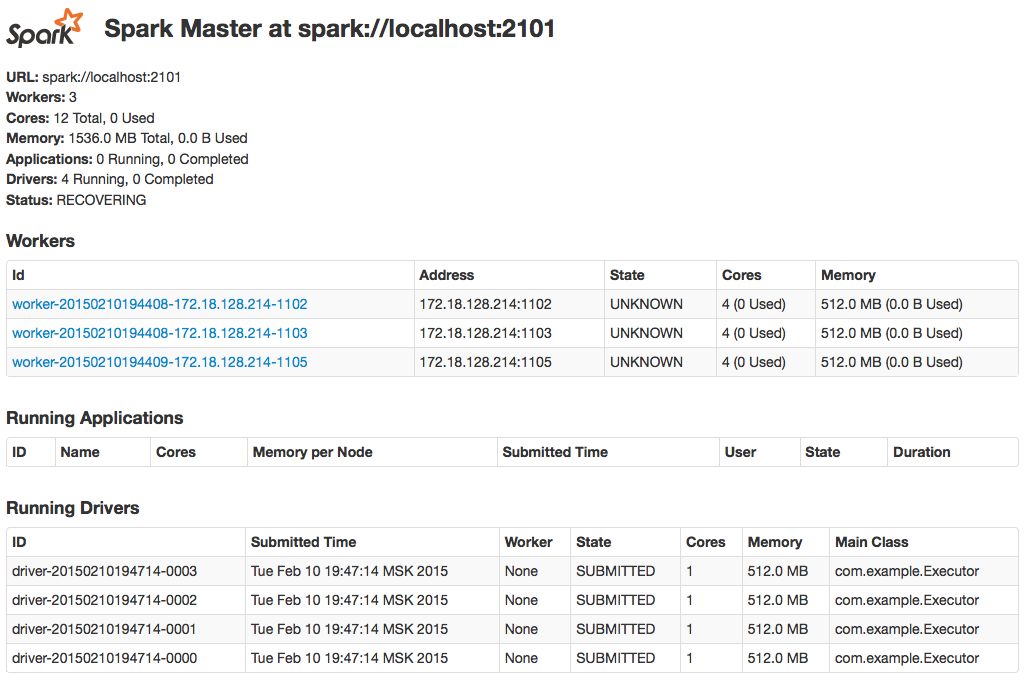
If we’re fast enough, we can see how Spark failover mechanism works – all we need is to track changes on our standby node web UI (http://localhost:7661). Usually it takes about a half of a minute to see any updates. Expected behaviour is that no submitted task will lost if the worker is down (pic. 6), spare node will change its status from STANDBY to ALIVE (it becomes leader node) if current leader node is terminated, and no orphan worker will left – they all become connected to new leader (pic. 7):
Pic. 6 – Driver relaunching

Pic. 7 – Spark recovery process on spare master node
Finally, when all drivers become completed, we need to go back to Solr and check that all match query returns the same result as we seen (pic. 5) – 4000 documents.
Okay, seems our problem is solved — we simulated long-run distributed task, we randomly terminated executing applications and we saw entire recovery process which ensured that we haven’t lost any data. We didn’t have to write any special code to achieve this level of resiliency and job recovery. So, Spark can be used as a resilient job manager for long running data importing tasks.