Новая статья после перерыва почти пол года. В этой статье мы кратко рассмотрим, как вы можете начать работу с vert.x, и более интересно, как вы можете использовать RxJava для упрощения программирования асинхронных систем. Мы рассмотрим следующие темы:
- Создайте пустой проект vert.x, используя maven
- Импортируйте в IntelliJ и создайте простой HTTP-сервер
- Загрузка данных из mongoDB с помощью модуля постоянных данных vert.x mongoDB
- Выставить почтовые индексы через интерфейс REST
- Замените обратные вызовы наблюдателями RxJava
Первое, что нужно сделать, это очень просто, мы просто используем стандартный архетип Maven для создания проекта vert.x. (обратите внимание, что полный окончательный пример можно скачать с github: https://github.com/josdirksen/smartjava/tree/master/vertx-demo-1 )
Создайте пустой проект vert.x, используя maven
Перейдите в каталог, в котором вы хотите создать свой проект vert.x, введите следующее и нажмите enter:
jos@Joss-MacBook-Pro.local:~/Dev/playground$ mvn archetype:generate -Dfilter=io.vertx:
Здесь показаны все доступные архетипы io.vertx (в данном случае только 1)
[INFO] Scanning for projects...
[INFO]
[INFO] ------------------------------------------------------------------------
[INFO] Building Maven Stub Project (No POM) 1
[INFO] ------------------------------------------------------------------------
[INFO]
[INFO] >>> maven-archetype-plugin:2.2:generate (default-cli) @ standalone-pom >>>
[INFO]
[INFO] <<< maven-archetype-plugin:2.2:generate (default-cli) @ standalone-pom <<<
[INFO]
[INFO] --- maven-archetype-plugin:2.2:generate (default-cli) @ standalone-pom ---
[INFO] Generating project in Interactive mode
[INFO] No archetype defined. Using maven-archetype-quickstart (org.apache.maven.archetypes:maven-archetype-quickstart:1.0)
Choose archetype:
1: remote -> io.vertx:vertx-maven-archetype (-)
Choose a number or apply filter (format: [groupId:]artifactId, case sensitive contains): :
Так как есть только один, просто введите «1» и нажмите Enter. Далее он покажет вам версии, которые вы можете выбрать. Для этого примера я выбрал 2.0.1-финальную версию.
Choose io.vertx:vertx-maven-archetype version:
1: 1.0.0-beta1
2: 1.0.0-beta2
3: 1.0.0-beta3
4: 1.0.0-CR1
5: 1.0.0-CR2
6: 2.0.0-final
7: 2.0.1-final
Choose a number: 7:
Введите «7» и нажмите Enter. Следующие шаги позволяют вам определить имя и версию вашего проекта:
Define value for property 'groupId': : org.smartjava Define value for property 'artifactId': : vertx-demo-1 Define value for property 'version': 1.0-SNAPSHOT: : Define value for property 'package': org.smartjava: : Confirm properties configuration: groupId: org.smartjava artifactId: vertx-demo-1 version: 1.0-SNAPSHOT package: org.smartjava Y: : Y
Введите значения, которые вы видите выше (или используйте свои собственные), и, наконец, введите «Y», чтобы подтвердить свой выбор. Теперь будет создан проект:
[INFO] ---------------------------------------------------------------------------- [INFO] Using following parameters for creating project from Archetype: vertx-maven-archetype:2.0.1-final [INFO] ---------------------------------------------------------------------------- [INFO] Parameter: groupId, Value: org.smartjava [INFO] Parameter: artifactId, Value: vertx-demo-1 [INFO] Parameter: version, Value: 1.0-SNAPSHOT [INFO] Parameter: package, Value: org.smartjava [INFO] Parameter: packageInPathFormat, Value: org/smartjava [INFO] Parameter: package, Value: org.smartjava [INFO] Parameter: version, Value: 1.0-SNAPSHOT [INFO] Parameter: groupId, Value: org.smartjava [INFO] Parameter: artifactId, Value: vertx-demo-1 [INFO] project created from Archetype in dir: /Users/jos/Dev/playground/vertx-demo-1 [INFO] ------------------------------------------------------------------------ [INFO] BUILD SUCCESS [INFO] ------------------------------------------------------------------------ [INFO] Total time: 5:37.710s [INFO] Finished at: Sun Nov 24 14:55:12 CET 2013 [INFO] Final Memory: 9M/24M [INFO] ------------------------------------------------------------------------
Чтобы проверить, все ли прошло правильно, просто перейдите в только что созданный каталог и запустите mvn install. это загрузит все необходимые библиотеки, запустит несколько тестов и установит ваш проект в локальное хранилище maven. Теперь, когда у нас есть проект maven, мы можем загрузить его в нашу любимую среду IDE. В моем случае я использую IntelliJ, но Eclipse работает примерно так же.
Импортируйте в IntelliJ и создайте простой HTTP-сервер
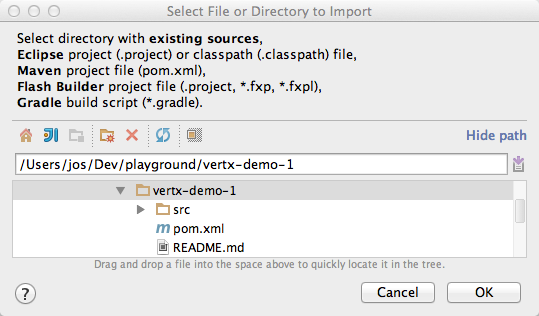
Запустите IntelliJ и выберите «Файл-> Импортировать проект», перейдите в каталог, созданный maven, и импортируйте проект.
Просто нажмите «Далее» по всем вопросам, и вы получите проект внутри IntelliJ. Если вы создаете проект на основе этого архетипа, вы автоматически получаете ряд статей, с которыми можно поэкспериментировать. Несколько из них определены в заводной. IntelliJ автоматически пытается скомпилировать их, но так как он не может найти отличный компилятор, процесс компиляции / создания завершается неудачно. В этом примере мы сначала сосредоточимся на Java-части файла vert.x, поэтому просто удалите файлы .groovy из каталога ‘src / main / resources’ и каталога ‘test / resources /gration_tests / groovy’.
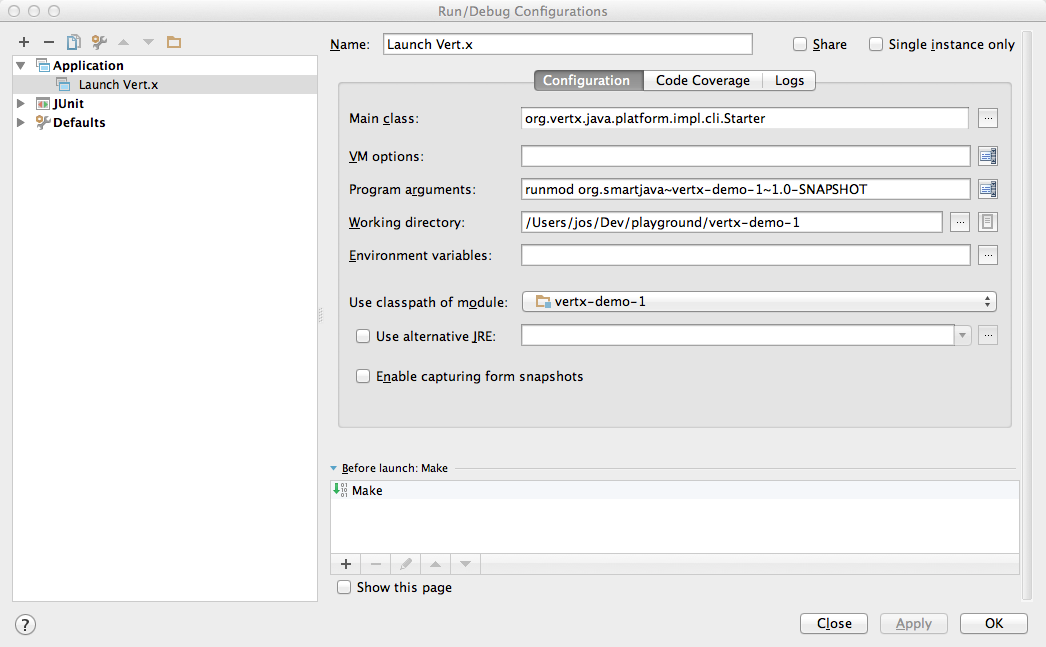
Теперь мы можем запустить vert.x с предоставленными обработчиками напрямую через maven, установив модуль с помощью maven и затем вызвав цель ‘vertx: runModIDEA’. Обратите внимание, что вам нужно сначала вызвать mvn: compile, чтобы увидеть ваши изменения. Если вы не хотите использовать maven для запуска проекта из IDE, вы также можете использовать другой подход, где вы используете класс org.vertx.java.platform.impl.cli.Starter для запуска vert.x прямо из IDE. В IntelliJ вы создаете следующую конфигурацию запуска для этого:
Если вы запустите это, вы все равно увидите ошибку. Что-то вроде этого:
Exception in thread "main" java.lang.ClassNotFoundException: org.vertx.java.platform.impl.cli.Starter at java.net.URLClassLoader$1.run(URLClassLoader.java:366) at java.net.URLClassLoader$1.run(URLClassLoader.java:355) at java.security.AccessController.doPrivileged(Native Method) at java.net.URLClassLoader.findClass(URLClassLoader.java:354) at java.lang.ClassLoader.loadClass(ClassLoader.java:424) at sun.misc.Launcher$AppClassLoader.loadClass(Launcher.java:308) at java.lang.ClassLoader.loadClass(ClassLoader.java:357) at java.lang.Class.forName0(Native Method) at java.lang.Class.forName(Class.java:190) at com.intellij.rt.execution.application.AppMain.main(AppMain.java:113)
Причина, по которой вы это видите, заключается в том, что в файле pom.xml, созданном архетипом vert.x, библиотеки vert.x указаны как «предоставленные». В качестве быстрого решения откройте pom.xml и измените область действия трех зависимостей io.vertx с «предоставлено» на «компилировать». Теперь, когда вы запускаете этот модуль запуска из IntelliJ, vert.x будет запускаться правильно.
/Library/Java/JavaVirtualMachines/jdk1.7.0_25.jdk/Contents/Home/bin/java -Didea.launcher.port=7543 "-Didea.launcher.bin.path=/Applications/IntelliJ IDEA 12.app/bin" -Dfile.encoding=UTF-8 -classpath "..." com.intellij.rt.execution.application.AppMain org.vertx.java.platform.impl.cli.Starter runmod org.smartjava~vertx-demo-1~1.0-SNAPSHOT log4j:WARN No appenders could be found for logger (io.netty.util.internal.logging.InternalLoggerFactory). log4j:WARN Please initialize the log4j system properly. log4j:WARN See http://logging.apache.org/log4j/1.2/faq.html#noconfig for more info. Nov 24, 2013 3:43:26 PM org.vertx.java.core.logging.impl.JULLogDelegate info INFO: Module org.smartjava~vertx-demo-1~1.0-SNAPSHOT successfully installed Nov 24, 2013 3:43:26 PM org.vertx.java.core.logging.impl.JULLogDelegate info INFO: PingVerticle started Nov 24, 2013 3:43:26 PM org.vertx.java.core.logging.impl.JULLogDelegate info INFO: Succeeded in deploying module
Теперь, когда у нас есть настройка проекта в IntelliJ, и мы можем легко запустить его непосредственно из IDE (и перезапустить его с помощью ctrl-F5), давайте приступим к созданию простого HTTP-сервера, чтобы мы могли видеть некоторые выходные данные из браузера для проведения тестирования. Проще (обратите внимание, что есть гораздо лучшие способы тестирования vert.x и verstitutions, чем я здесь показываю, но это кое-что для другой статьи). Откройте файл PingVerticle.java и замените метод запуска следующим кодом:
package org.smartjava; import org.vertx.java.core.Handler; import org.vertx.java.core.http.HttpServerRequest; import org.vertx.java.platform.Verticle; public class PingVerticle extends Verticle { public void start() { vertx.createHttpServer().requestHandler(new Handler<HttpServerRequest>() { @Override public void handle(HttpServerRequest httpServerRequest) { httpServerRequest.response().end("Hello smartjava"); } }).listen(8888); container.logger().info("Webserver started, listening on port: 8888"); } }
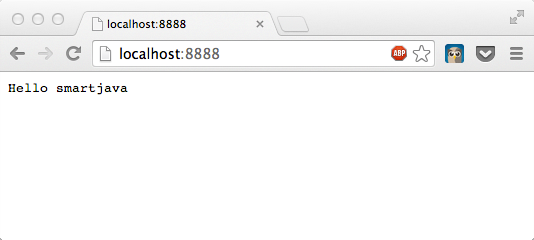
Запустите это и откройте браузер для localhost: 8888, и вы увидите следующее.
Это веб-сервер, который вы создали в vert.x и запускали прямо из вашей IDE. Кусок торта до сих пор. Теперь давайте поэкспериментируем с некоторыми данными.
Загрузка данных из mongoDB с помощью модуля постоянных данных vert.x mongoDB
Я не буду углубляться в то, как вы устанавливаете mongoDB, в Интернете достаточно статей, объясняющих это. Если вы работаете на Mac и у вас установлены macports, вы можете просто использовать следующую командную строку для установки mongoDB:
sudo port install mongodb
В оставшейся части этой статьи я предполагаю, что у вас установлен mongoDB, а утилиты командной строки доступны из консоли. Первое, что нам нужно сделать, это получить данные, с которыми можно поиграться. Для этого примера мы будем использовать список почтовых индексов, которые вы можете скачать с сайта mongoDB: http://media.mongodb.org/zips.json . Загрузите этот файл, откройте консоль и выполните следующую команду, чтобы сначала запустить mongoDB, а затем импортировать этот список zip-файлов в mongoDB.
jos@Joss-MacBook-Pro.local:~/Dev/playground/vertx-demo-1$ mkdir data
jos@Joss-MacBook-Pro.local:~/Dev/playground/vertx-demo-1$ mongod --dbpath ./data/
Sun Nov 24 16:23:51.765 [initandlisten] MongoDB starting : pid=77755 port=27017 dbpath=./data/ 64-bit host=Joss-MacBook-Pro.local
Sun Nov 24 16:23:51.765 [initandlisten] db version v2.4.5
Sun Nov 24 16:23:51.765 [initandlisten] git version: nogitversion
Sun Nov 24 16:23:51.765 [initandlisten] build info: Darwin Joss-MacBook-Pro.local 12.4.0 Darwin Kernel Version 12.4.0: Wed May  1 17:57:12 PDT 2013; root:xnu-2050.24.15~1/RELEASE_X86_64 x86_64 BOOST_LIB_VERSION=1_54
Sun Nov 24 16:23:51.765 [initandlisten] allocator: tcmalloc
Sun Nov 24 16:23:51.765 [initandlisten] options: { dbpath: "./data/" }
Sun Nov 24 16:23:51.766 [initandlisten] journal dir=./data/journal
Sun Nov 24 16:23:51.766 [initandlisten] recover : no journal files present, no recovery needed
Sun Nov 24 16:23:51.779 [FileAllocator] allocating new datafile ./data/local.ns, filling with zeroes...
Sun Nov 24 16:23:51.779 [FileAllocator] creating directory ./data/_tmp
Sun Nov 24 16:23:51.812 [FileAllocator] done allocating datafile ./data/local.ns, size: 16MB,  took 0.031 secs
Sun Nov 24 16:23:51.853 [FileAllocator] allocating new datafile ./data/local.0, filling with zeroes...
Sun Nov 24 16:23:52.254 [FileAllocator] done allocating datafile ./data/local.0, size: 64MB,  took 0.4 secs
Sun Nov 24 16:23:52.260 [initandlisten] command local.$cmd command: { create: "startup_log", size: 10485760, capped: true } ntoreturn:1 keyUpdates:0  reslen:37 480ms
Sun Nov 24 16:23:52.260 [initandlisten] waiting for connections on port 27017
Sun Nov 24 16:23:52.260 [websvr] admin web console waiting for connections on port 28017
Теперь мы можем использовать mongoImport для импорта загруженных почтовых индексов:
jos@Joss-MacBook-Pro.local:~/Dev/playground/vertx-demo-1$ wget http://media.mongodb.org/zips.json --2013-11-24 16:25:45-- http://media.mongodb.org/zips.json Resolving media.mongodb.org... 54.230.131.14, 54.230.131.51, 54.230.128.129, ... Connecting to media.mongodb.org|54.230.131.14|:80... connected. HTTP request sent, awaiting response... 200 OK Length: 2871006 (2.7M) Saving to: `zips.json' 100%[======================================>] 2,871,006 2.20M/s in 1.2s 2013-11-24 16:25:47 (2.20 MB/s) - `zips.json' saved [2871006/2871006] jos@Joss-MacBook-Pro.local:~/Dev/playground/vertx-demo-1$ mongoimport --db vertx --collection zips --file ./zips.json connected to: 127.0.0.1 Sun Nov 24 16:26:28.337 check 9 29470 Sun Nov 24 16:26:28.458 imported 29470 objects jos@Joss-MacBook-Pro.local:~/Dev/playground/vertx-demo-1$
Если вы установили плагин mongoDB в IntelliJ, вы можете легко проверить, работает ли он:
На данный момент нам нужно только вызвать экземпляр mongoDB из vert.x и загрузить данные. Для этого мы будем использовать библиотеку mongodb persistor. Во-первых, нам нужно добавить этот модуль в сборку maven (обратите внимание, что это в основном для случаев, когда мы хотим отладить внутренне, vert.x разрешает сам этот модуль):
<dependency> <groupId>io.vertx</groupId> <artifactId>mod-mongo-persistor</artifactId> <version>2.1.0-SNAPSHOT</version> <scope>compile</scope> </dependency>
Vert.x имеет очень хорошую и интересную модульную систему (также для другой статьи), чтобы иметь возможность использовать этот моно-персистор, нам сначала нужно развернуть его как модуль. Это на самом деле довольно легко сделать:
// load the general config object, loaded by using -config on command line JsonObject appConfig = container.config(); // deploy the mongo-persistor module, which we'll use for persistence container.deployModule("io.vertx~mod-mongo-persistor~2.1.0-SNAPSHOT", appConfig.getObject("mongo-persistor"));
Здесь мы загружаем конфигурацию для этого модуля, а затем вызываем deployModule с именем модуля и соответствующей частью конфигурации. Прежде всего, давайте посмотрим на конфигурацию, которую мы используем для этого:
{ "mongo-persistor" : { "address": "mongodb-persistor", "host": "localhost", "port": 27017, "pool_size": 10, "db_name": "vertx" } }
Nothing to difficult. We just point the mongo-persister unit to our mongoDB instance. The one question you might have is, how do we get this file inside vert.x. For that we just have to make a small change to our launcher and change the program arguments from:
runmod org.smartjava~vertx-demo-1~1.0-SNAPSHOT
to this:
runmod org.smartjava~vertx-demo-1~1.0-SNAPSHOT -conf src/main/resources/config.json
The config.json file, contains the configuration we just showed. So with this setup we’ve got the mongodb-persistor library listening on eventbus address «mongodb-persistor». Now all that is left to do, is send messages to this endpoint in a format understood by this module. For this first step we’re just going to search for all the zip codes in the state «AL». If you look through the documentation of [a href=»http://www.smartjava.org/content/mongo-persistor» style=»color: rgb(34, 98, 164); outline-style: none; text-decoration: none;»]https://github.com/vert-x/mod-mongo-persistor/ you can see that we have tell this module the ‘collection’ we want to search through and the type of ‘action’ we want to use. Depending on the action additional configuration is required. To search for all the zipcodes in the state of ‘AL’ we need to create the following json message:
{ "action": "find", "collection": "zips", "matcher": { "state": "AL" } }
Lets change the request handler and look at the complete start method:
public void start() { // load the general config object, loaded by using -config on command line JsonObject appConfig = container.config(); // deploy the mongo-persistor module, which we'll use for persistence container.deployModule("io.vertx~mod-mongo-persistor~2.1.0-SNAPSHOT", appConfig.getObject("mongo-persistor")); // create and run the server vertx.createHttpServer().requestHandler(new Handler<HttpServerRequest>() { @Override public void handle(final HttpServerRequest httpServerRequest) { // we send the response from the mongo query back to the client. // first create the query JsonObject matcher = new JsonObject().putString("state", "AL"); JsonObject json = new JsonObject().putString("collection", "zips") .putString("action", "find") .putObject("matcher", matcher); // send it over the bus vertx.eventBus().send("mongodb-persistor", json, new Handler<Message<JsonObject>>() { @Override public void handle(Message<JsonObject> message) { // send the response back, encoded as string httpServerRequest.response().end(message.body().encodePrettily()); } }); } }).listen(8888); // output that the server is started container.logger().info("Webserver started, listening on port: 8888"); }
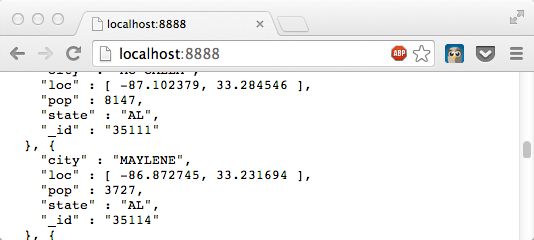
Here you can see that we create the correct json message, send it over the bus, and wait with sending the response back until we get a response from mongoDB. We prettify this response and send it back to the client:
Expose the zips through a REST interface
Now that we’ve got the basis backend components in place, lets look at what it takes to create a simple REST based frontend. We’ll skip the mediatype specific filtering (I’ll add that to a later article), for now we’ll just look at the HTTP verbs and the urls. For this part we want to support the following REST calls:
* GET /zips Show all the zipcode information that are stored in mongoDB * GET /zips/:id Show the information belonging to the specified zip code * GET /zips?state=:state&city=:city Simple search service, where you can search for zip codes per city or state * POST /zips/:id Update existing zip code information
Very simple, but the main goal here is to show how it is done, not how you can create a full RESTful service. To handle these various URLs and verbs, vert.x provides a route matcher: (method bodies left out for clarity)
RouteMatcher matcher = new RouteMatcher(); // the matcher for the complete list and the search matcher.get("/zips", new Handler<HttpServerRequest>() {...} // the matcher for a specific id matcher.get("/zips/:id", new Handler<HttpServerRequest>() {...} // the matcher for the update matcher.post("/zips/:id", new Handler<HttpServerRequest>() {...} vertx.createHttpServer().requestHandler(matcher).listen(8888);
For those of you who’ve worked with libraries such as sinatra or scalatra, this’ll look familiar. We define the method we want to process (get and post in this case), the url we’re interested in and the handler that will be called when a request is received. As you can see in the last line, we pass in this handler to process the requests for the server we created.
Now lets have a quick look at the implementation of these handlers. This is where we create the mongo-persistor messages that communicate with mongoDB for us. I won’t go into too much detail of these methods since they are pretty much self explanatory:
// the matcher for the complete list and the search matcher.get("/zips", new Handler<HttpServerRequest>() { public void handle(final HttpServerRequest req) { JsonObject json = new JsonObject(); MultiMap params = req.params(); if (params.size() > 0 && params.contains("state") || params.contains("city")) { // create the matcher configuration JsonObject matcher = new JsonObject(); if (params.contains("state")) matcher.putString("state", params.get("state")); if (params.contains("city")) matcher.putString("city", params.get("city")); // create the message for the mongo-persistor verticle json = new JsonObject().putString("collection", "zips") .putString("action", "find") .putObject("matcher", matcher); } else { // create the query json = new JsonObject().putString("collection", "zips") .putString("action", "find") .putObject("matcher", new JsonObject()); } JsonObject data = new JsonObject(); data.putArray("results", new JsonArray()); // and call the event we want to use vertx.eventBus().send("mongodb-persistor", json, new ReplyHandler(req, data)); } });
In this method we retrieve all the zipcodes from mongoDB. since mongo-persistor doesn’t return everything we have to iterate over the response. We do this using the following ReplyHandler:
   private static class ReplyHandler implements Handler<Message<JsonObject>> {   private final HttpServerRequest request; private JsonObject data;   private ReplyHandler(final HttpServerRequest request, JsonObject data) { this.request = request; this.data = data; }   @Override public void handle(Message<JsonObject> event) { // if the response contains more message, we need to get the rest if (event.body().getString("status").equals("more-exist")) { JsonArray results = event.body().getArray("results");   for (
  Object el : results) { data.getArray("results").add(el); }   event.reply(new JsonObject(), new ReplyHandler(request, data)); } else {   JsonArray results = event.body().getArray("results"); for (
  Object el : results) { data.getArray("results").add(el); }   request.response().putHeader("Content-Type", "application/json"); request.response().end(data.encodePrettily()); } } }
In this replyHandler we just walk through the results and keep asking for more content until we don’t see the status «more-exist» anymore. I’ll skip the handler where we just retrieve a single zip code, since it isn’t that interesting. The next handler processes the post function with which we update an existing element.
   matcher.post("/zips/:id", new Handler<HttpServerRequest>() { public void handle(final HttpServerRequest req) {   // process the body req.bodyHandler(new Handler<Buffer>() {   @Override public void handle(Buffer event) { // normally we'd validate the input, for now just assume it is correct. final
  String body = event.getString(0,event.length());   // create the query JsonObject newObject = new JsonObject(body); JsonObject matcher = new JsonObject().putString("_id", req.params().get("id")); JsonObject json = new JsonObject().putString("collection", "zips") .putString("action", "update") .putObject("criteria", matcher) .putBoolean("upsert", false) .putBoolean("multi",false) .putObject("objNew",newObject);   // and call the event we want to use vertx.eventBus().send("mongodb-persistor", json, new Handler<Message<JsonObject>>() { @Override public void handle(Message<JsonObject> event) { // we could handle the errors here, but for now // assume everything went ok, and return the original // and updated json req.response().end(body); } }); } }); } });
The code in itself isn’t that complex. We first use a handler to process the request, from this handler we create a new handler that is used to get the body of the request and finally a handler is created that updates the database and sends a response back. Even though it isn’t complex, it gets a bit cumbersome and hard to read when more and more handlers are involved. So in the last section of this article we’ll have a look at how you can replace the nested handlers using rxjava provided functionality.
Replace the callbacks with RxJava observers
For the rxjava code we’ll just add a couple of extra handlers that match a different url. So instead of /zips/90210 the url will be /rxzips/90210. To start first add the following dependency to your maven configuration:
<dependency> <groupId>io.vertx</groupId> <artifactId>mod-rxjava</artifactId> <version>1.0.0-beta2-SNAPSHOT</version> <scope>compile</scope> </dependency>
Before diving into how rxjava and vert.x can be used together a quick quote (from the rxjava site) that explains why this is useful:
Java Futures are straightforward to use for a single level of asynchronous execution but they start to add non-trivial complexity when they’re nested.
It is difficult to use Futures to optimally compose conditional asynchronous execution flows (or impossible, since latencies of each request vary at runtime). This can be done, of course, but it quickly becomes complicated (and thus error-prone) or it prematurely blocks on Future.get(), which eliminates the benefit of asynchronous execution.
RxJava Observables on the other hand are intended for composing flows and sequences of asynchronous data.
With the RxJava Observables it is easy to compose flows and sequences of asynchronous data. If you look through the last couple of code samples from our example you could see why this would be useful. In the last ‘post’ example we had three nested callbacks, with observables it is much easier to compose this and let the code actually tell what is happening.
Now lets extend the post method to do the following:
- first get the body
- after we have the body, we update the element in the database
- next we get the latest version from the database, after the update has succeeded
- after we’ve got the latest version we return this in the response.
If we did this using callbacks we’d probably need four nested levels of callbacks. In rxjava we can do this in the following manner:
   matcher.post("/rxzips/:id", new Handler<HttpServerRequest>() { public void handle(final HttpServerRequest req) { // first access the buffer as an observable. We do this this way, since // we want to keep using the matchhandler and we can't do that with rxHttpServer Observable<Buffer> reqDataObservable = RxSupport.toObservable(req);   // after we have the body, we update the element in the database Observable<RxMessage<JsonObject>> updateObservable = reqDataObservable.flatMap(new Func1<Buffer, Observable<RxMessage<JsonObject>>>() { @Override public Observable<RxMessage<JsonObject>> call(Buffer buffer) {
  System.out.println("buffer = " + buffer); // create the message JsonObject newObject = new JsonObject(buffer.getString(0, buffer.length())); JsonObject matcher = new JsonObject().putString("_id", req.params().get("id")); JsonObject json = new JsonObject().putString("collection", "zips") .putString("action", "update") .putObject("criteria", matcher) .putBoolean("upsert", false) .putBoolean("multi", false) .putObject("objNew", newObject);   // and return an observable return rxEventBus.send("mongodb-persistor", json); } });   // use the previous input again, so we could see whether the update was successful. Observable<RxMessage<JsonObject>> getLatestObservable = updateObservable.flatMap(new Func1<RxMessage<JsonObject>, Observable<RxMessage<JsonObject>>>() { @Override public Observable<RxMessage<JsonObject>> call(RxMessage<JsonObject> jsonObjectRxMessage) {
  System.out.println("jsonObjectRxMessage = " + jsonObjectRxMessage); // next we get the latest version from the database, after the update has succeeded // this isn't dependent on the previous one. It just has to wait till the previous // one has updated the database, but we could check whether the previous one was successfully JsonObject matcher = new JsonObject().putString("_id", req.params().get("id")); JsonObject json2 = new JsonObject().putString("collection", "zips") .putString("action", "find") .putObject("matcher", matcher); return rxEventBus.send("mongodb-persistor", json2); } });   // after we've got the latest version we return this in the response. getLatestObservable.subscribe(new Action1<RxMessage<JsonObject>>() { @Override public void call(RxMessage<JsonObject> jsonObjectRxMessage) { req.response().end(jsonObjectRxMessage.body().encodePrettily()); } }); } });
Still a big piece of code, but most are comments and caused by the fact that Java doesn’t support closures (yet). So what happens here?
- We first create an observer from the request
reqDataObservable = RxSupport.toObservable(req). This means that we want to be informed when data is available in the buffer of our request. - Since we want to do something with this data, we use the
reqDataObservable.flatMapfunction. This allows us to specify what happens when some data comes available on the previously created observable. So instead of nesting callbacks, we just specify the flow of data through the various asynchronous calls. When data is received we use that to update the database. Note that we use therxEventBus.sendmethod. This doesn’t make the call yet, but once again returns an observable. - As the third step we use the output from the previous one to (possibly) determine whether the update was successful. We then get the latest version from the database. This is once again done using observables.
- As long as we don’t have a subscriber nothing really happens. Since we’re interested in the result from the final asynchronous action we use the
getLatestObservable.subscribefunction and ‘wait’ (it is still non-blocking) for the result from the final database read. Once that is received we send the response back based on the received message.
In this example we’ve only showed a couple of very small parts of rxjava:
- We used observables to make working and sequencing asynchronous actions easier.
- We use the flatmap function to pass the result from one asynchronous call into the other, and so eliminating nested callbacks
- We used the rxSupport and rxEventbus rxJava vert.x extensions to easily create rxJava observables
- And we kicked off the complete sequence by subscribing to the last observable in the chain
In a future article we’ll dive a bit deeper into rxJava how you can also organize more complex asynchronous flows.


![PingVerticle.java - [vertx-demo-1> - vertx-demo-1 - [~ _Dev_playground_vertx-demo-1] .png](/wp-content/uploads/images/dzo/e00c3e21a8f3f518f399402e6962cc06.png)
