вступление
Каждый раз, когда я встречаюсь с кем-то из команды Windows Phone Map (или вступаю с ним в контакт каким-либо другим способом), я говорю о важности возможности привязывать фигуры к картам. Ситуация определенно улучшается: элементы XAML могут отображаться с использованием привязки данных из коробки (раньше для этого нам требовался инструментарий Windows Phone), но, увы, нет. Как говорится, «если гора не придет к Мухаммеду, тогда Мухаммед должен идти к горе». Я взялся за старую идею , которую использовал для Bing Maps в Windows 8, а затем преобразовал в Windows Phone 8.0 — и в основном адаптировал ее для использования в Windows Phone 8.1. в том числе некоторые исправления ошибок.
Краткий обзор элементов отображения карты
Вы можете отображать либо элементы XAML поверх карты, либо использовать формы карты. Элементы XAML могут быть любыми, их можно отобразить, либо добавив их в коде в свойство Children карты, либо с помощью MapItemControl, связав его свойство ItemSource с объектом списка, и они определяют шаблон для отображения, используя свойства из привязанного объекта к шаблону. Как правило, это выглядит так:
<Maps:MapItemsControl ItemsSource="{Binding Activities}">
    <Maps:MapItemsControl.ItemTemplate>
        <DataTemplate >
            <Image Source="{Binding Image}" Height="25"
                Maps:MapControl.NormalizedAnchorPoint="{Binding Anchor}"
                Maps:MapControl.Location="{Binding Position}">
            </Image>
        </DataTemplate>
    </Maps:MapItemsControl.ItemTemplate>
</Maps:MapItemsControl>
Важно знать, что эти элементы рисуются не картой, а поверх карты, потоком пользовательского интерфейса. Как правило, они медленные .
Карта формы , с другой стороны, рисуются на карте самого , нативным кодом, и поэтому быстро . Вы можете добавить их на карту, добавив дочерний класс MapShape в свойства карт MapElements. Вы можете выбрать MapPolyLine, MapPolygon и — новое в Windows Phone 8.1 — MapIcon. К сожалению, привязка данных не поддерживается.
Введите WpWinNlMaps
На этот раз вам не нужно будет набирать или просматривать код, поскольку я уже опубликовал все необходимое для NuGet — в пакете WpWinNlMaps . Вы просто добавляете это в свое приложение, и вы готовы к работе. Имейте в виду, это включает в себя множество других вещей — сам пакет WpWinNl , MVVMLight и некоторые другие вещи. Это позволит вам привязать модели вида к карте, отобразить их и сделать их «накладными». Все это делается с помощью — как вы уже догадались — поведения. MapShapeDrawBehavior, чтобы быть точным.
Концепции
Как правило, карты делятся на слои . Вы можете думать об этом как о логических единицах, представляющих один класс объектов реального мира (или «особенности», как их обычно называют в геопространственном слове). Например, «дома», «заправки», «дороги». В Windows Phone это явно не так: все MapShapes выбрасываются в одну корзину — свойство MapElements. В WpWinNlMaps слой примерно соответствует одному поведению, прикрепленному к карте.
MapShapeDrawBehavior содержит несколько свойств
- ItemsSource — это место, где вы привязываете свои бизнес-объекты / модели просмотра к
- PathPropertyName — имя свойства в связанном объекте, который содержит Geopath, описывающий местоположение объекта
- LayerName — название слоя. Убедитесь, что это уникально на карте
- ShapeDrawer — имя класса, который фактически определяет способ отображения Geopath в PathPropertyName
- EventToCommandMappers — содержит коллекцию событий карты, которые необходимо перехватить , сопоставленные с командой связанного объекта, которую необходимо вызвать, когда карта получает это событие. В настоящее время единственными событиями, которые имеют смысл, являются «Tapped» и «MapTapped».
Образец впереди
Прежде чем углубляться в детали, давайте сначала сделаем небольшой пример, потому что теория хороша, но, по моему опыту, код работает лучше. Итак, у меня есть небольшой класс, содержащий модель представления с Geopath и Name, и команду, которую можно запустить:
public class PointList : ViewModelBase
{
  public PointList()
  {
    Points = null;
  }
  public string Name { get; set; }

  public Geopath Points { get; set; }

  public ICommand SelectCommand
  {
    get
    {
      return new RelayCommand<MapSelectionParameters>(
        p => DispatcherHelper.CheckBeginInvokeOnUI(() =>
        Messenger.Default.Send(new MessageDialogMessage(
          Name, "Selected object", "Ok", "Cancel"))));
    }
  }
}
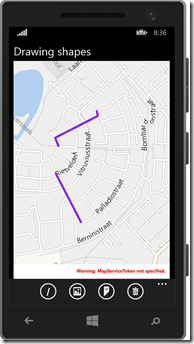
Предположим, что пара этих вещей находится в свойстве модели «Основной вид» моего основного вида, тогда я могу просто отобразить ряд синих фиолетовых линий, используя следующий XAML
<maps:MapControl x:Name="MyMap" >
  <mapbinding:MapShapeDrawBehavior LayerName="Lines" ItemsSource="{Binding Lines}"
       PathPropertyName="Points">

      <mapbinding:MapShapeDrawBehavior.EventToCommandMappers>
        <mapbinding:EventToCommandMapper EventName="MapTapped"
             CommandName="SelectCommand"/>
      </mapbinding:MapShapeDrawBehavior.EventToCommandMappers>

      <mapbinding:MapShapeDrawBehavior.ShapeDrawer>
        <mapbinding:MapPolylineDrawer Color="BlueViolet"/>
      </mapbinding:MapShapeDrawBehavior.ShapeDrawer>

  </mapbinding:MapShapeDrawBehavior>
</maps:MapControl
- Objects are created from the collection “Lines”
- The name of the layer is “Lines” (this does not need to correspond with the name used in the previous bullet)
- The property containing the Geopath for a single object in the list “Lines” is called “Points”
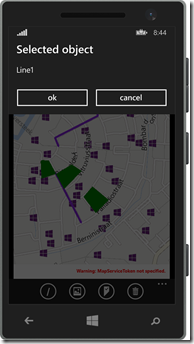
- When the event “MapTapped” is detected on one of these lines, the command “SelectCommand” is to be fired. Mind you, this command should be on the bound object. Notice this fires a MessageDialogMessage that can be displayed by a MessageDialogBehavior. Basically, if all the parts are in place, it will show a message dialog displaying the name of the object the user tapped on.
- This object is to be drawn as a blue violet line.
The result being something as displayed to the right.
Map shape drawers
These are classes that turn the Geopath into an actual shape. You get three out of the box that can be configured using a few simple properties.
- MapIconDrawer
- MapPolyLineDrawer
- MapPolygonDrawer
To draw an icon, line or polygon (duh). The key thing is – the drawers are very simple. For instance, this is the drawer that makes a line:
public class MapPolylineDrawer : MapLinearShapeDrawer
{
  public MapPolylineDrawer()
  {
    Color = Colors.Black;
    Width = 5;
  }

  public override MapElement CreateShape(object viewModel, Geopath path)
  {
    return new MapPolyline { Path = path, StrokeThickness = Width,
                             StrokeColor = Color, StrokeDashed = StrokeDashed,
                             ZIndex = ZIndex };
  }
}
There is only one method CreateShape that you need to override to make your own drawer. You get the viewmodel and the Geopath (as extracted by the MapShapeDrawBehavior and you can simply mess around with it.
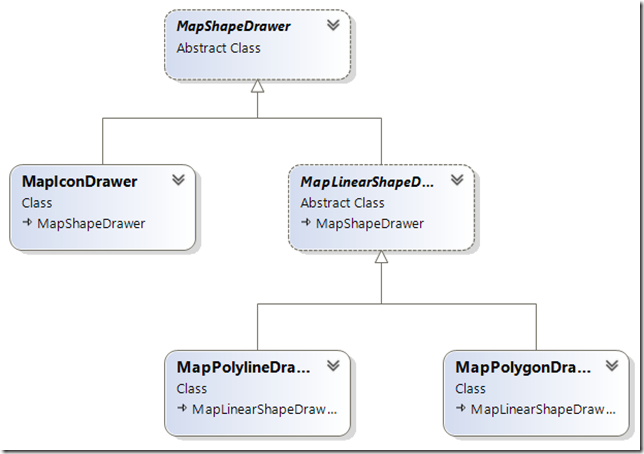
The drawer class model is like this:
Trapping events and activating commands with EventToCommandMapper
By adding an EventToCommandMapper to EventToCommandMappers you can make a command get called when an event occurs. You can do that easily in XAML as displayed in the sample. Basically only events that have a MapInputEventArgs or TappedRoutedEventArgs can be trapped. In most real-world cases you will only need to trap MapTapped. See the example above how to do that. Keep in mind, again, that although the event is trapped on the map, the command is executed on the elements found on the location of the event.
There is a special case though where you might want to trap the “Tapped” event too – that is when you mix and match XAML elements and MapShapes. See this article for background information on that particular subject.
Some limitations and caveats
- Even for MapIcons the PathPropertyName needs to point to a Geopath. This is to create a common signature for the CreateShape method in the drawers. Geopaths of one point are valid, so that is no problem. If you provide Geopaths containing more than one point, it will just use the first point.
- Although the properties are read from bound objects, those properties are not bound themselves. Therefore, an object that has already been drawn on the map will not be updated on the map if you change the contents of the Geopath. You will need to make sure the objects are in an ObservableCollection and then replace the whole object in the collection to achieve that result.
- If you use a method like mine to deal with selecting objects (firing messages), your app’s code will need to deal with multiple selected objects – since there can be more than one object on one location. My sample solution does clearly not do that. All objects will fire a message, but only one will show the message dialog. A better way to deal with it would be
- Make a message that contains the MapSelectionParameters that are supplied to the command that is fired on select (see sample code)
- Have the MainViewModel collect those messages, and decide based upon the SelectTime timestamp what messages are the result of one select action and should be displayed together.
- In professional map systems the order of the layers determines the order in which elements are drawn. So the layers that are drawn first, appear at the bottom, and everything that’s drawn later on top of it. In Windows Phone, the Z-index of each element determines that. So be sure to set those in the right order if you want to appear stuff on top of each other.
- Be aware that MapIcons are a bit of an oddball. First, they are drawn using a ‘best effort’. In layman’s terms, this means that some of them won’t a appear if they are too close together. If there are a lot close together, a lot won’t appear. This will change while you zoom and pan, and you have no way to control it. Furthermore, MapIcons don’t always show on top of other shapes even if you specify the Z-index to be higher.
Conclusion

Although there are quite some limitations with respect to the binding, mainly caused by the nature of how the map works (you cannot bind to a command that is to be called when you tap the element – you can just provide the name of the command, just like the path property) I think this library makes using the map a lot easier – at least in MVVM apps. I am using this library extensively in my latest app Travalyzer.
Happy mapping!

