Автор Крис Де Волдер в весеннем блоге
Spring Tool Suite 3.6.4 был выпущен на прошлой неделе. Этот блог представляет собой учебное пособие, демонстрирующее некоторые новые функции, которые STS предоставляет для создания и работы с приложениями Spring Boot.
В этом уроке вы научитесь:
- создать простое приложение Spring Boot с STS
- запустить и отладить загрузочное приложение из STS
- используйте новый редактор свойств STS для редактирования свойств конфигурации.
- используйте @ConfigurationProperties в вашем коде, чтобы получить такую же поддержку редактора для ваших собственных свойств конфигурации.
Создание загрузочного приложения
Мы используем мастер NewSpring Starter для создания базового весеннего загрузочного приложения.

Spring boot предоставляет так называемые «стартеры». Начальный набор — это набор путей к классам, которые вместе с автоконфигурацией Spring Boot позволяют начать работу с приложением без необходимости какой-либо настройки. Мы выбираем «веб» стартер, так как создадим простой сервис «Привет».
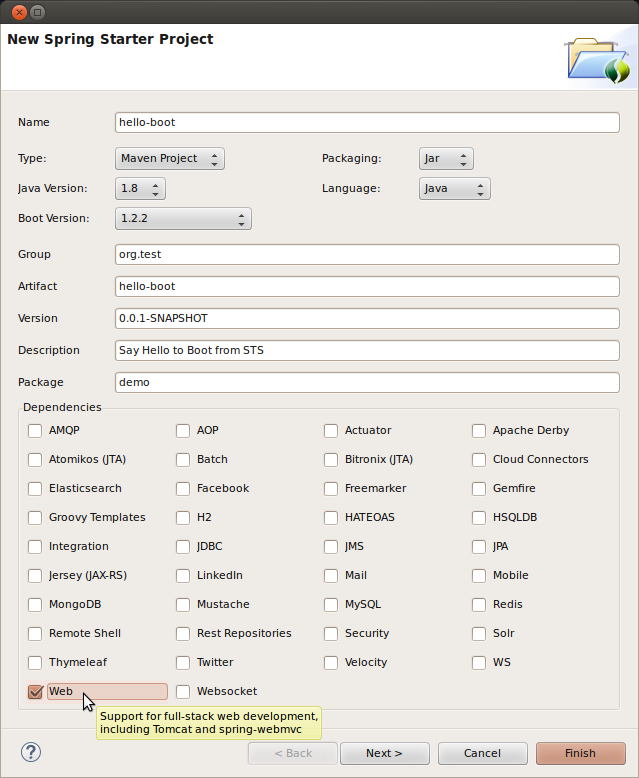
Мастер представляет собой интерфейс с графическим интерфейсом, который использует внутреннюю службу start.spring.io для создания некоторых базовых лесов. Вы можете сами использовать веб-сервис, скачать созданный zip-архив, распаковать его, импортировать и т. Д. Использование мастера STS делает все это одним нажатием кнопки и гарантирует, что проект настроен правильно, чтобы вы могли немедленно начать кодирование.
После нажатия кнопки «Готово» ваше рабочее пространство будет выглядеть примерно так:
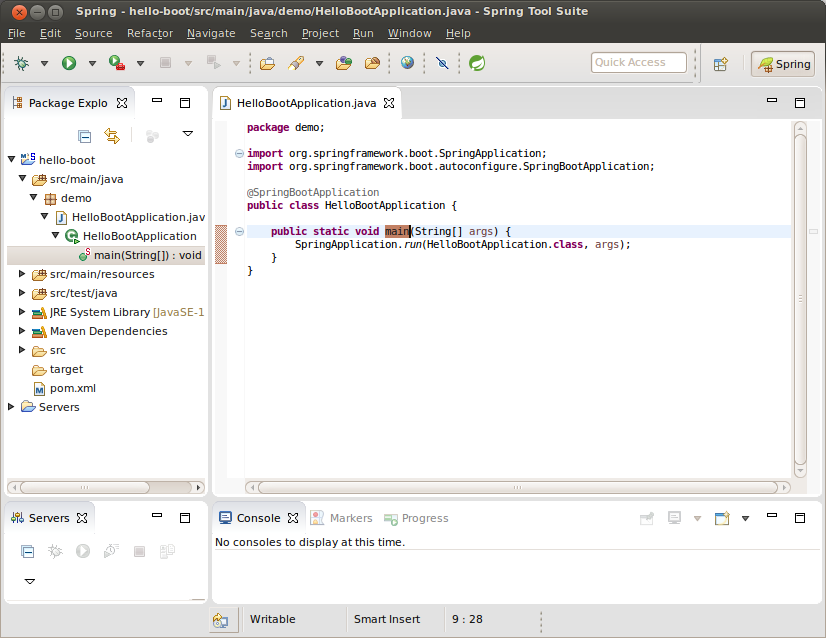
The HelloBootApplication Java-main class generated by start.spring.io is the only code in our app at the moment. Thanks to the ‘magic’ of spring boot, and because we added the ‘web’ starter to our dependencies, this tiny piece of code is already a fully functional web server! It just doesn’t have any real content yet. Before adding some content, let’s learn how to run the app, and verify it actually runs in the process.
Running a Boot App in STS
Spring boot apps created by the wizard come in two flavors ‘jar’ or ‘war’. The Starter wizard let’s you choose between them in its ‘packaging’ option. A great feature of spring-boot is that you can easily create standalone ‘jar’ packaged projects that contain a fully functional embedded web server. All you need to do to run your app, is run its Java Main type, just like you do any other plain Java application. This is a huge advantage as you don’t have to mess around with setting up local or remote Tomcat servers, war-packaging and deploying. If you really want to do things ‘the hard way’ you can still choose ‘war’ packaging. However there’s really no need to do so because:
- you can convert your ‘jar’ app to a ‘war’ app at any time
- the Cloud Foundry platform directly supports deploying standalone Java apps.
Note: We won’t cover how to deploy apps to Cloud Foundry here, but in this article you can learm more about using Cloud Foundry Eclipse to do that directly from your IDE.
Now, if you understood what I just said, then you probably realize you don’t actually need any ‘special’ tooling from STS to run the app locally. Just click on the Java Main type and select “Run As >> Java Application” and voila. Also all of your standard Eclipse Java debugging tools will ‘just work’. However, STS provides a dedicated launcher that does basically the same thing but adds a few useful bells and whistles. So let’s use that instead.

Your app should start and you should see some output in the console view:

You can open your app running locally at http://localhost:8080. All you’ll get is a 404 error page, but that is exactly as expected since we haven’t yet added any real content to our app.
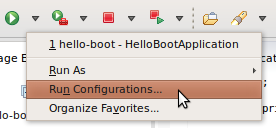
Now, what about the bells and whistles I promised? “Run As >> Boot App” is pretty much a plain Java launcher but provides some extra options to customize the launch configurations it creates. To see those options we need to open the “Launch Configuration Editor”, accessible from the  or
or  toolbar button:
If you’ve used the Java Launch Configuration Editor in Eclipse, this should look familiar. For a Boot Launch Configuration, the ‘Main’ tab is a little different and has some extra stuff. I won’t discuss all of the extras, you can find out more in the STS 3.6.4 release notes. So let’s just do something simple, for example, override the default http port 8080 to something else, like8888. You can probably guess that this can be done by setting a system property. In the ‘pure’ Java launcher you can set such properties via command-line arguments. But what, you might wonder, is the name of that property exactly “spring.port”, “http.port”, “spring.server.port”? Fortunately, the launch configuration editor helps. The Override Properties table provides some basic content assist. You just type ‘port’ and it makes a few suggestions:
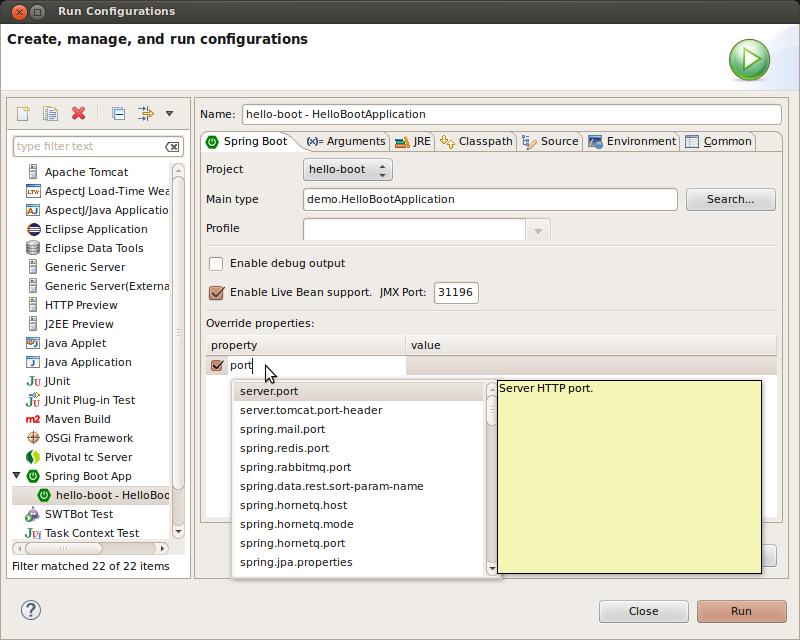
Select server.port add the value 8888 in the right column and click “Run”.
If you followed the steps exactly up to this point, your launch probably terminates immediately with an exception:
Error: Exception thrown by the agent : java.rmi.server.ExportException: Port already in use: 31196; nested exception is:
    java.net.BindException: Address already in use
This may be a bit of a surprise, since we just changed our port didn’t we? Actually the port conflict here is not from the http port but a JMX port used to enable “Live Bean Graph Support” (I won’t discuss this feature in this Blog post, see STS 3.6.4 release notes).
There are a few things we could do to avoid the error. We could open the editor again and change the JMX port as well, or we could disable ‘Live Bean Support’. But probably we don’treally want to run more than one copy of our app in this scenario. So we should just stop the already running instance before launching a new one. As this is such a common thing to do, STS provides a  Toolbar Button for just this purpose. Click the Button, the running app is stopped and restarted with the changes you just made to the Launch Configuration now taking effect. If it worked you should now have a
 404 error page at http://localhost:8888instead of 8080. (Note: the Relaunch button won’t work if you haven’t launched anything yet because it works from your current session’s launch history. However if you’ve launched an app at least once, it is okay to ‘Relaunch’ an app that is already terminated)
Editing Properties Files
Overriding default property values from the Launch Configuration editor is convenient for a ‘quick override’, but it probably isn’t a great idea to rely on this to configure many properties and manage more complex configurations for the longer term. For this it is better to manage properties in a properties file which you can commit to SCM. The starter Wizard already conveniently created an empty application.properties for us.
To help you edit application.properties STS 3.6.4 provides a brand new Spring Properties Editor. The editor provides nice content assist and error checking:
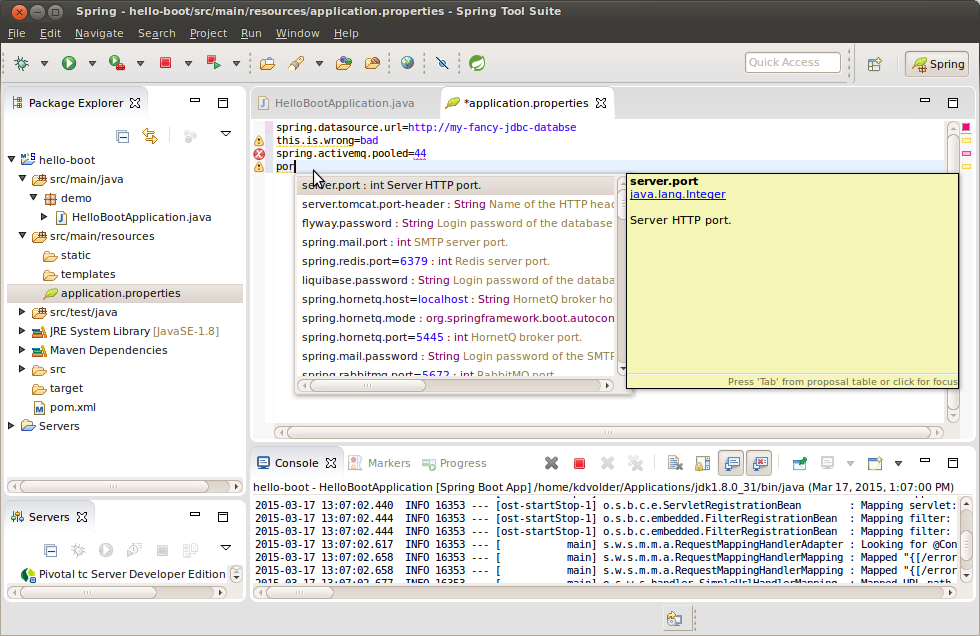
The above screen shot shows a bit of ‘messing around’ with the content assist and error checking. The only property shown that’s really meaningful for our very simple ‘error page App’ right now is server.port. Try changing the port in the properties file and it should be picked up automatically when you run the app again. However be mindful that properties overridden in the Launch Configuration take priority over application.properties. So you’ll have to uncheck or delete the server.port property in the Launch Configuration to see the effect.
Making Our App More Interesting
Let’s make our app more interesting. Here’s what we’ll do:
- Create a ‘Hello’ rest service that returns a ‘greeting’ message.
- Make the greeting message configurable via Spring properties.
- Set up the project so user-defined properties get nice editor support.
Create a Simple Hello Rest Service
To create the rest service you could follow this guide. Hover we’re doing something even simpler and more direct.
Go ahead and create a controller class with this code:
package demo;

import org.springframework.web.bind.annotation.RequestMapping;
import org.springframework.web.bind.annotation.RequestParam;
import org.springframework.web.bind.annotation.RestController;

@RestController
public class HelloController {
	@RequestMapping("/hello")
	public String hello(@RequestParam String name) {
		return "Hello "+name;
	}
}
Try this out by Relaunching () your app. The URLhttp://localhost:8888/hello?name=Kris should return a text message “Hello Kris”.
Making the Greeting Configurable
This is actually quite easy to do, and you might be familiar with Spring’s @Value annotation. However, using @Value you won’t be able get nice content assist. Spring Properties Editor won’t be aware of properties you define that way. To understand why, it is useful to understand a little bit about how the Spring Properties Editor gets its information about the known properties.
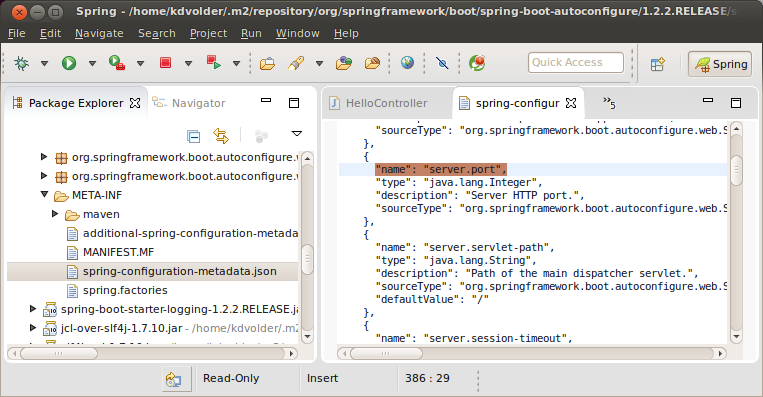
Some of the Spring Boot Jars starting from version 1.2.x contain special JSON meta-data files that the editor looks for on your project’s classpath and parses. These files contain information about the known configuration properties. If you dig for a little, you can find these files from STS. For example, open “spring-boot-autoconfigure-1.2.2.RELEASE.jar” (under “Maven Dependencies”) and browse to “META-INF/spring-configuration-metadata.json”. You’ll find properties like server.port being documented there.
For our own user-defined properties to be picked-up by the editor we have to create this meta data. Fortunately this can be automated easily provided you define your properties using Spring Boot @ConfigurationProperties. So define a class like this:
package demo;

import org.springframework.boot.context.properties.ConfigurationProperties;
import org.springframework.stereotype.Component;

@Component
@ConfigurationProperties("hello")
public class HelloProperties {

    /**
     * Greeting message returned by the Hello Rest service.
     */
	private String greeting = "Welcome ";
	public String getGreeting() {
		return greeting;
	}
	public void setGreeting(String greeting) {
		this.greeting = greeting;
	}
}
The @ConfigurationProperties("hello") tells Boot to take configuration properties starting with hello. and try to inject them into corresponding Bean properties of theHelloProperties Bean. The @Component annotation marks this class so that Spring Boot will pick up on it scanning the classpath and turn it into a Bean. Thus, if a configuration file (or another property source) contains a property hello.greeting then the value of that property will be injected into setGreeting of our HelloProperties Bean.
Now, to actually use this property all we need is a reference to the bean. For example to customize the message returned by the rest service, we can add a @Autowired field to theHelloController and call its getGreeting method:
@RestController
public class HelloController {

	@Autowired
	HelloProperties props;

	@RequestMapping("/hello")
	public String hello(@RequestParam String name) {
		return props.getGreeting()+name;
	}
}
Relaunch your app again and try to access http://localhost:8888/hello?name=yourname. You should get the default “Welcome yourname” message.
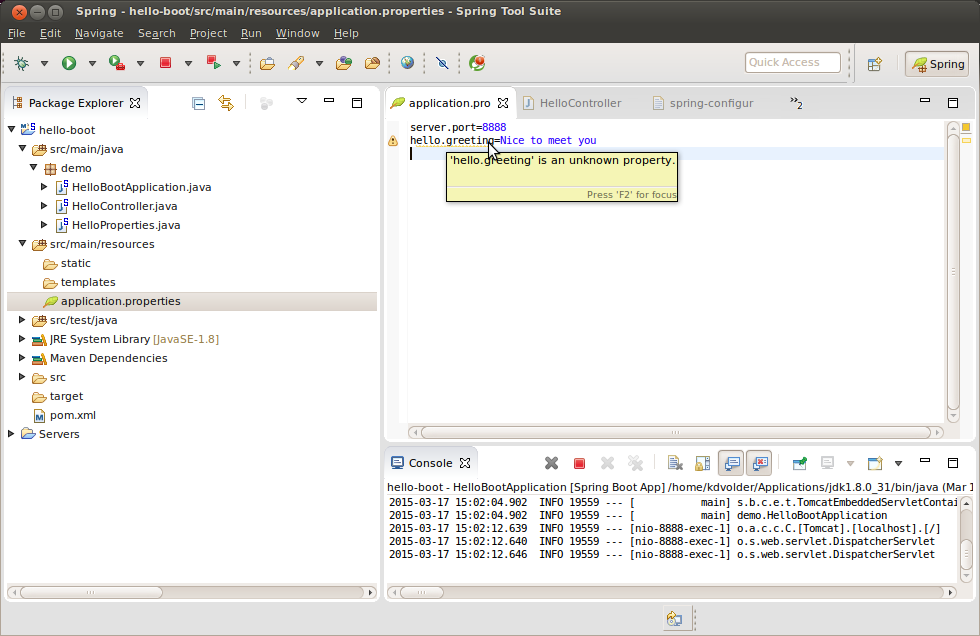
Now go ahead and try editing application.properties and change the greeting to something else. Allthough we already have everything in place to correctly define the property at run-time, you’ll notice that the editor is still unaware of our newly minted property:
What’s still missing to make the editor aware is the spring-configuration-metadata.jsonfile. This file is created at build-time by the spring-boot-configuration-processor which is a Java Annotation Processor. We have to add this processor to our project and make sure it is executed during project builds.
Add this to the pom.xml:
<dependency>
	<groupId>org.springframework.boot</groupId>
	<artifactId>spring-boot-configuration-processor</artifactId>
</dependency>
Then perform a “Maven >> Update Project” to trigger a project configuration update. A Maven project configurator provided by STS will configure JDT APT and activate the processor for Eclipse builds. The warning will immediately disappear from the editor. You’ll also get proper Hover Info:

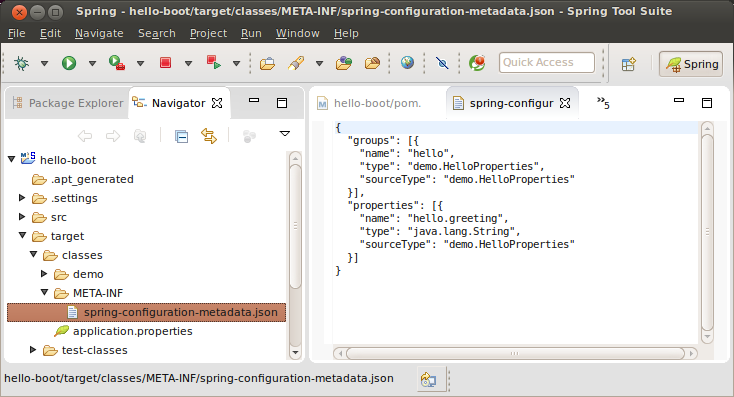
Now that the annotation processor has been activated, any future changes to yourHelloProperties class will trigger an automatic update of the json metadata. You can try it out by adding some extra properties, or renaming your greeting property to something else. Warnings will appear / disappear as appropriate. If you are curious where your metadata file is, you can find it in target/classes/META-INF. The file is there, even though Eclipse does its best to hide it from you. Eclipse does this with all files in a project’s output folder. You can get around this though by using the Navigator view which doesn’t filter files as much and shows you a more direct view on the actual resources in your workspace. Open this view via “Window >> Show View >> Other >> Navigator”:
Note: We know that the manual step of adding the processor seems like an unnecessary complication. We have plans to automate this further in the future.
The End
I hope you enjoyed this Tutorial. Comments and questions are welcome. In another post, coming soon, I will show you more adanced uses of @ConfigurationProperties and how the STS properties editor supports that.
Links
- Spring Tool Suite
- STS 3.6.4 release notes
- Cloud Foundry Eclipse
- Service Management Through Cloud Foundry Eclipse
- Java Buildpack for Cloud Foundry
- Spring Boot
- Getting Started Guide: Converting Boot project from Jar to War
- start.spring.io A Boot App to Generate ‘Getting Started’ Boot Apps
- Getting Started Guide: Building A Rest Service
- @ConfigurationProperties JavaDoc