1. Введение
В этом уроке мы научимся реализовывать приложение-службу SOAP, работающее по контракту, используя JAX-WS, Spring и Maven. Это скорее проектное решение, использовать ли сначала контрактный или кодовый подход.
Наиболее заметное преимущество использования подхода «сначала контракт» при разработке приложения веб-службы на основе SOAP заключается в том, что контракт может быть передан потребителям / клиентам сразу после внесения в него необходимых изменений, поэтому клиентское приложение и работа веб-службы Внедрение может выполняться независимо разными командами одновременно, что экономит много времени.
2. Реализация
Примером, описанным выше, будет сценарий, в котором приложение клиент / потребитель будет взаимодействовать с нашим примером веб-службы JAX-WS на основе SOAP через конечную точку службы.
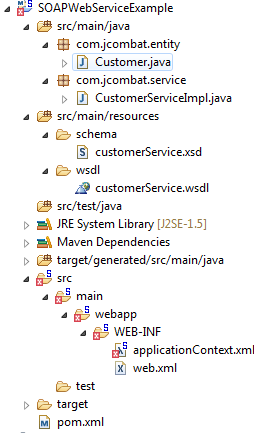
Чтобы начать с реализации, сначала создайте проект Maven в Eclipse и убедитесь, что мы переходим к структуре каталогов, близкой к той, что была показана ниже.
Сначала рассмотрим наши зависимости pom, которые должны выглядеть следующим образом:
pom.xml
|
01
02
03
04
05
06
07
08
09
10
11
12
13
14
15
16
17
18
19
20
21
22
23
24
25
26
27
28
29
30
31
32
33
34
35
36
37
38
39
40
41
42
43
44
45
46
47
48
49
|
<dependencies> <!-- Spring dependencies --> <dependency> <groupId>org.springframework</groupId> <artifactId>spring-core</artifactId> <version>4.2.1.RELEASE</version> </dependency> <dependency> <groupId>org.springframework</groupId> <artifactId>spring-web</artifactId> <version>4.2.1.RELEASE</version> </dependency> <!-- JAX-WS dependencies --> <dependency> <groupId>org.jvnet.jax-ws-commons.spring</groupId> <artifactId>jaxws-spring</artifactId> <version>1.9</version> </dependency> <dependency> <groupId>com.sun.xml.ws</groupId> <artifactId>jaxws-rt</artifactId> <version>2.2.8</version> </dependency></dependencies><build> <finalName>SOAPWebServiceExample</finalName> <plugins> <plugin> <groupId>org.codehaus.mojo</groupId> <artifactId>jaxws-maven-plugin</artifactId> <version>1.12</version> <configuration> <wsdlDirectory>${basedir}/src/main/resources/wsdl</wsdlDirectory> <packageName>com.jcombat.ws</packageName> <keep>true</keep> <sourceDestDir>${basedir}/target/generated/src/main/java</sourceDestDir> </configuration> <executions> <execution> <id>wsdl_import</id> <goals> <goal>wsimport</goal> </goals> </execution> </executions> </plugin> </plugins></build> |
Обратите внимание на инструмент wsimport , который мы будем использовать для создания заглушек позже из файла WSDL.
Давайте теперь проверим файл web.xml .
web.xml
|
01
02
03
04
05
06
07
08
09
10
11
12
13
14
15
16
17
18
19
20
21
22
23
24
25
|
<?xml version="1.0" encoding="ISO-8859-1"?> xsi:schemaLocation="http://java.sun.com/xml/ns/javaee id="WebApp_ID" version="2.5"> <display-name>SOAPWebServiceExample</display-name> <listener> <listener-class>org.springframework.web.context.ContextLoaderListener</listener-class> </listener> <servlet> <servlet-name>customer</servlet-name> <servlet-class>com.sun.xml.ws.transport.http.servlet.WSSpringServlet</servlet-class> <load-on-startup>1</load-on-startup> </servlet> <servlet-mapping> <servlet-name>customer</servlet-name> <url-pattern>/customer</url-pattern> </servlet-mapping> </web-app> |
Далее мы создаем файл схемы для нашего веб-сервиса. Назовите его как customerService.xsd , который в основном будет определять строительные блоки для файла WSDL или контракта веб-сервиса, который мы будем создавать.
customerService.xsd
|
01
02
03
04
05
06
07
08
09
10
11
12
13
14
15
16
17
18
19
20
21
22
23
24
25
26
27
28
29
30
|
<?xml version="1.0" encoding="UTF-8"?> <element name="CustomerServiceRequest" type="tns:CustomerServiceRequestType"> </element> <complexType name="CustomerServiceRequestType"> <sequence> <element name="customerId" type="int"></element> </sequence> </complexType> <complexType name="CustomerServiceResponseType"> <sequence> <element name="customer" type="tns:Customer" maxOccurs="unbounded" minOccurs="0"></element> </sequence> </complexType> <element name="CustomerServiceResponse" type="tns:CustomerServiceResponseType"> </element> <complexType name="Customer"> <sequence> <element name="id" type="int" maxOccurs="1" minOccurs="1"></element> <element name="name" type="string" maxOccurs="1" minOccurs="1"></element> </sequence> </complexType></schema> |
Создайте действительный файл WSDL, используя только что созданную XML-схему.
customerService.wsdl
|
01
02
03
04
05
06
07
08
09
10
11
12
13
14
15
16
17
18
19
20
21
22
23
24
25
26
27
28
29
30
31
32
33
34
35
36
37
38
39
40
41
42
43
44
45
46
47
48
49
50
|
<?xml version="1.0" encoding="UTF-8"?><wsdl:definitions xmlns:wsp="http://www.w3.org/ns/ws-policy" xmlns:wsp1_2="http://schemas.xmlsoap.org/ws/2004/09/policy" xmlns:wsam="http://www.w3.org/2007/05/addressing/metadata" xmlns:soap="http://schemas.xmlsoap.org/wsdl/soap/" name="customerService"> <wsdl:types> schemaLocation="../schema/customerService.xsd" /> </xsd:schema> </wsdl:types> <wsdl:message name="CustomerServiceRequest"> <wsdl:part name="CustomerServiceRequest" element="tns:CustomerServiceRequest" /> </wsdl:message> <wsdl:message name="CustomerServiceResponse"> <wsdl:part name="CustomerServiceResponse" element="tns:CustomerServiceResponse" /> </wsdl:message> <wsdl:portType name="CustomerServicePortType"> <wsdl:operation name="getCustomer"> <wsdl:input name="CustomerServiceRequest" message="tns:CustomerServiceRequest" /> <wsdl:output name="CustomerServiceResponse" message="tns:CustomerServiceResponse" /> </wsdl:operation> </wsdl:portType> <wsdl:binding name="CustomerEndpointPortBinding" type="tns:CustomerServicePortType"> <soap:binding style="document" <wsdl:operation name="getCustomer"> <soap:operation style="document" soapAction="getCustomer" /> <wsdl:input name="CustomerServiceRequest"> <soap:body use="literal" /> </wsdl:input> <wsdl:output name="CustomerServiceResponse"> <soap:body use="literal" /> </wsdl:output> </wsdl:operation> </wsdl:binding> <wsdl:service name="customerService"> <wsdl:port name="CustomerEndpointPort" binding="tns:CustomerEndpointPortBinding"> </wsdl:port> </wsdl:service></wsdl:definitions> |
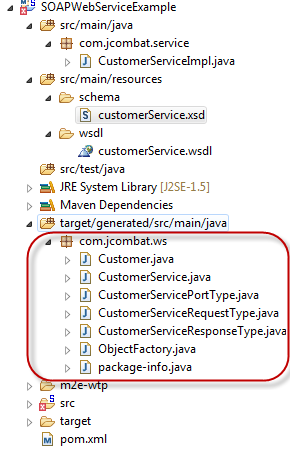
Далее следует создать заглушки из файла WSDL. Для этого выполните приведенную ниже команду в командной строке вашей системы.
|
1
|
mvn clean install |
Проверьте сгенерированные заглушки в каталоге / target .
Теперь давайте создадим реализацию сгенерированного интерфейса службы CustomerServicePortType в классе с именем CustomerServiceImpl .
CustomerServiceImpl.java
|
01
02
03
04
05
06
07
08
09
10
11
12
13
14
15
16
17
18
19
20
21
22
23
|
package com.jcombat.service; import javax.jws.WebService; import com.jcombat.ws.Customer;import com.jcombat.ws.CustomerServicePortType;import com.jcombat.ws.CustomerServiceRequestType;import com.jcombat.ws.CustomerServiceResponseType; @WebService(endpointInterface="com.jcombat.ws.CustomerServicePortType")public class CustomerServiceImpl implements CustomerServicePortType { public CustomerServiceResponseType getCustomer( CustomerServiceRequestType customerServiceRequest) { final CustomerServiceResponseType response = new CustomerServiceResponseType(); Customer customer = new Customer(); customer.setId(123); customer.setName("Ramesh"); response.getCustomer().add(customer); return response; } } |
Аннотация @WebService должна применяться к классу реализации интерфейса конечной точки, чтобы пометить его как конечную точку веб-службы. Аннотация @WebService указывает среде выполнения сервера выставлять все открытые методы этого класса в качестве методов веб-службы.
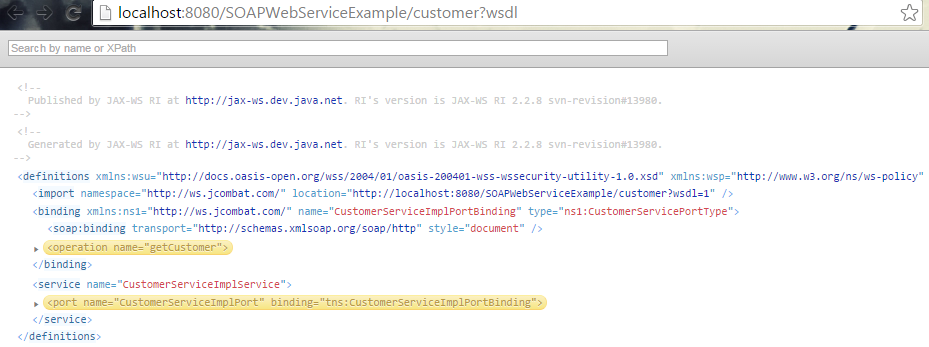
Мы все сделали с приложением. Последняя проверка — видим ли мы содержимое WSDL, отображаемое при достижении указанного ниже URI конечной точки, местоположение которого мы указали в нижней части файла WSDL.
- HTTP: // локальный: 8080 / SOAPWebServiceExample / клиент WSDL
Ниже то, что мы видим в браузере, когда мы нажимаем на него.
Так что да, мы сделали это успешно.
3. Запуск приложения
Настройте проект SOAP в пользовательском интерфейсе SOAP с помощью URI WSDL (http: // localhost: 8080 / SOAPWebServiceExample / customer? Wsdl).
Ниже приведено то, что мы видим, когда на самом деле запускаем сервис в SOAP UI.
4. Загрузите исходный код
| Ссылка: | Заключите контракт на первое SOAP-обслуживание со Spring и Maven от нашего партнера JCG Абхиманью Прасада в блоге jCombat . |


