В эпоху RESTful Web Services у меня появилась возможность использовать SOAP Web Service. Чтобы сделать то же самое, я выбрал Spring , потому что мы уже используем Spring в качестве серверной среды в нашем проекте, и, во-вторых, он предоставляет интуитивно понятный способ взаимодействия сервисов с четко определенными границами для обеспечения возможности повторного использования и переносимости через WebServiceTemplate .
Предполагая, что вы уже знаете о веб-службах SOAP, давайте начнем создавать мыльный сервис hello-world, работающий на порту 9999 и клиенте, который будет использовать то же самое, выполнив следующие шаги:
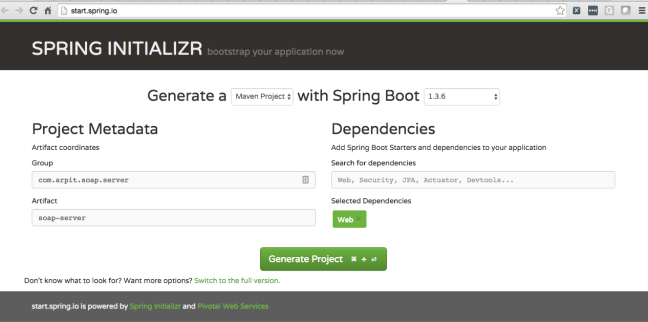
Шаг 1 : Перейдите на start.spring.io и создайте новый мыльный сервер проекта с добавлением веб-стартеров на основе следующего изображения:
Шаг 2. Отредактируйте SoapServerApplication.java, чтобы опубликовать службу hello-world в конечной точке — http: // localhost: 9999 / service / hello-world , следующим образом:
|
01
02
03
04
05
06
07
08
09
10
11
12
13
14
15
16
17
18
19
20
21
22
23
24
25
26
27
|
package com.arpit.soap.server.main;import javax.xml.ws.Endpoint;import org.springframework.beans.factory.annotation.Value;import org.springframework.boot.CommandLineRunner;import org.springframework.boot.SpringApplication;import org.springframework.boot.autoconfigure.SpringBootApplication;import com.arpit.soap.server.service.impl.HelloWorldServiceImpl;@SpringBootApplicationpublic class SoapServerApplication implements CommandLineRunner { @Value("${service.port}") private String servicePort; @Override public void run(String... args) throws Exception { + "/service/hello-world", new HelloWorldServiceImpl()); } public static void main(String[] args) { SpringApplication.run(SoapServerApplication.class, args); }} |
Шаг 3: Измените application.properties, указав имя приложения, порт и номер порта службы hello-world , следующим образом:
|
1
2
3
4
5
|
server.port=9000spring.application.name=soap-server## Soap Service Portservice.port=9999 |
Шаг 4. Создайте дополнительные пакеты как com.arpit.soap.server.service и com.arpit.soap.server.service.impl для определения веб-службы и ее реализации следующим образом:
HelloWorldService.java
|
01
02
03
04
05
06
07
08
09
10
11
12
13
14
15
16
|
package com.arpit.soap.server.service;import javax.jws.WebMethod;import javax.jws.WebParam;import javax.jws.WebService;import com.arpit.soap.server.model.ApplicationCredentials;@WebServicepublic interface HelloWorldService { @WebMethod(operationName = "helloWorld", action = "https://aggarwalarpit.wordpress.com/hello-world/helloWorld") String helloWorld(final String name, @WebParam(header = true) final ApplicationCredentials credential);} |
Указанный выше @WebService помечает класс Java как реализующий веб-службу или интерфейс Java как определяющий интерфейс веб-службы.
Указанный выше @WebMethod помечает метод Java как операцию веб-службы.
@WebParam, указанный выше, настраивает сопоставление отдельного параметра с частью сообщения веб-службы и элементом XML.
HelloWorldServiceImpl.java
|
01
02
03
04
05
06
07
08
09
10
11
12
13
14
15
16
|
package com.arpit.soap.server.service.impl;import javax.jws.WebService;import com.arpit.soap.server.model.ApplicationCredentials;import com.arpit.soap.server.service.HelloWorldService;@WebService(endpointInterface = "com.arpit.soap.server.service.HelloWorldService")public class HelloWorldServiceImpl implements HelloWorldService { @Override public String helloWorld(final String name, final ApplicationCredentials credential) { return "Hello World from " + name; }} |
Шаг 5: Перейдите в каталог мыльного сервера и выполните команду: mvn spring-boot: run . После запуска откройте http: // localhost: 9999 / service / hello-world? Wsdl, чтобы просмотреть WSDL для службы hello-world .
Далее мы создадим мыльный клиент, который будет использовать наш недавно созданный сервис hello-world .
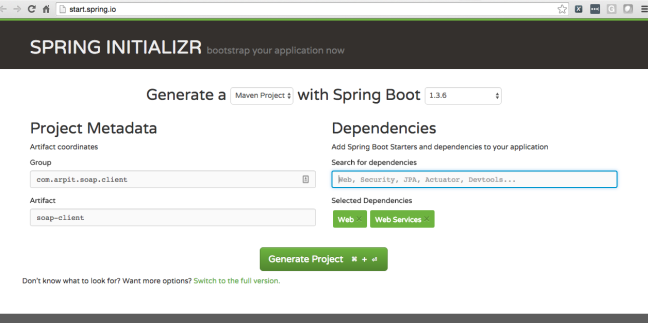
Шаг 6: Перейдите к файлу start.spring.io и создайте новый мыльный клиент проекта, добавив стартеры Web, Web Services, на основе следующего изображения:
Шаг 7: Отредактируйте SoapClientApplication.java, чтобы создать запрос к веб-сервису hello-world , отправив его на soap-сервер вместе с заголовком и получить от него ответ следующим образом:
|
01
02
03
04
05
06
07
08
09
10
11
12
13
14
15
16
17
18
19
20
21
22
23
24
25
26
27
28
29
30
31
32
33
34
35
36
37
38
39
40
41
42
43
44
45
46
47
48
49
50
51
52
53
54
55
56
57
58
59
60
61
62
63
64
65
66
67
68
69
70
71
72
73
74
75
76
77
78
79
80
81
82
83
84
85
86
87
88
89
90
91
92
93
94
95
96
97
98
|
package com.arpit.soap.client.main;import java.io.IOException;import java.io.StringWriter;import javax.xml.bind.JAXBElement;import javax.xml.transform.Transformer;import javax.xml.transform.TransformerException;import javax.xml.transform.TransformerFactory;import javax.xml.transform.stream.StreamResult;import org.springframework.beans.factory.annotation.Autowired;import org.springframework.beans.factory.annotation.Qualifier;import org.springframework.beans.factory.annotation.Value;import org.springframework.boot.CommandLineRunner;import org.springframework.boot.SpringApplication;import org.springframework.boot.autoconfigure.SpringBootApplication;import org.springframework.context.annotation.ComponentScan;import org.springframework.ws.WebServiceMessage;import org.springframework.ws.client.core.WebServiceMessageCallback;import org.springframework.ws.client.core.WebServiceTemplate;import org.springframework.ws.soap.SoapMessage;import org.springframework.xml.transform.StringSource;import com.arpit.soap.server.service.ApplicationCredentials;import com.arpit.soap.server.service.HelloWorld;import com.arpit.soap.server.service.HelloWorldResponse;import com.arpit.soap.server.service.ObjectFactory;@SpringBootApplication@ComponentScan("com.arpit.soap.client.config")public class SoapClientApplication implements CommandLineRunner { @Autowired @Qualifier("webServiceTemplate") private WebServiceTemplate webServiceTemplate; @Value("#{'${service.soap.action}'}") private String serviceSoapAction; @Value("#{'${service.user.id}'}") private String serviceUserId; @Value("#{'${service.user.password}'}") private String serviceUserPassword; public static void main(String[] args) { SpringApplication.run(SoapClientApplication.class, args); System.exit(0); } public void run(String... args) throws Exception { final HelloWorld helloWorld = createHelloWorldRequest(); @SuppressWarnings("unchecked") final JAXBElement<HelloWorldResponse> jaxbElement = (JAXBElement<HelloWorldResponse>) sendAndRecieve(helloWorld); final HelloWorldResponse helloWorldResponse = jaxbElement.getValue(); System.out.println(helloWorldResponse.getReturn()); } private Object sendAndRecieve(HelloWorld seatMapRequestType) { return webServiceTemplate.marshalSendAndReceive(seatMapRequestType, new WebServiceMessageCallback() { public void doWithMessage(WebServiceMessage message) throws IOException, TransformerException { SoapMessage soapMessage = (SoapMessage) message; soapMessage.setSoapAction(serviceSoapAction); org.springframework.ws.soap.SoapHeader soapheader = soapMessage .getSoapHeader(); final StringWriter out = new StringWriter(); webServiceTemplate.getMarshaller().marshal( getHeader(serviceUserId, serviceUserPassword), new StreamResult(out)); Transformer transformer = TransformerFactory .newInstance().newTransformer(); transformer.transform(new StringSource(out.toString()), soapheader.getResult()); } }); } private Object getHeader(final String userId, final String password) { final https.aggarwalarpit_wordpress.ObjectFactory headerObjectFactory = new https.aggarwalarpit_wordpress.ObjectFactory(); final ApplicationCredentials applicationCredentials = new ApplicationCredentials(); applicationCredentials.setUserId(userId); applicationCredentials.setPassword(password); final JAXBElement<ApplicationCredentials> header = headerObjectFactory .createApplicationCredentials(applicationCredentials); return header; } private HelloWorld createHelloWorldRequest() { final ObjectFactory objectFactory = new ObjectFactory(); final HelloWorld helloWorld = objectFactory.createHelloWorld(); helloWorld.setArg0("Arpit"); return helloWorld; }} |
Шаг 8: Затем создайте дополнительный пакет com.arpit.soap.client.config для настройки WebServiceTemplate следующим образом:
ApplicationConfig.java
|
01
02
03
04
05
06
07
08
09
10
11
12
13
14
15
16
17
18
19
20
21
22
23
24
25
26
27
28
29
30
31
32
33
34
35
36
37
38
39
40
41
42
43
44
45
46
47
48
49
50
51
52
53
54
55
56
57
58
59
60
61
62
63
64
65
66
67
68
69
|
package com.arpit.soap.client.config;import org.springframework.beans.factory.annotation.Value;import org.springframework.context.annotation.Bean;import org.springframework.context.annotation.Configuration;import org.springframework.context.support.PropertySourcesPlaceholderConfigurer;import org.springframework.oxm.jaxb.Jaxb2Marshaller;import org.springframework.web.servlet.config.annotation.EnableWebMvc;import org.springframework.web.servlet.config.annotation.WebMvcConfigurerAdapter;import org.springframework.ws.client.core.WebServiceTemplate;import org.springframework.ws.soap.saaj.SaajSoapMessageFactory;import org.springframework.ws.transport.http.HttpComponentsMessageSender;@Configuration@EnableWebMvcpublic class ApplicationConfig extends WebMvcConfigurerAdapter { @Value("#{'${service.endpoint}'}") private String serviceEndpoint; @Value("#{'${marshaller.packages.to.scan}'}") private String marshallerPackagesToScan; @Value("#{'${unmarshaller.packages.to.scan}'}") private String unmarshallerPackagesToScan; @Bean public static PropertySourcesPlaceholderConfigurer propertySourcesPlaceholderConfigurer() { return new PropertySourcesPlaceholderConfigurer(); } @Bean public SaajSoapMessageFactory messageFactory() { SaajSoapMessageFactory messageFactory = new SaajSoapMessageFactory(); messageFactory.afterPropertiesSet(); return messageFactory; } @Bean public Jaxb2Marshaller marshaller() { Jaxb2Marshaller marshaller = new Jaxb2Marshaller(); marshaller.setPackagesToScan(marshallerPackagesToScan.split(",")); return marshaller; } @Bean public Jaxb2Marshaller unmarshaller() { Jaxb2Marshaller unmarshaller = new Jaxb2Marshaller(); unmarshaller.setPackagesToScan(unmarshallerPackagesToScan.split(",")); return unmarshaller; } @Bean public WebServiceTemplate webServiceTemplate() { WebServiceTemplate webServiceTemplate = new WebServiceTemplate( messageFactory()); webServiceTemplate.setMarshaller(marshaller()); webServiceTemplate.setUnmarshaller(unmarshaller()); webServiceTemplate.setMessageSender(messageSender()); webServiceTemplate.setDefaultUri(serviceEndpoint); return webServiceTemplate; } @Bean public HttpComponentsMessageSender messageSender() { HttpComponentsMessageSender httpComponentsMessageSender = new HttpComponentsMessageSender(); return httpComponentsMessageSender; }} |
Шаг 9: Отредактируйте application.properties, указав имя приложения, порт и настройки мыльного веб-сервиса hello-world следующим образом:
|
01
02
03
04
05
06
07
08
09
10
11
|
server.port=9000spring.application.name=soap-client## Soap Service Configurationservice.endpoint=http://localhost:9999/service/hello-worldservice.soap.action=https://aggarwalarpit.wordpress.com/hello-world/helloWorldservice.user.id=arpitservice.user.password=arpitmarshaller.packages.to.scan=com.arpit.soap.server.serviceunmarshaller.packages.to.scan=com.arpit.soap.server.service |
Точка service.endpoint, указанная выше, представляет собой URL-адрес, предоставленный пользователю службы для вызова служб, предоставляемых поставщиком услуг.
service.soap.action указывает, какой процесс или программу необходимо вызвать, когда запрос отправляет запрос службы, а также определяет относительный путь процесса / программы.
marshaller.packages.to.scan указывает пакеты для сканирования во время сортировки перед отправкой запроса на сервер.
unmarshaller.packages.to.scan указывает пакеты для сканирования во время демаршаллинга после получения запроса от сервера.
Теперь мы сгенерируем Java-объекты из WSDL с помощью wsimport и скопируем его в проект soap-client, выполнив следующую команду на терминале:
|
1
|
wsimport -keep -verbose http://localhost:9999/service/hello-world?wsdl |
Шаг 10: Перейдите в каталог soap-client и выполните команду: mvn spring-boot: run . Как только команда завершится, мы увидим «Hello World from Arpit» как ответ от мыльного сервиса hello-world на консоли.
Во время работы, если вы получаете сообщение об ошибке — Невозможно выполнить маршалирование, введите «com.arpit.soap.server.service.HelloWorld» в качестве элемента, поскольку отсутствует аннотация @XmlRootElement, затем добавьте @XmlRootElement (name = «helloWorld», namespace = « Http://service.server.soap.arpit.com/ ») в com.arpit.soap.server.service.HelloWorld , где пространство имен должно соответствовать xmlns: ser, определенному в мыльном конверте, как показано ниже:
|
01
02
03
04
05
06
07
08
09
10
11
12
13
14
|
<soapenv:Envelope xmlns:soapenv="http://schemas.xmlsoap.org/soap/envelope/" xmlns:ser="http://service.server.soap.arpit.com/"> <soapenv:Header> <ser:arg1> <userId>arpit</userId> <password>arpit</password> </ser:arg1> </soapenv:Header> <soapenv:Body> <ser:helloWorld> <!--Optional:--> <arg0>Arpit</arg0> </ser:helloWorld> </soapenv:Body></soapenv:Envelope> |
Полный исходный код размещен на github .
| Ссылка: | Написание и использование веб-службы SOAP с помощью Spring от нашего партнера JCG Арпита Аггарвала в блоге |

