Многопоточность похожа на многозадачность, но она позволяет обрабатывать несколько потоков одновременно, а не несколько процессов. CompletableFuture, который был представлен в Java 8, предоставляет простой способ написания асинхронного, неблокирующего и многопоточного кода.
Вам также может понравиться:
20 примеров использования Java CompletableFuture
Future Интерфейс был введен в Java 5 для обработки асинхронных вычислений. Но у этого интерфейса не было никаких методов для объединения нескольких асинхронных вычислений и обработки всех возможных ошибок. CompletableFuture Интерфейс реализует в будущем, он может объединить несколько асинхронных вычисления, обрабатывать возможные ошибки и предлагает гораздо больше возможностей.
Давайте приступим к написанию кода и посмотрим на преимущества.
Создайте пример проекта Spring Boot и добавьте следующие зависимости.
<?xml version="1.0" encoding="UTF-8"?>
<project xmlns="http://maven.apache.org/POM/4.0.0"
         xmlns:xsi="http://www.w3.org/2001/XMLSchema-instance"
         xsi:schemaLocation="http://maven.apache.org/POM/4.0.0 http://maven.apache.org/xsd/maven-4.0.0.xsd">
    <modelVersion>4.0.0</modelVersion>

    <groupId>com.techshard.future</groupId>
    <artifactId>springboot-future</artifactId>
    <version>1.0-SNAPSHOT</version>

    <parent>
        <groupId>org.springframework.boot</groupId>
        <artifactId>spring-boot-starter-parent</artifactId>
        <version>2.1.8.RELEASE</version>
        <relativePath />
    </parent>

    <properties>
        <project.build.sourceEncoding>UTF-8</project.build.sourceEncoding>
        <project.reporting.outputEncoding>UTF-8</project.reporting.outputEncoding>
    </properties>

    <dependencies>
        <dependency>
            <groupId>org.springframework.boot</groupId>
            <artifactId>spring-boot-starter-web</artifactId>
        </dependency>
        <dependency>
            <groupId>org.springframework.boot</groupId>
            <artifactId>spring-boot-starter-data-jpa</artifactId>
        </dependency>
        <dependency>
            <groupId>com.h2database</groupId>
            <artifactId>h2</artifactId>
            <scope>runtime</scope>
        </dependency>
        <dependency>
            <groupId>org.slf4j</groupId>
            <artifactId>slf4j-api</artifactId>
        </dependency>
        <dependency>
            <groupId>org.projectlombok</groupId>
            <artifactId>lombok</artifactId>
            <version>1.18.10</version>
            <optional>true</optional>
        </dependency>
    </dependencies>

    <build>
        <plugins>
            <plugin>
                <groupId>org.springframework.boot</groupId>
                <artifactId>spring-boot-maven-plugin</artifactId>
            </plugin>
        </plugins>
    </build>

</project>
В этой статье мы будем использовать образцы данных об автомобилях. Мы создадим сущность JPA и соответствующий репозиторий JPA. Car
package com.techshard.future.dao.entity;

import lombok.Data;
import lombok.EqualsAndHashCode;

import javax.persistence.*;
import javax.validation.constraints.NotNull;
import java.io.Serializable;

@Data
@EqualsAndHashCode
@Entity
public class Car implements Serializable {

    private static final long serialVersionUID = 1L;

    @Id
    @Column (name = "ID", nullable = false)
    @GeneratedValue (strategy = GenerationType.IDENTITY)
    private long id;

    @NotNull
    @Column(nullable=false)
    private String manufacturer;

    @NotNull
    @Column(nullable=false)
    private String model;

    @NotNull
    @Column(nullable=false)
    private String type;

}
package com.techshard.future.dao.repository;
import com.techshard.future.dao.entity.Car;
import org.springframework.data.jpa.repository.JpaRepository;
import org.springframework.stereotype.Repository;
@Repository
public interface CarRepository extends JpaRepository<Car, Long> {
}Let us now create a configuration class that will be used to enable and configure the asynchronous method execution.
package com.techshard.future;

import org.slf4j.Logger;
import org.slf4j.LoggerFactory;
import org.springframework.context.annotation.Bean;
import org.springframework.context.annotation.Configuration;
import org.springframework.scheduling.annotation.EnableAsync;
import org.springframework.scheduling.concurrent.ThreadPoolTaskExecutor;

import java.util.concurrent.Executor;

@Configuration
@EnableAsync
public class AsyncConfiguration {

    private static final Logger LOGGER = LoggerFactory.getLogger(AsyncConfiguration.class);

    @Bean (name = "taskExecutor")
    public Executor taskExecutor() {
        LOGGER.debug("Creating Async Task Executor");
        final ThreadPoolTaskExecutor executor = new ThreadPoolTaskExecutor();
        executor.setCorePoolSize(2);
        executor.setMaxPoolSize(2);
        executor.setQueueCapacity(100);
        executor.setThreadNamePrefix("CarThread-");
        executor.initialize();
        return executor;
    }

}
The @EnableAsync annotation enables Spring’s ability to run @Async methods in a background thread pool. The bean taskExecutor helps to customize the thread executor such as configuring the number of threads for an application, queue limit size, and so on. Spring will specifically look for this bean when the server is started. If this bean is not defined, Spring will create SimpleAsyncTaskExecutor by default.
We will now create a service and @Async methods.
package com.techshard.future.service;

import com.techshard.future.dao.entity.Car;
import com.techshard.future.dao.repository.CarRepository;
import org.slf4j.Logger;
import org.slf4j.LoggerFactory;
import org.springframework.beans.factory.annotation.Autowired;
import org.springframework.scheduling.annotation.Async;
import org.springframework.stereotype.Service;
import org.springframework.web.multipart.MultipartFile;

import java.io.*;
import java.util.ArrayList;
import java.util.List;
import java.util.concurrent.CompletableFuture;

@Service
public class CarService {

    private static final Logger LOGGER = LoggerFactory.getLogger(CarService.class);

    @Autowired
    private CarRepository carRepository;

    @Async
    public CompletableFuture<List<Car>> saveCars(final MultipartFile file) throws Exception {
        final long start = System.currentTimeMillis();

        List<Car> cars = parseCSVFile(file);

        LOGGER.info("Saving a list of cars of size {} records", cars.size());

        cars = carRepository.saveAll(cars);

        LOGGER.info("Elapsed time: {}", (System.currentTimeMillis() - start));
        return CompletableFuture.completedFuture(cars);
    }

    private List<Car> parseCSVFile(final MultipartFile file) throws Exception {
        final List<Car> cars=new ArrayList<>();
        try {
            try (final BufferedReader br = new BufferedReader(new InputStreamReader(file.getInputStream()))) {
                String line;
                while ((line=br.readLine()) != null) {
                    final String[] data=line.split(";");
                    final Car car=new Car();
                    car.setManufacturer(data[0]);
                    car.setModel(data[1]);
                    car.setType(data[2]);
                    cars.add(car);
                }
                return cars;
            }
        } catch(final IOException e) {
            LOGGER.error("Failed to parse CSV file {}", e);
            throw new Exception("Failed to parse CSV file {}", e);
        }
    }

    @Async
    public CompletableFuture<List<Car>> getAllCars() {

        LOGGER.info("Request to get a list of cars");

        final List<Car> cars = carRepository.findAll();
        return CompletableFuture.completedFuture(cars);
    }
}
Here, we have two @Async methods: saveCar() and getAllCars(). The first one accepts a multipart file, parses it, and stores the data in the database. The second method reads the data from the database.
Both methods are returning a new CompletableFuture that was already completed with the given values.
Let us create a Rest Controller and provide some endpoints:
package com.techshard.future.controller;

import com.techshard.future.dao.entity.Car;
import com.techshard.future.service.CarService;
import org.slf4j.Logger;
import org.slf4j.LoggerFactory;
import org.springframework.beans.factory.annotation.Autowired;
import org.springframework.http.HttpStatus;
import org.springframework.http.MediaType;
import org.springframework.http.ResponseEntity;
import org.springframework.web.bind.annotation.*;
import org.springframework.web.multipart.MultipartFile;

import java.io.File;
import java.util.List;
import java.util.concurrent.CompletableFuture;
import java.util.function.Function;

@RestController
@RequestMapping("/api/car")
public class CarController {

    private static final Logger LOGGER = LoggerFactory.getLogger(CarController.class);

    @Autowired
    private CarService carService;

    @RequestMapping (method = RequestMethod.POST, consumes={MediaType.MULTIPART_FORM_DATA_VALUE},
            produces={MediaType.APPLICATION_JSON_VALUE})
    public @ResponseBody ResponseEntity uploadFile(
            @RequestParam (value = "files") MultipartFile[] files) {
        try {
            for(final MultipartFile file: files) {
                carService.saveCars(file);
            }
            return ResponseEntity.status(HttpStatus.CREATED).build();
        } catch(final Exception e) {
            return ResponseEntity.status(HttpStatus.INTERNAL_SERVER_ERROR).build();
        }

    }

    @RequestMapping (method = RequestMethod.GET, consumes={MediaType.APPLICATION_JSON_VALUE},
            produces={MediaType.APPLICATION_JSON_VALUE})
    public @ResponseBody CompletableFuture<ResponseEntity> getAllCars() {
        return carService.getAllCars().<ResponseEntity>thenApply(ResponseEntity::ok)
                .exceptionally(handleGetCarFailure);
    }

    private static Function<Throwable, ResponseEntity<? extends List<Car>>> handleGetCarFailure = throwable -> {
        LOGGER.error("Failed to read records: {}", throwable);
        return ResponseEntity.status(HttpStatus.INTERNAL_SERVER_ERROR).build();
    };
}
The first REST endpoint accepts a list of multipart files. The second endpoint is to read the data. As you notice the GET endpoint, there is some difference in the return statement. We are returning a list of cars and we are also handling exceptions.
The function handleGetCarFailure is invoked when the CompletableFuture completes exceptionally, otherwise, if this CompletableFuture completes normally, it returns a list of cars to the client.
Testing the Application
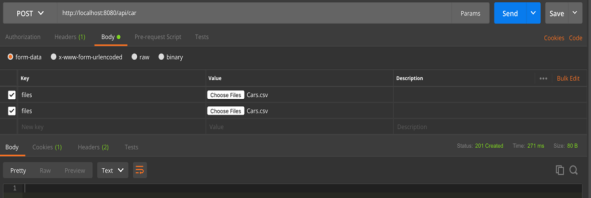
Run the Spring Boot Application. Once the server is started, test the POST endpoint. The sample screenshot from Postman tool.

Make sure to provide Content-Type as multipart\form-data in the headers section. When you send a request, you will notice that two threads have started at the same time, one thread for each file.

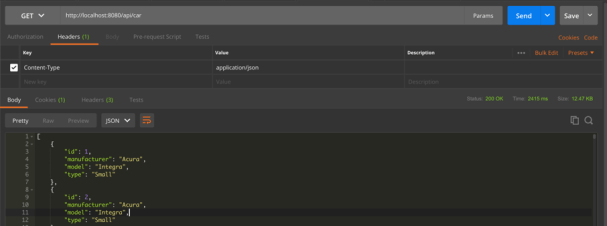
Let us now test the GET endpoint.

Now, just modify the GET endpoint as follows:
@RequestMapping (method = RequestMethod.GET, consumes={MediaType.APPLICATION_JSON_VALUE},
            produces={MediaType.APPLICATION_JSON_VALUE})
    public @ResponseBody ResponseEntity getAllCars() {
        try {
            CompletableFuture<List<Car>> cars1=carService.getAllCars();
            CompletableFuture<List<Car>> cars2=carService.getAllCars();
            CompletableFuture<List<Car>> cars3=carService.getAllCars();

            CompletableFuture.allOf(cars1, cars2, cars3).join();

            return ResponseEntity.status(HttpStatus.OK).build();
        } catch(final Exception e) {
            return ResponseEntity.status(HttpStatus.INTERNAL_SERVER_ERROR).build();
        }
    }
Here, we are calling the Async method 3 times. The CompletableFuture.allOf() will wait until all the CompletableFutures have been completed, and join() will combine the results. Note that this is just for demonstration purposes.
Add Thread.sleep(1000L) in getAllCars() of the CarService class. We are giving a delay of 1 second just for testing purpose.
Restart the application and test GET endpoint again.

As you see in the above screenshot, the first two calls to the Async method have started simultaneously. The third call has started with a delay of 1 second.
Remember that we have configured only 2 threads that can be used simultaneously. When at least one of the two threads becomes free, the third request to the Async method will be made.
Conclusion
In this article, we’ve seen some typical use cases of the CompletableFuture. Let me know if you have any comments or suggestions in the comments section below.
The source code for this article can be found on this GitHub repository.
Further Reading
20 Examples of Using Java’s CompletableFuture
Concurrency in Action: Using Java’s CompletableFuture With Work Manager