В этой статье показано, как интегрировать базу данных Java DB в приложение платформы NetBeans. Мы начнем с изучения базы данных Java DB, из которой мы создаем классы сущностей. Далее мы заключаем классы сущностей в модуль вместе с модулями для связанных JPA JARS.
Примечание. Эти инструкции не применимы только к Java DB. Скорее, они имеют отношение к любой реляционной базе данных, такой как Oracle или MySQL. Несколько приложений на платформе NetBeans, многие из которых перечислены здесь , также используют эти базы данных. Java DB была выбрана для этой статьи, потому что с ней легче всего начать, так как она поставляется с JDK.
Как только вышеупомянутые модули являются частью нашего приложения, мы создаем новый модуль, который обеспечивает пользовательский интерфейс для нашего приложения. Новый модуль предоставляет пользователю древовидную иерархию, отображающую данные из базы данных. Затем мы создаем другой модуль, который позволяет пользователю редактировать данные, отображаемые первым модулем. Отделяя средство просмотра от редактора в отдельных модулях, мы дадим пользователю возможность установить другой редактор для одного и того же средства просмотра, поскольку внешние поставщики могут создавать разные редакторы, некоторые коммерчески, а некоторые бесплатно. Именно такую гибкость обеспечивает модульная архитектура платформы NetBeans.
Когда у нас есть модуль для нашего редактора, мы начинаем добавлять функциональность CRUD. Сначала буква «R», обозначающая «Чтение», обрабатывается зрителем, описанным выше. Затем обрабатывается «U» для «Обновление», затем «C» для «Создать» и «D» для «Удалить».
В конце статьи вы узнаете о ряде функций платформы NetBeans, которые помогут вам в создании приложений такого рода. Например, вы узнали о UndoRedo.Manager и ExplorerManager , а также о компонентах Swing платформы NetBeans, таких как TopComponent и BeanTreeView .
содержание
- Настройка приложения
- Интеграция базы данных
- Создание классов сущностей из базы данных
- Оборачивание JAR класса сущности в модуль
- Создание других связанных модулей
- Разработка пользовательского интерфейса
- Установка зависимостей
- Запуск прототипа
- Интеграция функциональности CRUD
Приложение, которое вы создадите в этой статье, будет выглядеть следующим образом:
Исходный код: http://kenai.com/projects/nbcustomermanager
Как только вы окажетесь на показанном выше этапе, вы можете просто загрузить модуль NetBeans, который обеспечивает поддержку Office LAF ( описано здесь ), добавить его в свое приложение, а затем при повторном развертывании приложения вы увидите следующее:
Примечание.
Перед началом работы над этой статьей рекомендуется просмотреть 10 лучших API-интерфейсов NetBeans из серии скринкастов
. Многие из концепций, рассматриваемых в этой статье, более подробно обсуждаются в серии видеороликов.
Настройка приложения
Начнем с создания нового приложения на платформе NetBeans.
- Выберите «Файл»> «Новый проект» (Ctrl + Shift + N). В разделе «Категории» выберите «Модули NetBeans». В разделе Проекты выберите Приложение платформы NetBeans. Нажмите «Далее.
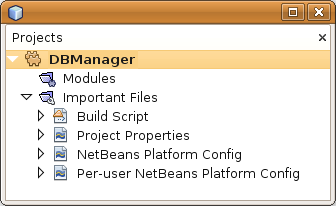
- На панели «Имя и местоположение» введите DBManager в поле «Имя проекта». Нажмите Готово.
В среде IDE создается проект DBManager. Проект является контейнером для всех остальных модулей, которые вы создадите.
Запустите приложение и обратите внимание, что у вас уже есть несколько функций из коробки. Откройте некоторые окна, открепите их и познакомьтесь с основными компонентами, которые предоставляет платформа NetBeans, не выполняя никакой работы:
Интеграция базы данных
Чтобы интегрировать базу данных, вам нужно создать классы сущностей из вашей базы данных и интегрировать эти классы сущностей вместе со связанными JAR-файлами в модули, которые являются частью вашего приложения на платформе NetBeans.
Создание классов сущностей
В этом разделе вы создаете классы сущностей из выбранной базы данных.
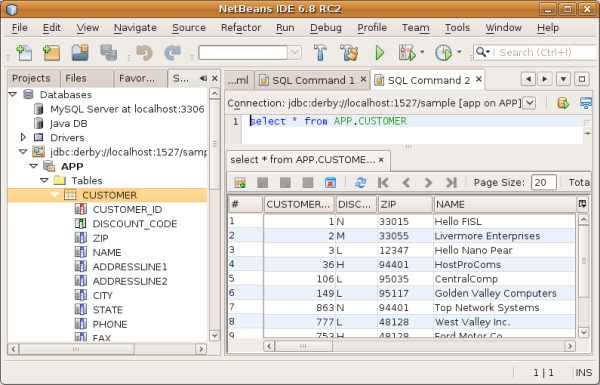
- В этом примере используйте окно «Службы» для подключения к образцу базы данных, которая входит в состав среды IDE NetBeans:

Примечание. В качестве альтернативы вы можете использовать любую базу данных и адаптировать шаги, которые следуют, к вашему конкретному варианту использования. В случае MySQL см. Подключение к базе данных MySQL .
- В IDE выберите Файл | Новый проект, за которым следует Java | Java Class Library для создания нового библиотечного проекта с именем CustomerLibrary.
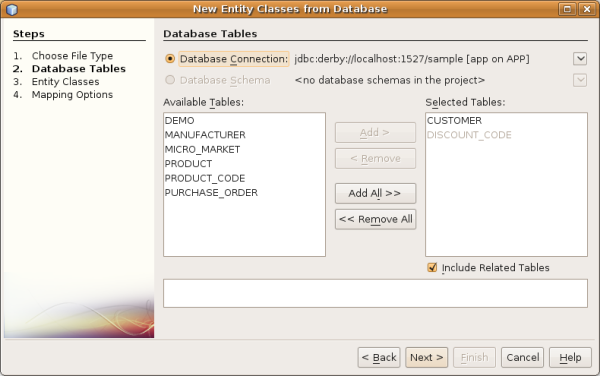
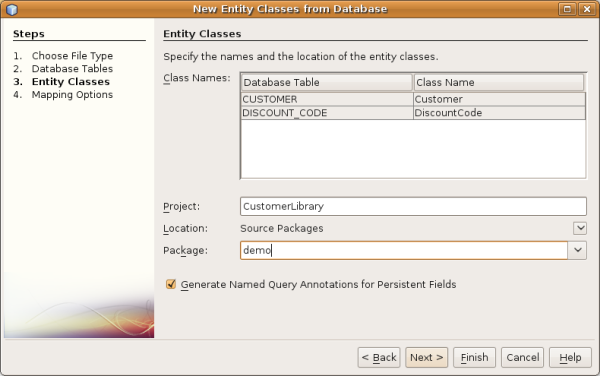
- В окне «Проекты» щелкните правой кнопкой мыши проект библиотеки и выберите «Файл | Новый файл с последующим сохранением | Классы сущностей из базы данных. В мастере выберите свою базу данных и нужные вам таблицы. Здесь мы выбираем «Клиент», а затем «Код скидки» добавляется автоматически, так как между этими двумя таблицами существует связь.
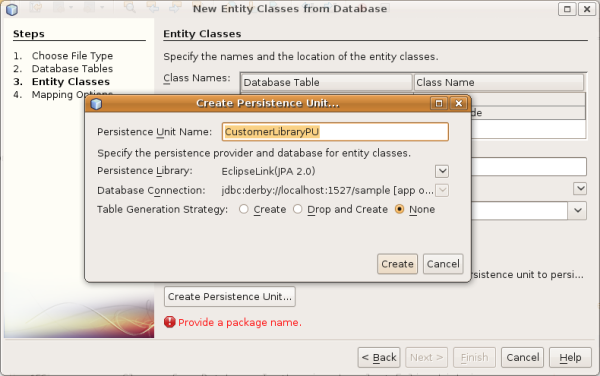
- Specify the persistence strategy, which can
be any of the available options. Here, since we need
to choose something, we’ll
choose EclipseLink: - Specify «demo» as the name of
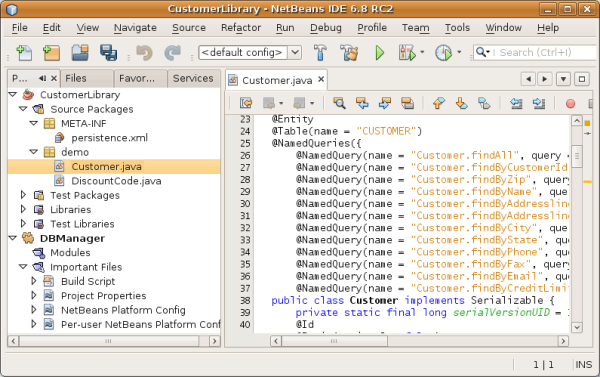
the package where the entity classes will be generated. - Click Finish. Once you have completed this step, look at the generated code and notice
that, among other things, you now have a persistence.xml file in a folder
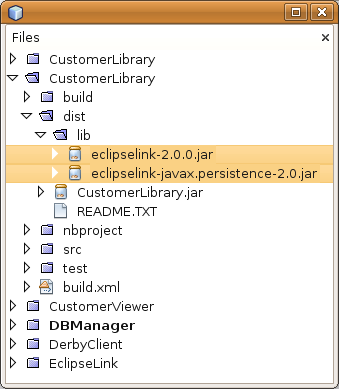
called META-INF, as well as entity classes for each of your tables: - Build the Java Library and you will have a JAR file in the library
project’s «dist» folder, which you can view in the Files window:

Wrapping the Entity Class JAR in a Module
In this section, you add your first module to your application!
The new NetBeans module will wrap the JAR file
you created in the previous section.
- Right-click the DBManager’s Modules node in the Projects window
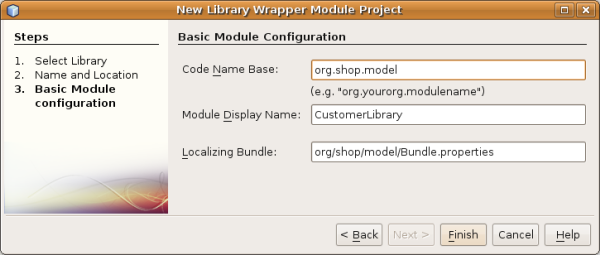
and choose Add New Library. - Select the JAR you created in the previous subsection
and complete the wizard, specifying any values you like. Let’s assume
the application is for dealing with customers at shop.org, in which case
a unique identifier «org.shop.model» is appropriate for the code name base:
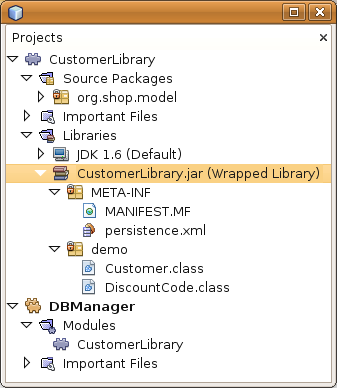
You now have your first custom module in your new application,
wrapping the JAR containing the entity classes and
the persistence.xml file:
Creating Other Related Modules
In this section, you create two new modules, wrapping the EclipseLink JARs,
as well as the database connector JAR.
- Do the same as you did when creating the library wrapper for the
entity class JAR, but this time for the EclipseLink JARs, which are in
the «CustomerLibrary» Java library that you created earlier:Note: In the Library Wrapper Module wizard,
you can use Ctrl-Click to select multiple JARs. - Next, create yet another library wrapper module, this time for the Java DB client JAR,
which is available in your JDK distribution, at db/lib/derbyclient.jar.
Designing the User Interface
In this section, you create a simple prototype user interface, providing
a window that uses a JTextArea to display data retrieved
from the database.
- Right-click the DBManager’s Modules node in the Projects window
and choose Add New. Create a new module named CustomerViewer, with
the code name base org.shop.ui. - In the Projects window, right-click the new module and choose
New | Window Component. Specify that it should be created in the editor
position and that it should open when the application starts. Set Customer
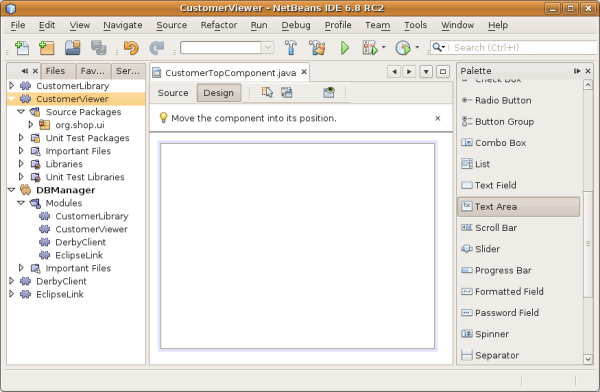
as the window’s class name prefix. - Use the Palette (Ctrl-Shift-8) to drag
and drop a JTextArea on the new window: - Add this
to the end of the TopComponent constructor:EntityManager entityManager = Persistence.createEntityManagerFactory("CustomerLibraryPU").createEntityManager();
Query query = entityManager.createQuery("SELECT c FROM Customer c");
List<Customer> resultList = query.getResultList();
for (Customer c : resultList) {
jTextArea1.append(c.getName() + " (" + c.getCity() + ")" + "\n");
}Note: Since you have not set dependencies on the modules that
provide the Customer object and the persistence JARs, the statements
above will be marked with red error underlines. These will be fixed
in the section that follows.
Above, you can see references to a persistence unit named «CustomerLibraryPU»,
which is the name set in the persistence.xml file. In addition,there is a reference
to one of the entity classes, called Customer, which is in the entity classes module.
Adapt these bits to your needs, if they are different to the above.
Setting Dependencies
In this section, you enable some of the modules to use code from
some of the other modules. You do this very explicitly by setting intentional
contracts between related modules, i.e., as opposed
to the accidental and chaotic reuse of code that tends to happen when
you do not have a strict modular architecture such as that provided by
the NetBeans Platform.
- The entity classes module needs to have dependencies on the Derby Client
module as well as on the EclipseLink module. Right-click the
CustomerLibrary module, choose Properties, and use the
Libraries tab to set dependencies on the two modules that the
CustomerLibrary module needs. - The CustomerViewer module needs a dependency
on the EclipseLink module as well as on the entity classes module.
Right-click the
CustomerViewer module, choose Properties, and use the
Libraries tab to set dependencies on the two modules that the
CustomerViewer module needs. - Open the CustomerTopComponent in the Source view, right-click
in the editor, and choose «Fix Imports». The IDE is now able to add
the required import statements, because the modules that provide
the required classes are now available to the CustomerTopComponent.
You now have set contracts between the modules
in your application, giving you control
over the dependencies between distinct pieces
of code.
Running the Prototype
In this section, you run the application so that you can see
that you’re correctly accessing your database.
- Start your database server.
- Run the application. You should see this:
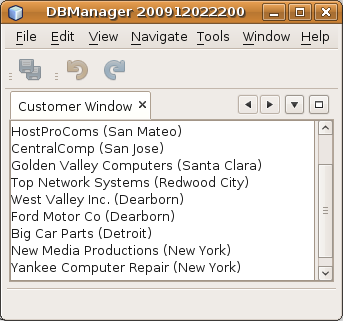
You now have a simple prototype, consisting of a NetBeans Platform
application that displays data from your database,
which you will extend in the next
section.
Integrating CRUD Functionality
In order to create CRUD functionality that integrates smoothly
with the NetBeans Platform, some very specific NetBeans Platform coding patterns need to
be implemented. The sections that follow describe these patterns
in detail.
Read
In this section, you change the JTextArea, introduced in the
previous section, for a NetBeans Platform explorer view. NetBeans Platform
explorer views are Swing components that integrate better with the
NetBeans Platform than standard Swing components do. Among other things,
they support the notion of a context, which enables them to be
context sensitive.
Representing your data,
you will have a generic hierarchical model provided by a NetBeans Platform
Node class, which can be displayed by any of the NetBeans Platform
explorer views. This section ends with an explanation of how to synchronize
your explorer view with the NetBeans Platform Properties window.
- In your TopComponent, delete the JTextArea
in the Design view and comment out its
related code in the Source view:EntityManager entityManager = Persistence.createEntityManagerFactory("CustomerLibraryPU").createEntityManager();
Query query = entityManager.createQuery("SELECT c FROM Customer c");
List<Customer> resultList = query.getResultList();
//for (Customer c : resultList) {
// jTextArea1.append(c.getName() + " (" + c.getCity() + ")" + "\n");
//} - Right-click the CustomerViewer module, choose Properties,
and use the Libraries tab to set dependencies on the Nodes API and
the Explorer & Property Sheet API. - Next, change the class signature to implement ExplorerManager.Provider:
final class CustomerTopComponent extends TopComponent implements ExplorerManager.Provider
- Switch to the TopComponent Design view,
right-click in the Palette, choose Palette Manager | Add from JAR. Then browse to
the org-openide-explorer.jar, which is in platform11/modules folder,
within the NetBeans IDE installation directory. Choose the BeanTreeView and complete
the wizard. You should now see BeanTreeView in the Palette. Drag it from
the Palette and drop it on the window. - Create a factory class that will create a new BeanNode
for each customer in your database:import demo.Customer;
import java.beans.IntrospectionException;
import java.util.List;
import org.openide.nodes.BeanNode;
import org.openide.nodes.ChildFactory;
import org.openide.nodes.Node;
import org.openide.util.Exceptions;
public class CustomerChildFactory extends ChildFactory<Customer> {
private List<Customer> resultList;
public CustomerChildFactory(List<Customer> resultList) {
this.resultList = resultList;
}
@Override
protected boolean createKeys(List<Customer> list) {
for (Customer customer : resultList) {
list.add(customer);
}
return true;
}
@Override
protected Node createNodeForKey(Customer c) {
try {
return new BeanNode(c);
} catch (IntrospectionException ex) {
Exceptions.printStackTrace(ex);
return null;
}
}
} - Back in the CustomerTopComponent,
use the ExplorerManager to pass the result list
from the JPA query in to the Node:EntityManager entityManager = Persistence.createEntityManagerFactory("CustomerLibraryPU").createEntityManager();
Query query = entityManager.createQuery("SELECT c FROM Customer c");
List<Customer> resultList = query.getResultList();
em.setRootContext(new AbstractNode(Children.create(new CustomerChildFactory(resultList), true)));
//for (Customer c : resultList) {
// jTextArea1.append(c.getName() + " (" + c.getCity() + ")" + "\n");
//} - Run the application. Once the application is running,
open the Properties window. Notice that even though the data
is available, displayed in a BeanTreeView, the BeanTreeView
is not synchronized with the Properties window, which is available
via Window | Properties. In other words, nothing is displayed
in the Properties window when you move up and down the tree hierarchy. - Synchronize the Properties window with the BeanTreeView
by adding the following to the constructor in the TopComponent:associateLookup(ExplorerUtils.createLookup(em, getActionMap()));
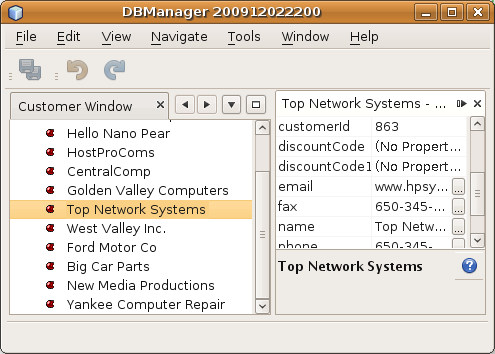
- Run the application again and notice that the Properties window
is now synchronized with the explorer view:
You will need to override getExplorerManager()
@Override
public ExplorerManager getExplorerManager() {
    return em;
}
At the top of the class, declare and initialize the ExplorerManager:
private static ExplorerManager em = new ExplorerManager();
Note: Watch Top 10 NetBeans APIs
for details on the above code, especially the screencast dealing with the Nodes API
and the Explorer & Property Sheet API.
Here we add the TopComponent’s ActionMap and ExplorerManager
to the Lookup of the TopComponent.
Now you are able to view your data in a tree hierarchy, as you would
be able to do with a JTree. However, you’re also able to swap
in a different explorer view without needing to change the model at all
because the ExplorerManager mediates between the model and the
view. Finally, you are now also able to synchronize the view with the
Properties window.
Update
In this section, you first create an editor. The editor will be provided
by a new NetBeans module. So, you will first create a new module. Then, within
that new module, you will create a new TopComponent, containing two JTextFields,
for each of the columns you want to let the user edit. You will need to
let the viewer module communicate with the editor module. Whenever a new
Node is selected in the viewer module, you will add the current Customer
object to the Lookup. In the editor module, you will listen to the
Lookup for the introduction of Customer objects. Whenever a
new Customer object is introduced into the Lookup, you will
update the JTextFields in the editor.
Next, you will synchronize your JTextFields
with the NetBeans Platform’s Undo, Redo, and Save functionality. In other words,
when the user makes changes to a JTextField, you want the
NetBeans Platform’s existing functionality to become available so that,
instead of needing to create new functionality, you’ll simply be able to
hook into the NetBeans Platform’s support. To
this end, you will need to use the UndoRedoManager, together with the
SaveCookie.
- Create a new module, named CustomerEditor, with org.shop.editor as
its code name base. - Right-click the CustomerEditor module and choose New | Window Component.
Make sure to specify that the window should appear in the editor position and
that it should open when the application starts. In the final panel of the wizard,
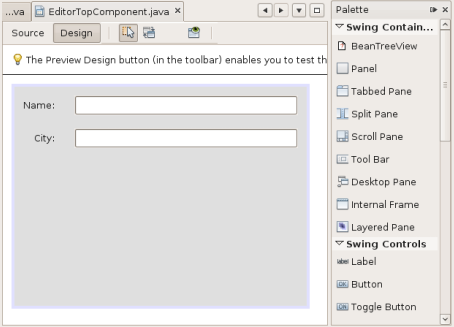
set «Editor» as the class name prefix. - Use the Palette (Ctrl-Shift-8) to add two JLabels and two JTextFields
to the new window. Set the texts of the labels to «Name» and «City» and
set the variable names of the two JTextFields to jTextField1
and jTextField2.In the GUI Builder, the window should now look something like this:
- Go back to the CustomerViewer module and change its layer.xml
file to specify that the CustomerTopComponent window will appear in the explorer mode.Note: Right-click the application project and choose «Clean», after
changing the layer.xml file. Why? Because whenever you run the
application and close it down, the window positions are stored in the
user directory. Therefore, if the CustomerViewer was initially
displayed in the editor mode, it will remain in the editor mode,
until you do a «Clean», thus resetting the user directory (i.e., thus
deleting the user directory) and enabling
the CustomerViewer to be displayed in the position currently set in the
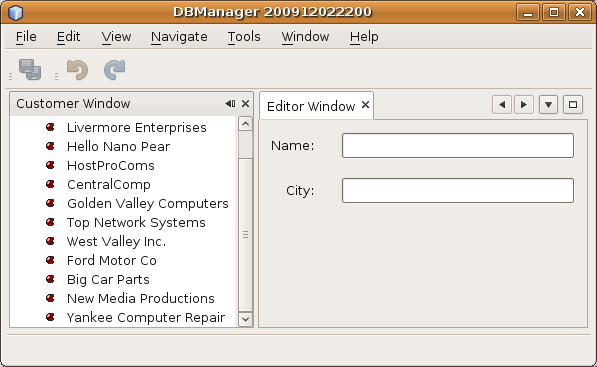
layer.xml file. - Run the application and make sure that you see the following when the
application starts up: - Now we can start adding some code.
Firstly, we need to show the currently selected Customer object in the editor:- Start by tweaking the CustomerViewer module so that the current Customer object
is added to the viewer window’s Lookup whenever a new Node
is selected. Do this by creating an AbstractNode, instead of a BeanNode,
in the CustomerChildFactory class. That enables you to add the
current Customer object to the Lookup of the Node,
as follows (note the «Lookups.singleton(c)» below):@Override
protected Node createNodeForKey(Customer c) {
Node node = new AbstractNode(Children.LEAF, Lookups.singleton(c));
node.setDisplayName(c.getName());
node.setShortDescription(c.getCity());
return node;
// try {
// return new BeanNode(c);
// } catch (IntrospectionException ex) {
// Exceptions.printStackTrace(ex);
// return null;
// }
} - Let’s
now change the editor module in such a way that its window
will end up listening for Customer objects being added to the Lookup. First,
set a dependency in the editor module on the module that provides
the entity class, as well as the module that provides the persistence
JARs. - Next, change the EditorTopComponent class signature
to implement LookupListener:public final class EditorTopComponent extends TopComponent implements LookupListener
- Override the
resultChanged so that the JTextFields are updated whenever
a new Customer object is introduced into the Lookup:@Override
public void resultChanged(LookupEvent lookupEvent) {
Lookup.Result r = (Lookup.Result) lookupEvent.getSource();
Collection<Customer> coll = r.allInstances();
if (!coll.isEmpty()) {
for (Customer cust : coll) {
jTextField1.setText(cust.getName());
jTextField2.setText(cust.getCity());
}
} else {
jTextField1.setText("[no name]");
jTextField2.setText("[no city]");
}
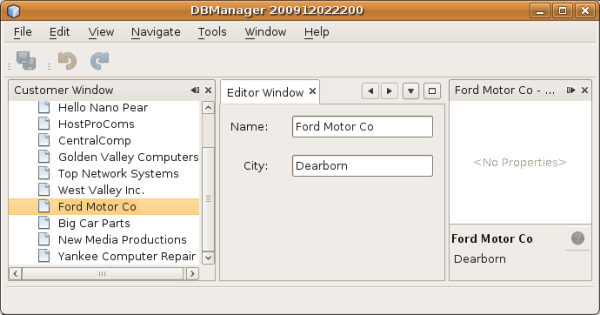
} - Now that the LookupListener is defined,
we need to add it to something. Here, we add it to
the Lookup.Result obtained from the global context.
The global context proxies the context of the selected Node.
For example, if «Ford Motor Co» is selected in the tree hierarchy,
the Customer object for «Ford Motor Co» is added to the Lookup
of the Node which, because it is the currently selected Node,
means that the Customer object for «Ford Motor Co» is now available in
the global context. That is what is then passed to the resultChanged,
causing the text fields to be populated.All of the above starts happening, i.e., the LookupListener
becomes active, whenever the editor window is opened, as you can see below:@Override
public void componentOpened() {
result = Utilities.actionsGlobalContext().lookupResult(Customer.class);
result.addLookupListener(this);
resultChanged(new LookupEvent(result));
}
@Override
public void componentClosed() {
result.removeLookupListener(this);
result = null;
} - Finally, declare the result variable at the top of the class, like this:
private Lookup.Result result = null;
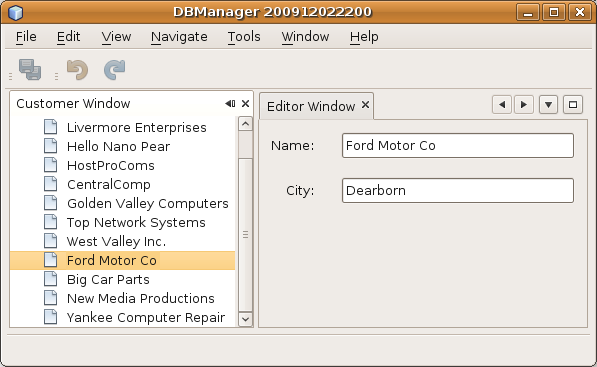
- Run the application again and notice that the editor window
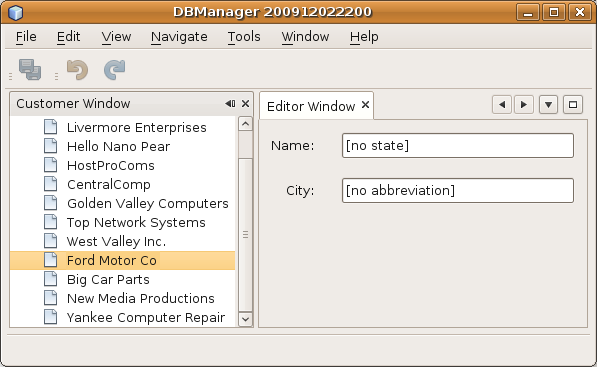
is updated whenever you select a new Node:However, notice what happens when you switch the focus to the editor window:
Because the Node is no longer current, the Customer object
is no longer in the global context. This is the case because, as pointed out
above, the global context proxies the Lookup of the current Node.
Therefore, in this case, we cannot use the global context. Instead, we will
use the local Lookup provided by the Customer window.
Now, whenever a new Node is created, which
happens when the user selects a new customer in the viewer, a new
Customer object is added to the Lookup of the Node.Since the editor window is opened when the application starts, the
LookupListener is available at the time that the application starts up.Rewrite this line:
result = Utilities.actionsGlobalContext().lookupResult(Customer.class);
To this:
result = WindowManager.getDefault().findTopComponent("CustomerTopComponent").getLookup().lookupResult(Customer.class);The string «CustomerTopComponent» is the ID of the CustomerTopComponent, which
is a string constant that you can find in the source code of the CustomerTopComponent. One
drawback of the approach above is that now our EditorTopComponent only works if it
can find a TopComponent with the ID «CustomerTopComponent». Either this needs to
be explicitly documented, so that developers of alternative editors can know that they
need to identify the viewer TopComponent this way, or you need to rewrite the
selection model, as described here by Tim Boudreau.If you take one of the above approaches, you will find that the context is not lost
when you switch the focus to the EditorTopComponent, as shown below:Note: Since you are now using AbstractNode, instead of BeanNode,
no properties are shown in the Properties window. You need to provide these yourself,
as described in the Nodes API Tutorial. - Start by tweaking the CustomerViewer module so that the current Customer object
- Secondly, let’s work on the Undo/Redo functionality. What we’d
like to have happen is that whenever the user makes a change to one
of the JTextFields, the «Undo» button and the «Redo» button,
as well as the related menu items in the Edit menu, become enabled. To
that end, the NetBeans Platform makes the UndoRedo.Manager available.- Declare and instantiate a new UndoRedoManager at the top of the
EditorTopComponent:private UndoRedo.Manager manager = new UndoRedo.Manager();
- Next, override the getUndoRedo() method in the EditorTopComponent:
@Override
public UndoRedo getUndoRedo() {
    return manager;
} - In the constructor of the EditorTopComponent, add
a KeyListener to the JTextFields and, within
the related methods that you need to implement, add the UndoRedoListeners:jTextField1.getDocument().addUndoableEditListener(manager);
jTextField2.getDocument().addUndoableEditListener(manager); - Run the application and show the Undo and Redo functionality in action,
the buttons as well as the menu items. The functionality works exactly as you would expect. You might want to
change the KeyListener so that not ALL keys cause the undo/redo
functionality to be enabled. For example, when Enter is pressed, you probably
do not want the undo/redo functionality to become available. Therefore, tweak
the code above to suit your business requirements.
- Declare and instantiate a new UndoRedoManager at the top of the
- Thirdly, we need to
integrate with the NetBeans Platform’s Save functionality:- By default, the «Save All» button is available in the
NetBeans Platform toolbar. In our current scenario, we do not
want to save «all», because «all» refers to a number of different
documents. In our case, we only have one «document», which is the
editor that we are reusing for all the nodes in the tree hirerarchy.
Remove the «Save All» button and add the «Save» button instead, by adding
the following to the layer file of the CustomerEditor module:<folder name="Toolbars">
<folder name="File">
<file name="org-openide-actions-SaveAction.shadow">
<attr name="originalFile" stringvalue="Actions/System/org-openide-actions-SaveAction.instance"/>
<attr name="position" intvalue="444"/>
</file>
<file name="org-openide-actions-SaveAllAction.shadow_hidden"/>
</folder>
</folder> - Set dependencies on the Dialogs API and the Nodes API.
- In the EditorTopCompontn constructor, add a
call to fire a method (which will be defined in the next step)
whenever a change is detected:public EditorTopComponent() {
...
...
...
jTextField1.getDocument().addDocumentListener(new DocumentListener() {
public void insertUpdate(DocumentEvent arg0) {
fire(true);
}
public void removeUpdate(DocumentEvent arg0) {
fire(true);
}
public void changedUpdate(DocumentEvent arg0) {
fire(true);
}
});
jTextField2.getDocument().addDocumentListener(new DocumentListener() {
public void insertUpdate(DocumentEvent arg0) {
fire(true);
}
public void removeUpdate(DocumentEvent arg0) {
fire(true);
}
public void changedUpdate(DocumentEvent arg0) {
fire(true);
}
});
//Create a new instance of our SaveCookie implementation:
impl = new SaveCookieImpl();
//Create a new instance of our dynamic object:
content = new InstanceContent();
//Add the dynamic object to the TopComponent Lookup:
associateLookup(new AbstractLookup(content));
}
...
...
... - Here are the two methods referred to above. First, the method
that is fired whenever a change is detected. An implementation of
the SaveCookie from the Nodes API is added to the InstanceContent
whenever a change is detected:public void fire(boolean modified) {
if (modified) {
//If the text is modified,
//we add SaveCookie impl to Lookup:
content.add(impl);
} else {
//Otherwise, we remove the SaveCookie impl from the lookup:
content.remove(impl);
}
}
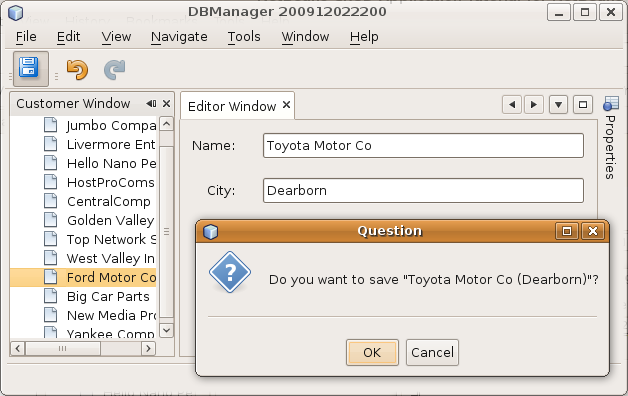
private class SaveCookieImpl implements SaveCookie {
@Override
public void save() throws IOException {
Confirmation message = new NotifyDescriptor.Confirmation("Do you want to save \""
+ jTextField1.getText() + " (" + jTextField2.getText() + ")\"?",
NotifyDescriptor.OK_CANCEL_OPTION,
NotifyDescriptor.QUESTION_MESSAGE);
Object result = DialogDisplayer.getDefault().notify(message);
//When user clicks "Yes", indicating they really want to save,
//we need to disable the Save action,
//so that it will only be usable when the next change is made
//to the JTextArea:
if (NotifyDescriptor.YES_OPTION.equals(result)) {
fire(false);
//Implement your save functionality here.
}
}
} - Run the application and notice the enablement/disablement of the
Save button: - Next, we add JPA code for persisting our change.
Do so by replacing the comment «//Implement your save functionality here.»
The comment should be replaced by all of the following:EntityManager entityManager = Persistence.createEntityManagerFactory("CustomerLibraryPU").createEntityManager();
entityManager.getTransaction().begin();
Customer c = entityManager.find(Customer.class, customer.getCustomerId());
c.setName(jTextField1.getText());
c.setCity(jTextField2.getText());
entityManager.getTransaction().commit();
When you now run the application, you will see a different icon
in the toolbar. Instead of the «Save All» button, you now have
the «Save» button available.Note: Right now, nothing happens when you click OK in the dialog
above. In the next step, we add some JPA code for handling persistence of
our changes.Note: The «customer» in customer.getCustomerId() is currently undefined. Add the line
«customer = cust;» in the resultChanged (as shown below), after declaring Customer customer; at the top
of the class, so that the current Customer object sets the customer,
which is then used in the persistence code above to obtain the ID of
the current Customer object.@Override
public void resultChanged(LookupEvent lookupEvent) {
Lookup.Result r = (Lookup.Result) lookupEvent.getSource();
Collection<Customer> c = r.allInstances();
if (!c.isEmpty()) {
for (Customer customer : c) {
customer = cust;
jTextField1.setText(customer.getName());
jTextField2.setText(customer.getCity());
}
} else {
jTextField1.setText("[no name]");
jTextField2.setText("[no city]");
}
} - By default, the «Save All» button is available in the
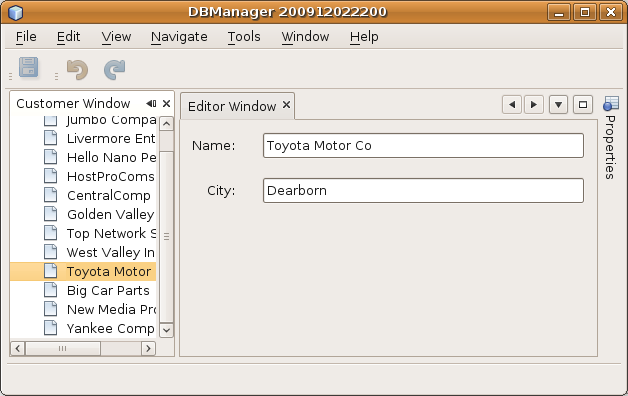
- Run the application and change some data. Currently, we have no «Refresh»
functionality (that will be added in the next step) so, to see the changed data, restart the application. Here, for
example, the tree hierarchy shows the persisted customer name for «Toyota Motor Co»: - Fourthly, we need to
add functionality for refreshing the Customer viewer. You might want to
add a Timer which periodically refreshes the viewer.
However, in this example, we will add
a «Refresh» menu item to the Root node so that the user will be able
to manually refresh the viewer.- In the main package of the CustomerViewer module,
create a new Node, which will replace the AbstractNode
that we are currently using as the root of the children in the
viewer. Note that we also bind a «Refresh» action to our
new root node.public class CustomerRootNode extends AbstractNode {
public CustomerRootNode(Children kids) {
super(kids);
setDisplayName("Root");
}
@Override
public Action[] getActions(boolean context) {
Action[] result = new Action[]{
new RefreshAction()};
return result;
}
private final class RefreshAction extends AbstractAction {
public RefreshAction() {
putValue(Action.NAME, "Refresh");
}
public void actionPerformed(ActionEvent e) {
CustomerTopComponent.refreshNode();
}
}
} - Add this method to the CustomerTopComponent, for refreshing
the view:public static void refreshNode() {
EntityManager entityManager = Persistence.createEntityManagerFactory("CustomerLibraryPU").createEntityManager();
Query query = entityManager.createQuery("SELECT c FROM Customer c");
List<Customer> resultList = query.getResultList();
em.setRootContext(new CustomerRootNode(Children.create(new CustomerChildFactory(resultList), true)));
} - In your save functionality, add the call to the method above so that,
whenever data is saved, an automatic refresh takes place. You can
take different approaches when implementing this extension to
the save functionality. For example, you might want to create a
new module that contains the refresh action. That module would
then be shared between the viewer module and the editor module,
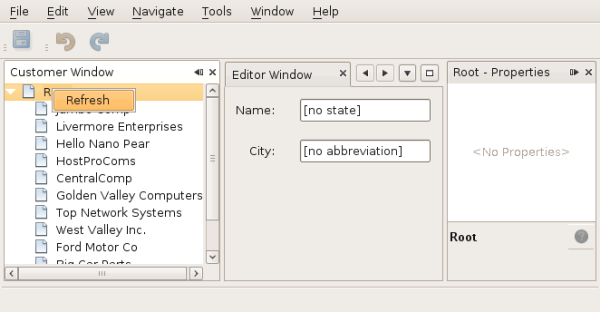
providing functionality that is common to both. - Run the application again and notice that you have a new root node,
with a «Refresh» action: - Make a change to some data, save it, invoke the Refresh action, and notice
that the viewer is updated.
Now replace the code above in the constructor
of the CustomerTopComponent with a call to the above. As
you can see, we are now using our CustomerRootNode instead
of the AbstractNode. The CustomerRootNode includes
the «Refresh» action, which calls the code above. - In the main package of the CustomerViewer module,
Also check
that the BeanTreeView in the CustomerViewer will stretch horizontally
and vertically when the user resizes the application. Check this by opening the window,
selecting the BeanTreeView, and then clicking the arrow buttons in the
toolbar of the GUI Builder.
You have now learned how to let the NetBeans Platform handle changes
to the JTextFields. Whenever the text changes, the NetBeans
Platform Undo and Redo buttons are enabled or disabled. Also, the
Save button is enabled and disabled correctly, letting the user
save changed data back to the database.
Create
In this section, you allow the user to create a new entry in the database.
- Right-click the CustomerEditor
module and choose «New Action».
Use the New Action wizard to create a new «Always Enabled» action. The new
action should be displayed anywhere in the toolbar and/or anywhere in
the menu bar. In the next step of the wizard, call the action NewAction.Note: Make sure that
you have a 16×16 icon available, which the wizard forces
you to select if you indicate that you want the
action to be invoked from the toolbar. - In the New action, let the TopComponent be opened,
together with emptied JTextFields:import java.awt.event.ActionEvent;
import java.awt.event.ActionListener;
public final class NewAction implements ActionListener {
public void actionPerformed(ActionEvent e) {
EditorTopComponent tc = EditorTopComponent.getDefault();
tc.resetFields();
tc.open();
tc.requestActive();
}
}Note: The action implements the ActionListener class, which
is bound to the application via entries in the layer file, put there
by the New Action wizard. Imagine how easy it will be when you
port your existing Swing application to the NetBeans Platform, since
you’ll simply be able to use the same Action classes that you
used in your original application, without needing to rewrite them
to conform to Action classes provided by the NetBeans Platform! - In the SaveCookie, ensure that a return of null
indicates that a new entry is saved, instead of an existing entry
being updated:public void save() throws IOException {
Confirmation message = new NotifyDescriptor.Confirmation("Do you want to save \""
+ jTextField1.getText() + " (" + jTextField2.getText() + ")\"?",
NotifyDescriptor.OK_CANCEL_OPTION,
NotifyDescriptor.QUESTION_MESSAGE);
Object result = DialogDisplayer.getDefault().notify(msg);
//When user clicks "Yes", indicating they really want to save,
//we need to disable the Save button and Save menu item,
//so that it will only be usable when the next change is made
//to the text field:
if (NotifyDescriptor.YES_OPTION.equals(result)) {
fire(false);
EntityManager entityManager = Persistence.createEntityManagerFactory("CustomerLibraryPU").createEntityManager();
entityManager.getTransaction().begin();
if (customer.getCustomerId() != null) {
Customer c = entityManager.find(Customer.class, cude.getCustomerId());
c.setName(jTextField1.getText());
c.setCity(jTextField2.getText());
entityManager.getTransaction().commit();
} else {
Query query = entityManager.createQuery("SELECT c FROM Customer c");
List<Customer> resultList = query.getResultList();
customer.setCustomerId(resultList.size()+1);
customer.setName(jTextField1.getText());
customer.setCity(jTextField2.getText());
//add more fields that will populate all the other columns in the table!
entityManager.persist(customer);
entityManager.getTransaction().commit();
}
}
} - Run the application again and add a new customer to the database.
In the EditorTopComponent, add the following method for resetting
the JTextFields and creating a new Customer object:
public void resetFields() {
    customer = new Customer();
    jTextField1.setText("");
    jTextField2.setText("");
}
Delete
In this section, let the user delete a selected entry in the database. Using
the concepts and code outlined above, implement the Delete action yourself.
- Create a new action, DeleteAction. Decide whether you
want to bind it to a Customer node or whether you’d rather bind it
to the toolbar, the menu bar, keyboard shortcut, or combinations of
these. Depending on where you want to bind
it, you will need to use a different approach in your code. Read the
article again for help, especially by looking at how the «New» action
was created, while comparing it to the «Refresh» action on the root
node. - Get the current Customer object, return an ‘Are you sure?’ dialog,
and then delete the entry. For help on this point, read the article
again, focusing on the part where the «Save» functionality is implemented.
Instead of saving, you now want to delete an entry from the database.
See Also
This concludes the article. You have learned
how to create a new NetBeans Platform application with CRUD functionality for
a given database.
You have also seen many of the NetBeans APIs in action. For more information about creating and developing applications on the NetBeans Platform, see the following resources: