Этот пост является одним из серии статей, в которых рассказывается об аутентификации единого входа Azure в собственных мобильных приложениях.
1. Аутентификация пользователей приложений iOS с помощью Azure Active Directory.
2. Как лучше всего обрабатывать токены доступа AAD в собственных мобильных приложениях.
3. Использование токена доступа Azure SSO для нескольких ресурсов AAD из собственных мобильных приложений
4. Совместное использование токена доступа Azure SSO между несколькими собственными мобильными приложениями
В предыдущем посте мы говорили об аутентификации пользователей мобильных приложений с помощью единого входа Azure AD. В этом посте мы рассмотрим, как использовать этот логин для сохранения токена доступа для взаимодействия с Azure AD. Давайте предположим, что у нас есть приложение веб-API и мобильное приложение, которое использует этот веб-API. Чтобы обеспечить взаимодействие между нашим мобильным приложением и веб-интерфейсом, мы могли зарегистрировать оба приложения в Azure AD и позволить Azure обрабатывать для нас аутентификацию. Azure AD хорошо подходит для таких задач и может синхронизироваться с вашей локальной AD. Это делает его очень подходящим для корпоративных приложений.
Защита веб-приложения
Для начала, мы внедрим механизм аутентификации в нашем веб-интерфейсе. Мы могли бы создать ванильный Web Api в Visual Studio и реализовать аутентификацию Azure AD на этом. Это простой процесс, и я предполагаю, что вы можете сделать это самостоятельно. Taiseer Joudeh предлагает хороший подробный учебник, вы можете найти его здесь .
Обеспечение безопасности мобильного приложения
В предыдущем посте мы говорили о том, как мы можем использовать Azure AD вместе с Microsoft ADAL (библиотека аутентификации ActiveDirectory) для аутентификации пользователей в собственных мобильных приложениях. Таким образом, мы будем считать, что вы выполнили предыдущий пост, и у вас есть эта часть готова. Если вы не уверены, пожалуйста, посетите мой предыдущий пост .
Настройка разрешений в AAD
Мы увидели, как защитить наши приложения с помощью AAD, теперь нам нужно авторизовать мобильное приложение для доступа к нашему веб-приложению в AAD. Чтобы сделать это, нам сначала нужно предоставить разрешения webApi в Azure AD. Мы можем перейти к AAD / Applications / our-web-app и нажать на манифест загрузки . Это даст нам копию конфигурации этого приложения в AAD (простой файл Json). Нам нужно изменить раздел разрешений. Нам просто нужно добавить следующий раздел, чтобы сообщить Azure AD, что к этому веб-приложению могут обращаться другие приложения AAD.
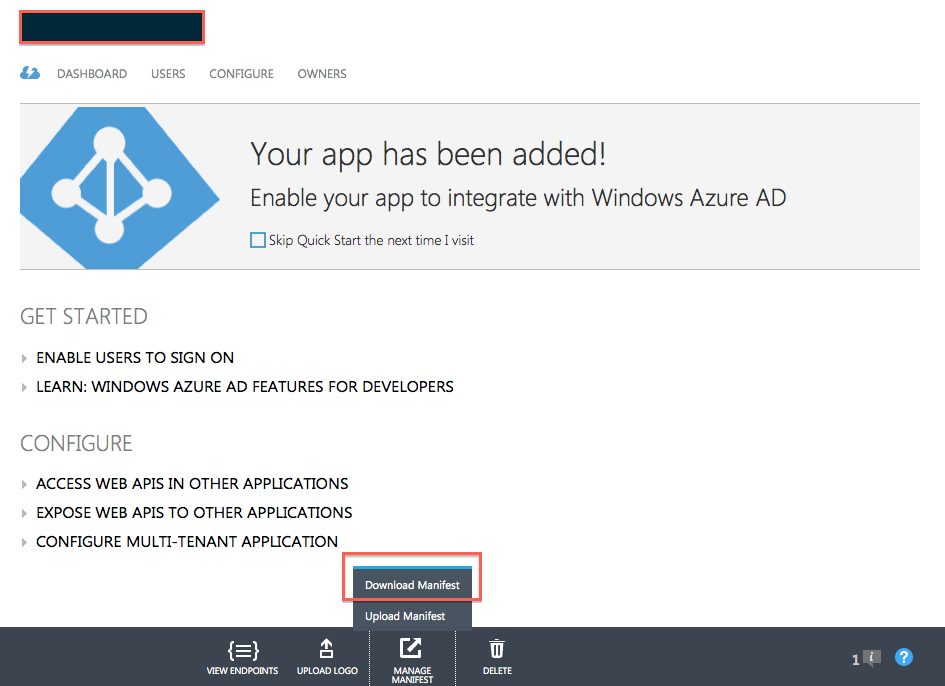
Конфигурация манифеста приложения AAD
appPermissions": [
    {
      "claimValue": "user_impersonation",
      "description": "Allow the application full access to the service on behalf of the signed-in user",
      "directAccessGrantTypes": [],
      "displayName": "Have full access to the service",
      "impersonationAccessGrantTypes": [
        {
          "impersonated": "User",
          "impersonator": "Application"
        }
      ],
      "isDisabled": false,
      "origin": "Application",
      "permissionId": "place a NEW GUID here",
      "resourceScopeType": "Personal",
      "userConsentDescription": "Allow the application full access to the service on your behalf",
      "userConsentDisplayName": "Have full access to the service"
    }
  ]
Мы можем обновить файл манифеста, а затем загрузить его. Azure проверит файл и обновит настройки разрешений. Это позволит AAD предлагать доступ к этому веб-интерфейсу, как и любые другие разрешения, которыми он управляет. Вы можете прочитать больше об олицетворении Azure AD и настройках разрешений в MSDN . Обратите внимание, что вам нужно выбрать НОВЫЙ GUID для идентификатора разрешения.
Теперь нам нужно настроить собственное мобильное приложение в Azure AD, чтобы иметь доступ к нашему веб-приложению API. Это очень просто, как на скриншоте ниже. В списке разрешений слева теперь у нас есть больше разрешений, которые мы можем предоставить мобильному приложению. Какое бы имя вы ни указали своему приложению, оно будет отображаться вместе с типом разрешений, которые вы настроили. В моем случае я назвал его MobileServices1, и это то, что появляется там.
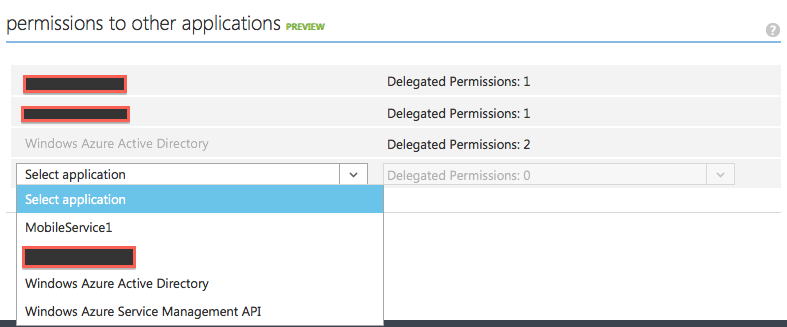
Настройки разрешений приложения Azure AD
Теперь Azure знает, как разрешить доступ из нашего собственного мобильного приложения к веб-приложению.
Установка разрешений и конфигурации выше позволит нашему мобильному приложению аутентифицировать пользователей и управлять доступом к веб-приложению. Этот доступ управляется токеном, который Azure выдаст при входе пользователя в систему. Теперь уловка заключается в том, как часто нам нужно запрашивать токен? Если мобильное приложение часто взаимодействует с веб-интерфейсом, нам всегда нужно иметь действительный токен для всех наших запросов. Тогда возникает вопрос, как сохранить постоянный токен запроса в собственном мобильном приложении?
The answer is certainly dependent on what you are doing. If you are implementing a highly secure app (ie: banking), you might want to always check with Azure and maybe ask the user to login every time the token expires. By Default, AAD access token expires in one hour. This means that you might want to ask the user to login every one hour. This might be OK for some mobile apps, but it is certainly not convenient and not the normal flow you see in most apps. So what should we do if we wanted to only ask the user to login once, or once a while (ie: 3 months). To do that, we would then need to manage the access tokens and refresh seamlessly.
ADAL comes with TokenCache, this is designed to help in caching tokens so that ADAL libray does not need to go back to Azure every time the mobile app asks for a token. Unfortunately, however, persistent caching of tokens is not supported in this release (ADAL 3.0.11..). This means that ADAL will only cache the token in memory, meaning that once the app restarts, or goes to the background in iOS, you might loose your access token. Therefore, we need to manage the token, and refresh it on our own in the background.
There are many ways that you could do this, a simple way is to always check before we access the api, and see if we have a valid token or not. If we do, then great. If not, then we could check for the Refresh Token. Azure AD gives us a refresh token to use when our access token is about to expire. As the name indicates, it is used to refresh tokens. This means that when we ask Azure for a new token and provide this refresh token, Azure will give us a new token without asking the user to re-login.
By Default, Azure AD refresh tokens are valid for about 14 days. This means as long as we refresh the token (even if once in this period of time), then we would have a valid token and we do not need to re-authenticate. Another security constraint that Azure AD imposes is that the access token can only be refreshed for a maximum period of 90 days
(i.e. 90 days after the initial issuance of the access and refresh tokens, the end user will have to sign themselves in again). This is done by Azure AD to enforce a better security measures and it still gives a convenient access to mobile users. Currently, these settings are not configurable in Azure AD, so we just go with the default ones.
Alright, time to write some code. The code snippet below shows how you could structure your web api calls from your mobile app. Notice that we always call either AcquireToken() or AcquireTokenByRefreshToken() before every call. This is to ensure that we always have a valid token before we send a request to the web api. This could even be optimised further by checking if the access token still valid, then we skip the token refreshing call. I will leave this as an exercise for you to implement. In the next release of ADAL hopefully the TokenCache would be implemented, and then we would not need to do this.
public async Task<string> GetResultFromWebApi(string apiCallPath)
{
    var token = await AcquireOrRefreshToken ();
    using (var httpClient = new HttpClient())
    {
        httpClient.DefaultRequestHeaders.Authorization = new AuthenticationHeaderValue("Bearer", token);
        HttpResponseMessage response = await httpClient.GetAsync(apiBaseAddress + apiCallPath);
        return await response.Content.ReadAsStringAsync();
    }
}

private async Task<string> AcquireOrRefreshToken()
{
    var refreshToken = _storage.Get<string> (Constants.CacheKeys.RefreshToken);
    AuthenticationResult authResult = null;

    if (string.IsNullOrEmpty (refreshToken))
    {
        authResult = await _authContext.AcquireTokenAsync (
            resourceId, clientId, new Uri (redirectUrl), new AuthorizationParameters (_controller), UserIdentifier.AnyUser, null);

    }
        else
        {
        authResult = await _authContext.AcquireTokenByRefreshTokenAsync (refreshToken, clientId);
    }

    // when calling refresh token, the UserInfo would be null
    if (authResult.UserInfo != null)
        _storage.Save<string> (Constants.CacheKeys.Email, authResult.UserInfo.DisplayableId);

    _storage.Save<string> (Constants.CacheKeys.Token, authResult.AccessToken);
    _storage.Save<string> (Constants.CacheKeys.ExpireOn, authResult.ExpiresOn.ToString("dd MMM HH:mm:ss"));
    _storage.Save<string> (Constants.CacheKeys.RefreshToken, authResult.RefreshToken);

    return authResult.AccessToken;
}
That’s it, now your mobile app would keep interacting with the web api using a valid token. And if you are concerned about what happens when the user account is disabled, or the password is changed, then well done, you are following the topic properly. Azure AD, would either try to re-authenticate the user again (by showing the login screen), or gives an error. So we need to add some error handling to our code to catch these types of exceptions and handle them properly on the mobile app.
Hope you find this blog post useful and would love to hear from you if you have a question or comment. In the next blog post, we will look at how we could use the same token for accessing multiple resources on Azure AD.
This blog post is one in a series that talk about Azure SSO Authentication in native mobile apps.
1. Authenticating iOS app users with Azure Active Directory
2. How to Best handle AAD access tokens in native mobile apps.
3. Using Azure SSO access token for multiple AAD resources from native mobile apps
4. Sharing Azure SSO access token across multiple native mobile apps