В публикации «Собственные узлы» JavaFX: пример графического меню я начал показывать вам, как создавать собственные элементы управления пользовательским интерфейсом в JavaFX. В этом посте мы определили пользовательские узлы MenuNode и ButtonNode, чтобы вы могли легко создавать меню, состоящие из кнопок, которые постепенно увеличиваются и растягиваются при наведении на них курсора мыши.
Затем в статье «Приступая к работе: еще один пользовательский узел JavaFX» мы определили DeckNode, который хранит набор экземпляров узла и отображает один из этих узлов одновременно. Он используется, например, для отображения узла, который относится к данной кнопке меню.
Указанные выше посты являются частью серии в категории «Пользовательские узлы JFX».в котором графический дизайнер (Марк Дингман из Malden Labs) и я сотрудничаем над воображаемым приложением «Sound Beans». Цели создания этого приложения состоят в том, чтобы продемонстрировать, как создавать пользовательские узлы, и предоставить пример того, как графический дизайнер и разработчик приложения могут эффективно работать вместе при разработке приложений JavaFX.
В сегодняшнем посте мы собираемся сделать две вещи:
- Определите элемент управления ProgressNode, который может использоваться для отображения хода выполнения операции.
- Введите класс модели в приложение Sound Beans. Как я уже говорил, «способ JavaFX» — это привязать пользовательский интерфейс к модели, и это приложение Sound Beans прошло достаточно долго без него.
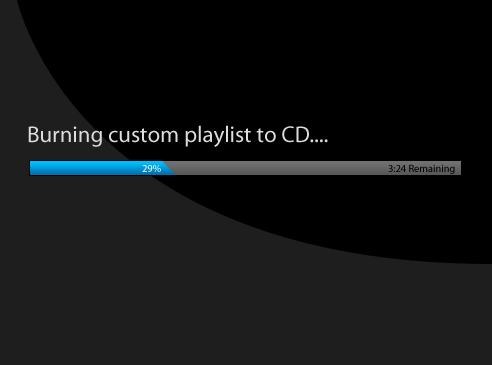
Вот макет, который Марк дал мне для страницы Burn CD:
Основываясь на этом изображении, я решил создать элемент управления «Индикатор выполнения», который состоит из графических узлов JavaFX (например, Rectangle, Text ). Для этой страницы не нужны графические ресурсы от Mark.
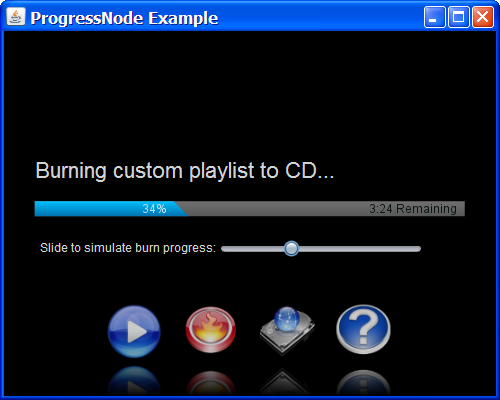
Я покажу вам код чуть позже, но сначала посмотрите на скриншот приложения Sound Beans после нажатия кнопки Burn :
Как вы можете видеть, я добавил ползунок для имитации процесса записи. Нажмите на эту ссылку Java Web Start, помня, что вам понадобится как минимум JRE 6. Кроме того, установка Java SE 6 update 10 ускорит развертывание.
Вот код для пользовательского узла ProgressNode в файле с именем ProgressNode.fx :
/*
 *  ProgressNode.fx -
 *  A custom node that functions as a progress bar
 *  TODO: Add the ability to have an "infinite progress" look as well
 *
 *  Developed 2008 by James L. Weaver (jim.weaver at lat-inc.com)
 *  to demonstrate how to create custom nodes in JavaFX
 */

package com.javafxpert.custom_node;

import javafx.scene.*;
import javafx.scene.geometry.*;
import javafx.scene.paint.*;
import javafx.scene.text.*;

public class ProgressNode extends CustomNode {

  /*
   * A number from 0.0 to 1.0 that indicates the amount of progress
   */
  public attribute progress:Number;

  /*
   * The fill of the progress part of the progress bar.  Because
   * this is of type Paint, a Color or gradient may be used.
   */
  public attribute progressFill:Paint = Color.BLUE;

  /*
   * The fill of the bar part of the progress bar. Because
   * this is of type Paint, a Color or gradient may be used.
   */
  public attribute barFill:Paint = Color.GREY;

  /*
   * The color of the progress percent text on the progress bar
   */
  public attribute progressPercentColor:Color = Color.WHITE;

  /*
   * The color of the progress text on the right side of the progress bar
   */
  public attribute progressTextColor:Color = Color.WHITE;

  /*
   * The progress text string on the right side of the progress bar
   */
  public attribute progressText:String;

  /*
   * Determines the width, in pixels, of the progress bar
   */
  public attribute width:Integer = 200;

  /*
   * Determines the height, in pixels, of the progress bar
   */
  public attribute height:Integer = 20;

  /**
   * Create the Node
   */
  public function create():Node {
    Group {
      var textRef:Text;
      var progTextRef:Text;
      var progBarFont =
        Font {
          name: "Sans serif"
          style: FontStyle.PLAIN
          size: 12
        };
      content: [
        // The entire progress bar
        Rectangle {
          width: bind width
          height: bind height
          fill: bind barFill
        },
        // The progress part of the progress bar
        Polygon {
          points: bind [
            0.0, 0.0,
            0.0, height as Number,
            width * progress + height / 2.0, height as Number,
            width * progress - height / 2.0, 0.0
          ]
          fill: bind progressFill
          clip:
            Rectangle {
              width: bind width
              height: bind height
            }
        },
        // The percent complete displayed on the progress bar
        textRef = Text {
          translateX: width / 4
          translateY: 3
          textOrigin: TextOrigin.TOP
          font: progBarFont
          fill: bind progressPercentColor
          content: bind "{progress * 100 as Integer}%"
        },
        // The progress text displayed on the right side of the progress bar
        progTextRef = Text {
          translateX: bind width - progTextRef.getWidth() - 5
          translateY: 3
          textOrigin: TextOrigin.TOP
          font: progBarFont
          fill: bind progressTextColor
          content: bind progressText
        }
      ]
    }
  }
}
Большинство понятий, использованных здесь, были обсуждены в постах, упомянутых выше. Одна вещь, на которую я хотел бы обратить внимание, это использование привязки, например, для отображения текущего значения атрибута progress в процентах в последней строке списка. Теперь взглянем на основную программу в файле с именем ProgressNodeExampleMain.fx :
/*
 *  ProgressNodeExampleMain.fx -
 *  An example of using the ProgressNode custom node.  It also demonstrates
 *  the DeckNode, MenuNode and ButtonNode custom nodes
 *
 *  Developed 2008 by James L. Weaver (jim.weaver at lat-inc.com)
 *  to demonstrate how to create custom nodes in JavaFX
 */
package com.javafxpert.progress_node_example.ui;

import javafx.application.*;
import javafx.ext.swing.*;
import javafx.scene.*;
import javafx.scene.geometry.*;
import javafx.scene.image.*;
import javafx.scene.layout.*;
import javafx.scene.paint.*;
import javafx.scene.text.*;
import javafx.scene.transform.*;
import java.lang.System;
import com.javafxpert.custom_node.*;
import com.javafxpert.progress_node_example.model.*;

var deckRef:DeckNode;

Frame {
  var model = ProgressNodeExampleModel.getInstance();
  var stageRef:Stage;
  var menuRef:MenuNode;
  title: "ProgressNode Example"
  width: 500
  height: 400
  visible: true
  stage:
    stageRef = Stage {
      fill: Color.BLACK
      content: [
        deckRef = DeckNode {
          fadeInDur: 700ms
          content: [
            // The "Splash" page
            Group {
              var vboxRef:VBox;
              var splashFont =
                Font {
                  name: "Sans serif"
                  style: FontStyle.BOLD
                  size: 12
                };
              id: "Splash"
              content: [
                ImageView {
                  image:
                    Image {
                      url: "{__DIR__}images/splashpage.png"
                    }
                },
                vboxRef = VBox {
                  translateX: bind stageRef.width - vboxRef.getWidth() - 10
                  translateY: 215
                  spacing: 1
                  content: [
                    Text {
                      content: "A Fictitious Audio Application that Demonstrates"
                      fill: Color.WHITE
                      font: splashFont
                    },
                    Text {
                      content: "Creating JavaFX Custom Nodes"
                      fill: Color.WHITE
                      font: splashFont
                    },
                    Text {
                      content: "Application Developer: Jim Weaver"
                      fill: Color.WHITE
                      font: splashFont
                    },
                    Text {
                      content: "Graphics Designer: Mark Dingman"
                      fill: Color.WHITE
                      font: splashFont
                    },
                  ]
                }
              ]
            },
            // The "Play" page
            Group {
              id: "Play"
              content: [
                ImageView {
                  image:
                    Image {
                      url: "{__DIR__}images/playlist.png"
                    }
                }
              ]
            },
            // The "Burn" page
            Group {
              var vboxRef:VBox;
              id: "Burn"
              content: [
                vboxRef = VBox {
                  translateX: bind stageRef.width / 2 - vboxRef.getWidth() / 2
                  translateY: bind stageRef.height / 2 - vboxRef.getHeight() / 2
                  spacing: 15
                  content: [
                    Text {
                      textOrigin: TextOrigin.TOP
                      content: "Burning custom playlist to CD..."
                      font:
                        Font {
                          name: "Sans serif"
                          style: FontStyle.PLAIN
                          size: 22
                        }
                      fill: Color.rgb(211, 211, 211)
                    },
                    ProgressNode {
                      width: 430
                      height: 15
                      progressPercentColor: Color.rgb(191, 223, 239)
                      progressTextColor: Color.rgb(12, 21, 21)
                      progressText: bind "{model.remainingBurnTime} Remaining"
                      progressFill:
                        LinearGradient {
                          startX: 0.0
                          startY: 0.0
                          endX: 0.0
                          endY: 1.0
                          stops: [
                            Stop {
                              offset: 0.0
                              color: Color.rgb(0, 192, 255)
                            },
                            Stop {
                              offset: 0.20
                              color: Color.rgb(0, 172, 234)
                            },
                            Stop {
                              offset: 1.0
                              color: Color.rgb(0, 112, 174)
                            },
                          ]
                        }
                      barFill:
                        LinearGradient {
                          startX: 0.0
                          startY: 0.0
                          endX: 0.0
                          endY: 1.0
                          stops: [
                            Stop {
                              offset: 0.0
                              color: Color.rgb(112, 112, 112)
                            },
                            Stop {
                              offset: 1.0
                              color: Color.rgb(88, 88, 88)
                            },
                          ]
                        }
                      progress: bind model.burnProgressPercent / 100.0
                    },
                    ComponentView {
                      component:
                        FlowPanel {
                          background: Color.BLACK
                          content: [
                            Label {
                              text: "Slide to simulate burn progress:"
                              foreground: Color.rgb(211, 211, 211)
                            },
                            Slider {
                              orientation: Orientation.HORIZONTAL
                              minimum: 0
                              maximum: 100
                              value: bind model.burnProgressPercent with inverse
                              preferredSize: [200, 20]
                            }
                          ]
                        }
                    }
                  ]
                }
              ]
            },
            // The "Config" page
            Group {
              id: "Config"
              content: [
                ImageView {
                  image:
                    Image {
                      url: "{__DIR__}images/config.png"
                    }
                }
              ]
            },
            // The "Help" page
            Group {
              id: "Help"
              content: [
                ImageView {
                  image:
                    Image {
                      url: "{__DIR__}images/help.png"
                    }
                }
              ]
            }
          ]
        },
        menuRef = MenuNode {
          translateX: bind stageRef.width / 2 - menuRef.getWidth() / 2
          translateY: bind stageRef.height - menuRef.getHeight()
          buttons: [
            ButtonNode {
              title: "Play"
              imageURL: "{__DIR__}icons/play.png"
              action:
                function():Void {
                  deckRef.visibleNodeId = "Play";
                }
            },
            ButtonNode {
              title: "Burn"
              imageURL: "{__DIR__}icons/burn.png"
              action:
                function():Void {
                  deckRef.visibleNodeId = "Burn";
                }
            },
            ButtonNode {
              title: "Config"
              imageURL: "{__DIR__}icons/config.png"
              action:
                function():Void {
                  deckRef.visibleNodeId = "Config";
                }
            },
            ButtonNode {
              title: "Help"
              imageURL: "{__DIR__}icons/help.png"
              action:
                function():Void {
                  deckRef.visibleNodeId = "Help";
                }
            },
          ]
        }
      ]
    }
}

deckRef.visibleNodeId = "Splash";
Использование элемента управления ProgressNode
You’ll notice that the main program above is almost identical to the main program in the Getting Decked post, except that instead of showing the mock-up graphic that Mark Dingman supplied, we’re using JavaFX code to display something similar, including our new ProgressNode control. Examine the Group block right after the //The «Play» page comment in the listing to see this additional code. One thing that deserves repeating from previous posts is that JavaFX is moving to a node-centric approach, so 2D graphics as well as components will all be graphical nodes. Because of this, I’m using the ComponentView class (which is a subclass of Node), to contain the Slider, which is a component. The JavaFX team is rapidly developing a set of controls (e.g. Button) that are subclasses of Node, so very soon the ComponentView class won’t be necessary.
Note that as the complexity of the individual pages grow, I’ll tend to put them in their own files, subclassing CustomNode just like we’re doing with this UI controls.
Introducing a Model into this Program
If you’ve followed this blog, you know that JavaFX inherently supports the model-view-controller pattern through constructs such as declarative programming syntax, binding, and triggers. In this program, our model has an attribute named burnProgressPercent, for example, that holds the completion percent of the CD burn, as shown in the ProgressNodeExampleModel.fx listing below. Notice that in the ProgressNodeExampleMain.fx listing above that the value attribute of the Slider is bound bi-directionally to this variable, and that the progress attribute of the ProgressNode is bound to it as well. This is what causes the progress bar to be updated as you move the slider. Here’s the ProgressNodeExampleModel.fx listing:
/*
 *  ProgressNodeExampleModel.fx -
 *  The model behind the ProgressNode example
 *
 *  Developed 2008 by James L. Weaver (jim.weaver at lat-inc.com)
 */
package com.javafxpert.progress_node_example.model;

/**
 * The model behind the ProgressNode example
 */
public class ProgressNodeExampleModel {

  /**
   * The total estimated number of seconds for the burn.
   * For this example program, we'll set it to 10 minutes
   */
  public attribute estimatedBurnTime:Integer = 600;

  /**
   * The percent progress of the CD burn, represented by a number
   * between 0 and 100 inclusive.
   */
  public attribute burnProgressPercent:Integer on replace {
      var remainingSeconds = estimatedBurnTime * (burnProgressPercent / 100.0) as Integer;
      remainingBurnTime = "{remainingSeconds / 60}:{%02d (remainingSeconds mod 60)}";
  };

  /**
   * The time remaining on the CD burn, expressed as a String in mm:ss
   */
  public attribute remainingBurnTime:String;

  //-----------------Use Singleton pattern to get model instance -----------------------
  private static attribute instance:ProgressNodeExampleModel;

  public static function getInstance():ProgressNodeExampleModel {
    if (instance == null) {
      instance = ProgressNodeExampleModel {};
    }
    else {
      instance;
    }
  }
}
Take a look at the burnProgressPercent attribute and you’ll notice a couple of things:
- It has an on replace trigger that gets executed whenever the value of burnProgressPercent changes. In the on replace block we’re altering the value of the remainingBurnTime attribute, which you may have noticed is being bound to by the progressText attribute of the ProgressNode. See the ProgressNodeExampleMain.fx listing above to see this bind.
- Another item of interest in the on replace block is the use of a format string to pad the seconds with a leading zero. The set of format strings available can be found in the java.util.Formatter class API documentation.
One last observation about this model class is that I’m using a singleton pattern to get a reference to it. As our program grows, and more classes need a reference to the model class, this is an alternative to supplying a model reference via public attributes to every class in the program that needs a reference.
By the way, the other classes used by this example (ButtonNode, MenuNode and DeckNode) are located in the Rolling Your Own, and Getting Decked posts referred to above. As always, please post a comment if you have any questions!
Regards,
Jim Weaver

