1. Введение
В этом руководстве мы рассмотрим, как мы можем использовать Spring Security с OAuth для защиты службы REST. В демонстрационном приложении защищенные ресурсы REST на сервере доступны по шаблону пути ( / api / ** ), так что URL-адреса запроса, основанные на этом пути, сопоставляются с различными методами контроллера. Это значит, что —
- Любой URL-адрес REST-запроса без « / api » в пути останется недействительным , поскольку он не будет соответствовать ни одному из сопоставлений контроллера.
- После выполнения необходимых настроек OAuth2 любой URL-адрес запроса REST без токена в качестве параметра будет неавторизован .
Мы настроили другой шаблон пути ( / oauth / token ), который поможет настроенному серверу авторизации сгенерировать токен доступа. Обратите внимание, что в этом демонстрационном приложении мы будем использовать тип предоставления пароля .
Прежде чем мы продолжим реализацию, давайте вспомним события, связанные с этим типом предоставления.
2. Тип предоставления полномочий для пароля владельца ресурса
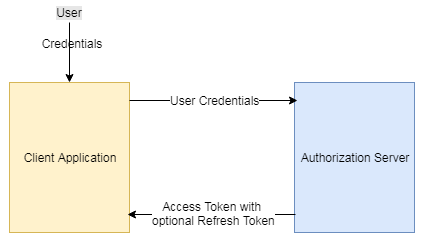
- Используется между доверенными приложениями.
- Пользователь (владелец ресурса) делится учетными данными напрямую с клиентским приложением, которое запрашивает у сервера авторизации вернуть токен доступа после успешной аутентификации учетных данных пользователя и дальнейшей авторизации пользователя для доступа к ограниченным ресурсам на сервере.
Полезные ссылки
3. Реализация
Убедитесь, что необходимые записи pom правильно добавлены в файл pom.xml.
pom.xml
|
01
02
03
04
05
06
07
08
09
10
11
12
13
14
15
16
17
18
19
20
21
22
23
24
25
26
27
28
29
30
31
32
33
34
35
36
37
38
39
40
41
42
43
44
45
46
47
48
49
50
51
52
53
54
55
56
57
58
59
60
61
62
63
64
65
|
<project xmlns="http://maven.apache.org/POM/4.0.0" xmlns:xsi="http://www.w3.org/2001/XMLSchema-instance" <modelVersion>4.0.0</modelVersion> <groupId>org.springframework.samples.service.service</groupId> <artifactId>SecureRESTWithOAuth</artifactId> <version>0.0.1-SNAPSHOT</version> <packaging>war</packaging> <dependencies> <dependency> <groupId>junit</groupId> <artifactId>junit</artifactId> <version>3.8.1</version> <scope>test</scope> </dependency> <!-- Spring dependencies --> <dependency> <groupId>org.springframework</groupId> <artifactId>spring-core</artifactId> <version>4.2.1.RELEASE</version> </dependency> <dependency> <groupId>org.springframework</groupId> <artifactId>spring-web</artifactId> <version>4.2.1.RELEASE</version> </dependency> <dependency> <groupId>org.springframework</groupId> <artifactId>spring-webmvc</artifactId> <version>4.2.1.RELEASE</version> </dependency> <!-- Jackson JSON Processor --> <dependency> <groupId>com.fasterxml.jackson.core</groupId> <artifactId>jackson-databind</artifactId> <version>2.4.1</version> </dependency> <!-- Spring Security Dependencies --> <dependency> <groupId>org.springframework.security</groupId> <artifactId>spring-security-core</artifactId> <version>3.2.3.RELEASE</version> </dependency> <dependency> <groupId>org.springframework.security</groupId> <artifactId>spring-security-web</artifactId> <version>3.2.3.RELEASE</version> </dependency> <dependency> <groupId>org.springframework.security</groupId> <artifactId>spring-security-config</artifactId> <version>3.2.3.RELEASE</version> </dependency> <dependency> <groupId>org.springframework.security.oauth</groupId> <artifactId>spring-security-oauth2</artifactId> <version>1.0.0.RELEASE</version> </dependency> </dependencies></project> |
web.xml
Обновите файл web.xml для загрузки файлов контекста и настройте фильтр Spring Security, который перенаправит запрос на аутентификацию и авторизацию перед его обработкой.
|
01
02
03
04
05
06
07
08
09
10
11
12
13
14
15
16
17
18
19
20
21
22
23
24
25
26
27
28
29
30
31
32
33
34
35
36
37
38
39
40
41
42
43
44
45
46
|
<?xml version="1.0" encoding="ISO-8859-1"?> xsi:schemaLocation="http://java.sun.com/xml/ns/javaee id="WebApp_ID" version="2.5"> <display-name>SecureRESTWithOAuth</display-name> <servlet> <servlet-name>mvc-dispatcher</servlet-name> <servlet-class>org.springframework.web.servlet.DispatcherServlet</servlet-class> <load-on-startup>1</load-on-startup> </servlet> <servlet-mapping> <servlet-name>mvc-dispatcher</servlet-name> <url-pattern>/*</url-pattern> </servlet-mapping> <listener> <listener-class>org.springframework.web.context.ContextLoaderListener</listener-class> </listener> <!-- Loads context files --> <context-param> <param-name>contextConfigLocation</param-name> <param-value> /WEB-INF/mvc-dispatcher-servlet.xml, /WEB-INF/spring-security.xml </param-value> </context-param> <!-- Spring Security --> <filter> <filter-name>springSecurityFilterChain</filter-name> <filter-class>org.springframework.web.filter.DelegatingFilterProxy </filter-class> </filter> <filter-mapping> <filter-name>springSecurityFilterChain</filter-name> <url-pattern>/*</url-pattern> </filter-mapping> </web-app> |
MVC-диспетчерская-servlet.xml
|
01
02
03
04
05
06
07
08
09
10
11
12
13
|
<?xml version="1.0" encoding="UTF-8"?> xmlns:xsi="http://www.w3.org/2001/XMLSchema-instance" xmlns:context="http://www.springframework.org/schema/context" xmlns:util="http://www.springframework.org/schema/util" xmlns:mvc="http://www.springframework.org/schema/mvc" xsi:schemaLocation="http://www.springframework.org/schema/mvc http://www.springframework.org/schema/mvc/spring-mvc-3.2.xsd http://www.springframework.org/schema/beans http://www.springframework.org/schema/beans/spring-beans.xsd http://www.springframework.org/schema/util http://www.springframework.org/schema/util/spring-util-3.2.xsd http://www.springframework.org/schema/context http://www.springframework.org/schema/context/spring-context-3.2.xsd"> <context:component-scan base-package="com.jcombat.controller" /> <mvc:annotation-driven /> </beans> |
Поскольку мы будем использовать файлы администратора JSP, мы настроили для него соответствующий преобразователь представления.
Теперь давайте настроим OAuth Spring Security в его контекстном файле.
весна-security.xml
|
001
002
003
004
005
006
007
008
009
010
011
012
013
014
015
016
017
018
019
020
021
022
023
024
025
026
027
028
029
030
031
032
033
034
035
036
037
038
039
040
041
042
043
044
045
046
047
048
049
050
051
052
053
054
055
056
057
058
059
060
061
062
063
064
065
066
067
068
069
070
071
072
073
074
075
076
077
078
079
080
081
082
083
084
085
086
087
088
089
090
091
092
093
094
095
096
097
098
099
100
101
102
103
104
105
106
107
108
109
110
111
112
113
114
115
116
117
118
119
120
121
122
123
124
125
126
127
128
129
130
131
132
133
134
135
136
137
138
139
140
141
142
143
144
145
146
147
|
<?xml version="1.0" encoding="UTF-8" ?> xmlns:xsi="http://www.w3.org/2001/XMLSchema-instance" xmlns:oauth="http://www.springframework.org/schema/security/oauth2" xmlns:sec="http://www.springframework.org/schema/security" xmlns:mvc="http://www.springframework.org/schema/mvc" xsi:schemaLocation="http://www.springframework.org/schema/security/oauth2 http://www.springframework.org/schema/security/spring-security-oauth2-2.0.xsd http://www.springframework.org/schema/mvc http://www.springframework.org/schema/mvc/spring-mvc-3.2.xsd http://www.springframework.org/schema/security http://www.springframework.org/schema/security/spring-security-3.2.xsd http://www.springframework.org/schema/beans http://www.springframework.org/schema/beans/spring-beans-4.1.xsd http://www.springframework.org/schema/context http://www.springframework.org/schema/context/spring-context-4.1.xsd "> <!-- Default url to get a token from OAuth --> <http pattern="/oauth/token" create-session="stateless" authentication-manager-ref="clientAuthenticationManager" <intercept-url pattern="/oauth/token" access="IS_AUTHENTICATED_FULLY" /> <anonymous enabled="false" /> <http-basic entry-point-ref="clientAuthenticationEntryPoint" /> <custom-filter ref="clientCredentialsTokenEndpointFilter" after="BASIC_AUTH_FILTER" /> <access-denied-handler ref="oauthAccessDeniedHandler" /> </http> <!-- URLs should be protected and what roles have access to them --> <!-- Can define more patterns based on the protected resources hosted on the server --> <http pattern="/api/**" create-session="never" entry-point-ref="oauthAuthenticationEntryPoint" access-decision-manager-ref="accessDecisionManager" <anonymous enabled="false" /> <intercept-url pattern="/api/**" access="ROLE_APP" /> <!-- Protect oauth clients with resource ids --> <custom-filter ref="resourceServerFilter" before="PRE_AUTH_FILTER" /> <access-denied-handler ref="oauthAccessDeniedHandler" /> </http> <bean id="oauthAuthenticationEntryPoint" class="org.springframework.security.oauth2.provider.error.OAuth2AuthenticationEntryPoint"> <property name="realmName" value="demo/client" /> </bean> <bean id="clientAuthenticationEntryPoint" class="org.springframework.security.oauth2.provider.error.OAuth2AuthenticationEntryPoint"> <property name="realmName" value="demo/client" /> <property name="typeName" value="Basic" /> </bean> <bean id="oauthAccessDeniedHandler" class="org.springframework.security.oauth2.provider.error.OAuth2AccessDeniedHandler" /> <bean id="clientCredentialsTokenEndpointFilter" class="org.springframework.security.oauth2.provider.client.ClientCredentialsTokenEndpointFilter"> <property name="authenticationManager" ref="clientAuthenticationManager" /> </bean> <bean id="accessDecisionManager" class="org.springframework.security.access.vote.UnanimousBased" <constructor-arg> <list> <bean class="org.springframework.security.oauth2.provider.vote.ScopeVoter" /> <bean class="org.springframework.security.access.vote.RoleVoter" /> <bean class="org.springframework.security.access.vote.AuthenticatedVoter" /> </list> </constructor-arg> </bean> <authentication-manager id="clientAuthenticationManager" <authentication-provider user-service-ref="clientDetailsUserService" /> </authentication-manager> <!-- This is simple authentication manager, with a hard-coded username/password combination. We can replace this with a user defined service to fetch user credentials from DB instead --> <authentication-manager alias="authenticationManager" <authentication-provider> <user-service> <user name="admin" password="123" authorities="ROLE_APP" /> </user-service> </authentication-provider> </authentication-manager> <bean id="clientDetailsUserService" class="org.springframework.security.oauth2.provider.client.ClientDetailsUserDetailsService"> <constructor-arg ref="clientDetails" /> </bean> <!-- This defines the token store. We have currently used in-memory token store but we can instead use a user defined one --> <bean id="tokenStore" class="org.springframework.security.oauth2.provider.token.InMemoryTokenStore" /> <!-- If need to store tokens in DB <bean id="tokenStore" class="org.springframework.security.oauth2.provider.token.store.JdbcTokenStore"> <constructor-arg ref="jdbcTemplate" /> </bean> --> <!-- This is where we defined token based configurations, token validity and other things --> <bean id="tokenServices" class="org.springframework.security.oauth2.provider.token.DefaultTokenServices"> <property name="tokenStore" ref="tokenStore" /> <property name="supportRefreshToken" value="true" /> <property name="accessTokenValiditySeconds" value="120" /> <property name="clientDetailsService" ref="clientDetails" /> </bean> <bean id="userApprovalHandler" class="org.springframework.security.oauth2.provider.approval.TokenServicesUserApprovalHandler"> <property name="tokenServices" ref="tokenServices" /> </bean> <!-- The server issuing access tokens to the client after successfully authenticating the resource owner and obtaining authorization --> <oauth:authorization-server client-details-service-ref="clientDetails" token-services-ref="tokenServices" user-approval-handler-ref="userApprovalHandler"> <oauth:authorization-code /> <oauth:implicit /> <oauth:refresh-token /> <oauth:client-credentials /> <oauth:password /> </oauth:authorization-server> <!-- Define protected resources hosted by the resource server --> <oauth:resource-server id="resourceServerFilter" resource-id="adminProfile" token-services-ref="tokenServices" /> <!-- OAuth clients allowed to access the protected resources, can be something like facebook, google if we are sharing any resource with them --> <oauth:client-details-service id="clientDetails"> <oauth:client client-id="fbApp" authorized-grant-types="password,refresh_token" secret="fbApp" authorities="ROLE_APP" resource-ids="adminProfile" /> </oauth:client-details-service> <sec:global-method-security pre-post-annotations="enabled" proxy-target-class="true"> <sec:expression-handler ref="oauthExpressionHandler" /> </sec:global-method-security> <oauth:expression-handler id="oauthExpressionHandler" /> <oauth:web-expression-handler id="oauthWebExpressionHandler" /> </beans> |
Мы настроили / oauth / token URL для выдачи доступа и обновления токенов и / api / ** сопоставлений с фактически защищенными ресурсами на сервере. Следовательно, для доступа к любому URL, соответствующему шаблону / api / ** , необходимо передать действительный токен вместе с запросом.
Диспетчер аутентификации — это контейнер, в котором происходит аутентификация. В нашем случае менеджер аутентификации проверяет —
- Если пользователь аутентифицирован.
- Если пользователь запросил правильный идентификатор клиента.
- Если идентификатор клиента в порядке, пользователь имеет право использовать его для доступа к профилю администратора на сервере.
Обратитесь к приведенному ниже фрагменту —
|
01
02
03
04
05
06
07
08
09
10
11
12
13
14
15
16
17
|
<authentication-manager id="clientAuthenticationManager" <authentication-provider user-service-ref="clientDetailsUserService" /></authentication-manager> <bean id="clientDetailsUserService" class="org.springframework.security.oauth2.provider.client.ClientDetailsUserDetailsService"> <constructor-arg ref="clientDetails" /></bean> <!-- OAuth clients allowed to access the protected resources, can be something like facebook, google if we are sharing any resource with them --><oauth:client-details-service id="clientDetails"> <oauth:client client-id="fbApp" authorized-grant-types="password,refresh_token" secret="fbApp" authorities="ROLE_APP" resource-ids="adminProfile" /></oauth:client-details-service> |
Как только пользователь аутентифицирован, сервер авторизации вызывает tokenServices и выдает токен доступа.
|
01
02
03
04
05
06
07
08
09
10
11
12
13
14
15
16
17
18
19
20
21
22
23
24
25
|
<oauth:authorization-server client-details-service-ref="clientDetails" token-services-ref="tokenServices" user-approval-handler-ref="userApprovalHandler"> <oauth:authorization-code /> <oauth:implicit /> <oauth:refresh-token /> <oauth:client-credentials /> <oauth:password /></oauth:authorization-server> <bean id="tokenServices" class="org.springframework.security.oauth2.provider.token.DefaultTokenServices"> <property name="tokenStore" ref="tokenStore" /> <property name="supportRefreshToken" value="true" /> <property name="accessTokenValiditySeconds" value="120" /> <property name="clientDetailsService" ref="clientDetails" /></bean> <bean id="tokenStore" class="org.springframework.security.oauth2.provider.token.InMemoryTokenStore" /> <bean id="userApprovalHandler" class="org.springframework.security.oauth2.provider.approval.TokenServicesUserApprovalHandler"> <property name="tokenServices" ref="tokenServices" /></bean> |
При указании клиентов обратите внимание на указанный нами тип предоставления — пароль .
|
1
2
3
4
5
|
<oauth:client-details-service id="clientDetails"> <oauth:client client-id="fbApp" authorized-grant-types="password,refresh_token" secret="fbApp" authorities="ROLE_APP" resource-ids="adminProfile" /></oauth:client-details-service> |
После того, как токен доступа был выдан, мы можем получить доступ к защищенным ресурсам на сервере, передавая его вместе с каждым запросом. Давайте наконец посмотрим на Spring Controller, который мы написали —
EmployeeController.java
|
01
02
03
04
05
06
07
08
09
10
11
12
13
14
15
16
17
18
19
20
21
22
23
24
|
package com.jcombat.controller; import org.springframework.web.bind.annotation.PathVariable;import org.springframework.web.bind.annotation.RequestMapping;import org.springframework.web.bind.annotation.RequestMethod;import org.springframework.web.bind.annotation.RequestParam;import org.springframework.web.bind.annotation.RestController; import com.jcombat.bean.Employee; @RestController@RequestMapping(value = "/api/Employee")public class EmployeeController { @RequestMapping(value = "/{name}", method = RequestMethod.GET) public Employee process( @PathVariable("name") String name, @RequestParam(value = "empId", required = false, defaultValue = "00000") final String id) { Employee employee = new Employee(); employee.setEmpId(id); employee.setName(name); return employee; }}; |
4. Запуск приложения
Чтобы запустить приложение, начнем с запроса токена доступа с сервера авторизации —
HTTP: // локальный: 8080 / SecureRESTWithOAuth / OAuth / маркер? grant_type = пароль & client_id = fbApp & client_secret = fbApp & username = admin & password = 123
|
01
02
03
04
05
06
07
08
09
10
11
12
13
14
15
16
17
|
{ "value":"a7718567-6e38-4be3-aa41-382c90e042e0", "expiration":1505631027817, "tokenType":"bearer", "refreshToken":{ "value":"7792b077-7ae0-427e-8170-8b1440e5fefd", "expiration":1508222907814 }, "scope":[ ], "additionalInformation":{ }, "expiresIn":109, "expired":false} |
После того как токен доступа сгенерирован, мы готовы передать его вместе с каждым последующим запросом защищенных ресурсов на сервере.
HTTP: // локальный: 8080 / SecureRESTWithOAuth / API / Employee / Abhimanyu? access_token = 7792b077-7ae0-427e-8170-8b1440e5fefd

5. Загрузите код
| См. Оригинальную статью здесь: Безопасный REST-сервис с токенами OAuth2
Мнения, высказанные участниками Java Code Geeks, являются их собственными. |