В предыдущем сообщении в блоге мы говорили об использовании Ansible для установки NGINX или NGINX Plus. Что касается многих других типов программного обеспечения, существует множество альтернатив, когда речь идет о программном обеспечении для управления конфигурацией. Наряду с Ansible одним из самых популярных является Chef . Оба инструмента имеют своих поклонников, и есть много статей, которые сравнивают их. Здесь мы сосредоточимся на том, как использовать Chef для установки и настройки NGINX и NGINX Plus.
Opscode, компания, стоящая за Chef, предоставляет обширную коллекцию поваренных книг, которые легко установить на ваш сервер Chef с помощью одной команды. В базовой комплектации базовая поваренная книга для NGINX является очень мощным инструментом для установки и настройки NGINX. Однако для новых пользователей Chef это может быть довольно сложно, поэтому в этом посте мы расскажем, как использовать его для установки пакета NGINX Plus и настройки базовой конфигурации. (Вы также можете использовать эту кулинарную книгу для установки NGINX через исходный код — со сторонними модулями или без них — но мы не будем освещать этот процесс в этом посте.)
В этом посте предполагается, что у вас есть базовые знания о Chef, его файлах конфигурации (рецепты, среды, роли и т. Д.) И связанных с ним инструментах, в основном knife. Если вам нужно просмотреть, ознакомьтесь с руководствами и документацией по адресу learn.chef.io .
Подготовка вашего шеф-повара
Чтобы быстро и легко запустить тестовую среду, мы работаем в среде Chef Zero. Chef Zero — это простой, простой в установке сервер Chef в оперативной памяти, который полезен для тестирования chef-client(аналогичных chef-solo) задач, а также задач, для которых требуется полный сервер Chef. Полные инструкции по установке см. На домашней странице Chef Zero на GitHub.
Вот процесс установки chef-zeroна базовую установку Ubuntu 14.04 и получения всего на месте:
- Используйте
aptдля установки необходимых пакетов:~$ sudo apt-get install ruby-dev make git [sudo] password for username: Reading package lists... Done Building dependency tree Reading state information... Done ...Need to get 52.6 MB of archives.
After this operation, 188 MB of additional disk space will be used.
Do you want to continue? [Y/n] y
Get:1 http://us.archive.ubuntu.com/ubuntu/ trusty-updates/main libasan0 amd64 4.8.4-2ubuntu1~14.04 [63.0 kB]
…
Setting up ruby1.9.1 (1.9.3.484-2ubuntu1.2) …
Processing triggers for libc-bin (2.19-0ubuntu6.6) … - Используйте
gemдля установкиchef-zero:~$ sudo gem install chef-zero Fetching: mixlib-log-1.6.0.gem (100%) Fetching: hashie-3.4.2.gem (100%) ... Successfully installed chef-zero-4.3.2 7 gems installed - Загрузите и установите пакет Chef. Мы извлекаем пакет непосредственно с серверов Opscode, а не используем его
apt, потому что дистрибутивы Ubuntu имеют довольно устаревшую версию пакета Chef. (Пакет Chef в примере может быть даже немного устаревшим; чтобы убедиться, что вы получаете последнюю версию, посетите веб-сайт Chef .) Загрузите пакет:~$ wget https://opscode-omnibus-packages.s3.amazonaws.com/ubuntu/10.04/x86_64/chef_12.4.3-1_amd64.deb ‑‑2015-10-19 11:33:44‑‑ https://opscode-omnibus-packages.s3.amazonaws.com/ubuntu/10.04/x86_64/chef_12.4.3-1_amd64.deb Resolving opscode-omnibus-packages.s3.amazonaws.com (opscode-omnibus-packages.s3.amazonaws.com)... 54.231.2.233 Connecting to opscode-omnibus-packages.s3.amazonaws.com (opscode-omnibus-packages.s3.amazonaws.com)|54.231.2.233|:443... connected. HTTP request sent, awaiting response... 200 OK Length: 38821266 (37M) [application/x-www-form-urlencoded] Saving to: 'chef_12.4.3-1_amd64.deb'100%[==========================================================================
===============================================================================
===============>] 38,821,266 9.96MB/s in 4.6s2015-10-19 11:33:50 (8.03 MB/s) — ‘chef_12.4.3-1_amd64.deb’ saved [38821266/38821266]
Установите пакет:
~$ sudo dpkg -i chef_12.4.3-1_amd64.deb Selecting previously unselected package chef. (Reading database ... 64482 files and directories currently installed.) Preparing to unpack chef_12.4.3-1_amd64.deb ... Unpacking chef (12.4.3-1) ... Setting up chef (12.4.3-1) ... Thank you for installing Chef! - Установите две глобальные переменные GitHub, чтобы вы могли клонировать репозитории. Значения не обязательно должны соответствовать существующему пользователю GitHub, поскольку мы клонируем только публичные репозитории, и здесь я использую свое имя и адрес электронной почты. Если вы планируете клонировать какие-либо частные репозитории или делать какие-либо изменения, укажите значения, соответствующие вашей учетной записи GitHub.
~$ git config ‑‑global user.name "Damian Curry" ~$ git config ‑‑global user.email "damian.curry@nginx.com" - Клонируйте
chef-zeroрепо. Репозиторий содержит необходимые файлы конфигурации, чтобы быстро двигаться, хотя мы использовали егоgemдля установки. Он также содержит некоторые кулинарные книги, определения узлов и определения среды, которые мы не будем использовать, но они являются хорошим примером, если вы новичок в Chef.~$ git clone https://github.com/chef/chef-zero.git Cloning into 'chef-zero'... remote: Counting objects: 3115, done. remote: Total 3115 (delta 0), reused 0 (delta 0), pack-reused 3115 Receiving objects: 100% (3115/3115), 548.87 KiB | 0 bytes/s, done. Resolving deltas: 100% (1727/1727), done. Checking connectivity... done. - Запустите
chef-zeroпроцесс, с которым мы будем работать. По умолчанию Chef Zero прослушивает порт 8889, ноknifeфайл конфигурации, связанный сchef-zeroрепо, по умолчанию использует порт 4000. Чтобы сохранить минимальные изменения в файле, мы сообщаемchef-zeroэкземпляру прослушивать порт 4000 Мы также добавили-dфлаг, чтобы Chef Zero работал как демон. Если у вас возникнут какие-либо проблемы, вы можете попробовать запустить процесс на переднем плане для устранения неполадок.~$ sudo chef-zero -p 4000 -d
Загрузка и настройка поваренной книги NGINX
Теперь мы устанавливаем и настраиваем кулинарную книгу NGINX на нашем сервере Chef.
- Измените каталог на каталог детской площадки внутри репозитория, который мы клонировали как ~ / chef-zero в предыдущем разделе. Это позволяет
knifeкомандам найти конфигурационный файл knife.rb , который находится в подкаталоге ~ / chef-zero / plays / /chef .~$ cd chef-zero/playground/ - Загрузите поваренную книгу и ее требования к вашей локальной системе. (Термин
installв командной строке вводит в заблуждение, потому что команда фактически не устанавливает NGINX или что-либо еще; вместо этого она просто загружает файлы.)~/chef-zero/playground$ knife cookbook site install nginx Installing nginx to /home/username/chef-zero/playground/cookbooks Checking out the master branch. Creating pristine copy branch chef-vendor-nginx Downloading nginx from the cookbooks site at version 2.7.6 to /home/username/chef-zero/playground/cookbooks/nginx.tar.gz ... Cookbook yum version 3.8.1 successfully installed - По какой-то причине
knifecookbookкоманда, которую мы выполняли на предыдущем шаге, загружает версии поваренной книги, для которых несовместимыrsyslog. Если мы не исправим это, несовместимость вызовет следующую ошибку позже, когда мы загрузим поваренные книги на шаге 4:# DO NOT RUN NOW: example to show error ~/chef-zero/playground/cookbooks$ knife cookbook upload * Uploading apache2 [1.0.0] Uploading apt [2.9.2] Uploading bluepill [2.4.1] ERROR: Cookbook bluepill depends on cookbooks which are not currently ERROR: being uploaded and cannot be found on the server. ERROR: The missing cookbook(s) are: 'rsyslog' version '~> 2.0'Чтобы избежать ошибки, выполните эту команду, чтобы получить более раннюю версию
rsyslogповаренной книги:~/chef-zero/playground$ cd cookbooks ~/chef-zero/playground/cookbooks$ knife cookbook site install rsyslog 2.0.0 Installing rsyslog to /home/username/chef-zero/playground/cookbooks Checking out the master branch. Pristine copy branch (chef-vendor-rsyslog) exists, switching to it. ... Cookbook rsyslog version 2.0.0 successfully installed - Создайте новый файл рецепта для установки NGINX Plus на основе существующего рецепта в кулинарной книге NGINX для установки программного обеспечения NGINX с открытым исходным кодом из готового двоичного файла package.rb . После того, как мы внесем несколько изменений в кулинарную книгу NGINX, мы загрузим ее на сервер Chef. Новый рецепт, plus_package.rb , создает все необходимые сертификаты и
aptрепозитории, необходимые для доступа к пакету NGINX Plus. Создайте файл plus_package.rb в каталоге ~ / chef-zero / playground / cookbooks / nginx / recipes с этим содержимым :# # Cookbook Name:: nginx # Recipe:: plus_package # Author:: Damian Curry <damian.curry@nginx.com> # # Copyright 2008-2013, Chef Software, Inc. # # Licensed under the Apache License, Version 2.0 (the "License"); # you may not use this file except in compliance with the License. # You may obtain a copy of the License at # # http://www.apache.org/licenses/LICENSE-2.0 # # Unless required by applicable law or agreed to in writing, software # distributed under the License is distributed on an "AS IS" BASIS, # WITHOUT WARRANTIES OR CONDITIONS OF ANY KIND, either express or implied. # See the License for the specific language governing permissions and # limitations under the License. #include_recipe ‘nginx::ohai_plugin’
directory ‘/etc/ssl/nginx’ do
owner ‘root’
group ‘root’
mode ‘0755’
action :create
endfile ‘/etc/ssl/nginx/nginx-repo.key’ do
owner ‘root’
group ‘root’
mode ‘0644’
content node.attribute[‘nginx’][‘nginx_repo_key’]
endfile ‘/etc/ssl/nginx/nginx-repo.crt’ do
owner ‘root’
group ‘root’
mode ‘0644’
content node.attribute[‘nginx’][‘nginx_repo_crt’]
endremote_file ‘/etc/ssl/nginx/CA.crt’ do
source ‘https://cs.nginx.com/static/files/CA.crt’
owner ‘root’
group ‘root’
mode ‘0644’
endremote_file ‘/etc/apt/apt.conf.d/90nginx’ do
source ‘https://cs.nginx.com/static/files/90nginx’
owner ‘root’
group ‘root’
mode ‘0644’
end#this is currently set up only for ubuntu; rhel to follow
if platform_family?(‘debian’)
include_recipe ‘apt::default’apt_repository ‘nginx_plus’ do
uri ‘https://plus-pkgs.nginx.com/ubuntu’
distribution node[‘lsb’][‘codename’]
components %w(nginx-plus)
deb_src false
key ‘http://nginx.org/keys/nginx_signing.key’
end
endpackage node[‘nginx’][‘package_name’] do
notifies :reload, ‘ohai[reload_nginx]’, :immediately
not_if ‘which nginx’
enddirectory node[‘nginx’][‘dir’] do
owner ‘root’
group node[‘root_group’]
mode ‘0755’
recursive true
enddirectory node[‘nginx’][‘log_dir’] do
mode node[‘nginx’][‘log_dir_perm’]
owner node[‘nginx’][‘user’]
action :create
recursive true
enddirectory File.dirname(node[‘nginx’][‘pid’]) do
owner ‘root’
group node[‘root_group’]
mode ‘0755’
recursive true
enddirectory «#{node[‘nginx’][‘dir’]}/conf.d» do
owner ‘root’
group node[‘root_group’]
mode ‘0755’
endservice ‘nginx’ do
supports :status => true, :restart => true, :reload => true
action :enable
endinclude_recipe ‘nginx::commons_script’
template ‘nginx.conf’ do
path «#{node[‘nginx’][‘dir’]}/nginx.conf»
source node[‘nginx’][‘conf_template’]
cookbook node[‘nginx’][‘conf_cookbook’]
owner ‘root’
group node[‘root_group’]
mode ‘0644’
notifies :reload, ‘service[nginx]’, :delayed
endif node[‘nginx’][‘default_site_enabled’] == ‘true’
template «#{node[‘nginx’][‘dir’]}/conf.d/default.conf» do
source ‘default-site.erb’
owner ‘root’
group node[‘root_group’]
mode ‘0644’
notifies :reload, ‘service[nginx]’, :delayed
end
else
file «#{node[‘nginx’][‘dir’]}/conf.d/default.conf» do
action :delete
end
endif node[‘nginx’][‘plus_status_enable’] == ‘true’
template ‘nginx_plus_status’ do
path «#{node[‘nginx’][‘dir’]}/conf.d/nginx_plus_status.conf»
source ‘nginx_plus_status.erb’
owner ‘root’
group node[‘root_group’]
mode ‘0644’
notifies :reload, ‘service[nginx]’, :delayed
end
end - Создайте файл шаблона nginx_plus_status.erb , на который ссылается последний раздел рецепта plus_package.rb . Поместите его в каталог ~ / chef-zero / Playground / Cookbooks / nginx / templates / default с таким содержимым:
upstream example { zone example 64k; server [::1]:8080; } server { listen <%= node['nginx']['plus_status_port'] -%>; status_zone status-page; access_log <%= node['nginx']['log_dir'] %>/status.access.log; location = /status.html { root /usr/share/nginx/html; } location = / { return 301 /status.html; } location /status { status; status_format json; access_log off; } location /upstream_conf { upstream_conf; } } - Создайте роль для использования при установке NGINX Plus. Роли в Chef состоят из четырех основных списков:
attributes to one or both of thedefault_attributesandoverride_attributeslists on each individual node.Create the nginx_plus.rb role definition file with these contents and place it in the ~/chef-zero/playground/roles directory:
name "nginx_plus" description "An example role to install NGINX Plus" run_list "recipe[nginx]" default_attributes "nginx" => { "install_method" => "plus_package", "package_name" => "nginx-plus", "init_style" => "init", "default_site_enabled" => "true", "nginx_repo_key" => "‑‑‑‑‑BEGIN PRIVATE KEY‑‑‑‑‑\nMIIEvQIBADANBgkqhkiG9w0BAQEFAASCBKcwggSjAgEAAoIBAQCbYwum24BwEY8Y\nnqc0 ... +BCnoMSzbvLWhZbpSrdmD9nOj1KkPcW\n4ArSv6prlYItUwWbNtFLw/E=\n‑‑‑‑‑END PRIVATE KEY‑‑‑‑‑", "nginx_repo_crt" => "‑‑‑‑‑BEGIN CERTIFICATE‑‑‑‑‑\nMIIDrDCCApSgAwIBAgICBs8wDQYJKoZIhvcNAQEFBQAwXjELMAkGA1UEBhGTg ... X2X\nbovinLlYPfdi7BhlXTI9u78+tqbo0YVsSBiDV49hcIA=\n‑‑‑‑‑END CERTIFICATE‑‑‑‑‑" }You will notice that I have added the contents of the nginx-repo.key and nginx-repo.crt files as the values of the
nginx_repo_keyandnginx_repo_crtattributes. If you use the example as the basis for your nginx_plus.rb file, replace the values in the example with the key and certificate for your NGINX Plus subscription or trial. I prefer recording the key and certificate in attributes this way instead of recording them in files inside of the cookbook, because it makes things more portable, but you can use either method.It is also possible to define the
run_listanddefault_attributesfor an individual host or an environment, inside either the node or environment definition, but I prefer to define them in a role. Then you can apply the role to any node where you want to install NGINX Plus, followed by another recipe that configures NGINX Plus for the specific function the node is to perform.Notes:
- You must define the
init_styleattribute asinit, because its default value ofrunitdoes not work with NGINX Plus. - When you copy in the key and certificate from your Subscriptions page at the NGINX Plus customer portal, each one is a block of about 20 lines of text with a hard linebreak at the end of each line. For Chef to parse the key and certificate properly, you must convert each one to a single line by replacing every hard linebreak with the linebreak character,
\n(backslash-n). For brevity, the example shows the converted form of only the first and last couple lines from the original blocks.
- You must define the
Bootstrapping and Preparing the Node for NGINX Plus Installation
Next we need to make sure that our node has the correct role in its run list. You can set up the run list when bootstrapping the node or after. To keep the process as simple as possible and thus avoid errors, I prefer to set up the run list after the node has been bootstrapped. Also, I always like to have a local copy of the node definitions so I can modify them on disk and then push the changes to Chef, which lets me keep track of changes using Git.
Run thisknifebootstrapcommand to associate the node with the Chef environment without actually executing any run lists against it. Once the node has been associated with Chef, we will define its run list.In this example I am using the-Nflag to set the name of the node to chef-test. You can set any name you like; if you omit the-Nflag, the name defaults to the IP address or FQDN provided as the last parameter to the command (127.0.0.1 in this example).~/chef-zero/playground/cookbooks$ cd .. ~/chef-zero/playground$ knife bootstrap -N chef-test -x username ‑‑sudo 127.0.0.1 Creating new client for chef-test Creating new node for chef-test Connecting to 127.0.0.1 username@127.0.0.1's password: 127.0.0.1 knife sudo password: Enter your password: 127.0.0.1 127.0.0.1 ‑‑‑‑‑> Existing Chef installation detected ... 127.0.0.1 Chef Client finished, 0/0 resources updated in 1.122875381 secondsCreate a local copy of the node’s definition.~/chef-zero/playground$ knife node show chef-test ‑‑format json > nodes/chef-test.jsonEdit the local node definition, adding thenginx_plusrole to its run list. Here is the definition after you have modified it:{ "name": "chef-test", "chef_environment": "_default", "run_list": [ "role[nginx_plus]" ] ´ "normal": { "tags": []
}
}With all of the required files in place, push them to the Chef server:~/chef-zero/playground$ knife role from file roles/nginx_plus.rb Updated Role nginx_plus!~/chef-zero/playground$ knife node from file nodes/chef-test.json
Updated Node chef-test!~/chef-zero/playground$ cd cookbooks
~/chef-zero/playground/cookbooks$ knife cookbook upload *
Uploading apache2 [1.0.0]
Uploading apt [2.8.2]
…
Uploaded 12 cookbooks.Run thechef-clientin the foreground so you can make sure everything works. The first time the cookbook runs, it can take a while as it needs to run anapt-getupdateoperation:~/chef-zero/playground/cookbooks$ sudo chef-client Starting Chef Client, version 12.4.3 resolving cookbooks for run list: ["nginx"] Synchronizing Cookbooks: - nginx - apt ... Compiling Cookbooks... Recipe: ohai::default ... Recipe: nginx::plus_package…
Running handlers:
Running handlers complete
Chef Client finished, 34/41 resources updated in 81.395229372 seconds
At this point NGINX Plus is installed with a very basic configuration, without any server blocks defined in the http block. This is not the default NGINX Plus configuration, but rather the default configuration from the official Chef NGINX cookbook. Here are the contents of the /etc/nginx/nginx.conf file:
user www-data;
worker_processes 1;error_log /var/log/nginx/error.log;
pid /run/nginx.pid;
events {
worker_connections 1024;
}
http {
include /etc/nginx/mime.types;
default_type application/octet-stream;
access_log /var/log/nginx/access.log;
sendfile on;
tcp_nopush on;
tcp_nodelay on;
keepalive_requests 100;
keepalive_timeout 65;
gzip on;
gzip_http_version 1.0;
gzip_comp_level 2;
gzip_proxied any;
gzip_vary off;
gzip_types text/plain text/css application/x-javascript text/xml
application/xml application/rss+xml
application/atom+xml text/javascript
application/javascript application/json text/mathml;
gzip_min_length 1000;
gzip_disable «MSIE [1-6]\.»;
variables_hash_max_size 1024;
variables_hash_bucket_size 64;
server_names_hash_bucket_size 64;
types_hash_max_size 2048;
types_hash_bucket_size 64;
include /etc/nginx/conf.d/*.conf;
include /etc/nginx/sites-enabled/*;
}
Because the basic default site has no virtual servers (server configuration blocks) defined, when you access it you see the NGINX welcome page:
Modifying the Default Options for the NGINX Cookbook
Now, let’s change some of the config variables by defining more attributes in the configuration file for the NGINX Plus role (~/chef-zero/playgrounds/roles/nginx_plus.rb). To match the default configuration in NGINX Plus packages, we are disabling the default site, setting the worker_processes directive to auto, changing the username from www-data to nginx, and turning off the gzip module. We’re also enabling the NGINX Plus live activity monitoring (status) dashboard and API and setting them to listen on port 8080.
Here is what the modified role looks like, with the changes highlighted in bold:
name "nginx_plus"
description "An example role to install NGINX Plus"
run_list "recipe[nginx]"
default_attributes "nginx" => { "install_method" => "plus_package",
"package_name" => "nginx-plus",
"init_style" => "init",
"default_site_enabled" => "false",
"worker_processes" => "auto",
"user" => "nginx",
"gzip" => "off",
"plus_status_enable" => "true",
"plus_status_port" => "8080",
"nginx_repo_key" => "‑‑‑‑‑BEGIN PRIVATE KEY‑‑‑‑‑\nMIIEvQIBADANBgkqhkiG9w0BAQEFAASCBKcwggSjAgEAAoIBAQCbYwum24BwEY8Y\nnqc0 ... +BCnoMSzbvLWhZbpSrdmD9nOj1KkPcW\n4ArSv6prlYItUwWbNtFLw/E=\n‑‑‑‑‑END PRIVATE KEY‑‑‑‑‑",
"nginx_repo_crt" => "‑‑‑‑‑BEGIN CERTIFICATE‑‑‑‑‑\nMIIDrDCCApSgAwIBAgICBs8wDQYJKoZIhvcNAQEFBQAwXjELMAkGA1UEBhGTg ... X2X\nbovinLlYPfdi7BhlXTI9u78+tqbo0YVsSBiDV49hcIA=\n‑‑‑‑‑END CERTIFICATE‑‑‑‑‑" }There are many other NGINX configuration options that you can define as attributes in the same way. We aren’t covering them here, but they are all documented in the README.md that is bundled with the cookbook. Keep in mind that the different attributes were designed for the open source NGINX software, so not all of them apply to NGINX Plus.
Now we go ahead and upload the modified role and rerun Chef to see the changes. To avoid errors, we need to manually stop NGINX Plus before running the chef-client command.
~/chef-zero/playground$ knife role from file roles/nginx_plus.rb
Updated Role nginx_plus!
~/chef-zero/playground$ sudo service nginx stop
~/chef-zero/playground$ ps axu | grep nginx
username 10493 0.0 0.2 11748 2144 pts/0 S+ 17:24 0:00 grep —color=auto nginx
~/chef-zero/playground$ sudo chef-client
Starting Chef Client, version 12.4.3
resolving cookbooks for run list: [«nginx»]
Synchronizing Cookbooks:
— apt
—
…
Compiling Cookbooks…
…
Recipe: nginx::commons_conf
* template[nginx.conf] action create
…
Running handlers:
Running handlers complete
Chef Client finished, 5/30 resources updated in 3.877185478 seconds
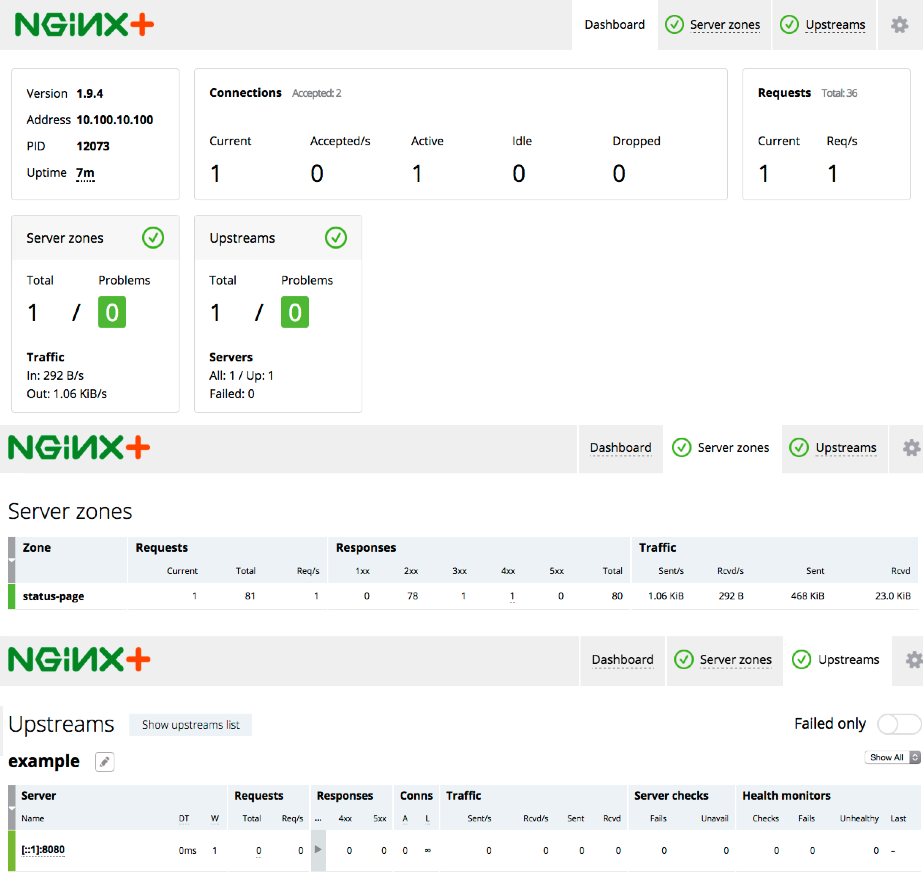
At this point you can display the NGINX Plus dashboard by pointing a browser at port 8080 on your NGINX Plus server’s IP address. There’s not much information on the dashboard’s main, Server zones or Upstreams tabs, because there are no running backend servers for it to monitor (the current entries are for the live activity monitoring module itself). So in the next section we’ll define a configuration of backend servers that takes advantage of some NGINX Plus features.
Creating a Cookbook for a DockerUI Deployment
The base NGINX cookbook does not include variables for creating a server configuration block, so we need to create a basic recipe to create the site configuration file for NGINX Plus. As an example, I am going to configure NGINX Plus as a frontend for DockerUI, adding SSL, basic htpasswd authentication, and a custom log format that makes it easy to track which users are accessing DockerUI.
- The demo-deploy cookbook that we are creating depends on a couple of other cookbooks, which we need to download:
- htpasswd – Creates and manages htaccess files. This is not an official Chef cookbook, but it is a good option. It depends on the Python cookbook, so we need to install that as well.
- selfsigned_certificate – Creates and manages self-signed certs.
Run these five commands to download the required files and verify they are in place:
$ cd ~/chef-zero/playground/cookbooks~/chef-zero/playground/cookbooks$ git clone https://github.com/redguide/htpasswd.git
Cloning into ‘htpasswd’…
remote: Counting objects: 234, done.
remote: Total 234 (delta 0), reused 0 (delta 0), pack-reused 234
Receiving objects: 100% (234/234), 32.88 KiB | 0 bytes/s, done.
Resolving deltas: 100% (96/96), done.
Checking connectivity… done.~/chef-zero/playground/cookbooks$ knife cookbook site install python
Installing python to /home/username/chef-zero/playground/cookbooks
Checking out the master branch.
Creating pristine copy branch chef-vendor-python…
Uploaded 15 cookbooks.~/chef-zero/playground/cookbooks$ git clone https://github.com/cgravier/selfsigned_certificate.git
Cloning into ‘selfsigned_certificate’…
remote: Counting objects: 169, done.
remote: Total 169 (delta 0), reused 0 (delta 0), pack-reused 169
Receiving objects: 100% (169/169), 105.59 KiB | 0 bytes/s, done.
Resolving deltas: 100% (59/59), done.
Checking connectivity… done.~/chef-zero/playground/cookbooks$ ls
apache2 apt bluepill build-essential htpasswd nginx ohai packagecloud php python rsyslog runit selfsigned_certificate yum yum-epel - Create the directory structure that Chef expects, as the first step in creating the new demo-deploy cookbook. This is a very basic cookbook at this time, so we only need to create directories for templates and recipes:
~/chef-zero/playground/cookbooks$ mkdir -p demo-deploy/templates/default~/chef-zero/playground/cookbooks$ mkdir -p demo-deploy/recipes
- Create three files that the demo-deploy cookbook needs:
- metadata.rb – Defines the details of the cookbook
- dockerui.rb – Controls the deployment
- dockerui.conf.erb – Provides a template for the actual NGINX configuration file
We also create an empty file called default.rb just because Chef expects to find a file with that name.Here are the contents of ~/chef-zero/playground/cookbooks/demo-deploy/metadata.rb:
name              'demo-deploy'
maintainer_email  'damian.curry@nginx.com'
license           'Apache 2.0'
description       'Deploys NGINX Plus demos'
version           '0.0.1'
recipe ‘demo-deploy::dockerui’, ‘Installs dockerui demo’
depends ‘selfsigned_certificate’, ‘~> 0.1.3’
depends ‘htpasswd’, ‘~> 0.2.5’Here are the contents of ~/chef-zero/playground/cookbooks/demo-deploy/recipes/dockerui.rb. Notice that in the third stanza we are using the htpasswd cookbook to add a user named dockerui with the password dockerui in the file /etc/nginx/htpassword. In a real world deployment, you would store the password in an encrypted data bag instead of as plain text.
#
# Cookbook Name:: demo-deploy
# Recipe:: dockerui
# Author:: Damian Curry <damian.curry@nginx.com>
#
# Copyright 2008-2013, Chef Software, Inc.
#
# Licensed under the Apache License, Version 2.0 (the "License");
# you may not use this file except in compliance with the License.
# You may obtain a copy of the License at
#
#     http://www.apache.org/licenses/LICENSE-2.0
#
# Unless required by applicable law or agreed to in writing, software
# distributed under the License is distributed on an "AS IS" BASIS,
# WITHOUT WARRANTIES OR CONDITIONS OF ANY KIND, either express or implied.
# See the License for the specific language governing permissions and
# limitations under the License.
#
node.default[‘htpasswd’][‘built-in’][‘lang’] = [‘ruby’]
include_recipe ‘htpasswd’
include_recipe ‘nginx’
include_recipe ‘selfsigned_certificate’htpasswd ‘/etc/nginx/htpassword’ do
user ‘dockerui’
password ‘dockerui’
endtemplate ‘/etc/nginx/conf.d/dockerui.conf’ do
source ‘dockerui.conf.erb’
owner ‘root’
group ‘root’
mode ‘0644’
notifies :reload, ‘service[nginx]’, :delayed
endbash ‘install docker.io’ do
user ‘root’
cwd ‘/root/’
code ‘curl -sSL https://get.docker.com/ | sh’
not_if ‘which docker’
endbash ‘start docker container’ do
user ‘root’
cwd ‘/root/’
code ‘docker run -d -p 8970:9000 ‑‑privileged -v /var/run/docker.sock:/var/run/docker.sock dockerui/dockerui’
not_if ‘ps -ef | grep docker-proxy | grep -v grep’
endHere are the contents of ~/chef-zero/playground/cookbooks/demo-deploy/templates/default/dockerui.conf.erb:
log_format main "$status $ssl_client_verify/$remote_user@$remote_addr $request / $bytes_sent bytes  ->$upstream_addr";
    upstream dockerui {
        zone dockerui 64k;
        server <%= node['ipaddress'] %>:8970;
    }
    server {
        listen 80;
        return 301 https://$http_host;
    }
    server {
        listen 443 ssl;
        ssl_certificate /usr/var/ssl/certs/server.crt;
        ssl_certificate_key /usr/var/ssl/certs/server.key;
        access_log  /var/log/nginx/access.log main;
location / {
auth_basic on;
auth_basic_user_file /etc/nginx/htpassword;
proxy_pass http://dockerui;health_check match=dockerui;
proxy_set_header Host $host;
proxy_buffering off;
proxy_http_version 1.1;
proxy_set_header Upgrade $http_upgrade;
proxy_set_header Connection «upgrade»;
}
}match dockerui {
status 200;
body ~ «dockerui»;
} - Upload the cookbooks to Chef.
~/chef-zero/playground/cookbooks$ knife cookbook upload * Uploading apache2 [1.0.0] Uploading apt [2.8.2] ... Uploading yum-epel [0.6.3] Uploaded 16 cookbooks. - Modify the NGINX Plus role definition file (~/chef-zero/playground/roles/nginx_plus.rb) so that the run list includes the recipe for our
DockerUIdeployment. The text to add appears in bold:name "nginx_plus" description "An example role to install NGINX Plus" run_list "recipe[nginx]","recipe[demo-deploy::dockerui]" default_attributes "nginx" => { "install_method" => "plus_package", "package_name" => "nginx-plus", "init_style" => "init", "default_site_enabled" => "false", "worker_processes" => "auto", "user" => "nginx", "gzip" => "off", "plus_status_enable" => "true", "plus_status_port" => "8080", "nginx_repo_key" => "‑‑‑‑‑BEGIN PRIVATE KEY‑‑‑‑‑\nMIIEvQIBADANBgkqhkiG9w0BAQEFAASCBKcwggSjAgEAAoIBAQCbYwum24BwEY8Y\nnqc0 ... +BCnoMSzbvLWhZbpSrdmD9nOj1KkPcW\n4ArSv6prlYItUwWbNtFLw/E=\n‑‑‑‑‑END PRIVATE KEY‑‑‑‑‑", "nginx_repo_crt" => "‑‑‑‑‑BEGIN CERTIFICATE‑‑‑‑‑\nMIIDrDCCApSgAwIBAgICBs8wDQYJKoZIhvcNAQEFBQAwXjELMAkGA1UEBhGTg ... X2X\nbovinLlYPfdi7BhlXTI9u78+tqbo0YVsSBiDV49hcIA=\n‑‑‑‑‑END CERTIFICATE‑‑‑‑‑" } - Update the role:
~/chef/zero/playground/cookbooks$ cd ../~/chef-zero/playground$ knife role from file roles/nginx_plus.rb
Updated Role nginx_plus! - Apply the updated role to our node:
~/chef-zero/playground$ sudo chef-client
Starting Chef Client, version 12.4.3
resolving cookbooks for run list: ["nginx", "demo-deploy::dockerui"]
Synchronizing Cookbooks:
  - demo-deploy
  - bluepill
  - apt
  - nginx
  - build-essential
  - packagecloud
  - runit
  - yum-epel
  - ohai
  - rsyslog
  - selfsigned_certificate
  - htpasswd
  - yum
  - python
Compiling Cookbooks...
...
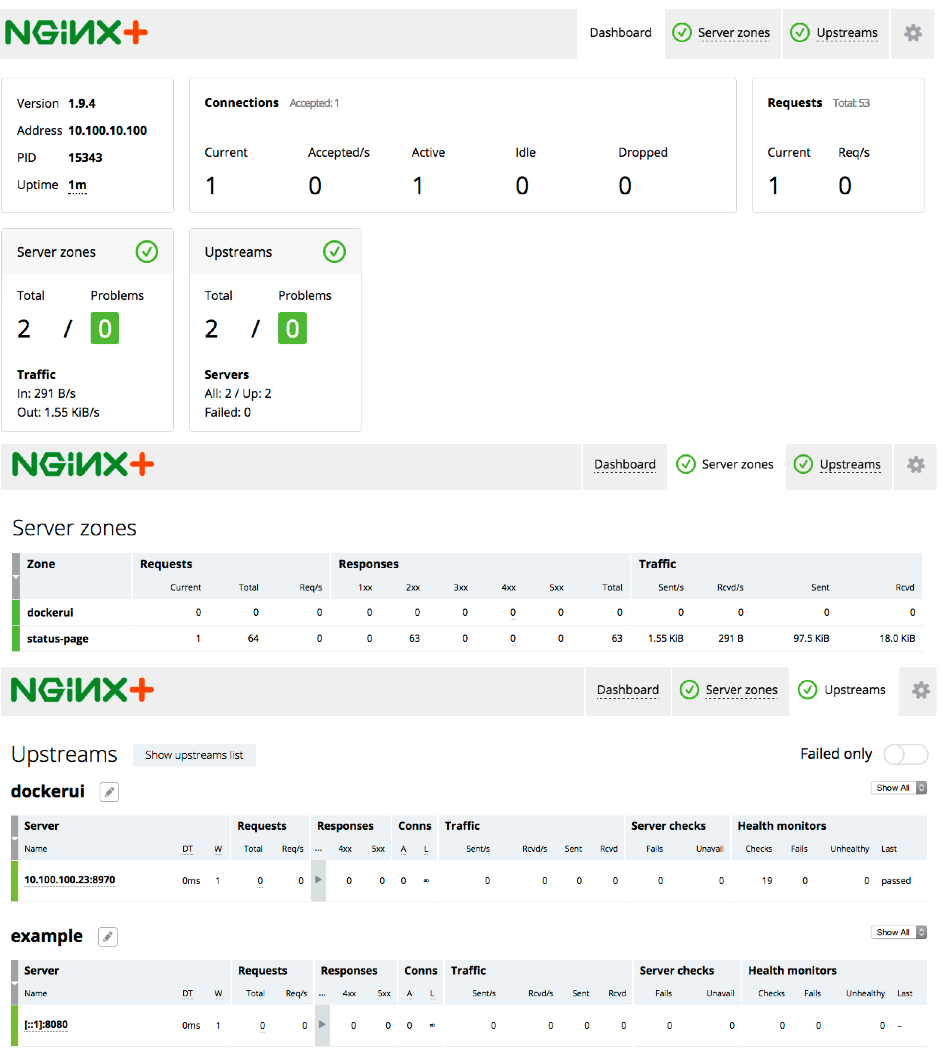
Now that DockerUI is running and the NGINX Plus configurations are in place, when we refresh the NGINX Plus dashboard we see a server zone and upstream group for it.
If you send an HTTP request to the server’s IP address, NGINX Plus redirects it to an HTTPS URL and prompts for a username and password. When you provide the username and password defined in the dockerui.rb recipe, you are brought to the DockerUI web interface. The first line of this snippet from the access log shows the redirect:
10.100.10.1 - - [11/Dec/2015:17:31:22 -0800] "GET / HTTP/1.1" 301 184 "-" "Mozilla/5.0 (Macintosh; Intel Mac OS X 10_10_5) AppleWebKit/537.36 (KHTML, like Gecko) Chrome/47.0.2526.80 Safari/537.36"
200 NONE/dockerui@10.100.10.1 GET / HTTP/1.1 / 1711 bytes  ->10.100.100.23:8970
200 NONE/dockerui@10.100.10.1 GET /vendor.css HTTP/1.1 / 127994 bytes  ->10.100.100.23:8970
200 NONE/dockerui@10.100.10.1 GET /dockerui.css HTTP/1.1 / 1352 bytes  ->10.100.100.23:8970
200 NONE/dockerui@10.100.10.1 GET /angular.js HTTP/1.1 / 209191 bytes  ->10.100.100.23:8970
200 NONE/dockerui@10.100.10.1 GET /dockerui.js HTTP/1.1 / 96665 bytes  ->10.100.100.23:8970
200 NONE/dockerui@10.100.10.1 GET /vendor.js HTTP/1.1 / 652438 bytes  ->10.100.100.23:8970
200 NONE/dockerui@10.100.10.1 GET /dockerapi/version HTTP/1.1 / 345 bytes  ->10.100.100.23:8970
200 NONE/dockerui@10.100.10.1 GET /dockerapi/containers/json?all=1 HTTP/1.1 / 564 bytes  ->10.100.100.23:8970
200 NONE/dockerui@10.100.10.1 GET /dockerapi/images/json?all=0 HTTP/1.1 / 431 bytes  ->10.100.100.23:8970
The snippet also shows the custom format for log entries that we defined in Creating a Cookbook for a DockerUI Deployment by including this log_format directive in the dockerui.conf.erb file:
log_format main "$status $ssl_client_verify/$remote_user@$remote_addr $request / $bytes_sent bytes ->$upstream_addr";The custom format adds the second field with the $remote_user variable to report the username that made the request, making it easier to track which users are accessing the DockerUI web interface. Because we placed the log_format directive in the server block for HTTPS traffic, the format is used only for the lines in the snippet after the first one. The first line uses the default format for log entries because it records the redirect operation that happens in the server block for HTTP traffic.
Summary
We’ve barely scratched the surface of what is possible with Chef, but I hope you have a better understanding of how you can implement Chef to deploy NGINX Plus. There are many more cookbooks and modules that can handle almost any administrative function that you need.
Ready to put what you’ve learned about Chef and NGINX Plus into practice?
Start your free 30-day trial of NGINX Plus or contact us today.