Эта статья знакомит с новым отладчиком сервисов для JBoss SwitchYard и предоставляет читателю обзор возможностей SwitchYard, как показано в примере программ «быстрого запуска».
Вступление
Одной из наиболее полезных (и, кстати, также одной из самых крутых) функций JBoss SwitchYard (http://switchyard.jboss.org/) является его графический редактор процессов. Редактор позволяет создавать составные определения сервисов через графический интерфейс, вместо того, чтобы напрямую редактировать громоздкий необработанный XML. Например:
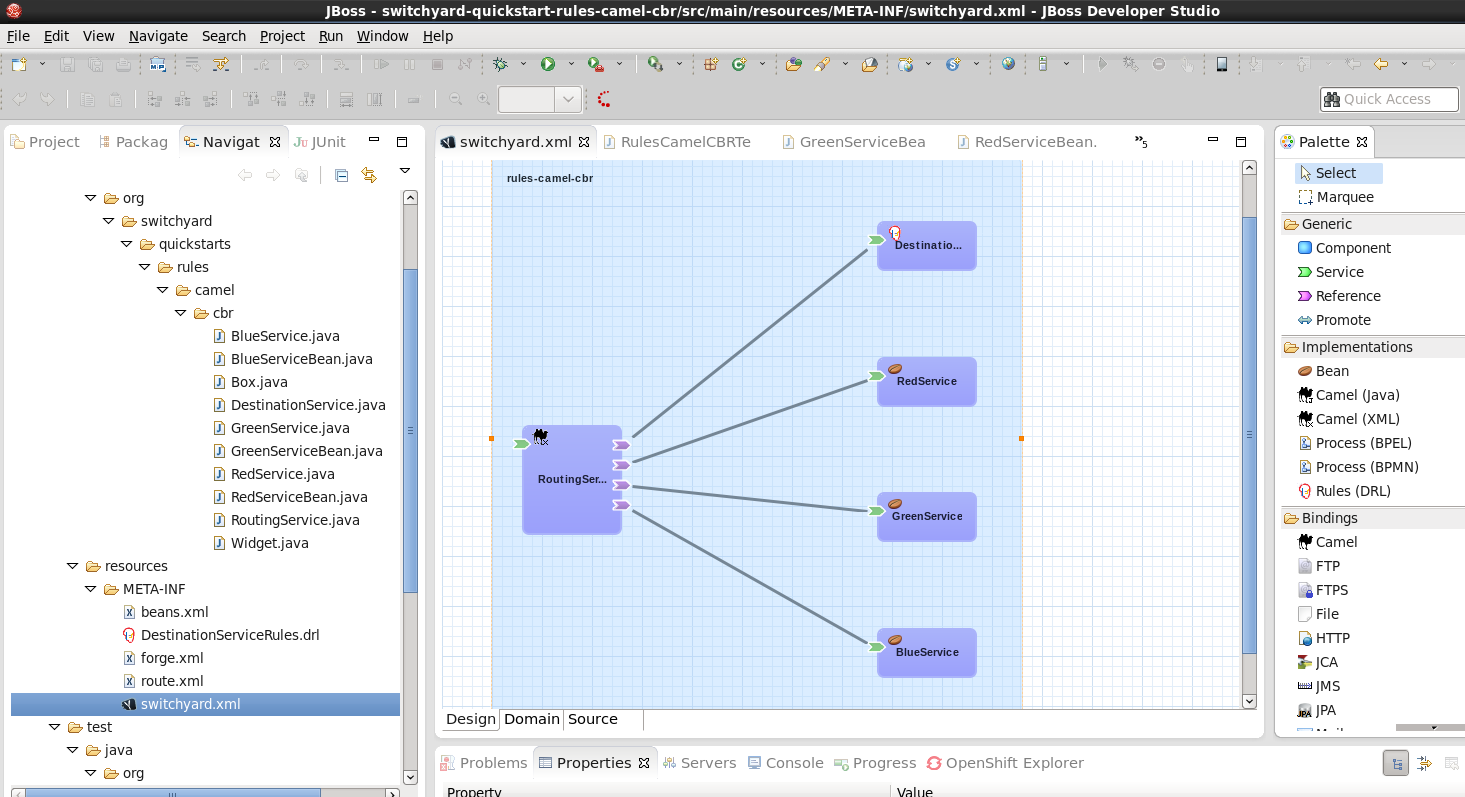
Большая синяя коробка в центре окна называется холст. Здесь вы можете увидеть графическое представление определения сервиса. С SwitchYard это все об услугах. С помощью редактора SwitchYard вы можете создавать службы, а не просто редактировать исходный код Java.
Чего всегда не хватало, так это соответствующего инструмента для отладки SwitchYard Services. Этот пробел сейчас заполняется отладчиком SwitchYard.
Отладчик SwitchYard
Отладчик, такой как GDB, дает вам возможность прерывать выполнение программы через точки останова, чтобы вы могли исследовать код и данные. Однако в SwitchYard вы не просто имеете дело с классами Java, вы создаете (и отлаживаете) сервисы. Отладчик SwitchYard позволяет вам добавить точку останова к любой службе или ссылку на службу. Отладчик поддерживает следующие действия:
-
Точки останова можно настроить так, чтобы они останавливались в различных точках цепочки выполнения, включая вход в службу или настройку транзакции (вход, разрыв, ошибка).
-
Если вы добавите точку останова в службу, она будет срабатывать для любой справочной или составной службы, вызывающей эту службу. Напротив, если вы добавите точку останова в ссылку на службу, она будет прерываться только тогда, когда эта ссылка вызывается.
-
Вы также можете установить точки останова в составном сервисе для отладки валидаторов и преобразователей (как входящих, так и исходящих). Это можно сделать, если вы хотите увидеть, что происходит с конкретным преобразователем или валидатором, который может использоваться рядом взаимодействий.
-
Если вы сконфигурируете точку останова для прерывания транзакций, она перейдет в метод SwitchYard TransactionHandler.handleMessage (). При этом создается трассировка стека, включающая сведения о SwitchYard (например, Exchange), которые видны в контекстном представлении SwitchYard, так что вы можете просматривать такие элементы, как содержимое сообщения и свойства контекста.
В отличие от отладчика Java, отладчик SwitchYard позволяет вызывать точки останова на этапах (например, преобразовании) во время выполнения службы прямо в служебной шине:
-
Точки останова на компонентных сервисах и составных ссылках (другими словами, поставщиках) будут прерываться каждый раз, когда они вызываются, независимо от того, кто их вызывает.
-
Точки останова на составных сервисах и ссылках на компоненты (другими словами, на потребителей) будут прерываться при каждом вызове.
-
Таким образом, если у вас возникли проблемы с сервисом, установка точки останова в сервисе позволит вам увидеть, что входит или выходит. Если у вас возникли проблемы с компонентом или конечной точкой, установка точки останова на потребителя позволит вам увидеть, что происходит, и куда идет.
-
Что касается местоположений в службе (например, преобразование), если у вас есть конкретная проблема, например, если вы видите, что исключения политики или транзакции работают не так, как вы ожидаете, вы можете настроить его на прерывание во время фаза политики или фаза транзакции, чтобы увидеть, что происходит (какие политики требуются, какие предоставляются).
Лучший способ понять новый отладчик — это увидеть его в действии. Мы сделаем это с помощью отладчика с примерами программ SwichYard «quickStart». Давайте начнем!
Получение SwitchYard
Прежде чем мы сможем увидеть отладчик в действии, мы должны установить среду выполнения SwitchYard и соответствующие инструменты Eclipse. К счастью, загрузка и установка программного обеспечения JBoss * выполняется быстро и безболезненно (и бесплатно!)
Шаги для установки среды выполнения SwitchYard:
-
Установите сервер WildFly 8.0. Загрузите и распакуйте этот файл: http://download.jboss.org/wildfly/8.0.0.Final/wildfly-8.0.0.Final.zip
-
Установите распределительное устройство на установленном WildFly сервер — Скачать и распаковать этот файл через установленный сервер WildFly — http://downloads.jboss.org/switchyard/releases/v2.0.Alpha2/switchyard-2.0.0.Alpha2-WildFly.zip
Шаги для установки инструментария SwitchYard Eclipse:
-
Установите Eclipse Luna — загрузите сжатый файл с http://www.eclipse.org/downloads/packages/release/Luna
-
Установите JBoss Tools версии 4.2.1 с Eclipse Marketplace
-
Установите инструмент SwitchYard с http://download.jboss.org/jbosstools/updates/development/luna/integration-stack/aggregate/4.2.0.Alpha1/
-
Создайте новое определение среды выполнения для WildFly 8.0 в Eclipse
* Мы используем последние версии программного обеспечения, доступные на момент написания этого поста.
Быстрый старт
Одной из полезных функций, включенных в проекты JBoss, являются примеры программ, называемых «быстрыми стартами». Как следует из названия, цель этих примеров — помочь пользователям быстро освоить технологии обучения, предоставляемые проектами JBoss. Как мы упоминали ранее в этом посте, подход, который мы будем использовать, состоит в том, чтобы вводить ошибки в быстрый запуск, а затем использовать отладчик для обнаружения этих ошибок.
Чтобы представить приложения SwitchYard новым пользователям, мы рассмотрим первый быстрый старт, который мы будем использовать более подробно. Если вы уже знакомы с приложениями SwitchYard, вы можете пропустить этот раздел поста.
Давайте начнем с использования отладчика для прерывания работающей службы в quickStart и предоставления нам возможности исследовать данные в сообщении, обрабатываемом службой. После этого мы сделаем еще один шаг вперед и введем ошибку в службу, а затем с помощью отладчика выясним причину ошибки и обойдем ее.
Глядя под капот быстрого запуска
Прежде чем мы рассмотрим, как можно использовать отладчик с быстрым запуском, мы посмотрим, как реализованы быстрые запуски и как использовать редактор SwitchYard.
Первый быстрый запуск, который мы запустим, использует Apache Camel для реализации контентной маршрутизации для маршрутизации сообщений в выбранные сервисы. Этот быстрый старт называется точно: rules-camel-cbr. Прежде чем запустить быстрый старт, давайте посмотрим, как он работает.
Чтобы понять, как устроен быстрый запуск и как он работает, мы рассмотрим его, рассмотрев эти 3 элемента:
-
Быстрый сервис на основе дизайна. Мы рассмотрим это через визуальный редактор SwitchYard.
-
Интеграция SwitchYard верблюжьих маршрутов с сервисами быстрого старта.
-
Поддержка для тестирования, которую обеспечивает SwitchYard.
Давайте начнем с рассмотрения дизайна приложения быстрого запуска и его сервисов.
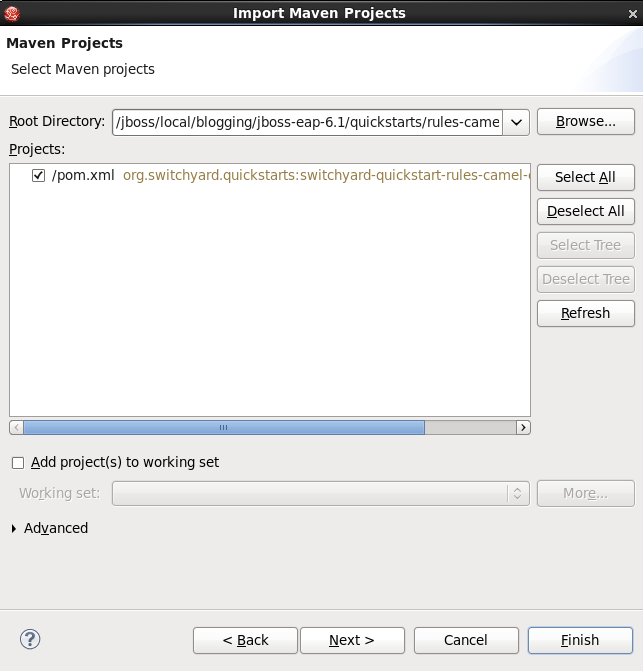
Чтобы импортировать быстрый старт в наше рабочее пространство JBDS, перейдите в Файл-> Импорт-> Maven-> Существующие проекты Maven:
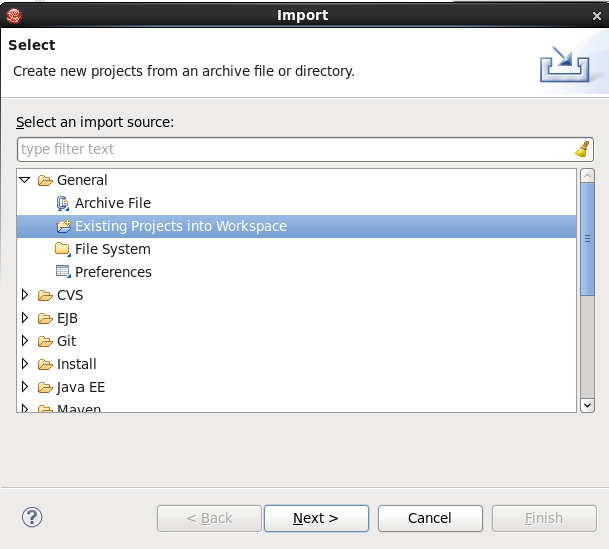
Перейдите в каталог быстрого запуска в каталоге, в который вы установили SwitchYard, выберите быстрый запуск, и он будет импортирован.
Сервисный редактор SwitchYard
Графический редактор приложений SwitchYard позволяет создавать службы и ссылки на службы, настраивать привязки шлюза для всех протоколов, которые поддерживает SwitchYard, настраивать преобразователи сообщений (для преобразования сообщений из одного формата в другой), создавать скелеты классов, интерфейсов и модулей. тесты для ваших услуг.
Определения служб, которые вы создаете в редакторе, хранятся в файле с именем switchyard.xml. При быстром запуске этот файл находится в каталоге src / main / resources / META-INF. Все быстрые старты, которые мы будем использовать в этом посте, следуют той же схеме. Давайте откроем этот файл в редакторе и посмотрим вокруг.
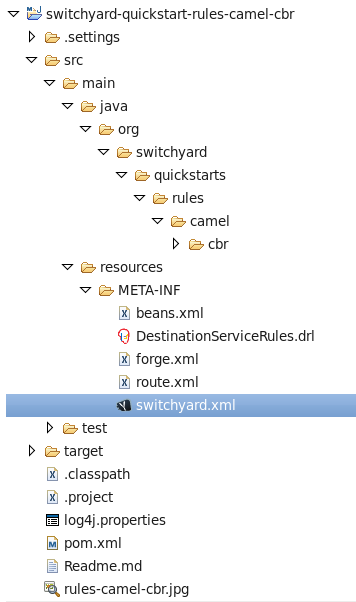
Чтобы открыть файл в редакторе, просто дважды щелкните значок файла switchyard.xml. Когда редактор открывается, вот что мы видим:

Большая синяя коробка в центре окна называется холст. Вот где вы можете увидеть графическое представление определений сервиса:
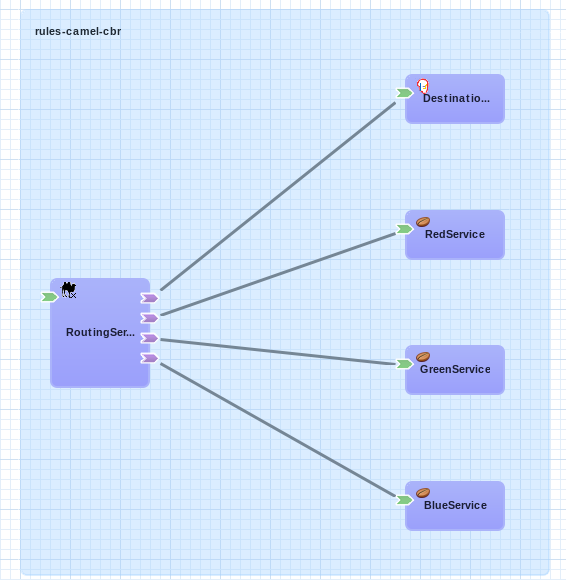
На этом этапе нам следует уделить время, чтобы понять графические символы, которые используются в определениях сервиса.
Визуальные элементы, определенные в switchyard.xml, соответствуют спецификации модели сборки архитектуры сервисных компонентов OASIS ( http://docs.oasis-open.org/opencsa/sca-assembly/sca-assembly-spec-v1.1.html ). Модель Service Component Architecture (SCA) предоставляет стандарты для построения приложений SOA.
Зеленый шеврон представляет собой определение сервиса. Соответствующий фиолетовый шеврон представляет собой ссылку на услугу. Синие прямоугольники являются служебными компонентами. Это контейнеры, которые могут содержать реализации или один или несколько сервисов через ссылки.
Почему этот стандарт был выбран в качестве языкового стандарта конфигурации SwitchYard? Какие преимущества дает нам использование этого стандарта? Есть несколько уровней преимуществ:
-
Команда SwitchYard использует модульный подход, который упрощает определение и обслуживание конфигурации службы. Файл switchyard.xml может содержать информацию о связывании в том же файле, что и реализация службы, но SCA также поддерживает рекурсивную композицию, так что один сервис, содержащий только подробности реализации, может быть включен в другой. Мы посмотрим на файлы и изображения SCA, которые упрощают создание и обслуживание инструментов Switchyard.
-
SwitchYard также хотел сделать информацию об интерфейсе службы (или «контракте») более понятной и, следовательно, более легкой для поиска.
-
Наконец, у команды SwitchYard был выбор. Они могут создать новый синтаксис конфигурации или попытаться использовать то, что уже существует, является общепринятым открытым стандартом и поддерживается активным сообществом. (Они выбрали последнее.) Кроме того, SCA — это хорошо известная модель для сервис-ориентированных приложений. Но важно не слишком зацикливаться на базовой модели конфигурации. Возможности, которые делает возможной модель, такие как модульность, более важны. И еще одна причина не слишком беспокоиться о модели конфигурации — это то, что SwitchYard предоставляет вам такие инструменты, как скрипты Forge (а вскоре и редактор SCA), чтобы упростить создание и обслуживание конфигураций сервисов.
Набор основных символов определения сервиса определен в Спецификации модели сборки архитектуры сервисного компонента OASIS здесь: http://docs.oasis-open.org/opencsa/sca-assembly/sca-assembly-1.1-spec-CD-01. HTML # _Toc193601722
Другие символы относятся к реализациям и привязкам службы, относящейся к SwitchYard. Например, RoutingService реализован как сервис Camel XML, DestinationService реализован как сервис JBoss Drools, а сервисы Red, Blue и Green реализованы как сервисы Java Bean.
Полный спектр параметров, поддерживаемых SwitchYard, отображается в виде палитры:
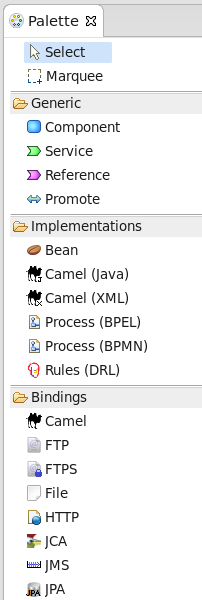
(Да, это длинный список. Вы должны прокрутить, чтобы увидеть все варианты.)
One thing to keep is that while this service definitions are persisted in an .xml file, and while you are able to view the contents of that file, you should not attempt to edit the raw XML in that file. The editor has built in protections to ensure that you do not create an invalid configuration. These protections are not in effect if you edit the raw XML directly. Accordingly, while we’ll examine both the information available to you in the graphical editor and the switchyard.xml file, we’ll focus on using the editor.
Let’s start by examining the application service design as presented by the editor, in the context of the application logic flow, then we’ll look a bit deeper into how you can create and manage the application design through the editor.
What happens in the quickstart is a three step process:
-
First, the incoming message is routed, by the RoutingService to the DestinationService
-
Second, the DestinationService uses JBossDrools to determine the correct destination for that message, based on the content in the message
-
Third, the RoutingServer then routes the message to the correct final destination (the Red, Green, or Blue service
How is this all accomplished? Let’s look at the RoutingService definition. Select the RoutingService in the diagram, open the Properties view and you’ll see this:

Remember that this service is a Camel XML service. The implementation of that route is defined in the route.xml file. The route definitions take the form of a Spring DSL. (See http://camel.apache.org/spring-xml-extensions.html for more details.)
The contents of this file are pretty self-explanatory as the destination color determines the ultimate destination. For example:
<from uri="switchyard://RoutingService"/>
<to uri="switchyard://DestinationService"/>
  <choice>
    <when>
        <simple>${body.destination} == 'Red'</simple>
    <to uri="switchyard://RedService"/>
SwitchYard and Routing With Camel (with help from JBoss Drools)
What happens when the quickstart processes a message is:
First, the incoming message is routed, by the RoutingService to the DestinationService.
As seen in route.xml:
<from uri="switchyard://RoutingService"/>
 <to uri="switchyard://DestinationService”/>
Let’s look at the DestinationService definition. Select the DestinationService in the diagram, open the Properties view and you’ll see this:
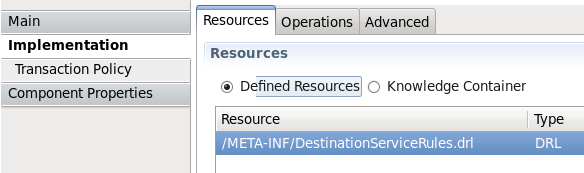
Then, the DestinationService service uses an MVEL statement to find the Widget class’s ID, and rules defined in JBoss Drools (remember that this service is implemented as a JBoss Drools service) to set the Destination value:
As seen in DestinationServiceRules.drl:
rule "Red Destination"
  when
    $widget : Widget(id matches "FF0000-.*")
  then
    $widget.getBox().setDestination("Red");
end
Then, the route logic continues in a structure to route the message to the correct destination:
OK. We have the Destination value set in each widget. But, how does the widget get routed to the correct destination?
Camel provides a Java DSL (Domain Specific Language) to implement routes. In the DSL, a camel route contains a source («from») and a destination («to). These reference the RoutingService and DestinationService interfaces that we just saw in the SwitchYard editor.
In the case of the quickstart, the route definitions take the form of a Spring DSL. The route is self-explanatory, even if you do not have experience with Camel. The destination service is selected based on the content; Red, Green, or Blue.
Test Support in SwitchYard
There’s just one more thing we have to look at before we run the quickstart — how to start the chain reaction of tasks that the quickstart will perform.
Testing server-side applications such as those built with SwitchYard can be difficult. Since this is server-side software, you have to install and run a server, the application has to be deployed to that server, and then you have to construct a client to access the application on the server. You can end up in a situation where you have to build either a throwaway test client, or a reusable test framework. Either way, you have to invest time and effort into building something other than your application.
Luckily, JBoss SwitchYard provides a built in framework that makes testing your applications fast and easy. This QuickStart makes use of the SwitchYardRunner class. SwitchYardRunner is a JUnit Runner class, but more than that, it starts up an embedded SwitchYard runtime. When this embedded runtime starts, your application is packaged up as a SwitchYard application that is deployed to the test instance.
To make use of SwitchYard’s test support, all you have to do is to annotate the test with the SwitchYardRunner JUnit test Runner class. This class will startup an embedded SwitchYard runtime, one for each test method, and then package up the test into a SwitchYard application and deploy that application to the runtime.
In addition to the SwitchYardRunner class, SwitchYard also makes testing easy by providing the TestMixIn feature. TestMixIns enable to turn on additional test support, based on the specific needs of your application. This quickstart makes use of the CDIMixIn to register its bean services. Some of the other TestMixIns support testing http services, JBoss Smooks transformations, and JMS services.
Building, Deploying, and Running the Quickstart
OK, enough talk. Let’s run the quickstart.
First, deploy the quickstart to a SwitchYard server. In JBDS, this is a simple task. It can be done with the server either started or stopped, but let’s start the server first so that you more easily spot the server logging messages when the quickstart is deployed.
To start the server, select it in the “servers” view, and press the start button.

The server console window will open, and you should see something like this:
21:21:59,145 INFO  [org.jboss.as] (Controller Boot Thread) JBAS015961: Http management interface listening on http://127.0.0.1:9990/management
21:21:59,146 INFO  [org.jboss.as] (Controller Boot Thread) JBAS015951: Admin console listening on http://127.0.0.1:9990
21:21:59,146 INFO  [org.jboss.as] (Controller Boot Thread) JBAS015874: WildFly 8.0.0.Final "WildFly" started in 4060ms
Then, to deploy the quickstart, select the server in the “servers” view again, right-click, select “Add/Remove Applications” and select the quickstart.
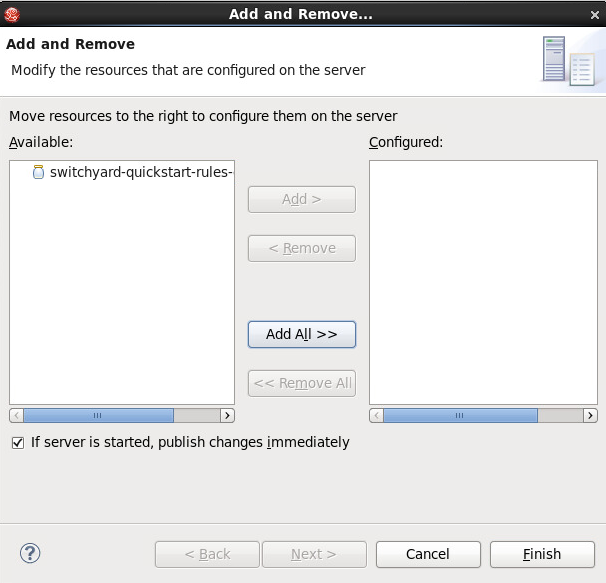
Switch back to the console view and you should see something like this:
INFO [org.jboss.as.server] (DeploymentScanner-threads — 1) JBAS018559: Deployed «switchyard-quickstart-rules-camel-cbr.jar» (runtime-name : «switchyard-quickstart-rules-camel-cbr.jar»)
To run the client test program, select the rules-camel-cbr/src/test/java/org/switchyard/quickstarts/rules/camel/cbr/RulesCamelCBRTest.java Java source file, and run it as a JUnit test.
Switch back to the server console, and you’ll see the quick start’s output!
INFO  [org.switchyard.quickstarts.rules.camel.cbr.RedServiceBean] Red service processing boxed widget with id: FF0000-ABC-123
INFO  [org.switchyard.quickstarts.rules.camel.cbr.GreenServiceBean] Green service processing boxed widget with id: 00FF00-DEF-456
INFO  [org.switchyard.quickstarts.rules.camel.cbr.BlueServiceBean] Blue service processing boxed widget with id: 0000FF-GHI-789
And the green bar appears!

Now, we’ll use the debugger to interrupt a running service in a QuickStart and enable us to examine the data in a message being processed by the service. After this, we’ll take things one step further and introduce a bug into a service and then use the debugger to find that bug.
Setting a Breakpoint in the Debugger
Let’s start by setting a breakpoint on the Blue service. We’ll use this breakpoint to enable us to view the contents of the message received by the service. For the purposes of our first example, we’ll use the Blue service.
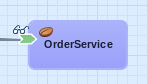
To set a breakpoint in the SwitchYard editor, first position the cursor over the service’s green chevron icon. A small palette of icons is displayed:
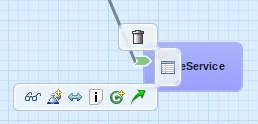
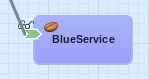
To set a breakpoint on the service, select the eyeglasses icon. The presence of this icon on a service definition as seen in the SwitchYard editor indicates that a breakpoint is set:
Notes that as we are adding a breakpoint on the service, the breakpoint will trigger for any reference or composite service invoking that service. In contrast, if you add a breakpoint on a service reference, it will only break when that reference is invoked.
To view and modify the breakpoint’s properties, open the Debug perspective and look in the breakpoints view:

And then right-click on the breakpoint, to view and edit the breakpoint’s properties:
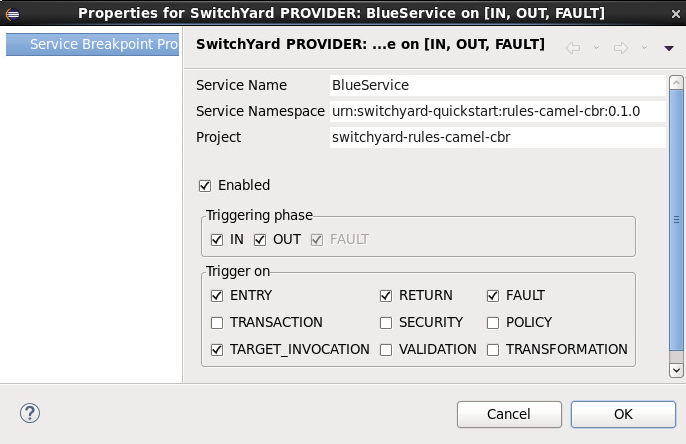
For our example, we’ll use the default properties. We’re mainly concerned with the breakpoint being triggered at service entry.
Now that our breakpoint has been defined, let’s run the RulesCamelCBRTest program again.
To run the test with the debugger, right-click on RulesCamelCBRTest, select Debug As->JUnit Test:

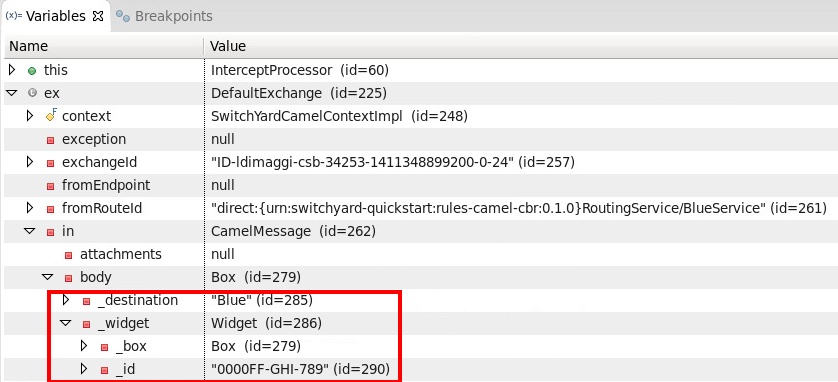
When the breakpoint is reached, the program is suspended. If we look in the Variables view in the Debug perspective, we can see the incoming message and the values that controlled the content-based routing of a message to the Blue service:
Now that we’ve seen the quickstart run correctly, it’s time to introduce a bug, and then use the debugger to find it. For this illustration, we’ll use a different quickstart.
Giving a Quickstart a Bug
Remember the scene in the movie “Independence Day,” when Will Smith uploads a software virus into the evil aliens’ spaceship? Let’s do something similar and add a bug into a quickstart, and then use the debugger to find the bug and even fix it.
Some of the types of bugs that you have to deal with in a services and message based system involve when there are problems in the content in the messages, and how the services are (or are not) able to handle those problems. What sorts of bad things can happen to good messages? Missing a field, wrong namespace, malformed XML, errors in the headers, etc. The debugger makes it possible to tweak a message to debug a problem, without having to redeploy the service.
The quickstart that we’ll look at is “validate-xml.” This quickstart demonstrates the SwitchYard XML validator. The quickstart deploys a service that accepts a message and returns an object that is transformed with XLST. The incoming message is checked for XML validity, so that malformed messages are caught. Before we can run the quickstart, it must be deployed in the same manner as the rules-camel-cbr quickstart that we looked at earlier in this article.
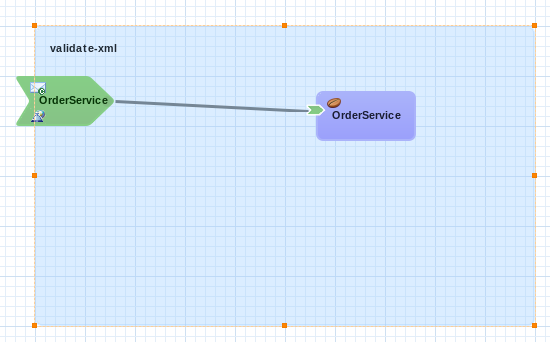
The quickstart’s application diagram is very simple as only one service (“OrderService”) is implemented. This service only accepts a message and returns an object that is processed by the XLST transformer, but it’s adequate for our purposes. The diagram looks like this:
The test application that we want to run is: validate-xml/src/test/java/org/switchyard/quickstarts/validate/xml/WebServiceTest.java
This application executes separate two Junit tests. First, it verifies that a properly formatted SOAP message can be transformed and validated, and then it verifies that an intentionally malformed SOAP message (that is, a message that contains invalid XML) is caught.
Before we look at causing and catching a bug, let’s examine the message tansformation that is performed by this quickstart. The transformation is performed with the order.xslt file in the quickstart. It’s a simple transformation in that it transforms incoming messages that look like this:
<soapenv:Envelope xmlns:soapenv="http://schemas.xmlsoap.org/soap/envelope/">
 <soapenv:Header/>
 <soapenv:Body>
  <orders:order xmlns:orders="urn:switchyard-quickstart:validate-xml:0.1.0">
  <orderId>PO-19838-XYZ</orderId>
  <itemId>BUTTER</itemId>
  <quantity>200</quantity>
  </orders:order>
 </soapenv:Body>
</soapenv:Envelope>
Into objects that look like this:
<SOAP-ENV:Envelope xmlns:SOAP-ENV="http://schemas.xmlsoap.org/soap/envelope/">
 <SOAP-ENV:Header/>
 <SOAP-ENV:Body>
  <orders:orderAck xmlns:orders="urn:switchyard-quickstart:validate-xml:0.1.0">
  <orderId>PO-19838-XYZ</orderId>
  <accepted>true</accepted>
  <status>Order Accepted</status>
  </orders:orderAck>
 </SOAP-ENV:Body>
</SOAP-ENV:Envelope>
The change simply indicates whether the incoming order was accepted.
If we set our breakpoint on the “OrderService” service:
And then run/debug the WebServiceTest, we can view the message, before and after its transformation, in the debugger. Here’s the message before transformation:
And here’s the message after its transformation:

The second test in the WebServiceTest intentionally sends a message that includes an invalid XML element.
The invalid SOAP message looks like this:
<soapenv:Envelope xmlns:soapenv="http://schemas.xmlsoap.org/soap/envelope/">
 <soapenv:Header/>
 <soapenv:Body>
  <orders:order xmlns:orders="urn:switchyard-quickstart:validate-xml:0.1.0">
  <orderId>PO-19838-XYZ</orderId>
  <itemId>BUTTER</itemId>
  <quantity>200</quantity>
  <invalid-element>This element is not allowed by XML Schema.</invalid-element>
  </orders:order>
 </soapenv:Body>
</soapenv:Envelope>
Yes, it’s easy to spot the invalid XML. ?
Let’s expand on this test application a bit and alter it to not gracefully trap the error resulting from the invalid XML. To do this, we’ll edit the invokeOrderWebServiceValidationFail() method and change this:
Assert.assertTrue("Unexpected response: " + response, response.contains("1 validation error(s)") && response.contains("invalid-element"));
To this:
Assert.assertFalse("Unexpected response: " + response, response.contains("1 validation error(s)") && response.contains("invalid-element"));
So that when we run the test, we see this JUnit error:
java.lang.AssertionError: Unexpected response: <soap:Envelope xmlns:soap="http://schemas.xmlsoap.org/soap/envelope/"><soap:Body><soap:Fault><faultcode>soap:Server</faultcode><faultstring>SWITCHYARD014000: Validator 'org.switchyard.validate.xml.internal.XmlValidator' failed: 1 validation error(s):
org.xml.sax.SAXParseException: cvc-complex-type.2.4.d: Invalid content was found starting with element 'invalid-element'. No child element is expected at this point.
</faultstring></soap:Fault></soap:Body></soap:Envelope>
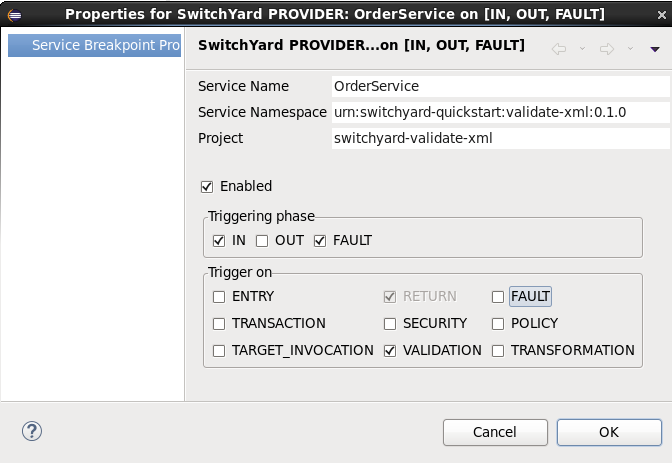
Before we can debug the OrderService, we must set our breakpoint:
Then we edit the breakpoint’s properties. For our example, we want the trigger to be set for the validation of incoming messages:
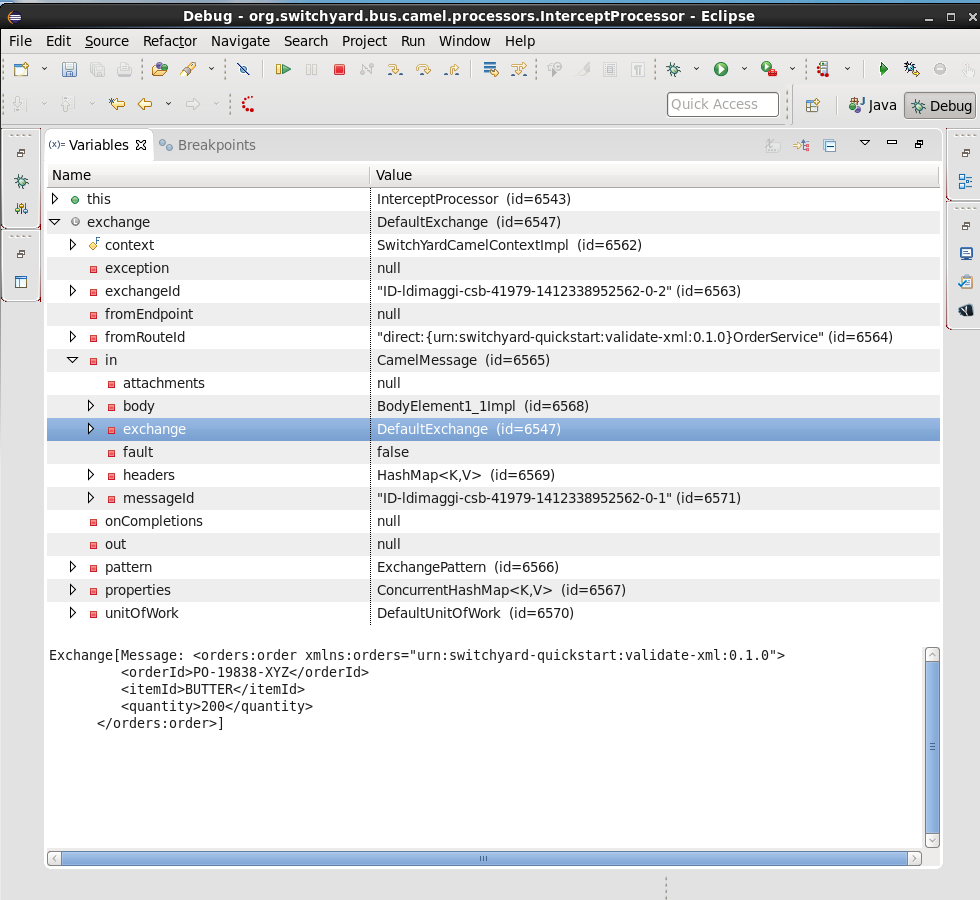
When we run/debug the WebServiceTest program, the breakpoint is reached and we can examine the message contents:
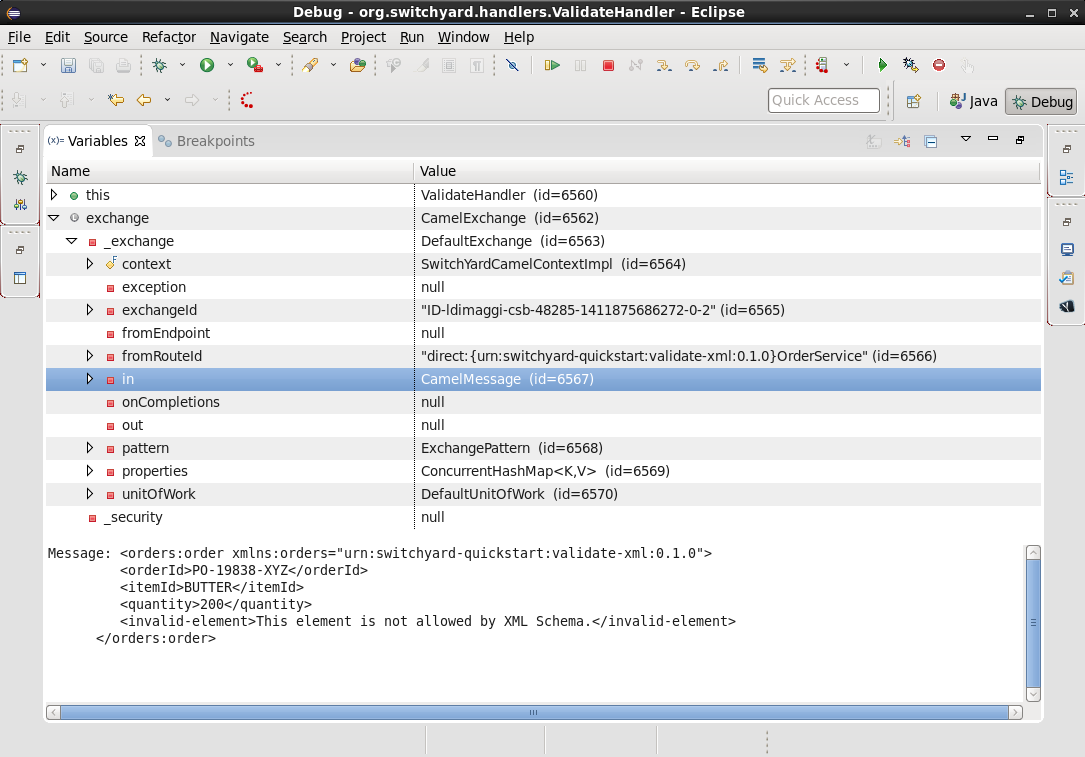
And, there’s the invalid XML element. What makes the debugger especially useful is that we can now edit the message and remove the invalid XML:
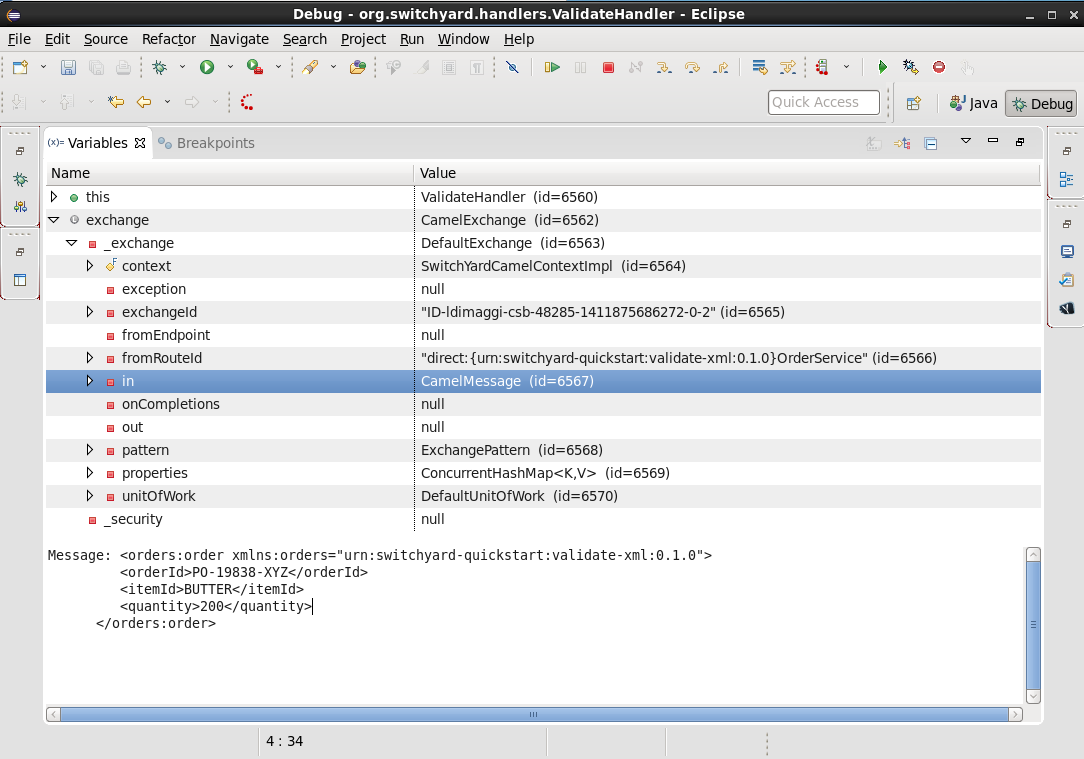
And then allow the program to resume its operation. In this way, we can determine if the program has any other bugs before we correct the cause of the invalid XML, redeploy, etc.
In Conclusion
We’ve taken an introductory look at the new SwitchYard debugger in this article. The debugger enables you to debug not just a class or method, but a Switchyard service. The debugger is configured through the SwitchYard graphical service/application editor and enables you to both monitor and control the operation of a service to make it easier for you to find those pesky bugs and is a great addition to the SwitchYard developer toolkit.
Acknowledgements
The author would like to thank Rob Cernich for his input and reviews of the article as it was being written, Keith Babo for his background on the SwitchYard editor, and Jiri Sedlacek for his painstaking review of my sometimes suspect grammar. (Many thanks!)
References
-
JBoss SwitchYard
-
Discussion on JBoss SwitchYard Debugger
-
OASIS Service Component Architecture Assembly Model Specification
-
JBoss Tools Integration Stack (SwitchYard Tooling for Eclipse)