В этом посте мы собираемся развернуть приложение Spring Boot на движке приложений Google Cloud Platform (GCP). Сначала мы рассмотрим различия между стандартной и гибкой средой App Engine. После этого мы шаг за шагом опишем, как можно выполнить развертывание в GCP App Engine.
1. Что такое App Engine?
GCP App Engine — это облачная платформа, на которой вы можете быстро развернуть свое приложение, не слишком заботясь об инфраструктуре. Кроме того, ваше приложение может автоматически увеличиваться и уменьшаться, вы можете отлаживать и отслеживать его, разделять трафик и т. Д.
Существуют два типа сред App Engine: стандартная среда и гибкая среда . Выбор среды зависит от потребностей вашего приложения. Полное сравнение функций двух сред можно найти здесь .
Вы выбираете для стандартной среды, когда:
- Вы не возражаете, что ваше приложение работает в изолированной программной среде, которая ограничена определенным набором языков и версий времени выполнения;
- Ваше приложение нуждается в быстром масштабировании;
- Вы хотите платить только тогда, когда ваше приложение используется;
- Цены основаны на экземплярах часов.
Вы выбираете гибкую среду, когда:
- Вы хотите, чтобы ваше приложение запускалось в контейнерах Docker на виртуальных машинах Compute Engine;
- Ваше приложение получает постоянный поток трафика и постепенно нуждается в увеличении и уменьшении;
- Вам необходимо использовать язык программирования или версию среды выполнения, которая не поддерживается стандартной средой;
- Вам необходимо получить доступ к ресурсам или услугам вашего проекта GCP;
- Вы платите в зависимости от использования vCPU, памяти и постоянных дисков.
Помимо функциональных различий между стандартной и гибкой средой, различия в затратах между двумя средами также могут быть решающими в выборе. Полезный инструмент для определения стоимости будет доступен в калькуляторе цен GCP .
2. Развертывание в гибкой среде
Начнем с развертывания в гибкой среде. Причина этого станет ясна, когда мы попытаемся выполнить развертывание в стандартной среде. Используемые источники можно найти на GitHub .
Создать приложение
Сначала нам нужно создать приложение Spring Boot. Мы создаем это в start.spring.io и выбираем Java 1.8 и Web MVC. Мы выбрали Java 1.8, потому что это поддерживаемая версия Java для стандартной среды, и наша цель — использовать это же приложение для развертывания в стандартной среде без каких-либо изменений.
Мы добавляем сообщение, HelloControllerкоторое печатает приветственное сообщение Привет Google App Engine, и хост, на котором работает наше приложение:
@RestController
public class HelloController {

  @RequestMapping("/hello")
  public String hello() {
    StringBuilder message = new StringBuilder("Hello Google App Engine!");
    try {
      InetAddress ip = InetAddress.getLocalHost();
      message.append(" From host: " + ip);
    } catch (UnknownHostException e) {
      e.printStackTrace();
    }
      return message.toString();
    }

}
Чтобы упростить развертывание в App Engine, мы добавим плагин App Engine Maven к нашему pom:
<build>
  <plugins>
    ...
    <plugin>
      <groupId>com.google.cloud.tools</groupId>
      <artifactId>appengine-maven-plugin</artifactId>
      <version>1.3.2</version>
      <configuration>
        <version>1</version>
      </configuration>
    </plugin>
  </plugins>
</build>
Нам также нужен app.yamlфайл, который необходим для настройки параметров приложения App Engine. Полная ссылка на app.yamlфайл может быть найдена здесь . Мы добавляем следующий app.yamlфайл в каталог src/main/appengine/:
runtime: java
env: flex

handlers:
  - url: /.*
    script: this field is required, but ignored
Создать проект GCP
Теперь, когда мы создали наше приложение, пришло время перейти к облачной платформе Google.
Создайте проект MyGoogleAppEnginePlanet в GCP. Это также показывает нам идентификатор проекта , который мы должны где-то запомнить.

Запустите Google Cloud Shell в браузере и клонируйте репозиторий git:
$ git clone https://github.com/mydeveloperplanet/mygoogleappengineplanet.gitВойдите в каталог mygoogleappengineplanet и запустите приложение:
$ mvn clean spring-boot:runНаше приложение теперь работает в консоли, и мы можем использовать веб-предварительный просмотр для доступа к нашему привет- URL:
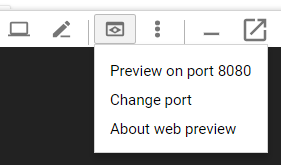
В браузере открывается новая вкладка по следующему URL:
https://8080-dot-6340638-dot-devshell.appspot.com/?authuser=0Это покажет страницу ошибки 404, потому что она отображается на корневой URL. Давайте изменим его на наш привет URL:
https://8080-dot-6340638-dot-devshell.appspot.com/hello/?authuser=0Это покажет нам наше приветственное сообщение, как и ожидалось:
Hello Google App Engine! From host: cs-6000-devshell-vm-859e05a5-a8a3-4cd2-813f-af385740076b/172.17.0.3Развертывание в App Engine
При создании приложения в AppEngine нам нужно выбрать регион, в котором будет запущено приложение. Список регионов можно показать, введя команду:
$ gcloud app regions listМы выберем регион europe-west и создадим наше приложение AppEngine:
$ gcloud app create --region europe-west
You are creating an app for project [gentle-respect-234016].
WARNING: Creating an App Engine application for a project is irreversible and the region
cannot be changed. More information about regions is at
<https://cloud.google.com/appengine/docs/locations>.

Creating App Engine application in project [gentle-respect-234016] and region [europe-west]....done.
Success! The app is now created. Please use `gcloud app deploy` to deploy your first app.
Из нашего каталога репозитория git мы можем развернуть наше приложение:
$ mvn -DskipTests appengine:deployПосле развертывания откройте браузер и введите приветственный URL:
https://gentle-respect-234016.appspot.com/helloЭто снова покажет нам приветственное сообщение.
In order to prevent extra charges against your GCP credit, you should shut down your GCP project.
3. Deploy to Standard Environment
Deployment to the standard environment deploys your application into a Jetty Web Server. The standard environment is mostly used for stateless web applications, which need to respond quickly to requests. Your application also runs in a sandbox. Because our application is running in a Jetty Web Server, the default configuration for a Spring Boot application will not work. This causes several conflicts because Spring Boot uses an embedded Tomcat Web Server. More information about the configuration of a Spring Boot application for the standard environment can be found here. The sources for the standard environment are available in the feature/standardenv branch of our git repository.
Convert for Standard AppEngine
In this section, we will convert our previously created application with configuration for the flexible environment to a configuration that will be deployable to the standard environment.
We need to remove the app.yaml file and we add an appengine-web.xml in directory src/main/webapp/WEB-INF with the following contents:
<appengine-web-app xmlns="http://appengine.google.com/ns/1.0">
  <threadsafe>true</threadsafe>
  <runtime>java8</runtime>
  <system-properties>
    <property name="java.util.logging.config.file" value="WEB-INF/classes/logging.properties"/>
  </system-properties>
</appengine-web-app>
We add a SpringBootServletInitializer implementation:
public class ServletInitializer extends SpringBootServletInitializer {
    @Override
    protected SpringApplicationBuilder configure(SpringApplicationBuilder application) {
        return application.sources(MyGoogleAppEnginePlanetApplication.class);
    }
}
The following changes are made to our pom:
...
<packaging>war</packaging>
...
<dependencies>
  <dependency>
    <groupId>org.springframework.boot</groupId>
    <artifactId>spring-boot-starter-web</artifactId>
    <exclusions>
      <exclusion>
        <groupId>org.springframework.boot</groupId>
        <artifactId>spring-boot-starter-tomcat</artifactId>
      </exclusion>
    </exclusions>
  </dependency>

  <dependency>
    <groupId>javax.servlet</groupId>
    <artifactId>javax.servlet-api</artifactId>
    <scope>provided</scope>
  </dependency>

  <!-- Exclude any jul-to-slf4j -->
  <dependency>
    <groupId>org.slf4j</groupId>
    <artifactId>jul-to-slf4j</artifactId>
    <scope>provided</scope>
  </dependency>
..
And finally, we add a logging.properties file into src/main/resources:
.level = INFORun and Deploy
In order to run the application, we need to issue the following command:
$ mvn appengine:runIn the logs, we can clearly see that the standard environment is used:
[INFO] Detected App Engine standard environment application.The URL is again accessible via the web preview, just as we did before at the flexible environment.
Deployment to AppEngine is identical as for the flexible environment:
$ mvn -DskipTests appengine:deployCheck the correct deployment by accessing the URL via web preview and the following response is issued:
Hello Google App Engine! From host: localhost/127.0.0.14. Conclusion
In this post, we looked at the GCP App Engine and how we can deploy a Spring Boot application to the standard and flexible environment. We would not advise deploying a Spring Boot application to the standard environment because you need to convert it in order to make it run into a Jetty Web Server. You will lose some benefits of Spring Boot. This does not mean that you should never use the standard environment. Spring Boot is probably not the best technical choice for the standard environment. The flexible environment in combination with Spring Boot is easy to use. Besides that, you have the choice of choosing another runtime than Java 8, and you can keep the benefits of using a Spring Boot application.