[Эта статья была первоначально написана Йорамом Вайнребом.]
Openstack явно делает волны и быстро становится стандартом де-факто в частных облаках.
В последних нескольких выпусках движок оркестровки Heat, который изначально был основан на Amazon CloudFormation, становится все более зрелым с более желаемой функциональностью.
Я хотел поделиться своим опытом настройки собственной игровой площадки Heat в качестве службы оркестровки развертывания Devstack, работающего в виртуальной машине HP Public Cloud.
Я начал с запуска * стандартной большой виртуальной машины под управлением Ubuntu 12.04 (на самом деле я сначала попробовал с 14.04 и увидел несколько проблем, которые привели меня к 12.04) в HP Cloud (очевидно, он может работать в любой облачной среде).
* Фиксированная подсеть по умолчанию для devstack — 10.0.0. Я рекомендую подключать упомянутую выше виртуальную машину к другому диапазону подсетей (хотя вы также можете настроить devstack для другой фиксированной подсети).
Когда виртуальная машина была готова, я вставил в нее SSH и установил git:
sudo apt-get update
sudo apt-get install git
Затем я клонировал git-репозиторий devstack в homedir моей виртуальной машины:
git clone https://github.com/openstack-dev/devstack.git
и перейдите в папку Devstack, которая была только что создана:
cd devstack/
Изучив файл stackrc, я обнаружил, что, хотя служба Neutron была установлена, службой по умолчанию была сеть Nova (n-net).
Чтобы иметь более современный и многофункциональный Neutron, я отключил сеть Nova n-net и включил службы Neutron (q-svc, q-agt, q-dhcp, q-l3, нейтрон) в local.conf. файл конфигурации (вам нужно будет создать его в папке Devstack). Я воспользовался этой возможностью, чтобы также установить пароли администратора в файле local.conf:
[[local|localrc]]
ADMIN_PASSWORD=password
DATABASE_PASSWORD=$ADMIN_PASSWORD
RABBIT_PASSWORD=$ADMIN_PASSWORD
SERVICE_PASSWORD=$ADMIN_PASSWORD
SERVICE_TOKEN=a682f596-76f3-11e3-b3b2-e716f9080d50

disable_service n-net
enable_service q-svc
enable_service q-agt
enable_service q-dhcp
enable_service q-l3
enable_service q-meta
enable_service neutron
Следующим шагом будет процесс установки Devstack:
./stack.sh
Эти сценарии заботятся об установке, настройке и запуске развертывания Devstack. С файлом local.conf мы создали. На самом деле установка может выполняться без присмотра (это здорово, потому что она занимает более 10 минут, это отличная возможность для перерыва на кофе или переписки по электронной почте…)
Как только скрипт завершает процесс установки, Devstack запускается и имеет связанный с ним экран, так что вы можете присоединить и отсоединить его, чтобы увидеть, что происходит:
screen –r stack
Для переключения между различными сервисными окнами наберите Ctrl-A «.
Ctrl-A Ctrl-D отсоединится от него, оставив Devstack работающим.
По умолчанию виртуальные машины, запущенные внутри DevStack и работающие на хосте виртуальных машин, не имеют доступа в Интернет.
To allow Internet, we will need to enable IP forwarding and NATing on the host machine:
echo 1 | sudo tee /proc/sys/net/ipv4/ip_forward
sudo iptables -t nat -A POSTROUTING -o eth0 -j MASQUERADE
You can access Horizon, its web UI, by typing http://<Your VM public/floating IP>/
The admin user is admin and the password is what we set in the local.conf.
Under Project you will see the orchestration service.
Now that our playground is ready, lets start playing with Heat…
Defining an orchestration (stack) in Heat is done by defining a HOT template (Heat is also compatible with CloudFormation syntax, but I will not go into that).
Templates can be defined in YAML or JSON. I find YAML much easier to read so I will stick with it for my examples.
I started with a basic stack example from the Openstack git repo: https://github.com/openstack/heat-templates/blob/master/hot/F18/WordPress_Native.yaml
This stack template simply provisions a VM, installs the WordPress services (Apache, MySQL and the WordPress web app) and configures it.
There are input parameters such as the user/password and output parameters such as the application URL.
Click the project->Orchestration ->stacks and then Launch Stack.
You can use the actual git URL to create the stack.
The «Environment Source» can be used to initialize the parameters defined in the stack template.
If we leave it empty, Heat will ask us to fill in the parameters in the next dialog box.
After clicking Next, we name the stack and fill in any parameters that were not initialized, and then we can launch the stack.
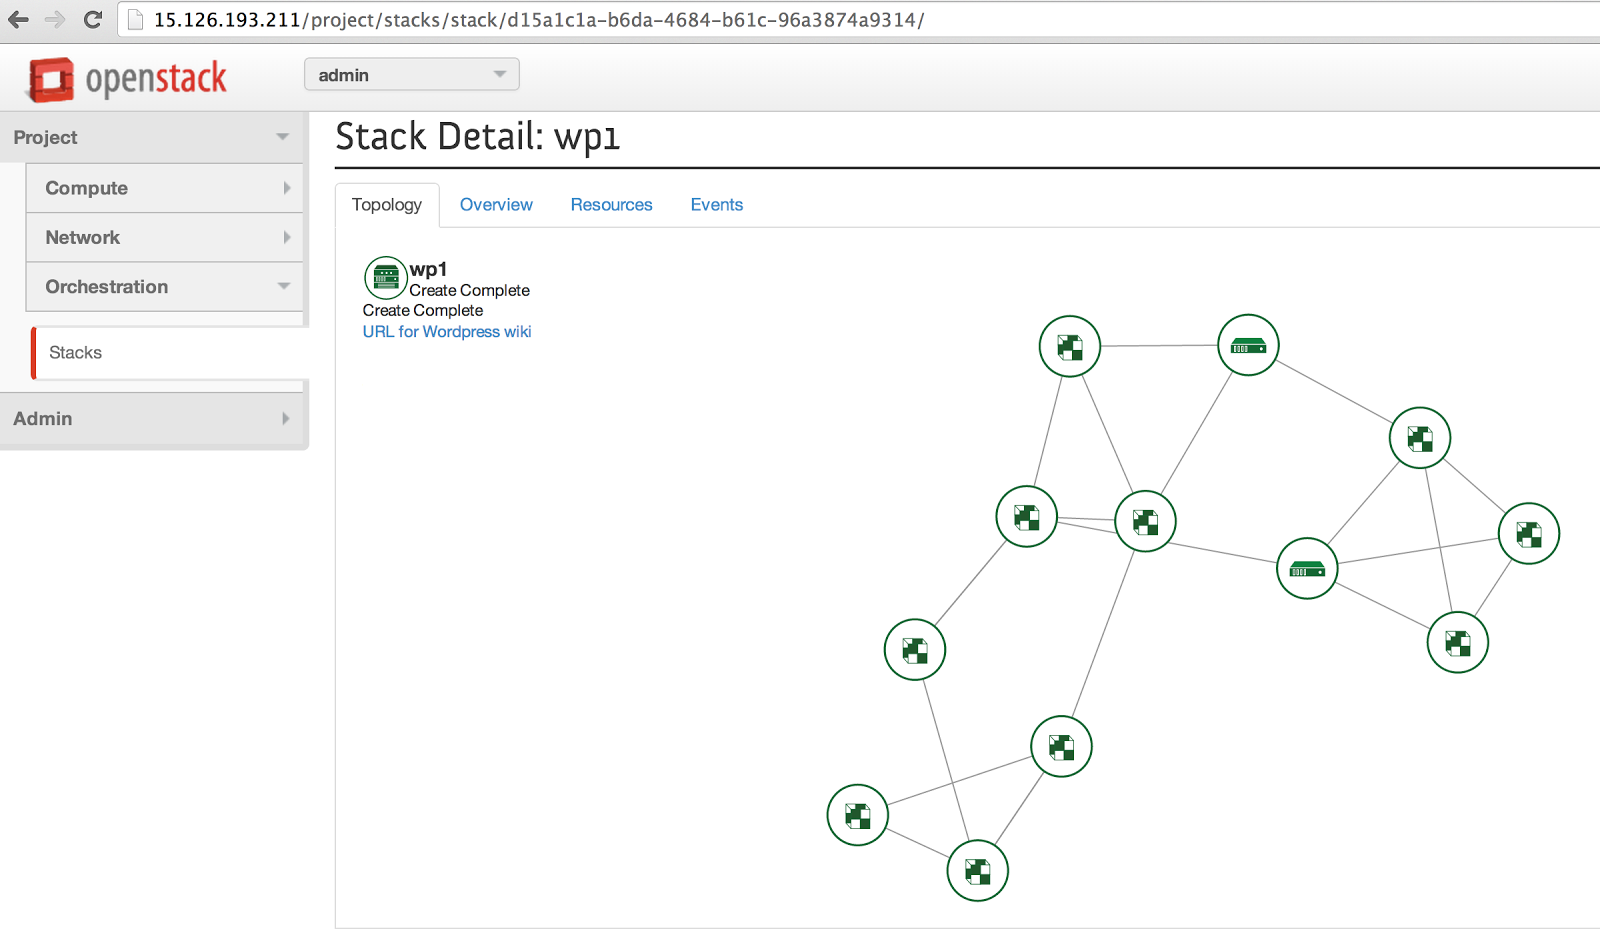
There are four views to track the deployment status of the stack.:
- Topology view that shows the stack resources and their relationships in graph format.
- Overview that just gives the basic properties of the stack.
- Resources view that lists all of the resources that were deployed.
- Events log that shows us the progress of the stack’s deployment.
- This was neat, in a few clicks we launched a ready to use WordPress server.
However, in real life deployments, things can get a bit more complicated, so let’s add some typical deployment customizations into the mix:
- Let’s separate the MySQL and the Apache from each other.
- Let’s build separate networks for the application data and the application’s public access.
These customizations make things more interesting on the Heat side. We need to define additional networks resources such as networks, subnets router and ports.
In addition, we need to create dependencies between the network resources and the VMs.
For example, we need the network provisioned before we can launch the VMs.
We also need a dependency between the Apache VM and the MySQL VM. We then also need to inject the MySQL IP address to the WordPress configuration on the Apache VM.
The dependency graph goes as follows:
First we define the networks and the router. Then we define the subnets, tying them to the networks by the «network_id: { get_resource: network_id/name}.
At the same time we can define the router_gateway tying it to the router «router_id: { get_resource: router }» and the pre-existing public network.
After the networks and the router are defined, we can define the router interface that does the same get_resource to reference both elements.
In parallel, the port, which depends on the network and the subnet, is defined too.
 app_network:
      type: OS::Neutron::Net
      properties:
        admin_state_up: true
        name: app_network
        shared: true
        tenant_id: admin
  app_subnet:
      type: OS::Neutron::Subnet
      properties:
        network_id: { get_resource: app_network }
        cidr: { get_param: app_net_cidr }
        gateway_ip: { get_param: app_net_gateway }
        dns_nameservers: [8.8.8.8, 8.8.4.4]   #public DNS nameservers are important so that the vms will be able to resolve host to IP addresses
        allocation_pools:
          - start: { get_param: app_net_pool_start }
            end: { get_param: app_net_pool_end }
Lastly, the two servers and the floating IP are defined. The floating IP is dependent on the definition of the server port.
wordpress_apache_app_port:
      type: OS::Neutron::Port
      properties:
        network_id: { get_resource: app_network }
        fixed_ips:
          - subnet_id: { get_resource: app_subnet }
  apache_floatingip:
      type: OS::Neutron::FloatingIP
      properties:
        floating_network_id: { get_param: public_net_id }
        port_id: { get_resource: wordpress_apache_app_port }
The MySQL server VM is dependent on its server data port and a random app network port for outbound Internet access.
The Apache server VM is dependent on its server app port as well as the floating IP, and a random data network port for accessing the MySQL on a separate network.
The template is available at http://s3.amazonaws.com/yoramw/wordpress.yaml
Here is the topology graph that was created when we launched our more sophisticated stack:
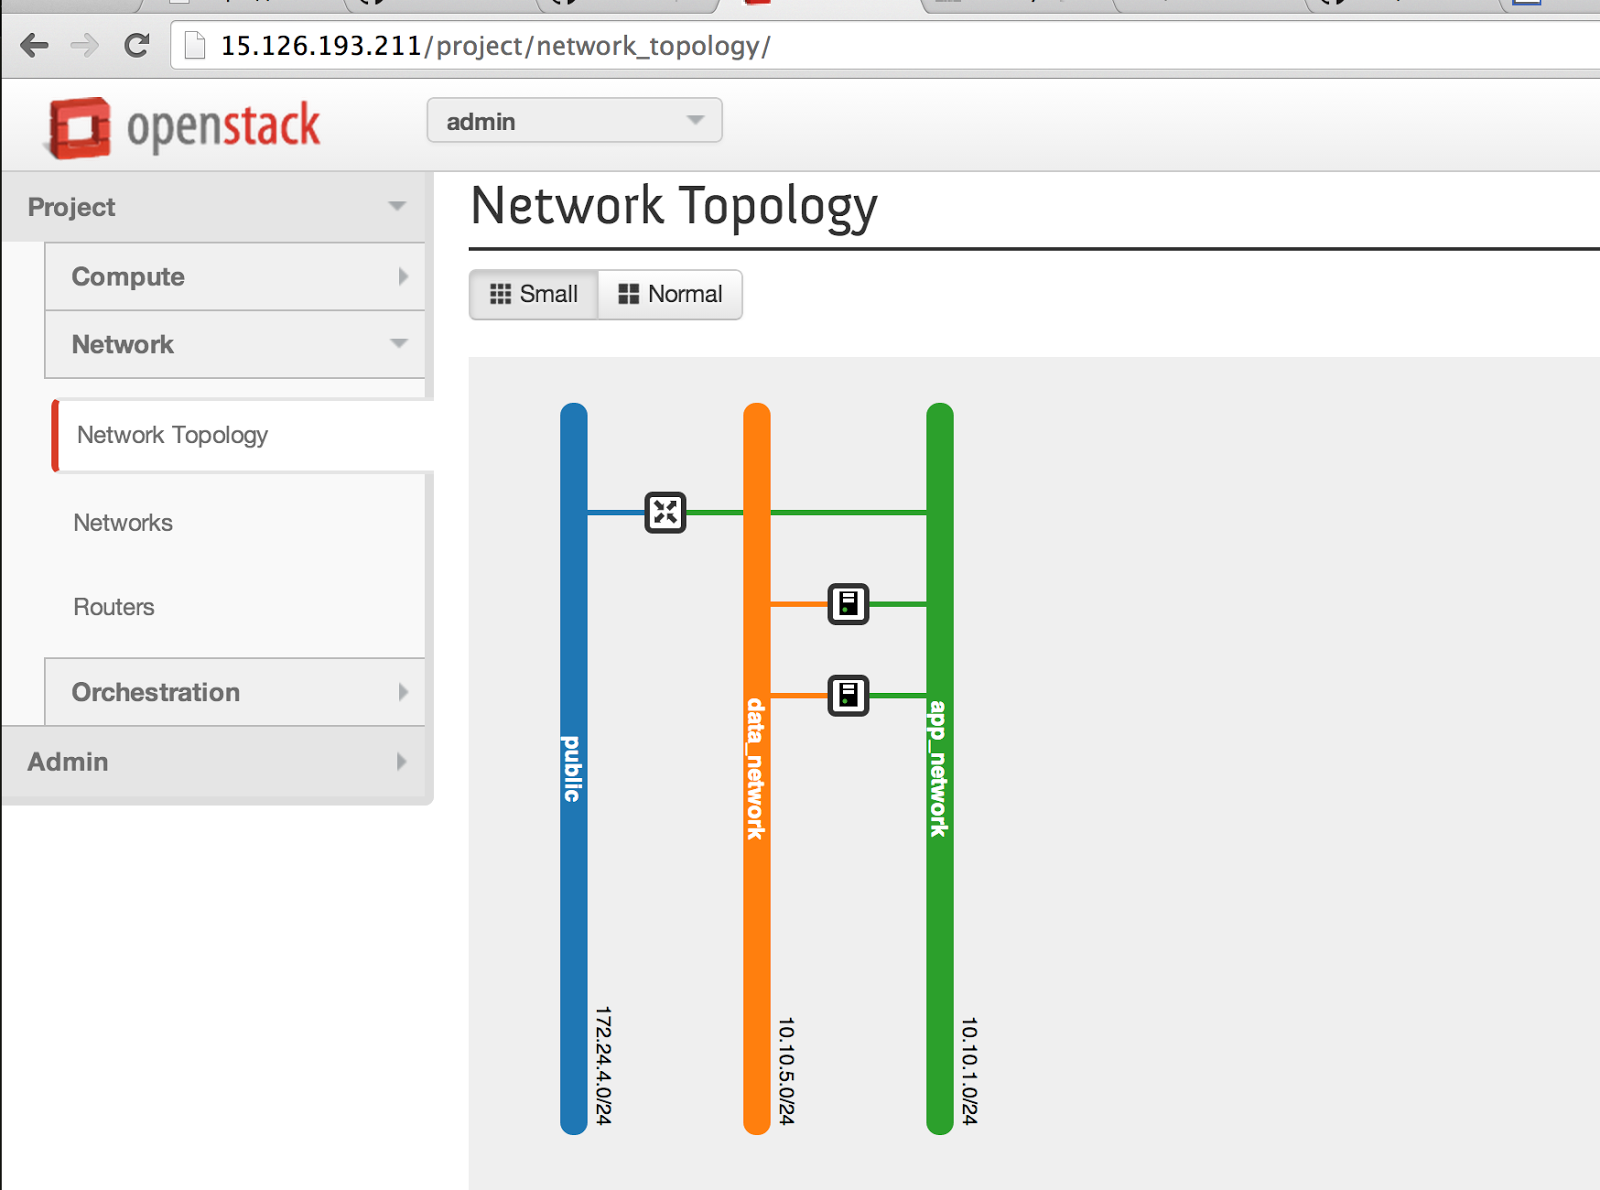
The network diagram view:
Feel free to let me know in the comments how this tutorial worked out for you.