Привет, друзья,
Вступление
Мы покроем:
- Обзор для настройки нескольких проектов сборки в TeamCity
- Настройте один из проектов сборки для развертывания в облаке Azure.
- Автоматическое развертывание в облаке Azure для веб-сайтов и рабочих ролей
- Используйте целевые шаблоны msbuild для автоматизации генерации файлов пакетов Azure.
- Альтернативное решение для создания файлов пакета Azure
- Использование преобразований конфигурации для управления настройками, например, UAT, Dev, Production
Мой коллега Тэтэм Одди и я в настоящее время используем TeamCity для автоматического развертывания нашего проекта на основе Azure / MVC3 / Neo4j в облаке Azure. Давайте посмотрим, как это можно сделать относительно легко и полностью автоматизировано. Основное внимание здесь будет уделено сценариям Powershell, использующим сценарии Cerebrata Command, которые можно найти здесь: http://www.cerebrata.com/Products/AzureManagementCmdlets/Default.aspx
Сценарий PowerShell, включенный здесь, автоматически удаляет и повторно развертывает службу Azure и даже будет ждать, пока все службы не будут в состоянии готовности.
Я оставлю вас на проверку этих командлетов, и они стоят каждого потраченного копейки.
Теперь давайте проверим, как у нас работает развертывание.
Основная идея заключается в том, что у вас есть конфигурация непрерывной интеграции, настроенная на сервере сборки в TeamCity, а затем вы настраиваете сборку CI для генерации артефактов, которые в основном представляют собой выходные данные сборки, которые могут использоваться другим проектом сборки, например, вы. может взять артефакты для сборки CI, а затем запустить сборки функциональных тестов или интеграционных тестов, которые выполняются совершенно отдельно от сборки CI. Идея в том, что ваш функционал и интеграция НИКОГДА не будут мешать сборке CI и тестам модулей. Таким образом, поддержание CI строит быстро и эффективно.
Предварительные условия на сервере сборки
- TeamCity Professional версия 6.5.1
- Облачный сертификат подписки с закрытым ключом импортируется в хранилище сертификатов пользователей для учетной записи службы Team City.
- Cerebrata CMDLETS
TeamCity — проект непрерывной интеграции
Итак, давайте быстро проверим мою сборку CI, которая выплевывает пакеты Azure.
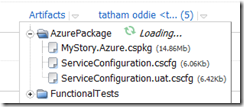
Как мы видим выше, сборка CI создает артефакт с именем AzurePackage.
Способ, которым мы генерируем эти артефакты, очень прост. В настройках CI Build Project мы устанавливаем путь к артефактам.
например, MyProjectMyProject.Azurebin% BuildConfiguration% Publish => AzurePackage
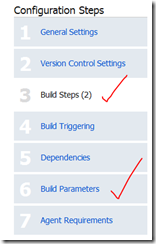
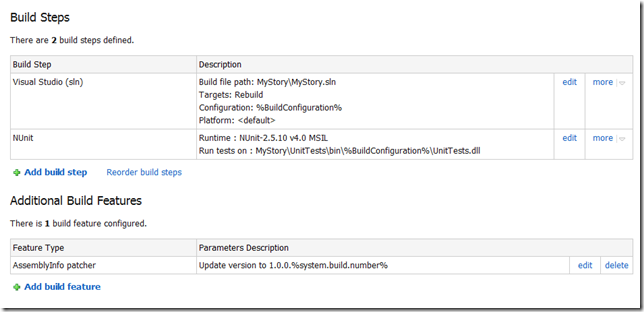
Итак, мы рассмотрим шаги сборки для настройки.
Как мы видим ниже, мы просто говорим, откуда запускается MSBuild, а затем где находятся dll модульных тестов.
Круто, теперь нам нужно настроить артефакты и конфигурацию.
Мы просто упоминаем, что хотим выпуск релиза.
Хорошо, теперь нам нужно сообщить нашему проекту развертывания Azure, чтобы он зависел от проекта CI, который мы настроили выше.
Team City — UAT Deployment Build Project
Итак, теперь давайте проверим проект развертывания UAT.
Этот проект будет зависеть от сборки CI, а затем мы настроим все параметры сборки, чтобы он мог подключаться к хранилищу Azure и службе для автоматического развертывания. Как только мы закончим здесь, мы посмотрим на сценарий powershell, который мы используем для автоматического развертывания в облаке. Этот сценарий поддерживает развертывание существующих слотов развертывания перед развертыванием нового с попытками повторных попыток.
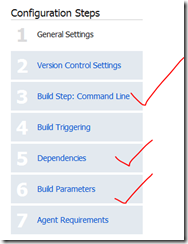
Хорошо, давайте проверим следующее для проекта развертывания UAT.
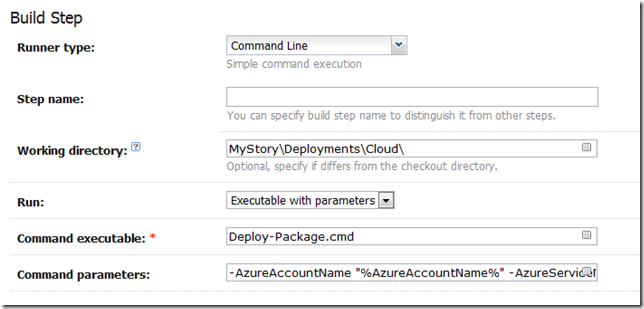
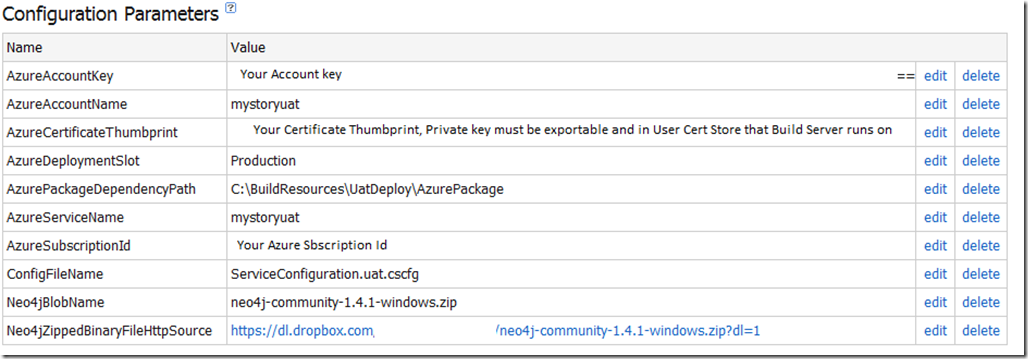
Приведенный выше снимок экрана — это команда, которая выполняет сценарий powershell, параметры (% независимо от%) будут разрешены из параметров сборки в шаге 6 на снимке экрана выше.
Вот команда для копирования / вставки без друзей. Конечно, если вы используете какую-то другую базу данных, вам не нужны вещи Neo4j.
| -AzureAccountName «% AzureAccountName%» -AzureServiceName «% AzureServiceName%» -AzureDeploymentSlot «% AzureDeploymentSlot%» -AzureAccountKey «% AzureAccountKey%» -AzureSubscriptionId «% AzureSubscriptionId%» -AzureCertificateThumbprint «% AzureCertificateThumbprint%» -PackageSource «% AzurePackageDependencyPath% MyProject. Azure.cspkg »-ConfigSource«% AzurePackageDependencyPath %% ConfigFileName% »-DeploymentName«% build.number% -% build.vcs.number% »-Neo4jBlobName«% Neo4jBlobName% »-Neo4jZttoSourceHileHourceBileNourceFileNN |
Это входные данные для файла deploy-package.cmd, который находится в нашем исходном хранилище.
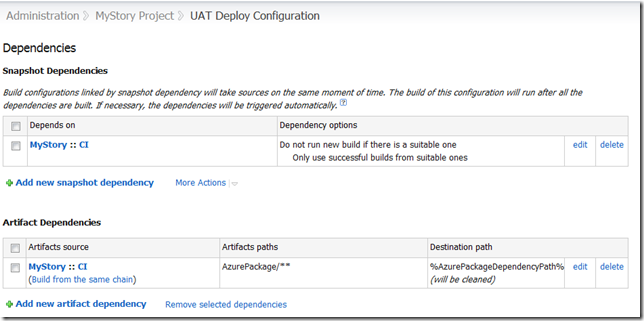
Теперь нам также нужно указать проекту развертывания использовать артефакт из нашего проекта CI. Поэтому мы устанавливаем зависимости артефактов, как показано ниже в разделе зависимостей. Также обратите внимание на то, как мы используем подстановочный знак, поэтому получите все файлы из AzurePackage (AzurePackage / **). Это будут файлы cspackage.
Обратите внимание, что у меня есть зависимость SnapShot, это заставляет развертывание UAT использовать тот же исходный код, который используется в проекте сборки CI.
Итак, параметры следующие.
Сценарии развертывания PowerShell
Сценарии развертывания состоят из трех файлов, и я помню, вы предположили, что вы установили командные сценарии управления Cerebrata.
Итак, давайте посмотрим на файл Deploy-Package.cmd, я хотел бы выразить свою благодарность Джейсону Стенгруму ( http://blog.codeassassin.com ) за это,
Джейсон писал: «Этот крошечный прокси-скрипт просто пишет временный сценарий PowerShell, содержащий все аргументы, которые вы пытаетесь передать, чтобы PowerShell мог их интерпретировать и избежать путаницы в собственном анализаторе командной строки Win32».
@echo off
setlocal
set tempscript=%temp%\%~n0.%random%.ps1
echo $ErrorActionPreference="Stop" >"%tempscript%"
echo ^& "%~dpn0.ps1" %* >>"%tempscript%"
powershell.exe -command "& \"%tempscript%\""
set errlvl=%ERRORLEVEL%
del "%tempscript%"
exit /b %errlvl%
Хорошо, а теперь вот код PowerShell, Deployment-Package.ps1. Я оставлю вас читать, что он делает. В итоге.
Это демонстрирует.
- Развертывание слота развертывания службы
- Развертывание слота развертывания сервиса
- Использование хранилища сертификатов для получения сертификата для подключений к службам через отпечаток сертификата — пользователи сохраняют сертификат под учетной записью службы, под которой работает TeamCity.
- Загрузка BLOB-объектов
- Загрузка BLOB-объектов
- Ожидание, пока новое развертывание не будет в состоянии готовности
#requires -version 2.0
param (
	[parameter(Mandatory=$true)] [string]$AzureAccountName,
	[parameter(Mandatory=$true)] [string]$AzureServiceName,
	[parameter(Mandatory=$true)] [string]$AzureDeploymentSlot,
	[parameter(Mandatory=$true)] [string]$AzureAccountKey,
	[parameter(Mandatory=$true)] [string]$AzureSubscriptionId,
	[parameter(Mandatory=$true)] [string]$AzureCertificateThumbprint,
	[parameter(Mandatory=$true)] [string]$PackageSource,
	[parameter(Mandatory=$true)] [string]$ConfigSource,
	[parameter(Mandatory=$true)] [string]$DeploymentName,
	[parameter(Mandatory=$true)] [string]$Neo4jZippedBinaryFileHttpSource,
	[parameter(Mandatory=$true)] [string]$Neo4jBlobName
)

$ErrorActionPreference = "Stop"

if ((Get-PSSnapin -Registered -Name AzureManagementCmdletsSnapIn -ErrorAction SilentlyContinue) -eq $null)
{
	throw "AzureManagementCmdletsSnapIn missing. Install them from Https://www.cerebrata.com/Products/AzureManagementCmdlets/Download.aspx"
}

Add-PSSnapin AzureManagementCmdletsSnapIn -ErrorAction SilentlyContinue

function AddBlobContainerIfNotExists ($blobContainerName)
{
	Write-Verbose "Finding blob container $blobContainerName"
	$containers = Get-BlobContainer -AccountName $AzureAccountName -AccountKey $AzureAccountKey
	$deploymentsContainer = $containers | Where-Object { $_.BlobContainerName -eq $blobContainerName }

	if ($deploymentsContainer -eq $null)
	{
		Write-Verbose  "Container $blobContainerName doesn't exist, creating it"
		New-BlobContainer $blobContainerName -AccountName $AzureAccountName -AccountKey $AzureAccountKey
	}
	else
	{
		Write-Verbose  "Found blob container $blobContainerName"
	}
}

function UploadBlobIfNotExists{param ([string]$container, [string]$blobName, [string]$fileSource)

	Write-Verbose "Finding blob $container\$blobName"
	$blob = Get-Blob -BlobContainerName $container -BlobPrefix $blobName -AccountName $AzureAccountName -AccountKey $AzureAccountKey

	if ($blob -eq $null)
	{
		Write-Verbose "Uploading blob $blobName to $container/$blobName"
		Import-File -File $fileSource -BlobName $blobName -BlobContainerName $container -AccountName $AzureAccountName -AccountKey $AzureAccountKey
	}
	else
	{
		Write-Verbose "Found blob $container\$blobName"
	}
}

function CheckIfDeploymentIsDeleted
{
	$triesElapsed = 0
	$maximumRetries = 10
	$waitInterval = [System.TimeSpan]::FromSeconds(30)
	Do
	{
		$triesElapsed+=1
		[System.Threading.Thread]::Sleep($waitInterval)
		Write-Verbose "Checking if deployment is deleted, current retry is $triesElapsed/$maximumRetries"
		$deploymentInstance = Get-Deployment `
			-ServiceName $AzureServiceName `
			-Slot $AzureDeploymentSlot `
			-SubscriptionId $AzureSubscriptionId `
			-Certificate $certificate `
			-ErrorAction SilentlyContinue

		if($deploymentInstance -eq $null)
		{
			Write-Verbose "Deployment is now deleted"
			break
		}

		if($triesElapsed -ge $maximumRetries)
		{
			throw "Checking if deployment deleted has been running longer than 5 minutes, it seems the delployment is not deleting, giving up this step."
		}
	}
	While($triesElapsed -le $maximumRetries)
}

function WaitUntilAllRoleInstancesAreReady
{
	$triesElapsed = 0
	$maximumRetries = 60
	$waitInterval = [System.TimeSpan]::FromSeconds(60)
	Do
	{
		$triesElapsed+=1
		[System.Threading.Thread]::Sleep($waitInterval)
		Write-Verbose "Checking if all role instances are ready, current retry is $triesElapsed/$maximumRetries"
		$roleInstances = Get-RoleInstanceStatus `
			-ServiceName $AzureServiceName `
			-Slot $AzureDeploymentSlot `
			-SubscriptionId $AzureSubscriptionId `
			-Certificate $certificate `
			-ErrorAction SilentlyContinue
		$roleInstancesThatAreNotReady = $roleInstances | Where-Object { $_.InstanceStatus -ne "Ready" }

		if ($roleInstances -ne $null -and
			$roleInstancesThatAreNotReady -eq $null)
		{
			Write-Verbose "All role instances are now ready"
			break
		}

		if ($triesElapsed -ge $maximumRetries)
		{
			throw "Checking if all roles instances are ready for more than one hour, giving up..."
		}
	}
	While($triesElapsed -le $maximumRetries)
}

function DownloadNeo4jBinaryZipFileAndUploadToBlobStorageIfNotExists{param ([string]$blobContainerName, [string]$blobName, [string]$HttpSourceFile)
	Write-Verbose "Finding blob $blobContainerName\$blobName"
	$blobs = Get-Blob -BlobContainerName $blobContainerName -ListAll -AccountName $AzureAccountName -AccountKey $AzureAccountKey
	$blob = $blobs | findstr $blobName

	if ($blob -eq $null)
	{
	    Write-Verbose "Neo4j binary does not exist in blob storage. "
	    Write-Verbose "Downloading file $HttpSourceFile..."
		$temporaryneo4jFile = [System.IO.Path]::GetTempFileName()
		$WebClient = New-Object -TypeName System.Net.WebClient
		$WebClient.DownloadFile($HttpSourceFile, $temporaryneo4jFile)
		UploadBlobIfNotExists $blobContainerName $blobName $temporaryneo4jFile
	}
}

Write-Verbose "Retrieving management certificate"
$certificate = Get-ChildItem -Path "cert:\CurrentUser\My\$AzureCertificateThumbprint" -ErrorAction SilentlyContinue
if ($certificate -eq $null)
{
	throw "Couldn't find the Azure management certificate in the store"
}
if (-not $certificate.HasPrivateKey)
{
	throw "The private key for the Azure management certificate is not available in the certificate store"
}

Write-Verbose "Deleting Deployment"
Remove-Deployment `
	-ServiceName $AzureServiceName `
	-Slot $AzureDeploymentSlot `
	-SubscriptionId $AzureSubscriptionId `
	-Certificate $certificate `
	-ErrorAction SilentlyContinue
Write-Verbose "Sent Delete Deployment Async, will check back later to see if it is deleted"

$deploymentsContainerName = "deployments"
$neo4jContainerName = "neo4j"

AddBlobContainerIfNotExists $deploymentsContainerName
AddBlobContainerIfNotExists $neo4jContainerName

$deploymentBlobName = "$DeploymentName.cspkg"

DownloadNeo4jBinaryZipFileAndUploadToBlobStorageIfNotExists $neo4jContainerName $Neo4jBlobName $Neo4jZippedBinaryFileHttpSource

Write-Verbose "Azure Service Information:"
Write-Verbose "Service Name: $AzureServiceName"
Write-Verbose "Slot: $AzureDeploymentSlot"
Write-Verbose "Package Location: $PackageSource"
Write-Verbose "Config File Location: $ConfigSource"
Write-Verbose "Label: $DeploymentName"
Write-Verbose "DeploymentName: $DeploymentName"
Write-Verbose "SubscriptionId: $AzureSubscriptionId"
Write-Verbose "Certificate: $certificate"

CheckIfDeploymentIsDeleted

Write-Verbose "Starting Deployment"
New-Deployment `
	-ServiceName $AzureServiceName `
	-Slot $AzureDeploymentSlot `
	-PackageLocation $PackageSource `
	-ConfigFileLocation $ConfigSource `
	-Label $DeploymentName `
	-DeploymentName $DeploymentName `
	-SubscriptionId $AzureSubscriptionId `
	-Certificate $certificate

WaitUntilAllRoleInstancesAreReady

Write-Verbose "Completed Deployment"
Automating Cloud Package File without using CSPack and CSRun explicitly
We will need to edit the Cloud Project file so that Visual Studio can create the cloud package files , as it will then automatically run the cspackage for you which can be consumed by the artifacts and hence other build projects. This allows us to bake functionality into the MSBuild process to generate the package files without the need for explicitly using cspack.exe and csrun.exe. Resulting in less scripts, else you would need a separate PowerShell script just to package the cloud project files.
Below are the changes for the .ccproj file of the Cloud Project. Notice the condition is that we generate these package files ONLY if the build is outside of visual studio, so this is nice to keep it from not always creating the packages to keep our development experience build process short. So for the condition below to work, you will need to build the project from the command line using MSBuild.
Here is the config entries for the project file.
<PropertyGroup>
  <CloudExtensionsDir Condition=" '$(CloudExtensionsDir)' == '' ">$(MSBuildExtensionsPath)\Microsoft\Cloud Service\1.0\Visual Studio 10.0\</CloudExtensionsDir>
</PropertyGroup>
<Import Project="$(CloudExtensionsDir)Microsoft.CloudService.targets" />
<Import Project="$(MSBuildExtensionsPath)\Microsoft\VisualStudio\v10.0\Web\Microsoft.Web.Publishing.targets" />
<Target Name="AzureDeploy" AfterTargets="Build" DependsOnTargets="CorePublish" Condition="'$(BuildingInsideVisualStudio)'!='True'">
</Target>
e.g.
C:\Windows\Microsoft.NET\Framework64\v4.0.30319\MSBuild.exe MyProject.sln /p:Configuration=Release
Configuration Transformations
You can also leverage configuration transformations so that you can have configurations for each environment. This is discussed here:
http://blog.alexlambert.com/2010/05/using-visual-studio-configuration.html
However, in a nutshell, you can have something like this in place, this means you can then have separate deployment config files, e.g.
ServiceConfiguration.cscfg
ServiceConfiguration.uat.cscfg
ServiceConfiguration.prod..cscfg
Just use the following config in the .ccproj file.
<Target Name="ValidateServiceFiles"
         Inputs="@(EnvironmentConfiguration);@(EnvironmentConfiguration->'%(BaseConfiguration)')"
         Outputs="@(EnvironmentConfiguration->'%(Identity).transformed.cscfg')">
   <Message Text="ValidateServiceFiles: Transforming %(EnvironmentConfiguration.BaseConfiguration) to %(EnvironmentConfiguration.Identity).tmp via %(EnvironmentConfiguration.Identity)" />
   <TransformXml Source="%(EnvironmentConfiguration.BaseConfiguration)" Transform="%(EnvironmentConfiguration.Identity)"
    Destination="%(EnvironmentConfiguration.Identity).tmp" />

   <Message Text="ValidateServiceFiles: Transformation complete; starting validation" />
   <ValidateServiceFiles ServiceDefinitionFile="@(ServiceDefinition)" ServiceConfigurationFile="%(EnvironmentConfiguration.Identity).tmp" />

   <Message Text="ValidateServiceFiles: Validation complete; renaming temporary file" />
   <Move SourceFiles="%(EnvironmentConfiguration.Identity).tmp" DestinationFiles="%(EnvironmentConfiguration.Identity).transformed.cscfg" />
 </Target>
 <Target Name="MoveTransformedEnvironmentConfigurationXml" AfterTargets="AfterPackageComputeService"
         Inputs="@(EnvironmentConfiguration->'%(Identity).transformed.cscfg')"
         Outputs="@(EnvironmentConfiguration->'$(OutDir)Publish\%(filename).cscfg')">
   <Move SourceFiles="@(EnvironmentConfiguration->'%(Identity).transformed.cscfg')" DestinationFiles="@(EnvironmentConfiguration->'$(OutDir)Publish\%(filename).cscfg')" />
 </Target>
Here is a sample ServiceConfiguration.uat.config that will then leverage the transformations. Note the transformation for the web and worker roles sections. Our worker role is Neo4jServerHost and the Web is just called Web.
<?xml version="1.0"?>
<sc:ServiceConfiguration
    xmlns:sc="http://schemas.microsoft.com/ServiceHosting/2008/10/ServiceConfiguration"
    xmlns:xdt="http://schemas.microsoft.com/XML-Document-Transform">
  <sc:Role name="Neo4jServerHost" xdt:Locator="Match(name)">
    <sc:ConfigurationSettings>
      <sc:Setting xdt:Transform="Replace" xdt:Locator="Match(name)" name="Microsoft.WindowsAzure.Plugins.Diagnostics.ConnectionString" value="DefaultEndpointsProtocol=https;AccountName=myprojectname;AccountKey=myaccountkey"/>
      <sc:Setting xdt:Transform="Replace" xdt:Locator="Match(name)" name="Storage connection string" value="DefaultEndpointsProtocol=https;AccountName=myprojectname;AccountKey=myaccountkey"/>
      <sc:Setting xdt:Transform="Replace" xdt:Locator="Match(name)" name="Drive connection string" value="DefaultEndpointsProtocol=http;AccountName=myprojectname;AccountKey=myaccountkey"/>
      <sc:Setting xdt:Transform="Replace" xdt:Locator="Match(name)" name="Neo4j DBDrive override Path" value=""/>
      <sc:Setting xdt:Transform="Replace" xdt:Locator="Match(name)" name="UniqueIdSynchronizationStoreConnectionString" value="DefaultEndpointsProtocol=https;AccountName=myprojectname;AccountKey=myaccountkey"/>
    </sc:ConfigurationSettings>
  </sc:Role>
  <sc:Role name="Web" xdt:Locator="Match(name)">
    <sc:ConfigurationSettings>
      <sc:Setting xdt:Transform="Replace" xdt:Locator="Match(name)" name="Microsoft.WindowsAzure.Plugins.Diagnostics.ConnectionString" value="DefaultEndpointsProtocol=https;AccountName=myprojectname;AccountKey=myaccountkey"/>
      <sc:Setting xdt:Transform="Replace" xdt:Locator="Match(name)" name="UniqueIdSynchronizationStoreConnectionString" value="DefaultEndpointsProtocol=https;AccountName=myprojectname;AccountKey=myaccountkey"/>
    </sc:ConfigurationSettings>
  </sc:Role>
</sc:ServiceConfiguration>
Manually executing the script for testing
Prerequisites:
- You will need to install the Cerebrata Azure Management CMDLETS from: https://www.cerebrata.com/Products/AzureManagementCmdlets/Download.aspx
- If you are running 64 bit version, you will need to follow the readme file instructions contained with the AzureManagementCmdlets, as it requires manual copying of files. If you followed the default install, this readme will be in C:\Program Files\Cerebrata\Azure Management Cmdlets\readme.pdf
- You will need to install the Certificate and Private Key (Which must be marked as exportable) to your User Certificate Store. This file will have an extension of .pfx. Use the Certificate Management Snap-In, for User Account Store. The certificate should be installed in the personal folder.
- Once the certificate is installed, you should note the certificate thumbprint, as this is used as one of the parameters when executing the PowerShell script. Ensure you remove all the spaces from the thumbprint when using it in the script!
1) First up, you’ll need to make your own ”MyProject.Azure.cspkg” file. To do this, run this:
C:\Windows\Microsoft.NET\Framework64\v4.0.30319\MSBuild.exe MyProject.sln /p:Configuration=Release
(Adjust paths as required.)
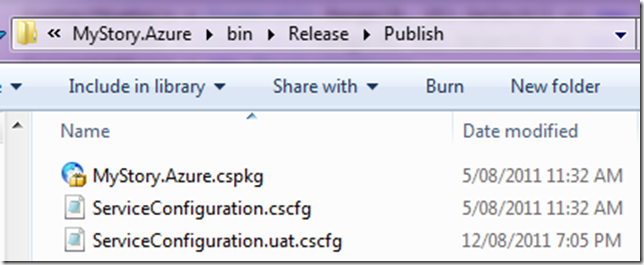
You’ll now find a package waiting for you at ”C:\Code\MyProject\MyProject\MyProject.Azure\bin\Release\Publish\MyProject.Azure.cspkg”.
2) Make sure you have the required management certificate installed on your machine (including the private key).
3) Now you’re ready to run the deployment script.
It requires quite a lot of parameters. The easiest way to find them is just to copy them from the last output log on TeamCity.
You will need to manually execute is Deploy-Package.ps1.
The Deploy-Package.ps1 file has input parameters that need to be supplied. Below is the list of parameters and description.
Note: These values can change in the future, so ensure you do not rely on this example below.
AzureAccountName: The Windows Azure Account Name e.g. MyProjectUAT
AzureServiceName: The Windows Azure Service Name e.g. MyProjectUAT
AzureDeploymentSlot: Production or Staging e.g. Production
AzureAccountKey: The Azure Account Key: e.g. youraccountkey==
AzureSubscriptionId:*The Azure Subscription Id e.g. yourazuresubscriptionId
AzureCertificateThumbprint: The certificate thumbprint you note down when importing the pfx file e.g. YourCertificateThumbprintWithNoWhiteSpaces
PackageSource: Location of the .cspkg file e.g. C:\Code\MyProject\MyProject.Azure\bin\Release\Publish\MyProject.Azure.cspkg
ConfigSource: Location of the Azure configuration files .cscfg e.g. C:\Code\MyProject\MyProject\MyProject.Azure\bin\Release\Publish\ServiceConfiguration.uat.cscfg
DeploymentName: This can be a friendly name of the deployment e.g. local-uat-deploy-test
Neo4jBlobName: The name of the blob file containing the Neo4j binaries in zip format e.g. neo4j-community-1.4.M04-windows.zip
Neo4jZippedBinaryFileHttpSource: The http location of the Neo4j zipped binary files e.g. https://mydownloads.com/mydownloads/neo4j-community-1.4.M04-windows.zip?dl=1
-Verbose: You can use an additional parameter to get Verbose output which is useful when developing and testing the script, just append -Verbose to the end of the command.
Below is an example executed on my machine, this will be different on your machine, so use it as a guideline only:
<code title=Sample Deployment Execution>
.\Deploy-Package.ps1 -AzureAccountName MyProjectUAT `
-AzureServiceName MyProjectUAT `
-AzureDeploymentSlot Production `
-AzureAccountKey youraccountkey== `
-AzureSubscriptionId yoursubscriptionid `
-AzureCertificateThumbprint yourcertificatethumbprint `
-PackageSource “c:\Code\MyProject\MyProject\MyProject.Azure\bin\Release\Publish\MyProject.Azure.cspkg” `
-ConfigSource “c:\Code\MyProject\MyProject\MyProject.Azure\bin\Release\Publish\ServiceConfiguration.uat.cscfg” `
-DeploymentName local-uat-deploy-test -Neo4jBlobName neo4j-community-1.4.1-windows.zip `
-Neo4jZippedBinaryFileHttpSource https://mydownloads.com/mydownloads/neo4j-community-1.4.1-windows.zip?dl=1 -Verbose
</code>
Note: When running the PowerShell command and the 64bit version of the scripts, ensure you running the PowerShell version that you fixed in the readme file from Cerebrata, do not rely on the default shortcut links in the start menu!
Summary
Well, I hope this will help you automating Azure Deployments to the cloud, this a great way to keep UAT happy with Agile deployments to meet the goals of every sprint.
If you do not like the way we generate the package files above, you can choose to use CSRun and CSPack explicitly, I have prepared this script already, below is the code for you to use.
#requires -version 2.0
param (
	[parameter(Mandatory=$false)] [string]$ArtifactDownloadLocation
)

$ErrorActionPreference = "Stop"

$installPath= Join-Path $ArtifactDownloadLocation "..\AzurePackage"
$azureToolsPackageSDKPath="c:\Program Files\Windows Azure SDK\v1.4\bin\cspack.exe"
$azureToolsDeploySDKPath="c:\Program Files\Windows Azure SDK\v1.4\bin\csrun.exe"

$csDefinitionFile="..\..\Neo4j.Azure.Server\ServiceDefinition.csdef"
$csConfigurationFile="..\..\Neo4j.Azure.Server\ServiceConfiguration.cscfg"

$webRolePropertiesFile = ".\WebRoleProperties.txt"
$workerRolePropertiesFile=".\WorkerRoleProperties.txt"

$csOutputPackage="$installPath\Neo4j.Azure.Server.csx"
$serviceConfigurationFile = "$installPath\ServiceConfiguration.cscfg"

$webRoleName="Web"
$webRoleBinaryFolder="..\..\Web"

$workerRoleName="Neo4jServerHost"
$workerRoleBinaryFolder="..\..\Neo4jServerHost\bin\Debug"
$workerRoleEntryPointDLL="Neo4j.Azure.Server.dll"

function StartAzure{
	"Starting Azure development fabric"
	& $azureToolsDeploySDKPath /devFabric:start
	& $azureToolsDeploySDKPath /devStore:start
}

function StopAzure{
	"Shutting down development fabric"
	& $azureToolsDeploySDKPath /devFabric:shutdown
	& $azureToolsDeploySDKPath /devStore:shutdown
}

#Example: cspack Neo4j.Azure.Server\ServiceDefinition.csdef /out:.\Neo4j.Azure.Server.csx /role:$webRoleName;$webRoleName /sites:$webRoleName;$webRoleName;.\$webRoleName /role:Neo4jServerHost;Neo4jServerHost\bin\Debug;Neo4j.Azure.Server.dll /copyOnly /rolePropertiesFile:$webRoleName;WebRoleProperties.txt /rolePropertiesFile:$workerRoleName;WorkerRoleProperties.txt
function PackageAzure()
{
	"Packaging the azure Web and Worker role."
	& $azureToolsPackageSDKPath $csDefinitionFile /out:$csOutputPackage /role:$webRoleName";"$webRoleBinaryFolder /sites:$webRoleName";"$webRoleName";"$webRoleBinaryFolder /role:$workerRoleName";"$workerRoleBinaryFolder";"$workerRoleEntryPointDLL /copyOnly /rolePropertiesFile:$webRoleName";"$webRolePropertiesFile /rolePropertiesFile:$workerRoleName";"$workerRolePropertiesFile
	if (-not $?)
	{
		throw "The packaging process returned an error code."
	}
}

function CopyServiceConfigurationFile()
{
	"Copying service configuration file."
	copy $csConfigurationFile $serviceConfigurationFile
}

#Example: csrun /run:.\Neo4j.Azure.Server.csx;.\Neo4j.Azure.Server\ServiceConfiguration.cscfg /launchbrowser
function DeployAzure{param ([string] $azureCsxPath, [string] $azureConfigPath)
	"Deploying the package"
    & $azureToolsDeploySDKPath $csOutputPackage $serviceConfigurationFile
	if (-not $?)
	{
		throw "The deployment process returned an error code."
	}
}

Write-Host "Beginning deploy and configuration at" (Get-Date)

PackageAzure
StopAzure
StartAzure
CopyServiceConfigurationFile
DeployAzure '$csOutputPackage' '$serviceConfigurationFile'

# Give it 60s to boot up neo4j
[System.Threading.Thread]::Sleep(60000)

# Hit the homepage to make sure it's warmed up
(New-Object System.Net.WebClient).DownloadString("http://localhost:8080") | Out-Null

Write-Host "Completed deploy and configuration at" (Get-Date)
note, if using .Net 4.0 which I am sure you all are, you will need to provide the text files for web role and worker role with these entries.
WorkerRoleProperties.txt
TargetFrameWorkVersion=v4.0
EntryPoint=Neo4j.Azure.Server.dll
WebRoleProperties.txt
TargetFrameWorkVersion=v4.0
Thanks to Tatham Oddie for contributing and coming up with such great ideas for our builds.
Cheers
Romiko

