Плагин maven-release-plugin используется для автоматизации множества ручных шагов, связанных с выпуском новых версий вашего программного обеспечения. Автоматизация предотвращает ошибки, которые в конечном итоге происходят с помощью ручного процесса. Объем работы, выполняемой плагином, впечатляет — он будет выполнять эти основные операции.
- Убедитесь, что все файлы в вашем проекте переданы в CVS
- Убедитесь, что ваш проект не имеет зависимостей SNAPSHOT
- Убедитесь, что <версия> вашего проекта pom.xml является версией SNAPSHOT
- Подтвердите, какой будет следующая версия проекта RELEASE
- Подтвердите, каким будет тег CVS проекта для следующей версии выпуска.
- Подтвердите, какой будет следующая версия SNAPSHOT проекта
- Обновите <версию> вашего pom.xml с версии SNAPSHOT до следующей версии RELEASE
- Зафиксируйте pom.xml в CVS
- Отметить проект в CVS
- Оформить заказ из CVS используя тег
- Построить проект
- Загрузите артефакты в репозиторий Maven.
- Обновите <version> вашего pom.xml с версии RELEASE до следующей версии SNAPSHOT вашего проекта
- Зафиксируйте pom.xml в CVS
Если вы работаете над одним проектом, выполнение всех этих шагов вручную может не иметь большого значения. Но если ваше предприятие состоит из нескольких проектов с зависимостями между ними, автоматизация, предоставляемая плагином maven-release-plugin, экономит время и предотвращает ошибки. Вот почему мне нужно было заставить работать плагин maven-release-plugin.
Домашняя страница для плагина ( http://maven.apache.org/plugins/maven-release-plugin/) расскажет вам все, что вам нужно знать о плагине, кроме как запустить его! Подумайте о технологиях, которые интегрирует плагин. Рассмотрим CVS. Должно быть достаточно простым для интеграции CVS; просто настройте проект с помощью строки подключения CVS. Однако для SourceForge.net требуется SSL-соединение для доступа на запись в хранилище CVS. Это означает интеграцию с чем-то вроде SSH. Теперь, когда задействован SSH, действительно ли вы хотите вводить свое имя пользователя / пароль каждый раз, когда требуется подключение к хранилищу CVS? Нет? Это означает интеграцию с парами открытого / закрытого ключей на стороне клиента и сервера. Посмотрите, как быстро это становится очень сложным. Теперь добавьте операционную систему Windows, где двоичные файлы SSH и CVS не так легко доступны, как в среде Linux, и у вас есть кошмар конфигурации.
Аннотация
Целью данной статьи является документирование шагов, необходимых для настройки всех технологий, которые понадобятся плагину maven-release-plugin для работы с обычным репозиторием Maven и с репозиторием CVS, требующим соединения SSL. Если вы являетесь разработчиком программного обеспечения с открытым исходным кодом, используя CVS-репозиторий на SourceForge.net, стандартный репозиторий Maven, и ваша основная ОС — Windows, то эта статья для вас.
Если у кого-то есть другой способ сделать это, пожалуйста, свяжитесь со мной! Мне потребовалось более недели, чтобы собрать различные интернет-ресурсы, чтобы это работало, и, учитывая сложность, я чувствую, что должен быть более легкий путь.
Контур
Существует много шагов, необходимых для правильной настройки всех технологий для maven-release-plugin. Прежде чем мы начнем, вот схема.
- Создать учетные записи
- Загрузить программное обеспечение
- Настроить систему% PATH%
- Генерация открытого / закрытого ключа
- Настроить SourceForge.net
- Настройте «sourceforge.cmd»
- Тест Плинк
- Настроить систему% CVS_RSH%
- Тест CVS
- Настроить Maven
- Настроить Eclipse
- Оформить заказ
- Настройте свой проект
- Запустите maven-release-плагин
- Продвигать артефакты от постановки
- Поиск проблемы
Создать учетные записи
SourceForge.net
SourceForge.net требует SSL-соединение для доступа на запись в хранилище CVS вашего проекта. Я собираюсь использовать SourceForge.net для этой статьи, однако шаги по настройке в этой статье также могут быть применены к любому хранилищу CVS, требующему SSL.
Обычно подключение к репозиторию SourceForge.net CVS через SSL не является проблемой. Сконфигурируйте соединение CVS в Eclipse для использования типа соединения «extssh» и введите свое имя пользователя и пароль при появлении запроса. Это не так просто, если вы хотите использовать maven-release-plugin позже.
Если у вас еще нет учетной записи SourceForge.net, зайдите на сайт и создайте новую учетную запись и новый проект.
Sonatype OSS Nexus
Sonatype недавно открыл репозиторий Maven на http://oss.sonatype.org для разработчиков с открытым исходным кодом. Как SourceForge.net предоставляет вам хранилище CVS для размещения вашего исходного кода, Sonatype OSS Nexus предоставляет вам хранилище Maven для размещения ваших артефактов (как RELEASE, так и SNAPSHOT). Ваша учетная запись в OSS Nexus может быть настроена для продвижения ваших артефактов в общедоступный репозиторий «Releases» OSS Nexus или в главный репозиторий Maven ( http://repo1.maven.org/maven2 ).
Если у вас еще нет учетной записи OSS Nexus, перейдите на веб-сайт и создайте новую.
Загрузить программное обеспечение
Вам понадобится все это программное обеспечение.
CVSNT
http://www.march-hare.com/cvspro/
CVSNT недавно стал CVSPRO с платной коммерческой версией. Существует еще версия для сообщества, которая является бесплатной, однако при первом использовании cvs.exe появляется всплывающее диалоговое окно с просьбой купить версию PRO, и вам просто нужно подождать, пока она не исчезнет. Если вы можете найти предыдущую версию CVSNT, используйте ее.
Когда вы перейдете по указанному выше URL-адресу для загрузки CVSNT, нажмите на гиперссылку «Все загрузки» вверху. В раскрывающемся списке загружаемых продуктов выберите «Клиент командной строки CVSNT Community 2.5.05 для Windows» (см. Рисунок 1). Скачайте и установите его на свой компьютер.
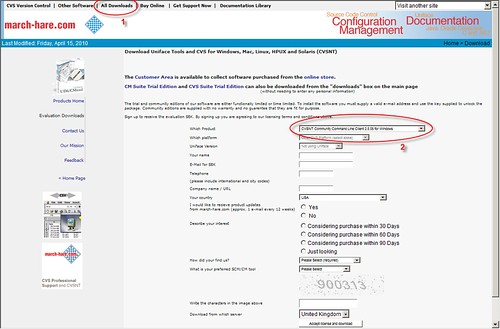
фигура 1
PuTTYgen
http://www.chiark.greenend.org.uk/~sgtatham/putty/download.html
Puttygen используется для генерации пары открытый / закрытый ключ, поэтому можно устанавливать SSL-соединения без необходимости каждый раз вводить имя пользователя и пароль.
палить
http://www.chiark.greenend.org.uk/~sgtatham/putty/download.html
Plink — это инструмент подключения к командной строке, похожий на ssh. Это позволит SSL-соединения с вашего компьютера к вашему хранилищу CVS на SourceForge.net.
MAVEN
Загрузите и распакуйте Maven.
ЗАТМЕНИЕ
Скачайте и распакуйте Eclipse
M2ECLIPSE
http://marketplace.eclipse.org/content/maven-integration-eclipse
M2Eclipse — это подключаемый модуль Eclipse для работы с проектами Maven и репозиториями Maven. Приведенный выше URL приведет вас на домашнюю страницу плагина M2Eclipse. Нажмите зеленую стрелку, чтобы получить URL-адрес для сайта обновления плагина, затем добавьте этот URL-адрес в Eclipse для установки плагина (см. Рисунок 2).
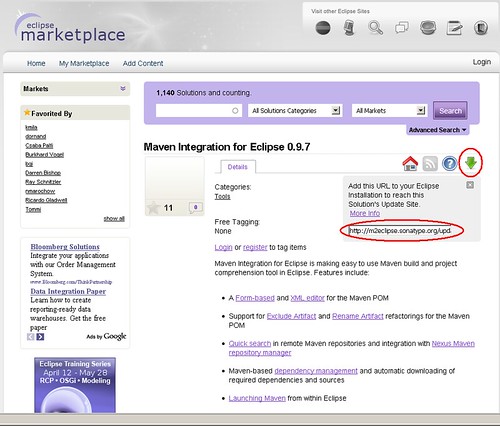
фигура 2
Настроить систему% PATH%
Двоичный файл cvs.exe необходимо добавить в системную переменную PATH. Выполните следующие действия (см. Рисунок 3).
- Щелкните правой кнопкой мыши «Мой компьютер» на рабочем столе.
- Выберите «Свойства»
- Нажмите на ссылку «Дополнительные параметры системы».
- Нажмите кнопку «Переменные среды …»
- Выберите «ПУТЬ» из списка.
- Нажмите кнопку «Редактировать …»
- Добавить «;» персонаж до конца
- Вставьте полный путь к каталогу CVSNT (ваш каталог CVSNT может отличаться от того, который показан на скриншоте).
- Нажимайте все кнопки «ОК», пока все окна не закроются.
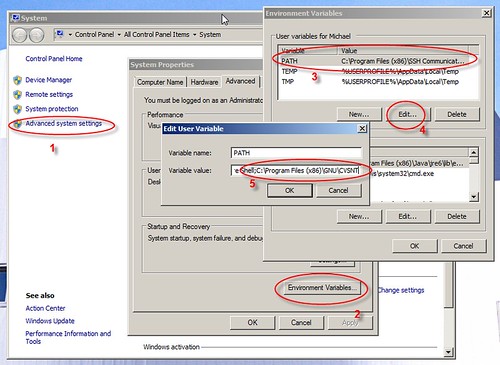
Рисунок 3
После добавления каталога CVSNT в PATH, давайте проверим, чтобы он работал. Для этого сначала нужно открыть командную строку Windows (или DOS Prompt). Выполните следующие действия (см. Рисунок 4).
- Нажмите кнопку «Пуск» на рабочем столе Windows
- Введите «cmd» в поле поиска.
- Нажмите клавишу «Ввод», чтобы открыть командную строку Windows
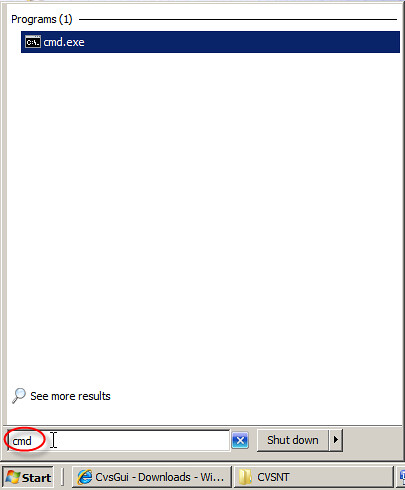
Рисунок 4
Чтобы проверить, что двоичный файл cvs.exe находится в переменной PATH, выполните команду cvs.exe. Результаты будут аналогичны рисунку 5.
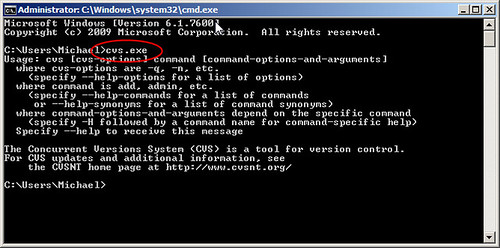
Рисунок 5
Если вы попытаетесь выполнить команду cvs.exe и вместо этого появится сообщение об ошибке, говорящее
«cvs.exe не распознан как внутренняя или внешняя команда …»,
ваш путь не установлен правильно. Исправьте это, прежде чем продолжить.
Генерация открытого / закрытого ключа
Puttygen.exe теперь будет использоваться для создания пары открытый / закрытый ключ. Это необходимо для связи с вашим репозиторием SourceForge.net через SSL. Пара открытый / закрытый ключ позволит осуществлять связь без запроса имени пользователя / пароля при каждом установлении соединения.
Дважды щелкните файл puttygen.exe, чтобы запустить приложение (см. Рисунок 6).
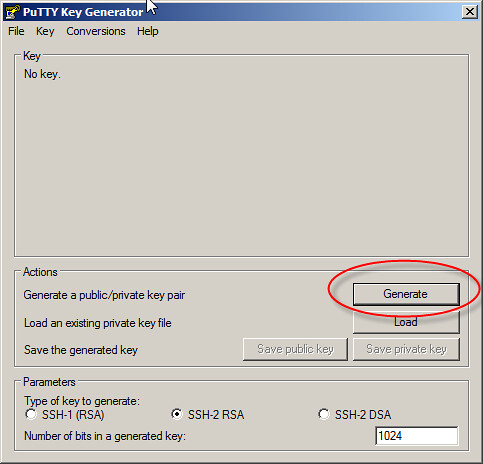
Рисунок 6
Чтобы создать новую пару открытый / закрытый ключ, выполните следующие действия.
- Нажмите кнопку «Создать» (см. Рисунок 6)
- Follow the instructions
- Click the «Save public key» button
- Save the public key in a file named «MyKey.pub»
- Click the «Save private key» button
- Save the private key in a file named «MyKey.ppk»
You now have a public/private key pair which you will use for SSL communication with your SourceForge.net CVS repository.
Keep the PuttyGen application running! You will need it open during the next step which is to configure your SourceForge.net account.
Configure SourceForge.net
For SSL communication with public/private key pairs, the private key always remains secret and protected on your computer. The public key, however, is put onto whatever system you are communicating securely with. In this case, you will be communicating securely with your SourceForge.net CVS repository. So you need to put the contents of your public key on your SourceForge.net account. Follow these steps (see figure 7).
- Open a browser to http://sourceforge.net
- Login to your SourceForge.net Account.
- Click the «Account» hyperlink in the upper-right corner of the page.
- Click the «Services» tab
- Click the «Edit SSH Keys for Shell/CVS»hyperlink.
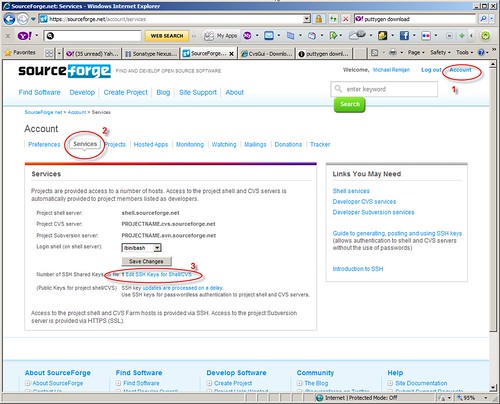
Figure 7
You will now be able to see the SSL public keys on your SourceForge.net account. If you have just created an account or you have never put a public key on your account, the text area of keys will be blank. To get your public key on your SourceForge.net account correctly, follow these steps.
- Switch back the running instance of PuttyGen
- Select and COPY the entire public key (see figure 8)
- Switch back to the web browser to SourceForge.net
- PASTE the contents of the public key on a new line of your list of keys (see figure 9). When you paste, the entire key should be on a single line – the key should not be broken up into multiple lines. If you have more than one key on your account, each key is pasted on its own line. Do not have an extra line between keys.
- Click the «Update» button.
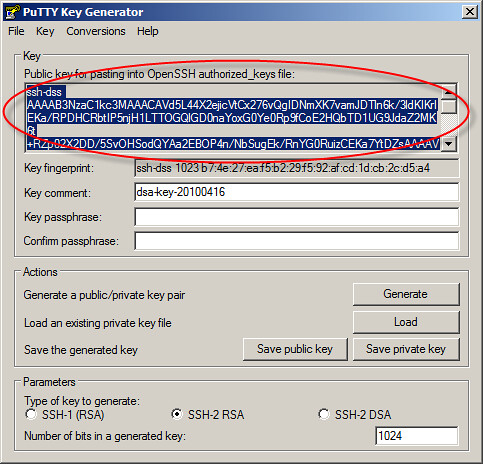
Figure 8
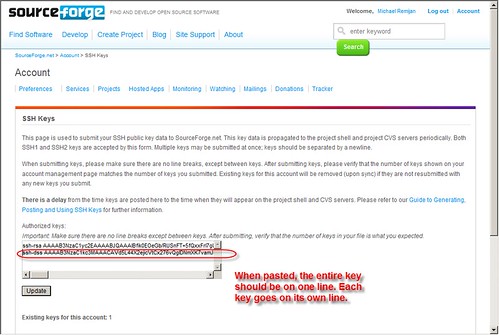
Figure 9
Configure «sourceforge.cmd»
Plink is a command-line connection tool similar to ssh. It will allow SSL connections from your computer to your CVS Repository on SourceForge.net. After having completed the creation of a public/private key pair and putting the public key on your SourceForge.net account, it is now time to see if Plink will work in establishing a secure SSL connection.
Instead of using the plink.exe binary directly, we are going to create a small Windows command file so configuration parameters can more easily passed to Plink. Follow these steps.
- Open Notepad
- Type the following into notepad (location of your files may be different)
C:\plink.exe -noagent -i C:\MyKey.ppk %*%
- Save the file as «sourceforge.cmd»
Test Plink
Now we are able to test Plink and see if an SSL connection can be made from your computer to your CVS Repository on SourceForge.net. Follow these steps.
- Open a Command Prompt (DOS Prompt).
- Change directory to the location of the «sourceforge.cmd» command file.
- Execute the following command:
C:\>sourceforge.cmd [YOUR_SOURCEFORGE_PROJECT_NAME].cvs.sourceforge.net
You will be prompted for your username as plink.exe prepares to make the connection. Once connected two things will happen. First, a short welcome message will be displayed showing you have successfully connected. Second, the connection will be immediately terminated because this is a non-interactive shell (see figure 10).
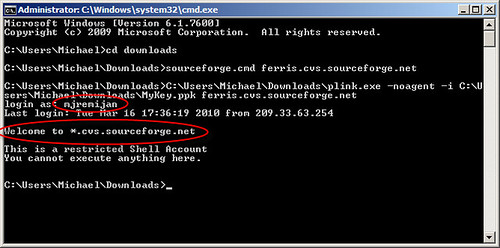
Figure 10
If this worked, congratulations! You just successfully established a SSL connection with SourceForge.net using your public/private key. If not, fix this before continuing.
Configure the System %CVS_RSH%
CVS relies on a System environment variable named CVS_RSH to tell it where the program is located which is capable of creating SSL connections. For Linux, this is typically ssh. For Windows, we have plink.exe. More specifically, we have the «sourceforge.cmd» command file created in the previous step.
A new System environment variable named «CVS_RSH» must now be created pointing to the «sourceforge.cmd» command file. Recalling how the System PATH was configured, follow these steps (see figure 11).
- Click the «New…» button.
- Set «Variable name:» equal to «CVS_RSH»
- Set «Variable value:» equal to the fully qualified location of the «sourceforge.cmd» file.
- Click all the «OK» buttons until all the windows are closed.
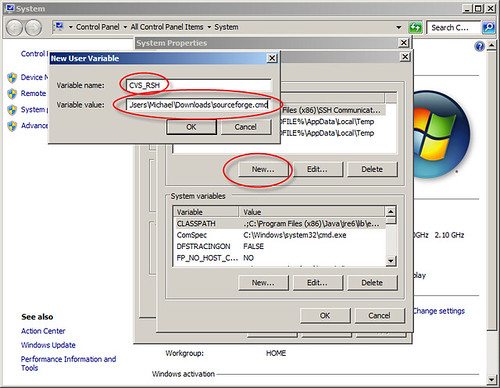
Figure 11
Test CVS
Now that the CVS_RSH environment variable is set, cvs.exe should be able to use it to establish a secure connection with a CVS repository. To test this, follow these steps:
- Open a NEW Command Prompt (DOS Prompt). I emphasize the word NEW here. If you already have a Command Prompt open you must close it and open a new one.
- Execute the following command (This is a long command! Make sure you have all the «:», «@», «.»and «/» characters in the right place!)
c:\>cvs -d :ext:[YOUR_SOURCEFORGE_USERNAME]@[YOUR_SOURCEFORGE_PROJECT_NAME].cvs.sourceforge.net:/cvsroot/[YOUR_SOURCEFORGE_PROJECT_NAME] ls
When this command is executed the first time, you may get a dialog box from CVSPRO asking you to purchase the software. You just have to wait until the dialog box goes away. After it does, your command will be executed. If successful, you will see a listing of the directories in your SourceForge.net CVS repository (see figure 12). If not, fix this before continuing.
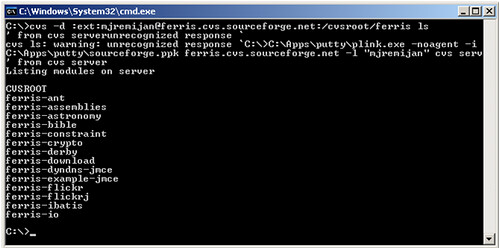
Figure 12
Configure Maven
Up until now we have been concentrating on CVS and your account at SourceForge.net. All the configuration done to this point allows you to establish a secure SSL connection from your computer to your SourceForge.net CVS repository using public/private key pairs.
Now we are going to concentrate on a Maven repository and your account at Sonatype OSS Nexus. We are going to configure Maven so your computer knows how to resolve dependencies deployed to Sonatype OSS Nexus and how to deploy your artifacts to Sonatype OSS Nexus.
If you have not visited the Sonatype OSS Nexus webpage and created an account, do so now.
The %HOME%\.m2\settings.xml file is a standard Maven configuration file and is where we will be starting the Maven configuration.
<server> my-snapshots
This server configures the username and password used by Maven to connect to the repository to which your SNAPSHOT artifacts will be deployed. NOTE – The URL of the snapshot repository is not defined here! It will be defined later in your project’s pom.xml.
<!-- settings.xml --> <server> <id>my-snapshots</id> <username>[YOUR_OSS_REPO_USERNAME]</username> <password>[YOUR_OSS_REPO_PASSWORD]</password> </server>
<server> my-staging
This server configures the username and password used by Maven to connect to the repository to which your RELEASE artifacts will be deployed. NOTE – The URL of the release repository is not defined here! It will be defined later in your project’s pom.xml.
OSS Nexus does not allow direct deployment into its public «Releases» repository. OSS Nexus is configured to deploy your artifacts to your staging repository first. After your artifacts are staged, you need to login to the OSS Nexus website to manually promote them to the public «Releases» repository. This staging allows you time to check the staged artifacts are correct before putting them into the public «Releases» repository. Once in the public «Releases» repository you cannot change them.
<!-- settings.xml --> <server> <id>my-staging</id> <username>[YOUR_OSS_REPO_USERNAME]</username> <password>[YOUR_OSS_REPO_PASSWORD]</password> </server>
<repository> oss-public
This repository defines the OSS Nexus public «Releases» repository. Once your artifacts are promoted from your staging repository, they are publically available from this repository.
NOTE – This is put into a <profile>.
<!-- settings.xml --> <repository><id>oss-public</id><url>http://oss.sonatype.org/content/groups/public</url><releases><enabled>true</enabled></releases> <snapshots><enabled>true</enabled></snapshots></repository>
<repository> oss-staging
This repository defines the OSS Nexus staging repository. Because your artifacts are staged first before they are put into the public «Releases» repository, this repository configuration allows Maven to resolve dependencies which you have staged but not promoted to the public «Releases» repository.
NOTE – This is put into a <profile>.
<!-- settings.xml --><repository><id>oss-staging</id><url> http://oss.sonatype.org/content/groups/staging</url> <releases> <enabled>true</enabled></releases> <snapshots><enabled>true</enabled></snapshots></repository>
<repository> oss-snapshots
This repository defines the OSS Nexus snapshot repository. If you are working on a project with multiple developers, this repository allows the team to resolve dependencies on the latest snapshots. Snapshots do not go into staging first. Snapshot cannot be promoted into the OSS Nexus public «Releases» repository.
NOTE – This is put into a <profile>.
<!-- settings.xml --><repository><id>oss-snapshots</id><url> http://oss.sonatype.org/content/repositories/snapshots</url> <releases> <enabled>true</enabled></releases> <snapshots><enabled>true</enabled></snapshots></repository>
Configure Eclipse
There are two parts of Eclipse to configure. The first is the Eclipse connection to your SourceForge.net CVS repository. The second is the Maven Indexes of the M2Eclipse plug-in.
M2Eclipse Plug-in
If you have not installed the M2Eclipse plug-in, do so now. When we edited the Maven settings.xml file, we did so to enable Maven to resolve dependencies deployed in the OSS Nexus repository. We now need to do a similar configuration for the M2Eclipse plug-in. If you right-click on a Maven project and select «Add Dependencies», the artifact search feature of M2Eclipse can only find artifacts in the repositories listed in the «Maven Indexes» view. In order to find your artifacts in the OSS Nexus repository, open the «Maven Indexes» view and add the three repositories shown in figure 13.
- http://oss.sonatype.org/content/groups/public
- http://oss.sonatype.org/content/repositories/snapshots
- http://oss.sonatype.org/content/groups/staging
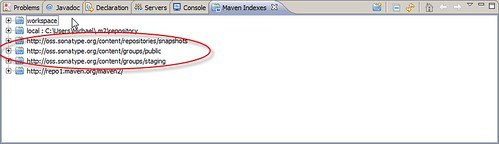
Figure 13
CVS Repositories
By default, Eclipse comes with the «CVS Repositories» view so there is no need to install it. Open the «CVS Repositories» view. We need to add your SourceForge.net CVS repository to the list.
NOTE — Even if you already have your repository configured you will need to remove it and add it again! The reason why will be given later.
To configure your SourceForge.net CVS repository, follow these steps (see figure 14)
- Enter your Host, Repository Path, and User
- Set the «Connection type:» dropdown box to be «ext» (see figure 14). It is very important to set the value to «ext».
- DO NOT click the «Finish» button yet!
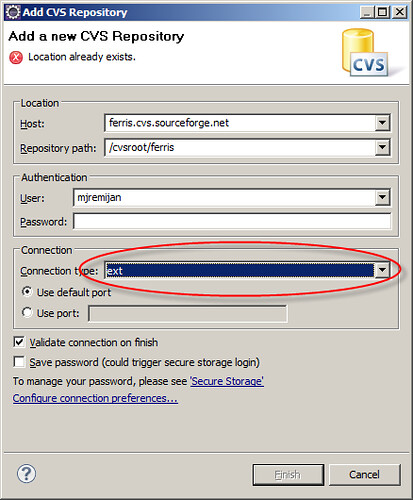
Figure 14
By setting the connection type to «ext», the CVS connection string will attempt to use some kind of external means to establish a connection to the CVS repository. In a command-line Linux environment, this external means is usually ssh to provide a secure connection to the CVS repository. To configure what «ext» means inside Eclipse, follow these steps:
- Click on the «Configure connection preferences…» hyperlink (see figure 15)
- Select the «Use another connection method type to connect» radio button (see figure 16).
- Select «extssh» from the «Connection type» dropdown box (see figure 16). This configuration tells Eclipse it should treat the «ext» connection type as its internal «extssh» connection type.
- Click the «OK» buttons until all the windows are closed.
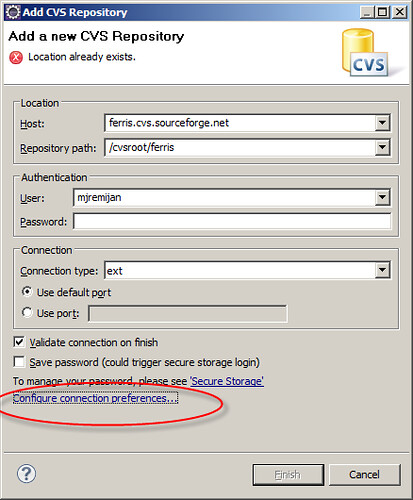
Figure 15
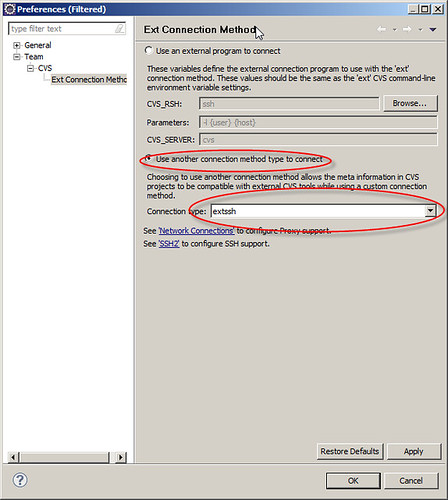
Figure 16
After all the windows are closed, the connection to your SourceForge.net CVS repository has been configured within Eclipse. Although you configured the connection type as «ext», Eclipse will treat it as its internal «extssh» connection type.
Test the connection by getting the list of directories in your SourceForge.net CVS repository. Eclipse will prompt you for a password. Eclipse will then use its internal ssh implementation to connect. When you check out a module (and this is the important part), the hidden CVS/Root file will have «ext» as its connection type (see figure 17). This is vital for getting the maven-release-plugin to work.
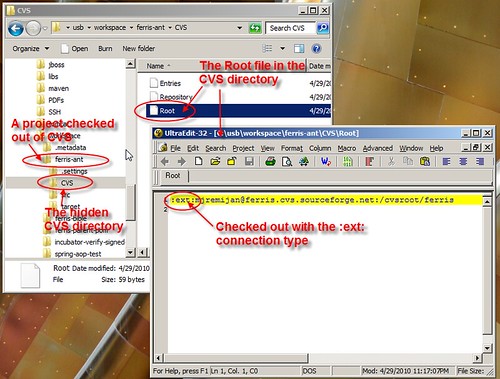
Figure 17
Checkout your project
It is now time to check out your project from your SourceForge.net CVS repository.
NOTE – If you already have your project checked out you need to delete it and check it out again using the Eclipse CVS Repository configured with the «ext» extension. If you do not do this, then the maven-release-plugin will not work.
Configure your project
Assuming you have checked out a Maven project from your SourceForge.net CVS repository, it is now time for the final configuration – configuring your project’s pom.xml.
<scm>
The <scm> tags hold information so Maven knows about the CVS repository the project came from. You will need to configure the <scm> tag with information about your SourceForge.net CVS repository.
This information must go into each project’s pom.xml. If your development group has a parent POM project, the <scm> information must still go into each project’s pom.xml because the information is unique to each project.
The <scm> configuration has a number of child tags Make sure you have all the «:», «@», «.»and «/» characters in the right place!. The child tags will be explained following this example:
<!-- pom.xml --><project...>...<scm> <connection>scm:cvs:pserver:anonymous@[YOUR_SOURCEFORGE_PROJECT_NAME].cvs.sourceforge.net:/cvsroot/[YOUR_SOURCEFORGE_PROJECT_NAME]:[DIRECTORY_IN_YOUR_CVS_REPOSITORY] </connection> <tag></tag><developerConnection>scm:cvs:ext: [YOUR_SOURCEFORGE_USERNAME]@[YOUR_SOURCEFORGE_PROJECT_NAME].cvs.sourceforge.net:/cvsroot/[YOUR_SOURCEFORGE_PROJECT_NAME]:[DIRECTORY_IN_YOUR_CVS_REPOSITORY]</developerConnection><url>[URL_TO_YOUR_PROJECT'S_HOMEPAGE] </url> </scm></project>
<connection>
This tag is configured for anonymous pserver (non-ssh) access to a module in your SourceForge.net CVS repository.
<tag>
This tag is used by the maven-release-plugin. You do not have to worry about it right now.
<developerConnection>
This tag is configured for your developer ext (ssh) access to a module in your SourceForge.net CVS repository.
<url>
This tag is the URL to your project’s homepage.
<distributionManagement>
The <distributionManagement> tag holds a lot of different information. In our case we want to configure a <repository> and a <snapshotRepository>. Remember back when the settings.xml file was configured with the username and password needed to deploy artifacts to the OSS Nexus repository? Remember the URL to the repository was not configured in settings.xml? The answer to where the URL to the repository is configured is pom.xml. If your development team has a parent POM, this configuration can go in the parent POM.
An explanation of <repository> and <snapshotRepository> follow this example:
<!-- pom.xml --><project...>... <distributionManagement>...<repository><id>my-staging</id><name>my-staging</name><url>http://oss.sonatype.org/service/local/staging/deploy/maven2</url></repository><snapshotRepository><id>my-snapshots</id><name>my-snapshots</name><url>http://oss.sonatype.org/content/repositories/snapshots</url></snapshotRepository></distributionManagement></project>
<repository>
This tag defines the location of your OSS Nexus staging repository. When you execute «mvn deploy», your RELEASE artifacts will be staged to this repository. After your artifacts are staged, you need to login to the OSS Nexus website to manually promote them to the public «Releases» repository.
The <id> values from settings.xml and pom.xml MUST MATCH!
<!— | In the settings.xml file of %HOME%\.m2\--><server>... <id>my-staging</id></ server ><!— | In the pom.xml file of your project!--><repository>... <id>my-staging</id></repository>
If the <id> values do not match, Maven will be unable to find the correct username and password to connect to this repository.
<snapshotRepository>
This tag defines the location of the OSS Nexus snapshot repository. When you execute «mvn deploy», your SNAPSHOT artifacts will be staged to this repository.
The <id> values from settings.xml and pom.xml MUST MATCH!
<!— | In the settings.xml file of %HOME%\.m2\--><server>... <id>my-snapshots</id></ server ><!— | In the pom.xml file of your project!--><snapshotRepository>... <id>my-snapshots</id></snapshotRepository>
If the <id> values do not match, Maven will be unable to find the correct username and password to connect to this repository.
Review
Before continuing, let us review what has been done so far.
- Downloaded and configured CVSNT
- Downloaded and used puttygen.exe to generate a public/private key and set the public key in your SourceForge.net account.
- Downloaded and configured plink.exe to allow cvs.exe to connect to your SourceForge.net CVS repository using SSL.
- Configured Maven for the Sonatype OSS Nexus repository.
- Configured Eclipse’s m2eclipse for the Sonatype OSS Nexus repository.
- Configured Eclipse’s CVS Repository for your SourceForge.net CVS repository
- Configured your project’s pom.xml for both your SourceForge.net CVS repository and the OSS Nexus repository.
Run maven-release-plugin
It is finally time to run the maven-release-plugin!
Our goal is to have the maven-release-plugin automate the deployment of a new version of your project to your OSS Nexus staging repository.
To prepare for the release, follow these steps:
- Edit your project’s pom.xml file so the version ends with «-SNAPSHOT». If you do not do this the maven-release-plugin will complain.
- Commit the changes to the pom.xml file to CVS. If you do not do this the maven-release-plugin will complain.
- Open a new Command Prompt (DOS Prompt)
- Change to your project’s directory.
- Execute the following command:
C:\>mvn -Dmaven.scm.provider.cvs.implementation=cvs_native release:prepare
If all goes well, you will first be prompted for what version this release will be. The maven-release-plugin removes the «-SNAPSHOT» from your pom’s <version> tag and assumes it is the next version. If it is, just press enter. If not type in the correct value for the next version then press enter (see figure 18).
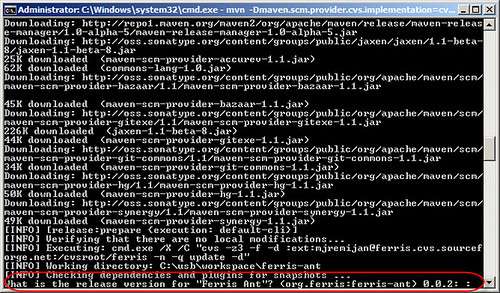
Figure 18
Next, the maven-release-plugin will ask you for the name it will use to tag this version in CVS. Again, the maven-release-plugin makes an intelligent guess for its value. If it is correct just press enter. If not type in the correct value for the CVS tag then press enter (see figure 19).
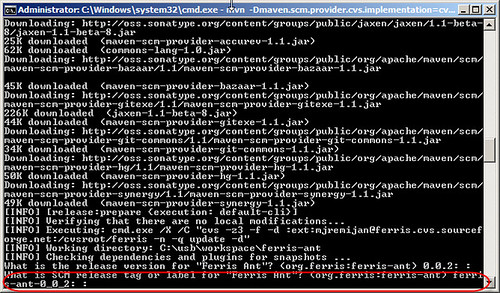
Figure 19
Finally, the maven-release-plugin will ask you for the name of the new SNAPSHOT version. Again, the maven-release-plugin makes an intelligent guess for its value. If it is correct just press enter. If not type in the correct value for the next SNAPSHOT version then press enter (see figure 20).
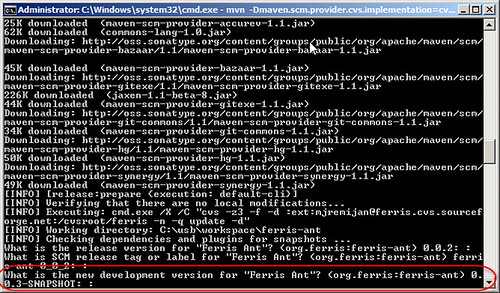
Figure 20
If all goes well, you will get the wonderful Maven build successful message:
[INFO] —————————————————————
[INFO] BUILD SUCCESSFUL
[INFO] —————————————————————
. . .BUT YOU ARE NOT DONE YET!
You have successfully prepared for the release. To perform the release and get your project’s artifact deployed to your OSS Nexus staging repository, execute the following command:
C:\>mvn -Dmaven.scm.provider.cvs.implementation=cvs_native release:perform
If this is successful and you get another. . .
[INFO] —————————————————————
[INFO] BUILD SUCCESSFUL
[INFO] —————————————————————
. . .congratulations! You have successfully configured all the technologies which the maven-release-plugin needs to work with a regular Maven repository and with a CVS repository requiring an SSL connection.
Promote Artifacts from Staging
Since running the maven-release-plugin was successful, your project’s RELEASE artifacts are waiting in your OSS Nexus staging repository.
You now need to login to your OSS Nexus Repository, verify your artifacts are properly staged, and finally promote the artifacts to the OSS Nexus «Releases» repository. Optionally, your artifacts will be promoted to the Maven main repo (http://repo1.maven.org/maven2) if your account is configured to promote there.
To verify your artifacts are properly staged, follow these steps (see figure 21):
- Open a browser to the Sonatype OSS Nexus repository (http://oss.sonatype.org)
- Log in
- Click the «Staging» hyperlink
- Click on your staging repository
- Click on what has been staged
- Expand the tree and see your artifacts ready for promotion

Figure 21
Verify all the artifacts for your release are properly staged. Once verified, continue to the final step, promotion.
To promote your artifacts from staging into the OSS Nexus «Releases» repository, follow these steps:
- Right-click what has been staged (see figure 22)
- Select «close»
- Enter a description
- Right-click (again) what has been staged (see figure 23)
- Select «promote»
- Enter a description
NOTE — At any point you can select «Drop» instead to remove it from staging. Re-run the maven-release-plugin to try again.
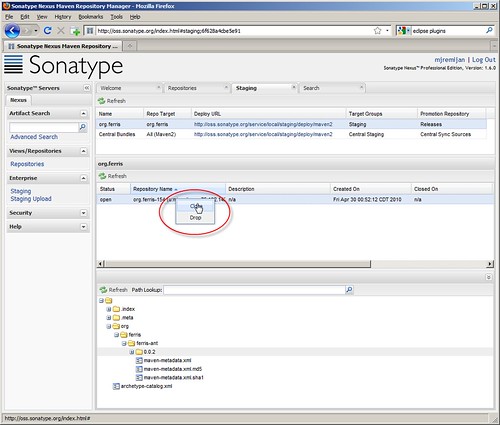
Figure 22
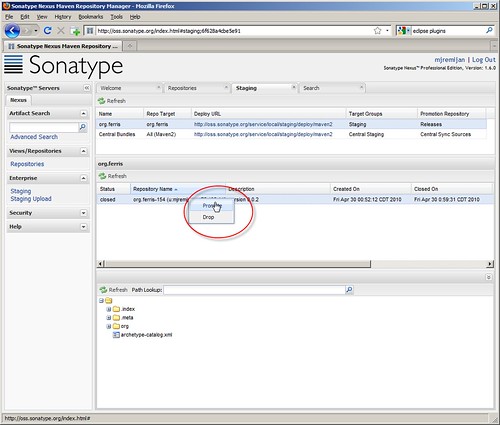
Figure 23
Congratulations! Your artifacts are now in the OSS Nexus «Releases» repository.
Troubleshooting
If everything was not successful there is a lot that could have gone wrong. This is a complex configuration and I cannot cover even a fraction of what might go wrong. Here are some tips:
- Make sure you follow each step of this document from top to bottom. Do not continue to the next step if you are not successful at the one you are on.
- I had a positive experience with descriptive error messages and finding solutions for them online. If you get stuck, search for the solution.
- The maven-release-plugin has 2 goals I did not cover. Make sure you read about these.
- release:clean
- release:rollback
- Have patience. It might be difficult to get working but the effort is rewarded with the ease coming from automating the complex release process.