Еще в феврале команда
SeatGeek открыла источник драгоценного камня, который они называют
Soulmate, который реализует автозаполнение с помощью
Redis . «Soulmate заканчивает ваши предложения», как они говорят на своей странице readme на Github. Вы можете увидеть это в действии на
SeatGeek.com . Soulmate очень полезен: многим из нас нужно поведение поиска типа вперед, и использование Redis — отличный способ сделать это быстро и быстро. Но что еще более важно, Soulmate — отличный пример того, как заранее создать индекс в Redis, что позволяет очень быстро выполнять поиск позже. Потратьте несколько минут, чтобы узнать, как работает Soulmate; Скорее всего, вы сможете использовать тот же подход в своем собственном приложении с совершенно другим набором данных.
Быстрое автозаполнение с помощью Soulmate может помочь пользователям влюбиться в ваше приложение Rails
Сегодня я начну с того, что шаг за шагом покажу, как настроить новое приложение Rails 3.1 с Soulmate и Redis, используя виджет автозаполнения пользовательского интерфейса jQuery. На следующей неделе я опишу вторую статью о том, как именно работает алгоритм кэширования Redis в Soulmate. Но прежде чем мы начнем создавать пример приложения, давайте узнаем кое-что о драгоценном камне Soulmate….
Как Soulmate должен был работать
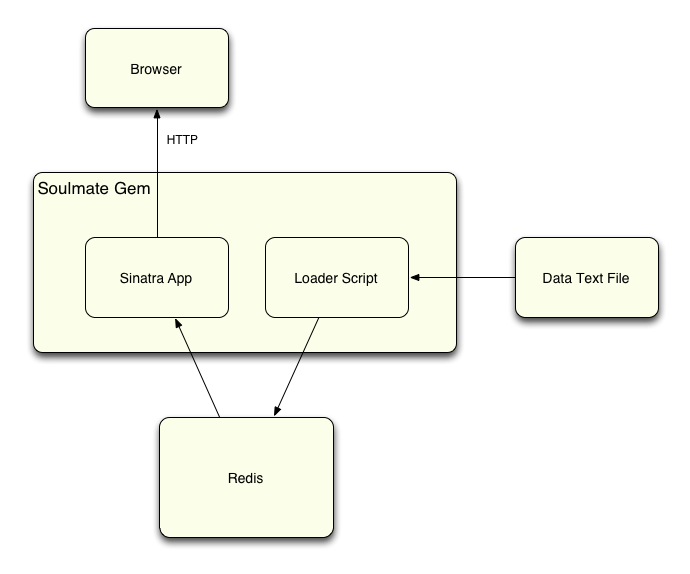
Вот концептуальная схема, показывающая, как вы обычно используете Soulmate:
Самоцвет Soulmate содержит два компонента, с которыми вы взаимодействуете напрямую:
- Скрипт загрузчика («загрузка родственной души»), который считывает текстовый файл данных, содержащий все слова или фразы, которые будут искать ваши конечные пользователи, и сохраняет их в Redis, а также:
- A Sinatra app that will perform searches against these words and return the matching results via HTTP directly to the user’s browser.
Check out Soulmate’s github readme page for more details on exactly how to use the load script, and also on how to send search requests to the Sinatra app. SeatGeek also explain how to mount their Sinatra app inside your Rails 3 app, so you can take advantage of Soulmate without having to setup a separate server, etc.
Calling Soulmate directly from a Rails 3 app
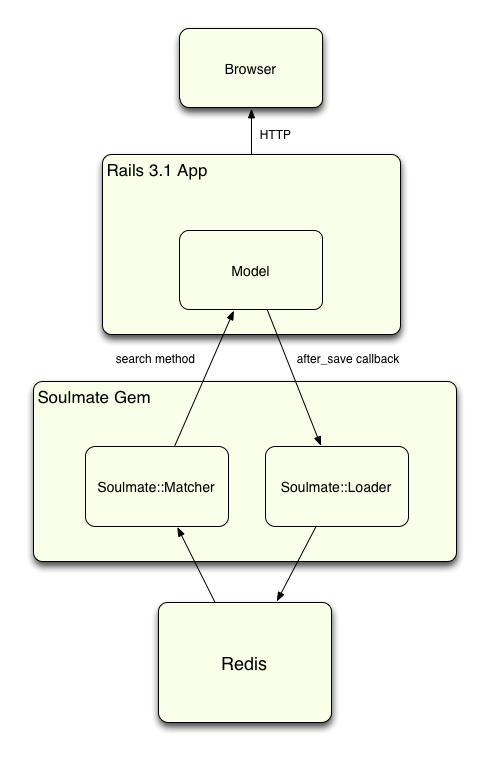
Using Sinatra is a great way to get started with Soulmate quickly; however, I decided to set up the gem inside my Rails 3.1 app today in a slightly different way. Instead of interacting with Soulmate via the load script and Sinatra, I called the Soulmate::Loader and Soulmate::Matcher Ruby classes found inside the Soulmate gem directly from an ActiveRecord model. Here’s a diagram showing my setup:
My ActiveRecord model’s database table contains the words my users will search for using autocomplete, and uses an after_save callback to save them in Soulmate by calling the same code that Soulmate’s loader script does: the Soulmate::Loader class. This allows me to keep my SQL database in sync with my Redis autocomplete cache. Later when my users perform a search from an autocomplete text field, my app will call the same code that Soulmate’s Sinatra app did: the Soulmate::Matcher class, without the need for a separate Rack app to service these results.
This was actually all very easy to do! Soulmate’s code was quite easy to follow and everything just worked for me. To prove it, let’s spend 10 or 20 minutes together and setup a new sample Rails 3.1 app right now that will use Soulmate and Redis for autocomplete.
Step 1: Installing Redis and creating a new Rails 3.1 app
I’ll assume most of you have already installed and used Redis by now; if not then I hope reading this article will encourage you to take the time to download and become familiar with it. If you have Homebrew, then it’s just a matter of running:
$ brew install redis
==> Downloading http://redis.googlecode.com/files/redis-2.2.14.tar.gz
etc...
If not, then you easily built it from source; see: http://redis.io/download for details.
Now that we have Redis, let’s create a new example Rails 3.1 app that we can try out Soulmate with:
$ rails -v
Rails 3.1.3
$ rails new soulmate_example
 create
 create  README
 create  Rakefile
 create  config.ru
 create  .gitignore
 create  Gemfile

etc...

Using sass-rails (3.1.5)
Using sqlite3 (1.3.4)
Using uglifier (1.1.0)
 Your bundle is complete! Use `bundle show [gemname]` to see where a bundled gem is installed.
And let’s add the Soulmate gem to the Gemfile, along with Faker, which will give us some silly names to test autocomplete with:
source 'http://rubygems.org'

gem 'rails', '3.1.3'
gem 'soulmate'
gem 'faker'

etc...
Now we need to run bundle update to install Soulmate and Faker, since Rails already ran bundle install for us when we created the new app:
$ bundle update
Step 2: Creating a model and some test data
Now let’s create a new ActiveRecord model called “Person” with a single string attribute called “name:”
$ rails g model person name:string
And next let’s write some code to create 1000 test person records using the Faker gem we added above. Editing db/seeds.rb:
1000.times do
  Person.create :name => "#{Faker::Name.first_name} #{Faker::Name.last_name}"
end
Finally we can create our database along with 1000 silly names:
$ rake db:migrate
$ rake db:seed
Step 3: Adding the after_save callback, and loading the data into Redis
As I discussed above, today I’m going to call the Soulmate code directly to load the Redis cache with data, instead of using the load script. To do that, all we need to do is add an after_save callback to our Person model:
class Person < ActiveRecord::Base
  after_save :load_into_soulmate

  def load_into_soulmate
    loader = Soulmate::Loader.new("person")
    loader.add("term" => name, "id" => id)
  end
end
My Person model can access the Soulmate::Loader class since I included the Soulmate gem in my bundle when I created the app. Now if I drop and recreate my database, all of the 1000 names will be loaded right into Redis via Soulmate, since the after_save callback will be called 1000 times when the “db:seed” rake task is called by “db:reset:”
$ rake db:reset
-- create_table("people", {:force=>true})
   -> 0.0027s
-- initialize_schema_migrations_table()
   -> 0.0027s
-- assume_migrated_upto_version(20111122161511, ["/path/to/db/migrate"])
   -> 0.0013s
rake aborted!
Connection refused - Unable to connect to Redis on 127.0.0.1:6379
Oops – I forgot to start my redis server; let’s do that in a separate terminal window:
$ redis-server
[1467] 22 Nov 11:20:12 # Warning: no config file specified, using the default config...
[1467] 22 Nov 11:20:12 * Server started, Redis version 2.2.14
[1467] 22 Nov 11:20:12 * DB loaded from disk: 0 seconds
[1467] 22 Nov 11:20:12 * The server is now ready to accept connections on port 6379
[1467] 22 Nov 11:20:13 - DB 0: 35 keys (0 volatile) in 96 slots HT.
[1467] 22 Nov 11:20:13 - 0 clients connected (0 slaves), 957552 bytes in use
And back in my first terminal window I’ll try again:
$ rake db:reset
-- create_table("people", {:force=>true})
   -> 0.0041s
-- initialize_schema_migrations_table()
   -> 0.0027s
-- assume_migrated_upto_version(20111122161511, ["/path/to/db/migrate"])
   -> 0.0015s
A window into your soul: taking a quick peek at the Redis data set
Let’s take a look at the special sauce that makes Soulmate interesting, how it saves the autocomplete data inside of Redis. To get sense of how this works, I’ll open the Redis command line interface:
$ redis-cli
redis 127.0.0.1:6379>
Next week I’ll cover this in a lot more detail, but for now let’s take a quick look at how the autocomplete data are saved in Redis. First, I’ll take a look at a few entries in the “soulmate-data:person” hash:
redis 127.0.0.1:6379> hget soulmate-data:person 1
"{\"term\":\"Eda Lueilwitz\",\"id\":1}"
redis 127.0.0.1:6379> hget soulmate-data:person 2
"{\"term\":\"Abbey Lindgren\",\"id\":2}"
redis 127.0.0.1:6379> hget soulmate-data:person 3
"{\"term\":\"Brooklyn Mayer\",\"id\":3}"
These wonderful names were generated by the call to Faker::Name.first_name and Faker::Name.last_name above in seeds.rb. The Redis key names use the pattern “soulmate-data:person” because I passed “person” into the constructor for the Soulmate::Loader class above. You can see the Soulmate saves each name as a separate element in this Redis hash object.
The real magic happens next: Soulmate also calculates a series of substrings for each phrase, or name in my example, and saves them separately into a search index, using a Redis sorted set object. For example, the name “Laurel” would be split into these possible substrings:
La
Lau
Laur
Laure
Laurel
We can also see these values, along with a few other “Lau” substrings from other names, using the Redis command line:
redis 127.0.0.1:6379> keys soulmate-index:person:lau*
1) "soulmate-index:person:laur"
2) "soulmate-index:person:laurel"
3) "soulmate-index:person:laurie"
4) "soulmate-index:person:laure"
5) "soulmate-index:person:lauri"
6) "soulmate-index:person:laury"
7) "soulmate-index:person:lau"
If you try this yourself, you’ll get different values since the Faker gem creates random names. You might have to try different combinations of two or more letters to see the data.
What we see here is really a search index: Soulmate has expanded all the possible combinations of matching letters your users might type as keys in this sorted set. The values corresponding to these keys are the id’s found above in the Redis hash – also the id’s of my ActiveRecord model objects! When a user types “lau” for example, Soulmate can issue a Redis query to figure out very quickly which person objects match… all without ever calling ActiveRecord to issue a single SQL query!
There are a lot of interesting details here; stay tuned for a follow up post next week on how this algorithm actually works, and the computer science theory behind it.
Step 4: Putting it all together with JQuery in Rails 3.1
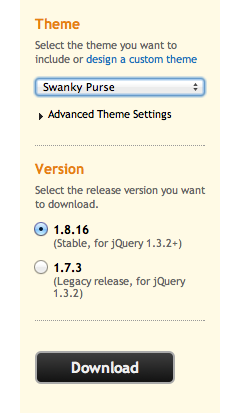
Ok, let’s finish up our Rails 3.1 app and see Soulmate in action! I decided not to use a Rails autocomplete gem, such as the excellent rails3-jquery-autocomplete, since I don’t need any help with my server code; Soulmate is doing it all for me. Instead, I’ll just write the view code manually using the jQuery UI autocomplete widget. First I’ll head over to jquery-ui.org:
… and then deselect everything and then check off just the autocomplete widget:
Finally I’ll select the jQuery UI theme I want – hmm…. “Swanky Purse” sounds interesting:
And I’ll download the tar ball to my laptop. Now I just need to copy the “Swanky Purse” jQuery UI files into my Rails 3.1 asset folder like this:
$ cd ~/Downloads/jquery-ui-1
$ cp js/* /path/to/app/assets/javascripts/.
$ cp -r css/swanky-purse /path/to/app/assets/stylesheets/.
This gives me both the Javascript I need to perform the autocomplete, and also the styling required to make it look “swanky!” Now I’ll generate a controller and view codes files for my sample web site like this:
$ rails g controller people index autocomplete_person_name
This will create an index action, and also a second action to handle the AJAX requests generated by the autocomplete widget. Next I’ll enable the default root in routes.rb:
# You can have the root of your site routed with "root"
# just remember to delete public/index.html.
root :to => 'people#index'
… and delete the default Rails index page:
$ rm public/index.html
And finally my view will consist of a single text field; editing app/views/people/index.html.erb:
Please enter the name of a person:
<%= text_field_tag 'person_name' %>

<script>
$(function() {
  $("#person_name" ).autocomplete({
    source: "<%= people_autocomplete_person_name_path %>"
  });
})
</script>
Here I call the jQuery UI autocomplete widget on page load, and set it up against my single text field. I’ve set the source attribute to be the path of the “autocomplete_person_name” action, which I included in the people controller generate command above. Using unobtrusive Javascript would be much better, but for today this keeps things simple. If I have time, I’ll try to add Soulmate support to an existing Rails autocomplete gem, such as rails3-jquery-autocomplete.
Step 5: Calling Soulmate for autocomplete searches
The last thing we need to do to finish our Soulmate sample app is to actually call Soulmate when users start typing. To do this, all we need to do is implement the autocomplete_person_name action in the PeopleController:
class PeopleController < ApplicationController
  def index
  end

  def autocomplete_person_name
    render :json => Person.search(params['term'])
  end
end
This just passes the “term” parameter, sent by JQuery, to the Person model’s search method and then renders the return value, the matching names, as JSON. And now let’s write that Person.search method like this:
class Person < ActiveRecord::Base

  def self.search(term)
    matches = Soulmate::Matcher.new('person').matches_for_term(term)
    matches.collect {|match| {"id" => match["id"], "label" => match["term"], "value" => match["term"] } }
  end

etc...
Just like I did earlier in the after_save callback, here i’m calling the Soulmate gem directly, this time using the Soulmate::Matcher class. I pass the same “person” string into the constructor, and then just call the same method the Soulmate Sinatra app does: matches_for_term, which calls Redis to perform the search! Once I have the matches, all I need to do is convert them into the format that the jQuery UI widget expects: an array of hashes containing the id, label and value for each name.
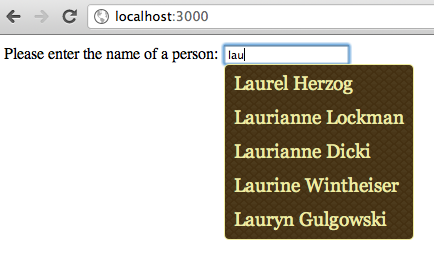
Now running my Rails server and trying it out, I can see that “Swanky Purse” style:
Stay tuned for more…
Whether or not you ever need to use autocomplete in your Rails 3 app, I hope this article will inspire you to consider using Redis the next time you have a large data set that you need to access quickly. Redis is an amazing tool, and when your data set is appropriate it can provide you with lightning fast query results. Next week I’ll continue my discussion of Soulmate, taking a closer look at the details of the autocomplete caching algorithm. There are a lot of interesting details there and a lot to learn from about how to use Redis.
Source: http://patshaughnessy.net/2011/11/23/finding-your-soulmate-autocomplete-with-redis-in-rails-3-1
