Вступление
В моих предыдущих постах обсуждалась необходимость автоматического развертывания баз данных и советы по началу работы в этом направлении. Хватит разговоров, пора действовать! В этой статье мы рассмотрим настройку конвейера автоматического развертывания базы данных с использованием подхода, основанного на состоянии, для Redgate SQL Change Automation . Я выбрал этот инструмент для начала, потому что он прост в настройке, интегрируется с SSMS и … ну … у меня уже была демонстрационная версия. Я также немного склонен к инструментам Редгейта. Вот и все.
Конечная цель этой статьи — дать вам демонстрацию рабочего концепта.
Подготовительная работа
Для этой демонстрации вам понадобится запущенный экземпляр SQL Server, экземпляр Octopus Deploy и сервер CI. Я рекомендую использовать среду разработки или вашу локальную машину для этого доказательства концепции.
Необходимые инструменты
Вам понадобятся следующие инструменты. В приведенных примерах используются TeamCity и VSTS / TFS. Как вы увидите позже, основные концепции и пользовательский интерфейс для всех инструментов CI будут очень похожи.
- Осьминог Развернуть:
- Redgate SQL Toolbelt
- Получите 14-дневную бесплатную пробную версию здесь .
- Инструмент CI (выберите один):
- SQL Server Management Studio (SSMS):
- Скачать бесплатно здесь .
- SQL Server:
Установка программного обеспечения
Я не собираюсь рассказывать вам, как установить эти инструменты. Эта статья была бы длиной в 100 страниц, если бы я сделал это. Если у вас возникнут проблемы, обратитесь за помощью к веб-сайту поставщика. Если вам нужна помощь в установке Octopus Deploy, пожалуйста, начните с наших документов или свяжитесь с нами .
Машина разработчика
Это машина, на которой мы будем вносить изменения в схему и проверять их в системе контроля версий. При установке SQL Toolbelt от Redgate вам будет предложено установить довольно много программного обеспечения. Вам нужно только установить следующее:
- SQL Source Control
- SQL Prompt (это не обязательно, но делает вашу жизнь намного проще)
- Пакет интеграции SSMS
Сервер сборки
Оба Octopus Deploy и Redgate имеют плагины для основных серверов сборки.
- Дженкинс:
- TeamCity:
- VSTS / TFS:
- Бамбук:
Цель развертывания
Установка Octopus Tentacle на SQL Server — это большая проблема. Документация идет в подробности , почему. Вместо этого мы установим щупальце на поле перехода, которое находится между Octopus Deploy и SQL Server. В целях безопасности я рекомендую запускать щупальце в качестве определенной учетной записи пользователя. Таким образом, вы можете использовать встроенную безопасность. Вот некоторая документация о том, как это настроить. Имейте в виду, что это работает, только если вы используете Active Directory. Если вы не используете это, вы все равно можете использовать этот процесс, вам просто нужно будет вместо этого использовать пользователей SQL.
Для прыжкового бокса вам необходимо установить следующие предметы:
- Автоматизация изменений SQL PowerShell 3.0.
- Автоматизация изменений SQL.
Пример проекта
Для этого пошагового руководства я изменил проект RandomQuotes, который использовался в предыдущих видеороликах Will It Deploy. Если у вас не было возможности проверить их, вы пропускаете. Сделайте себе одолжение и следите за ними. Каждый эпизод длится около 15 минут. Вы можете найти список воспроизведения здесь .
Исходный код этого примера можно найти здесь . Вам нужно будет раскошелиться на этот репозиторий, чтобы вы могли внести изменения в него позже в этой статье.
Настройка конвейера CI / CD
Все, что вам нужно, уже проверено в системе контроля версий. Все, что нам нужно сделать, это собрать его и отправить на SQL Server.
Конфигурация Octopus Deploy
Вам понадобятся шаблоны шагов от Redgate для создания выпуска базы данных и развертывания выпуска базы данных . При просмотре шаблона шага вы можете заметить, что шаблон шага развертывается непосредственно из пакета . Функциональность на основе состояния для SQL Change Automation работает путем сравнения состояния базы данных, хранящейся в пакете NuGet, с целевой базой данных. Каждый раз, когда он запускается, он создает новый набор дельта-скриптов для применения. Из-за этого рекомендуемый процесс:
- Загрузите пакет базы данных на поле перехода.
- Создайте дельта-скрипт, сравнив пакет в поле перехода с базой данных на SQL Server.
- Просмотрите дельта-скрипт (можно пропустить в dev).
- Запустите скрипт на SQL Server, используя щупальце на поле перехода.
Using the step template to deploy from the package prevents the ability to review the scripts.
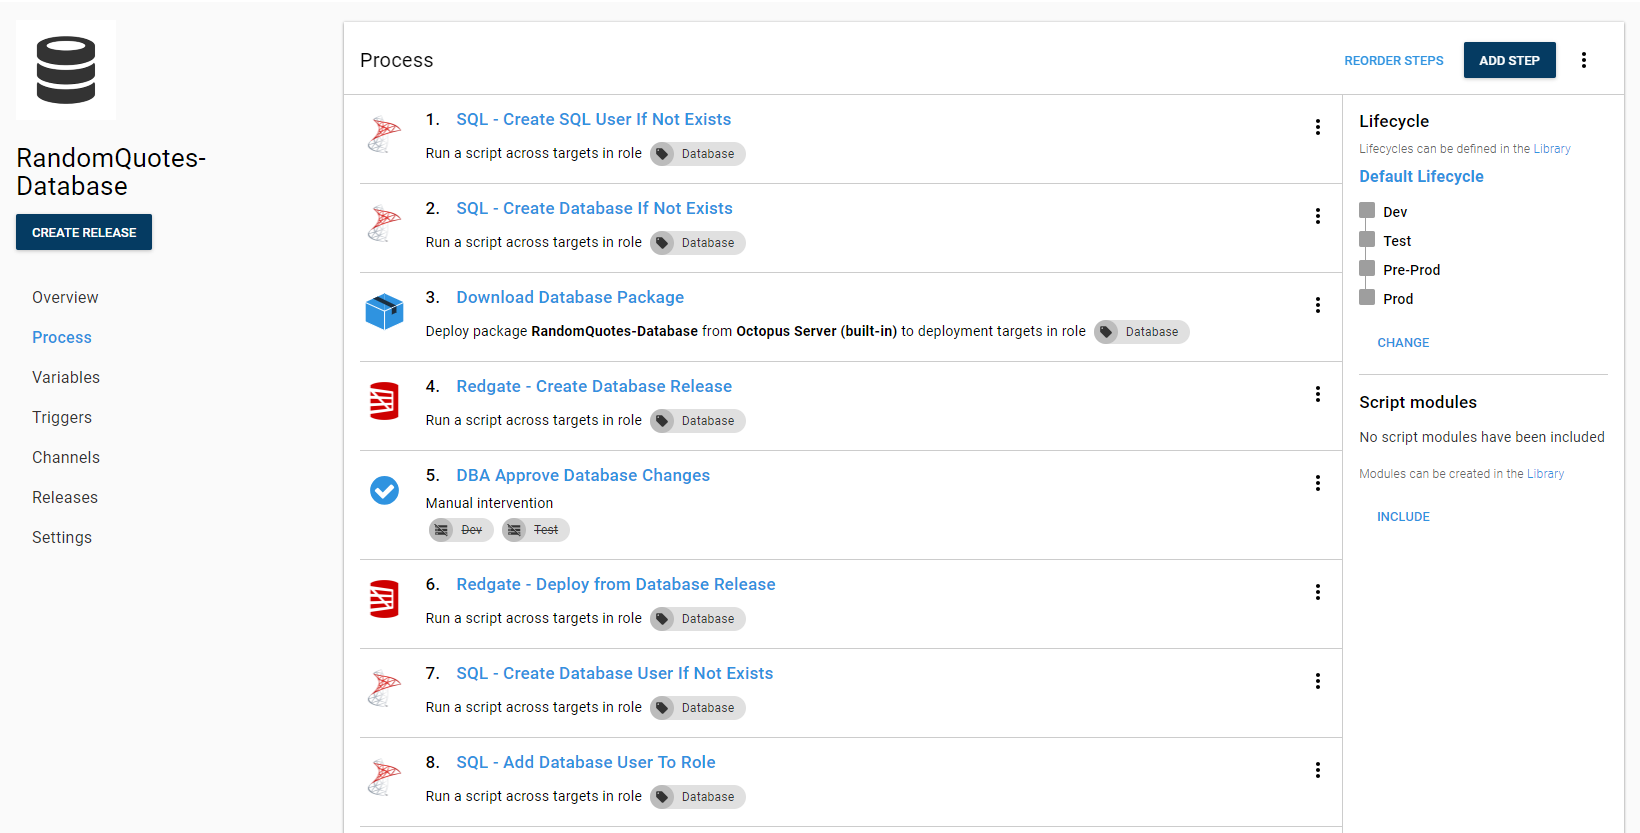
This is the process I have put together for deploying databases.
I am a firm believer of having tools handle all the manual work for me. This is why my process will create the main SQL user for the database, the database, add the SQL user to the database, and the user to the role. If you want your process to do that, you can download those step templates from the Octopus Community Step Template Library.
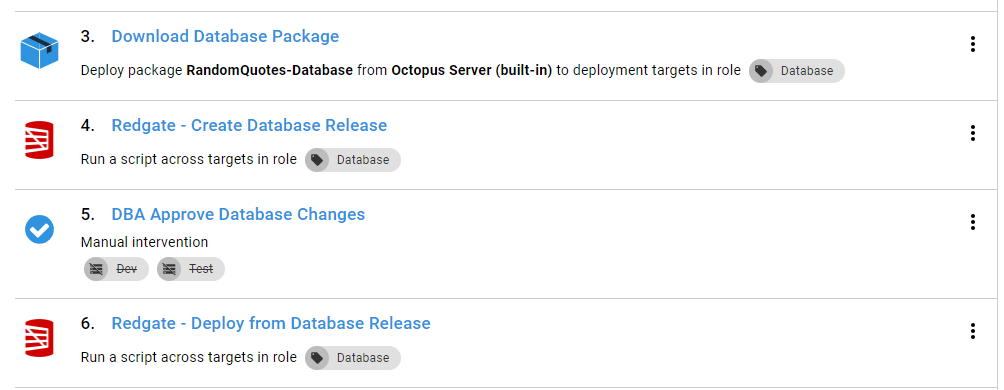
You don’t have to add all that functionality. This is the beginning of your automated database deployment journey. Providing that much automation can be very scary without trusting the process. Completely understandable. The main steps you need from the above screenshot are:
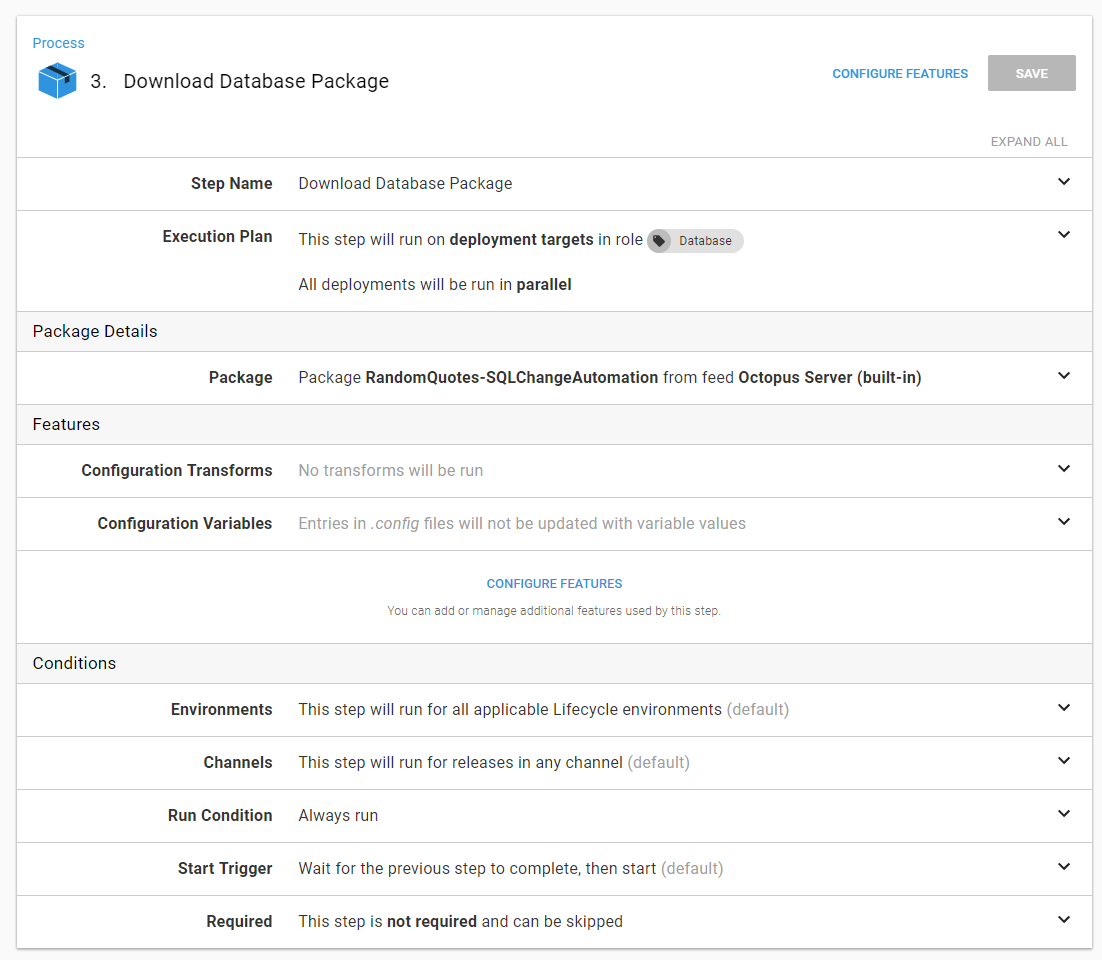
Let’s go ahead and walk through each one. The download a package step is very straightforward, no custom settings aside from picking the package name.
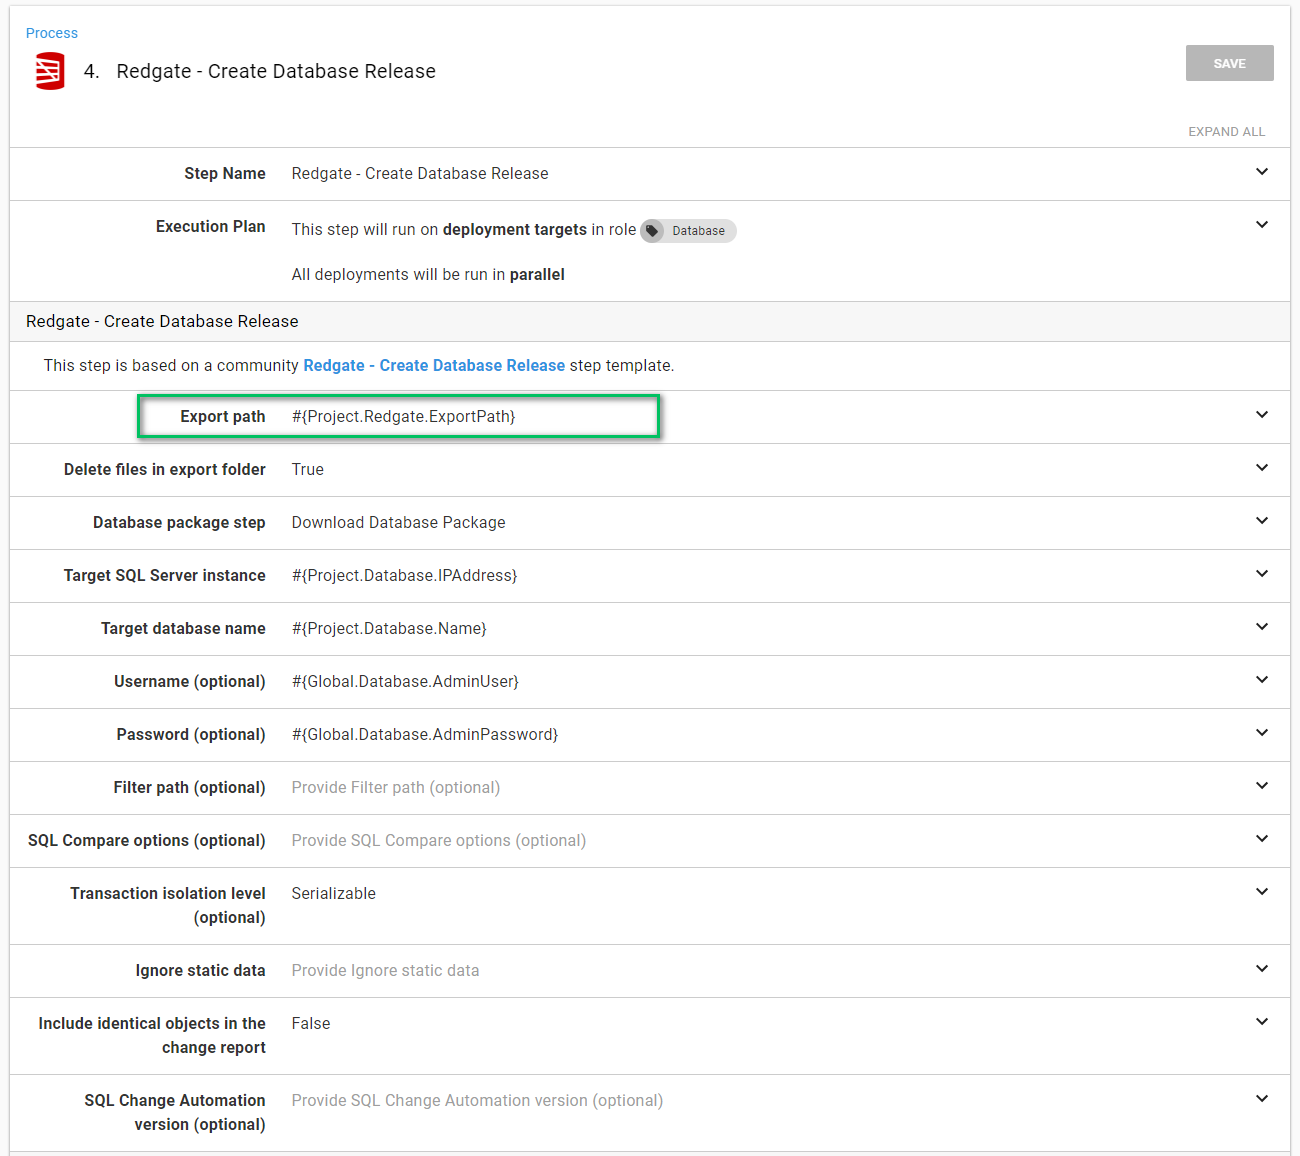
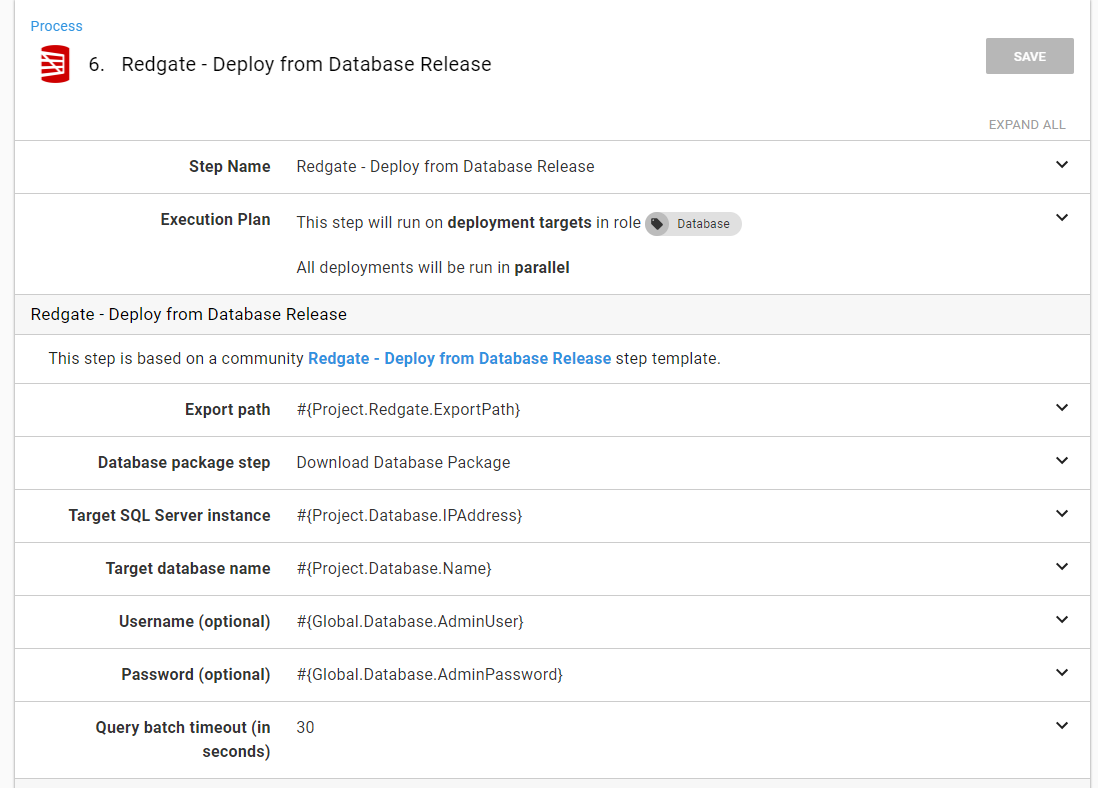
The Redgate — Create Database Release step is a little more interesting. What trips up most people is the Export Path. The export path is where the delta script will be exported to. This needs to be a directory outside of the Octopus Deploy tentacle folder. This is because the «Redgate — Deploy from Database Release» step needs access to that path and the Tentacle folder will be different for each step.
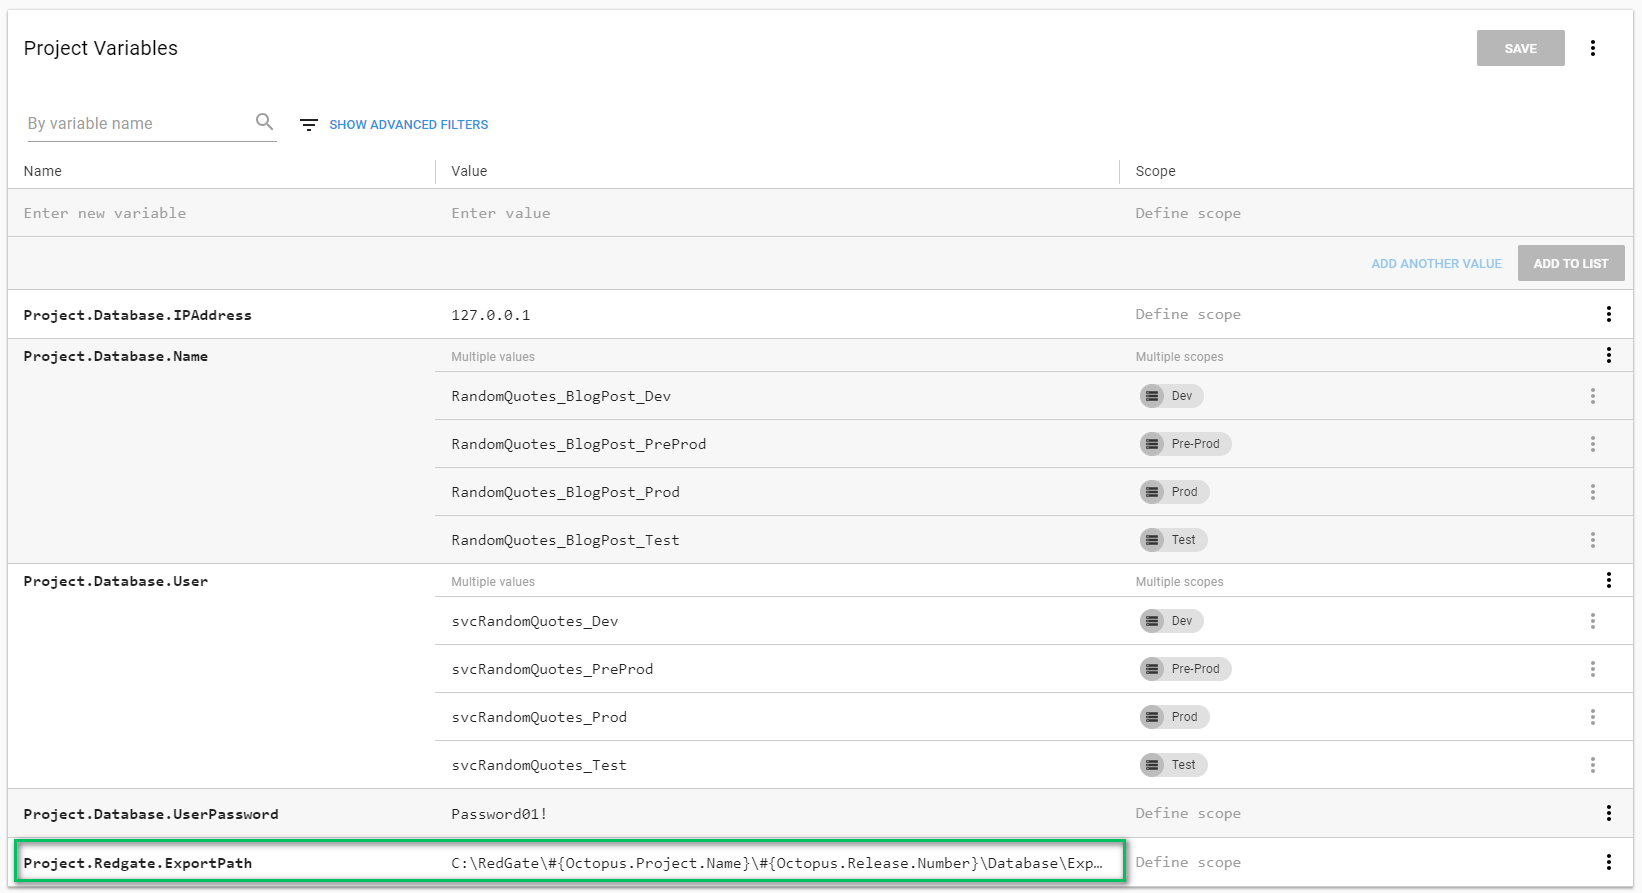
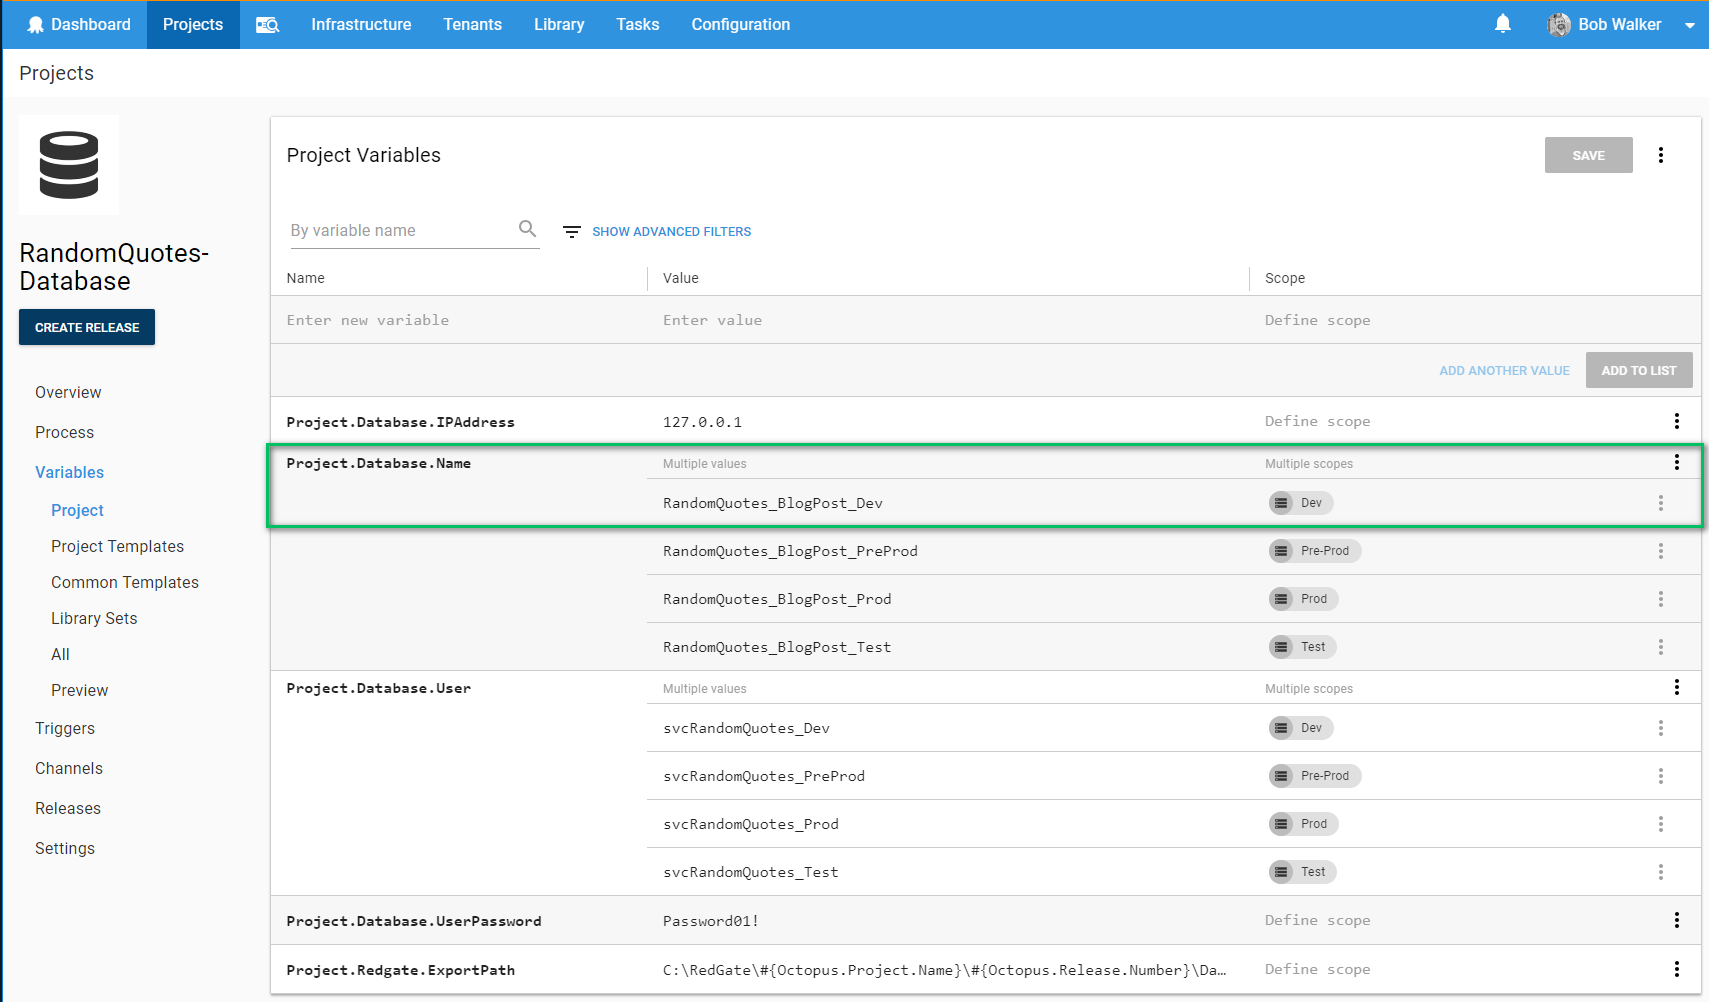
What I like to do is use a project variable.
The full value of the variable is:
C:\RedGate\#{Octopus.Project.Name}\#{Octopus.Release.Number}\Database\Export
Other recommendations on this screen:
- You will also notice I have supplied the username and password. I recommend using integrated security and having the Tentacle running as a specific service account. I don’t have Active Directory setup on my test machine so SQL Users it is for this demo.
- Take a look at the default SQL Compare Options and make sure they match up with what you want. If they don’t then you will need to supply the ones you want in the «SQL Compare Options (optional)» variable. You can view the documentation here. If you do decide to go the route of custom options I recommend creating a variable in a library variable set so those options can be shared across many projects.
- Use a custom filter in the event you want to limit what the deployment process can change. I wrote a lengthy blog post on how to do that here. My personal preference is to filter out all users and let the DBAs manage them. Even better, let Octopus manage them since it can handle environmental differences.
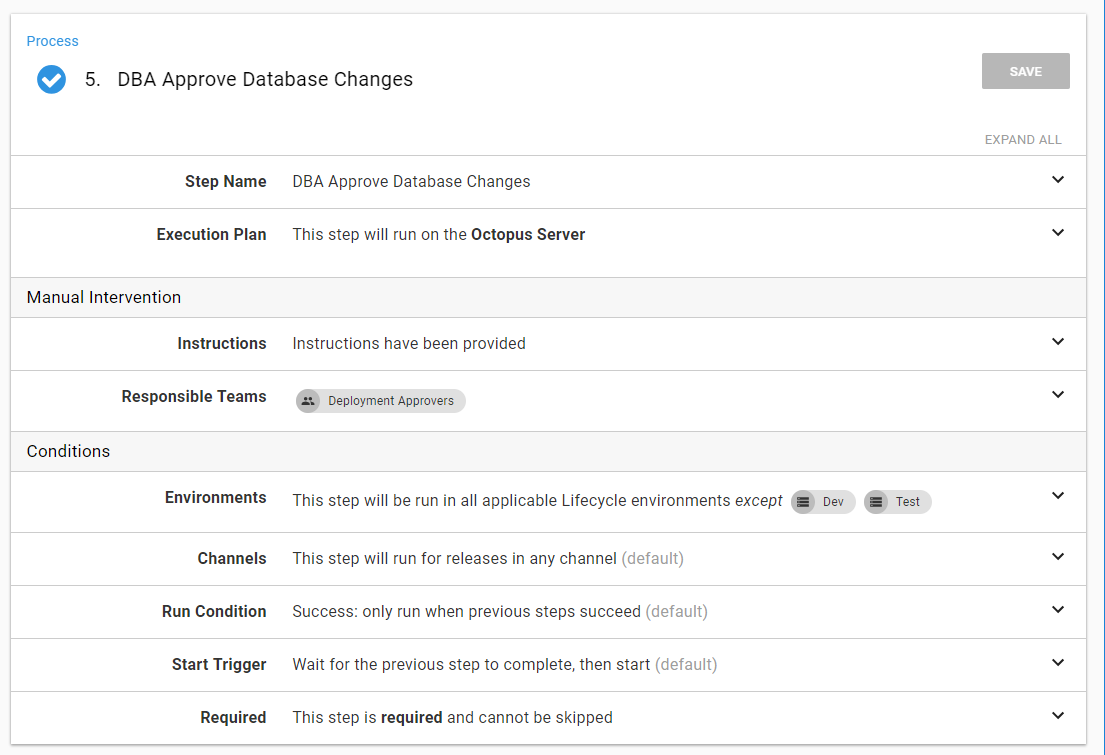
The next step is approving the database release. I recommend creating a custom team to be responsible for this. My preference is to skip this step in Dev and QA.
The create database release step makes use of the artifact functionality built into Octopus Deploy. This allows the approver to download the files and review them.
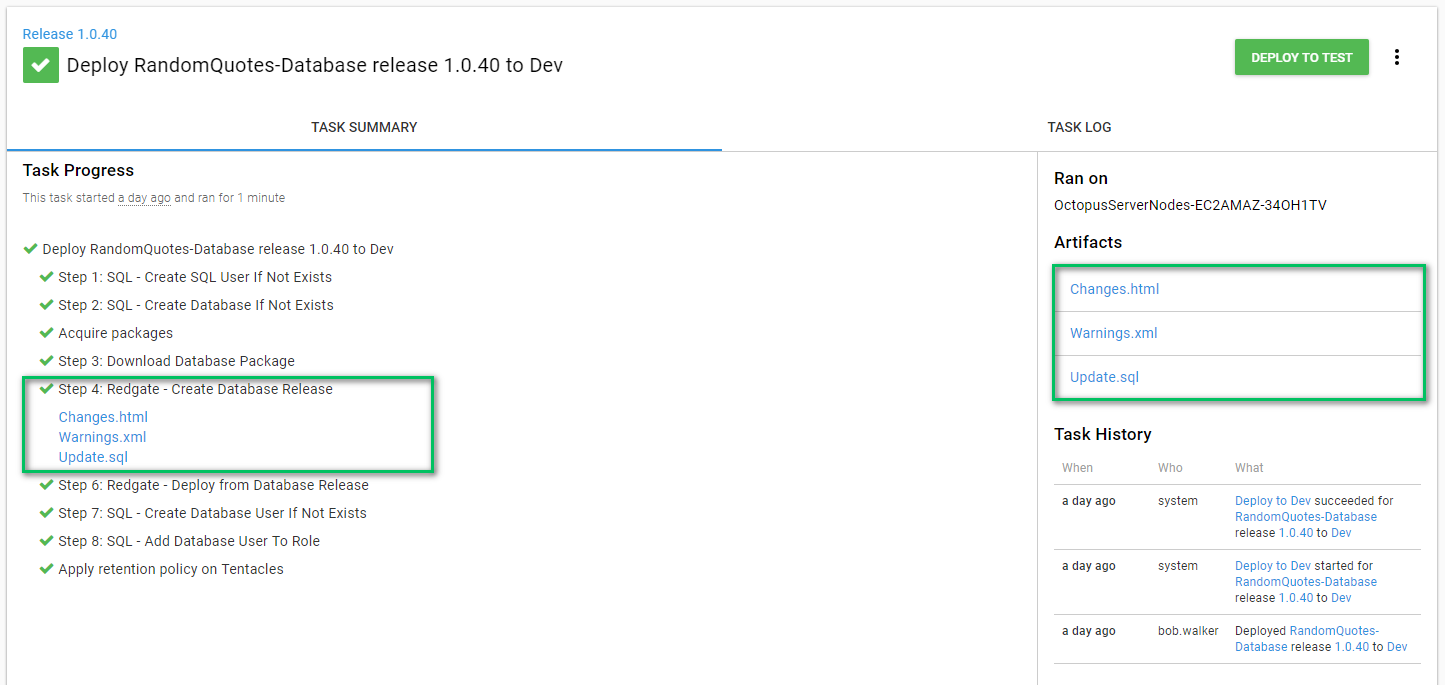
That is it for the Octopus Deploy configuration. Now it is time to move on to the build server.
Build Server Configuration
For this blog post, I will be using VSTS/TFS and TeamCity. The build should, at least, do the following:
- Build a NuGet package containing the database state using the Redgate plug-in.
- Push that package to Octopus Deploy using the Octopus Deploy plug-in.
- Create a release for the package which was just pushed using the Octopus Deploy plug-in.
- Deploy that release using the Octopus Deploy plug-in.
VSTS / TFS Build
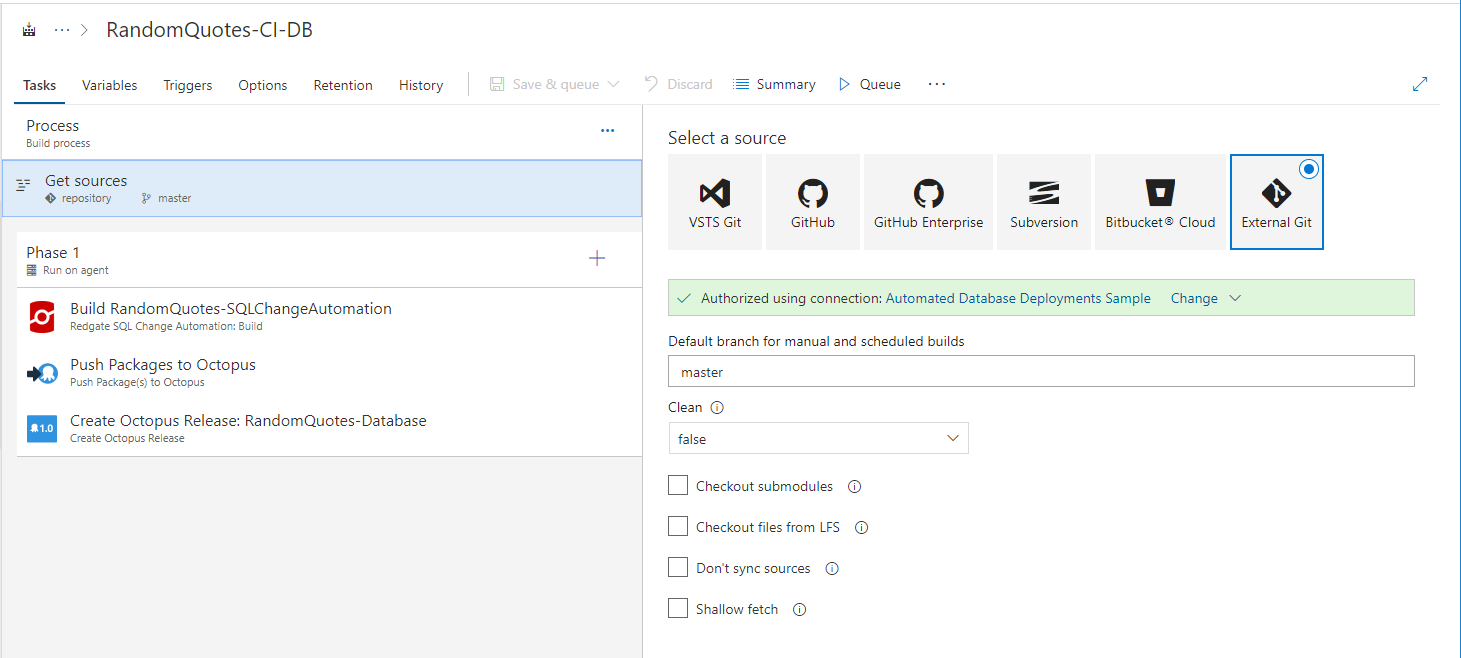
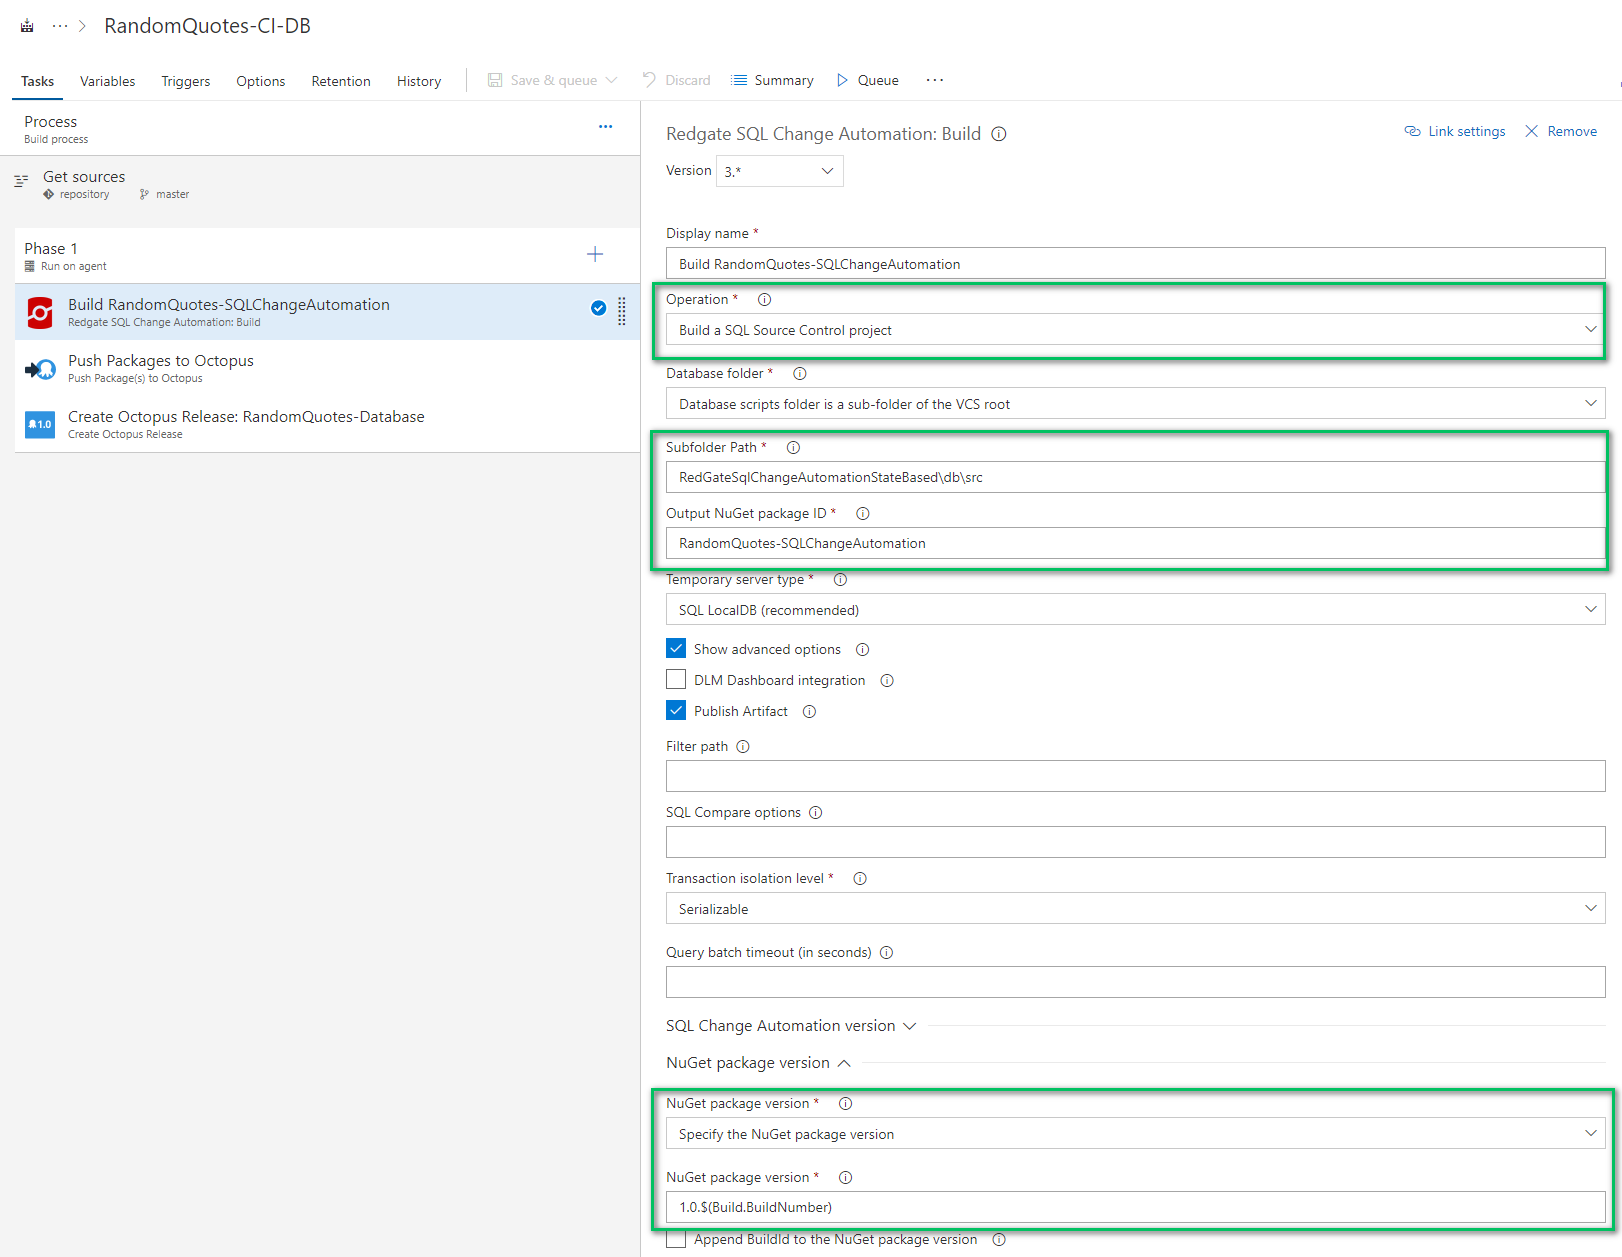
Only three steps are needed in VSTS/TFS to build and deploy a database.
The first step will build the database package from source control. The items highlighted are the ones you need to change. The subfolder path variable is relative. I am using sample Git repo which is why I have the «RedgateSqlChangeAutomationStateBased» folder in the path.
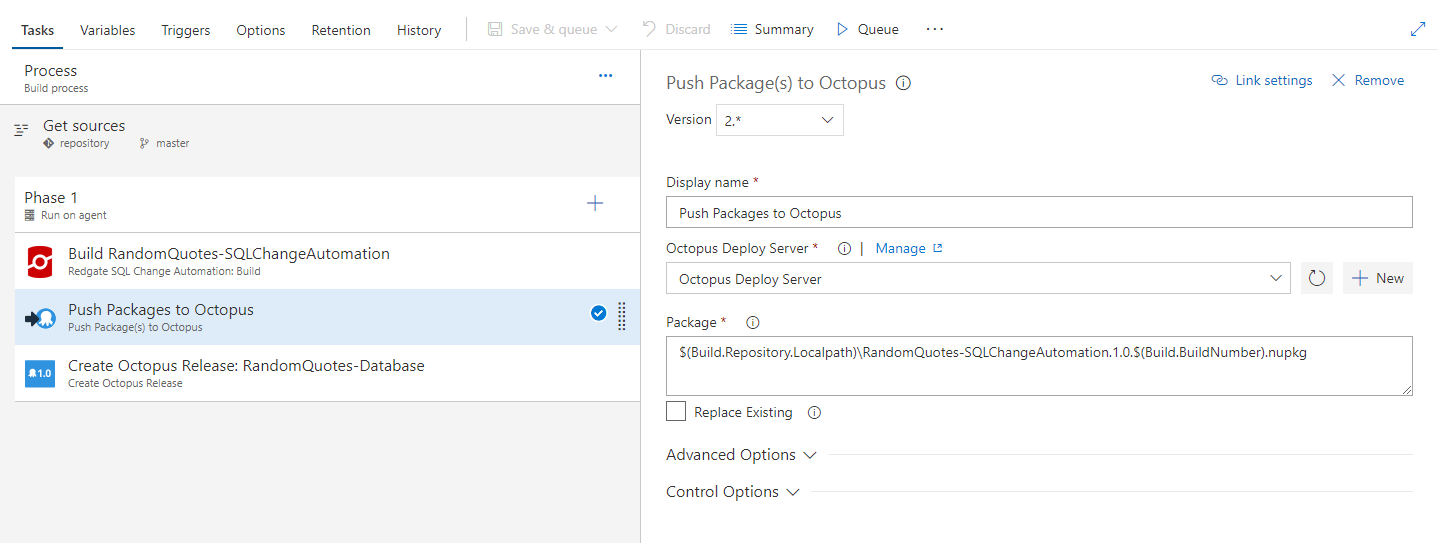
The push package to Octopus step can be a little tricky. You need to know the full path to the artifact generated by the previous step. I’m not 100% sure how you would know without trial and error.
Here is the full value in case you wish to copy it.
$(Build.Repository.Localpath)\RandomQuotes-SQLChangeAutomation.1.0.$(Build.BuildNumber).nupkg
The Octopus Deploy Server must be configured in VSTS/TFS. You can see how to do that by going to our documentation.
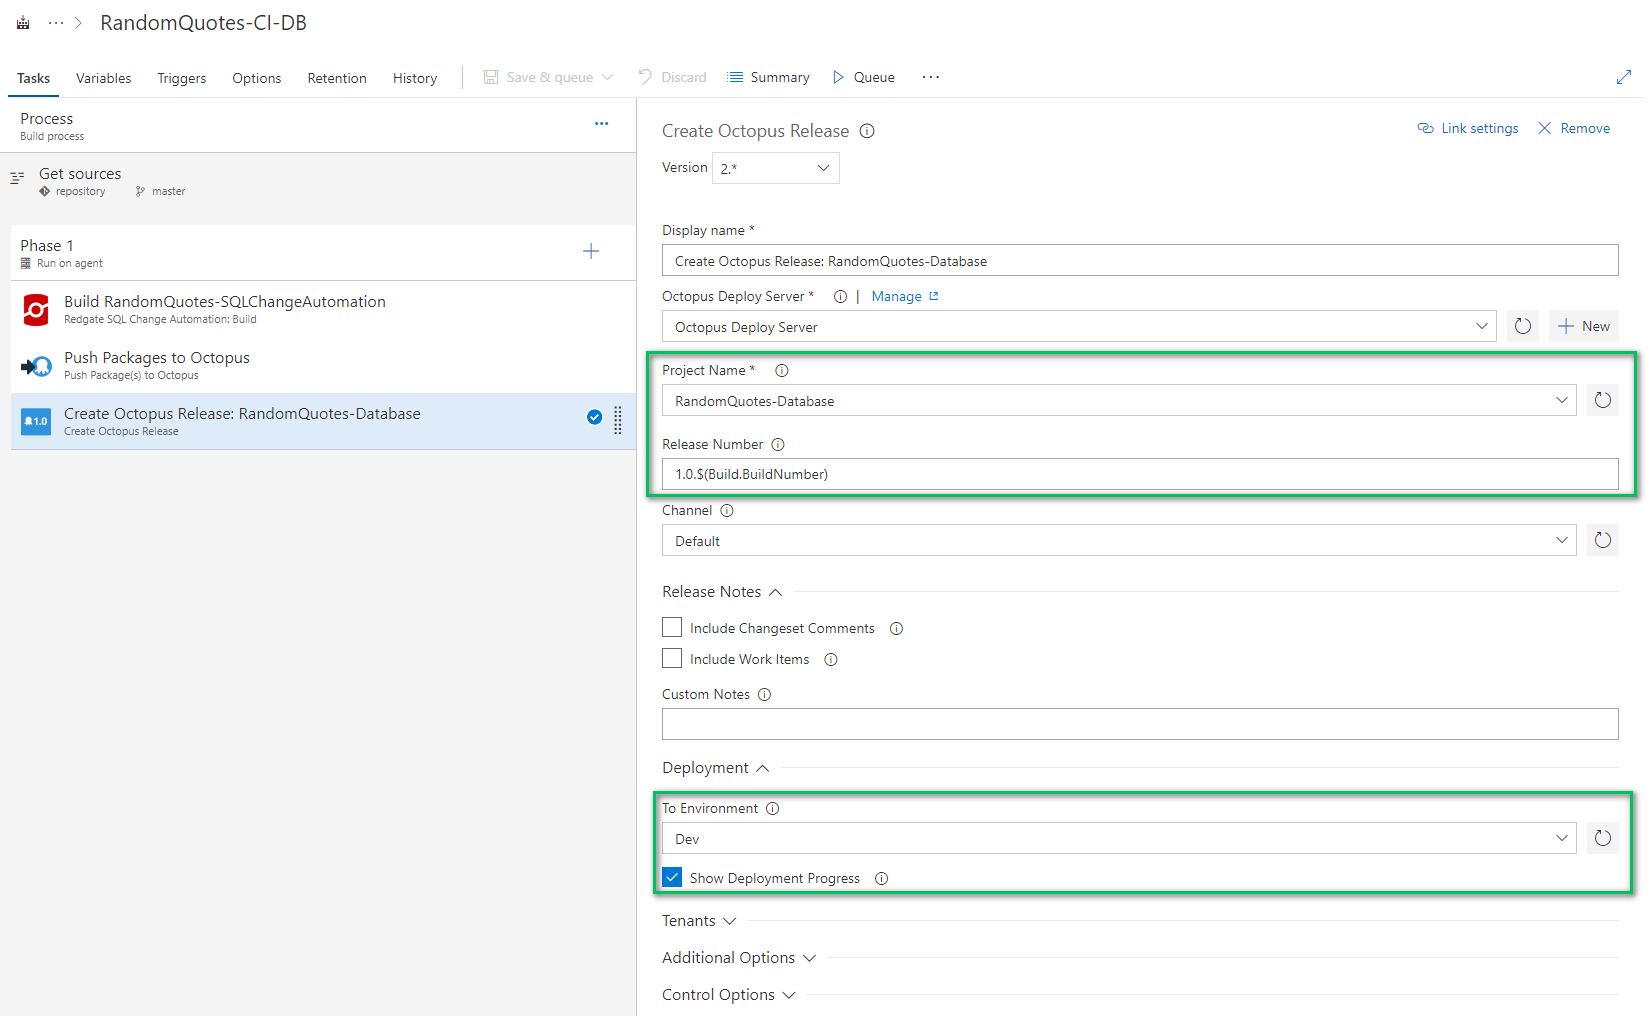
The last step is to create a release and deploy it to dev. After connecting, VSTS/TFS with Octopus Deploy, you will be able to read all the project names. You can also configure this step to deploy the release to Dev. Clicking the «Show Deployment Progress» will stop the build and force it to wait on Octopus to complete.
TeamCity
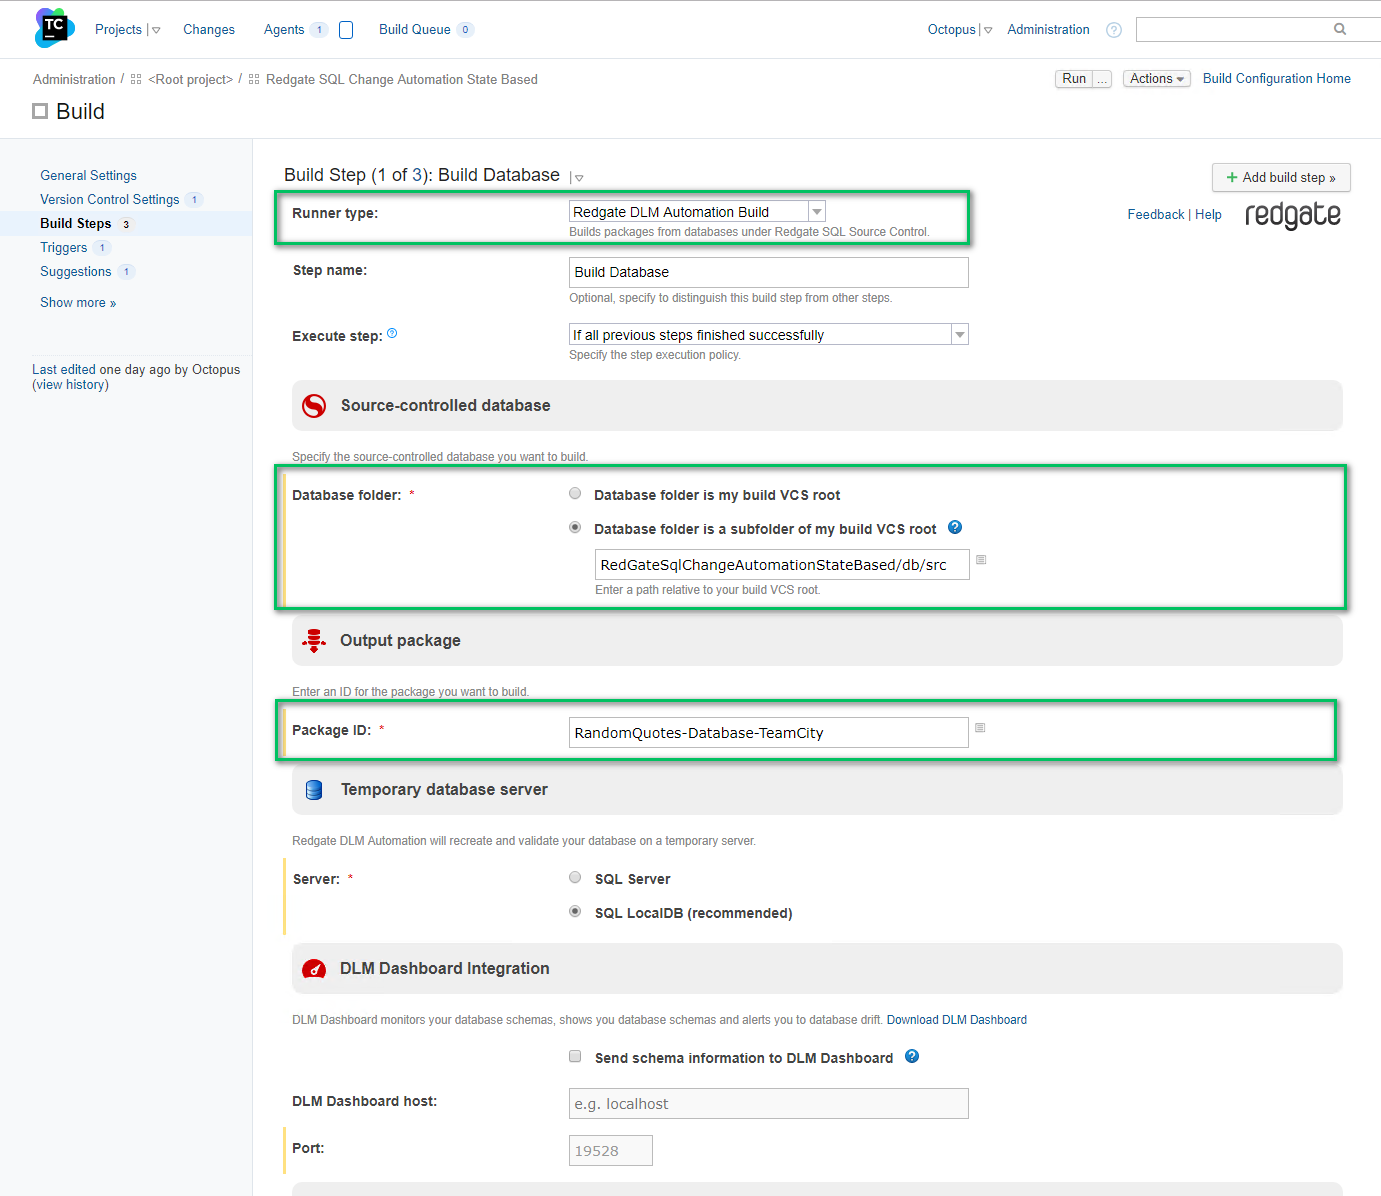
The TeamCity setup is very similar to the VSTS/TFS setup. Only three steps are needed.
The first step, the build database package step, has similar options to VSTS/TFS. You will need to enter in the folder as well as the name of the package.
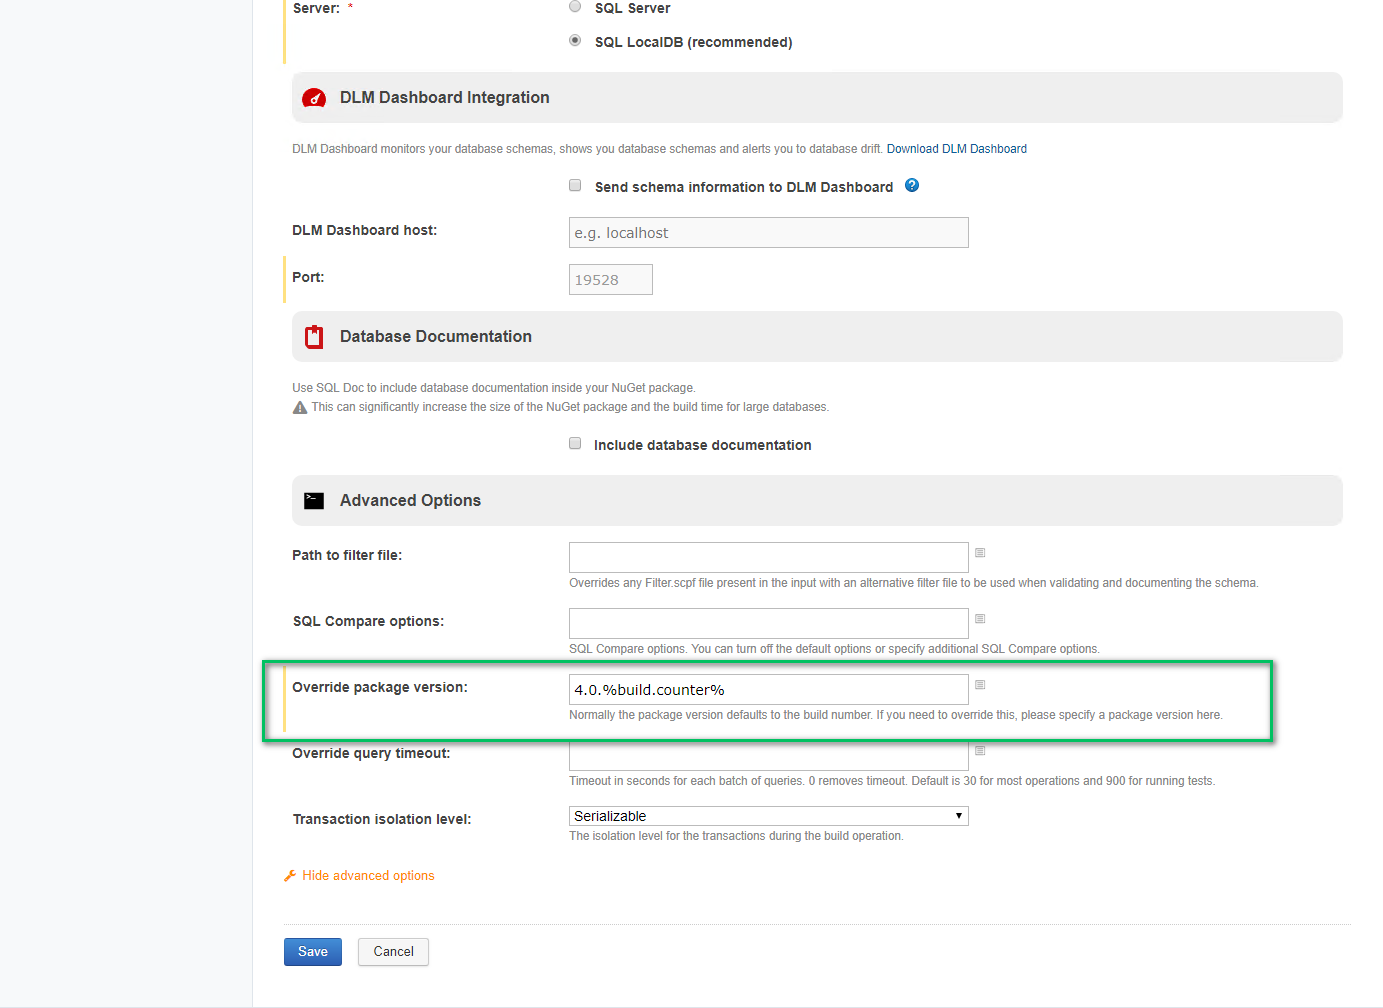
The kicker is you have to enter in a package version in the advanced options. If you don’t then you will start getting random errors from the Redgate tooling saying something about an invalid package version.
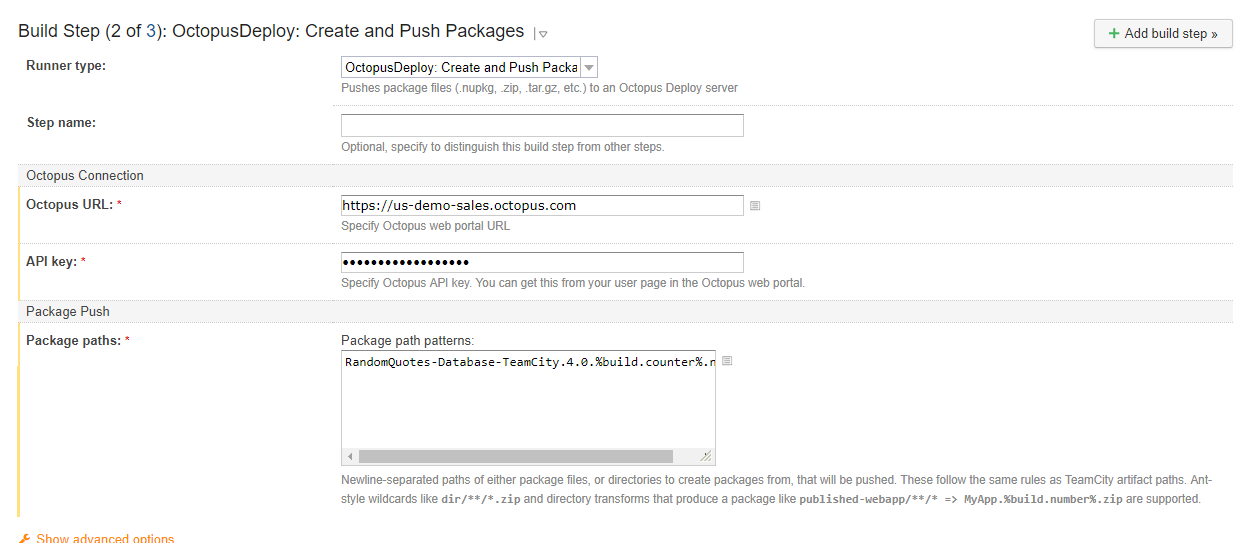
The publish package step requires all three of the options to be populated. By default, the Redgate tool will create the NuGet package in the root working directory.
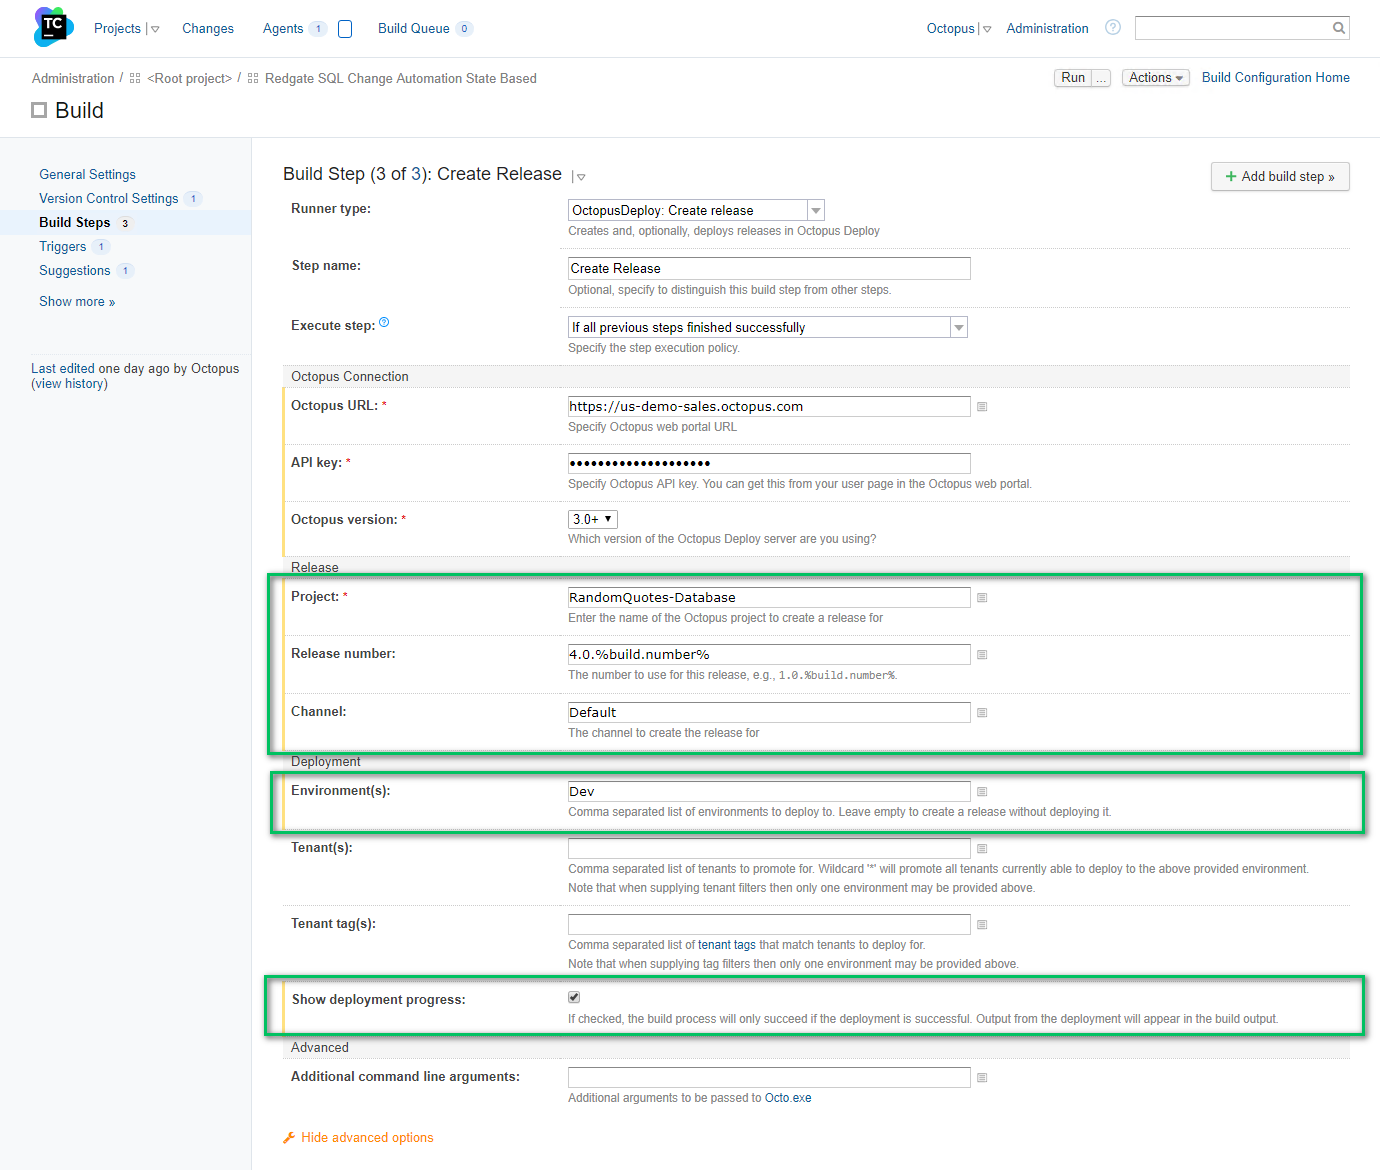
The final step is creating and deploying the release. Very similar to before, you provide the name of the project, the release number and the environment you wish to deploy to.
The CI/CD Pipeline In Action
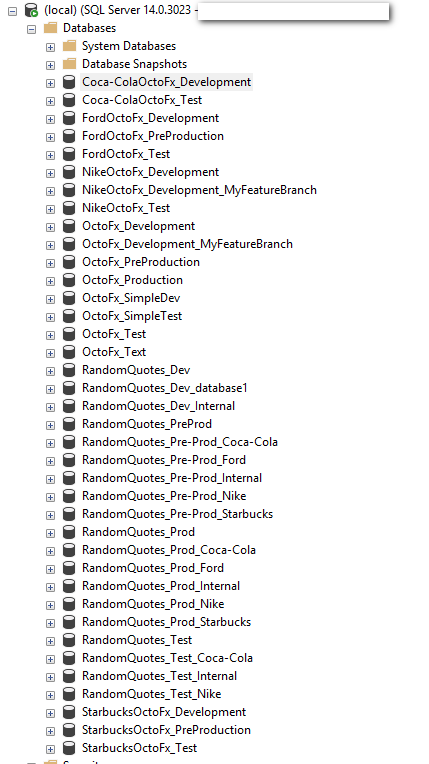
Now it is time to see all of this in action. For this demo, I will be creating a new database, RandomQuotes_BlogPost_Dev.
As you can see, I do not have any databases with that name. I have used this SQL Server as my test bench for automated deployments.
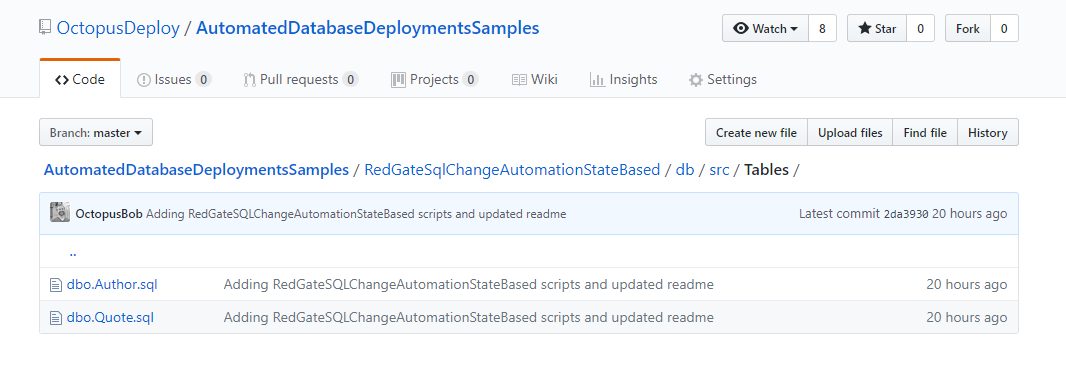
Let’s take a quick look at the tables stored in source control.
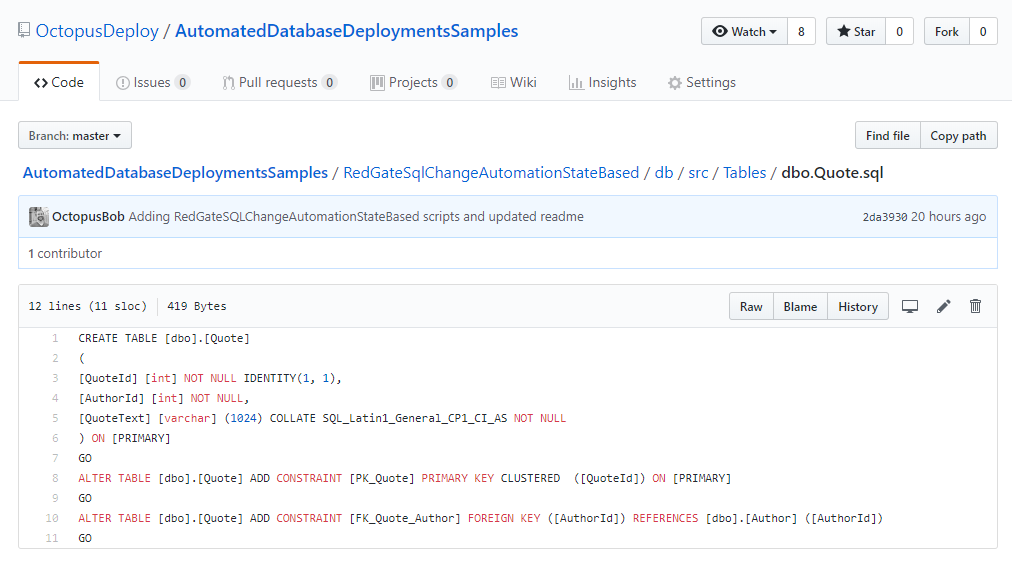
If we open up one of those files we can see the create script generated by Redgate’s SQL Source Control.
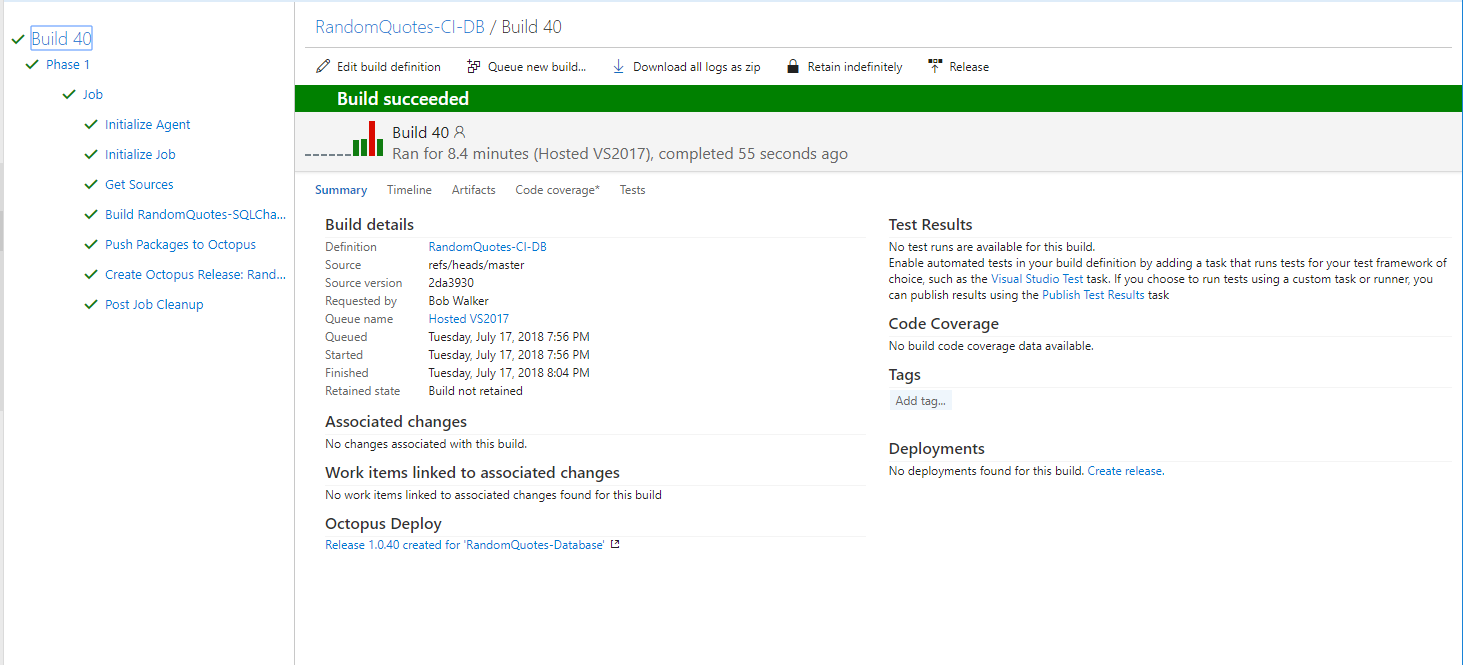
Kick off a build and let’s see that whole pipeline in action. The build looks successful.
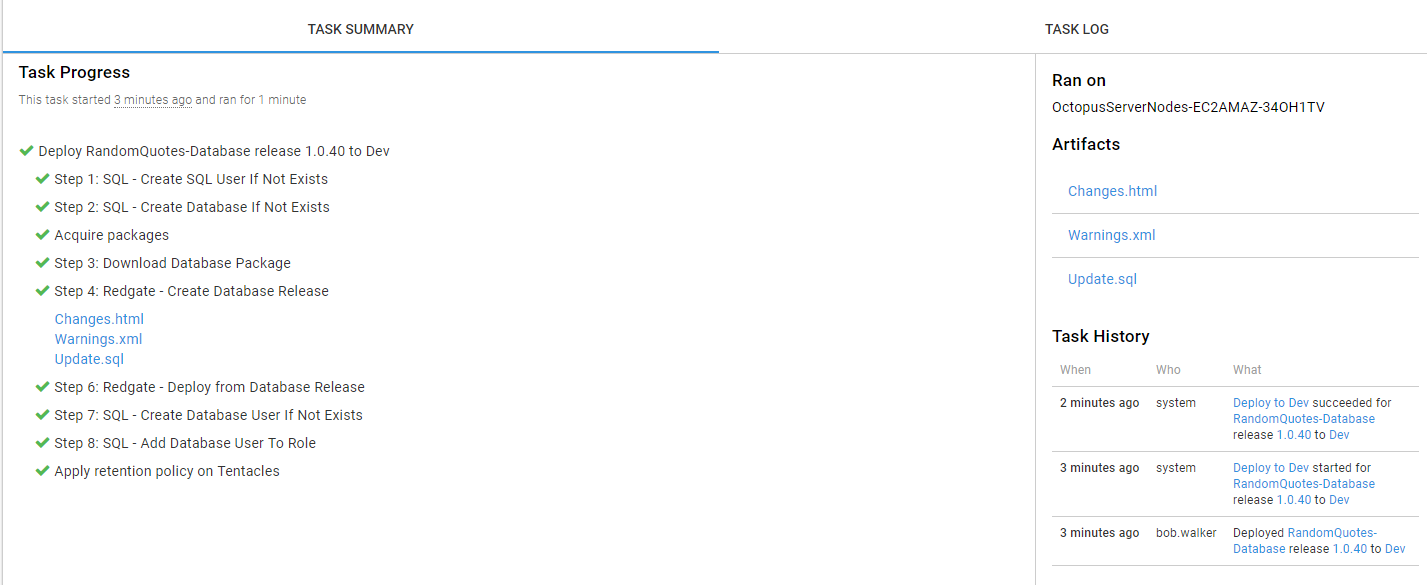
No surprise, the deployment was successful in Octopus Deploy. The VSTS/TFS build was set to wait on Octopus Deploy to finish deploying the database. If the deployment failed the build would’ve failed.
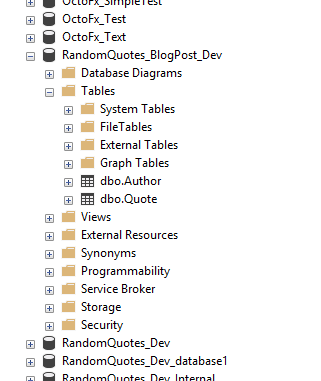
Going back to SSMS and we can now see the database and the tables have been created.
Changing the Schema
Well, that is all well and good but that was a project already created. Let’s make a small change and test the whole process. There is a bit more setup involved with doing this.
- Clone your forked repo to your local machine.
- Open up SSMS and create a random quotes database on your local machine or dev.
- In SSMS bind the source controlled database to the newly created database. You can read how to do that in the documentation.
When linking the database to source control you need to provide the full path to the folder where the source control is stored. I store all my code in a folder called C:\Code.git. So the full path is:
Here is the text of that path for you to copy:
C:\Code.git\AutomatedDatabaseDeploymentsSamples\RedGateSqlChangeAutomationStateBased\db\src\
Once you are finished you should see something like this:
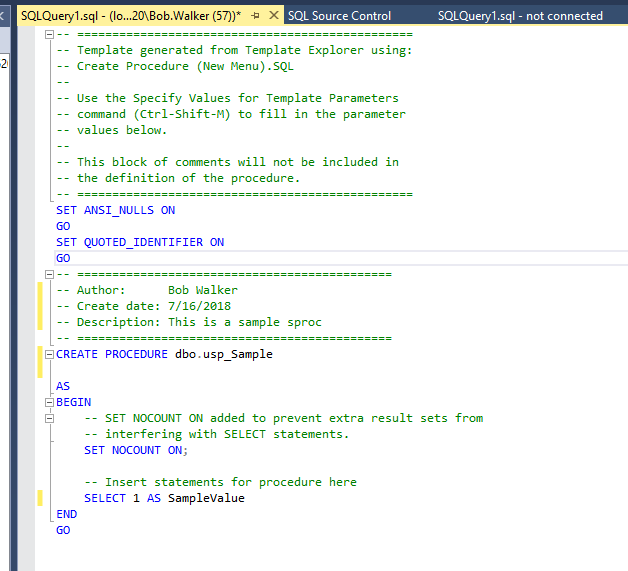
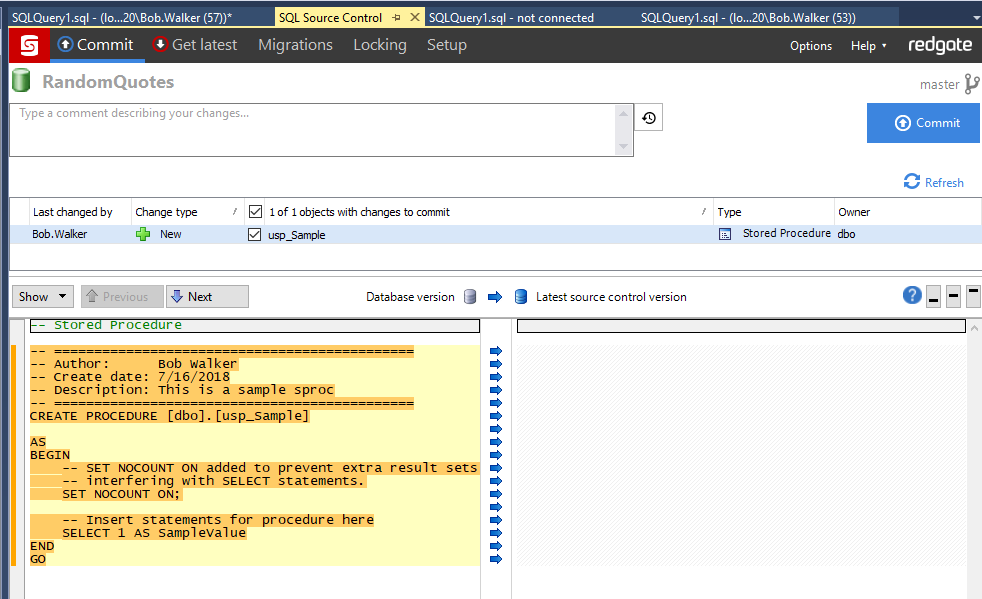
Now we can make the change to the database. For this test, let’s just add in a stored procedure which will return a value.
Now we can commit that change to source control.
Conclusion
Automating database deployments does require a bit of prep work, but the payoff is well worth the effort. Having the auditing alone is well worth it. With this tool, I can now see who made a change, when a change was made, and when that change went into production. In the past, that was kept in another location with a 50/50 shot of it being updated.
As you start down this journey, my recommendation is to add the manual verification step to all environments until trust has been established. This will ensure you don’t accidentally check in a change that blows away half the team’s database changes.
Until next time, happy deployments!
