Возможность делать снимки экрана — одна из интересных функций, доступных в Watir. Во время автоматизации тестирования вы можете делать скриншоты и сохранять экраны. В случае, если возникает какая-либо ошибка, то же самое может быть задокументировано с помощью скриншота.
Простой пример вместе с тестовой страницей, где мы сделали снимок экрана, обсуждается ниже —
Синтаксис
browser.screenshot.save 'nameofimage.png'
Тестовая страница
<html>
   <head>
      <title>Testing UI using Watir</title>
   </head>

   <body>
      <script type = "text/javascript">
         function wsentered() {
            console.log("inside wsentered");
            var firstname = document.getElementById("firstname");

            if (firstname.value != "") {
               document.getElementById("displayfirstname").innerHTML =
                  "The name entered is : " + firstname.value;

               document.getElementById("displayfirstname").style.display = "";
            }
         }
      </script>
      <div id = "divfirstname">
         Enter First Name :
         <input type = "text" id = "firstname" name = "firstname" onchange = "wsentered()" />
      </div>
      <br/>
      <br/>
      <div style = "display:none;" id = "displayfirstname"></div>
   </body>
</html>
пример
require 'watir'
b = Watir::Browser.new :chrome
b.goto('http://localhost/uitesting/textbox.html')
t = b.text_field(id: 'firstname') // using the id of the textbox to locate the textbox
t.exists?
t.set 'Riya Kapoor'
b.screenshot.save 'textboxbefore.png'
t.value
t.fire_event('onchange')
b.screenshot.save 'textboxafter.png'
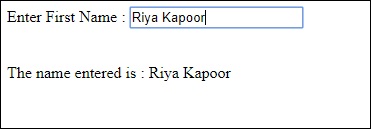
Скриншоты, которые мы сделали с помощью Watir, показаны здесь —
textboxbefore.png

textboxafter.png