Шаблон Rest используется для создания приложений, использующих веб-службы RESTful. Вы можете использовать метод exchange (), чтобы использовать веб-сервисы для всех методов HTTP. Приведенный ниже код показывает, как создать Bean for Rest Template для автоматического подключения объекта Rest Template.
package com.tutorialspoint.demo;

import org.springframework.boot.SpringApplication;
import org.springframework.boot.autoconfigure.SpringBootApplication;
import org.springframework.context.annotation.Bean;
import org.springframework.web.client.RestTemplate;

@SpringBootApplication
public class DemoApplication {
   public static void main(String[] args) {
      SpringApplication.run(DemoApplication.class, args);
   }
   @Bean
   public RestTemplate getRestTemplate() {
      return new RestTemplate();
   }
}
ПОЛУЧИТЬ
Использование GET API с помощью метода RestTemplate — exchange ()
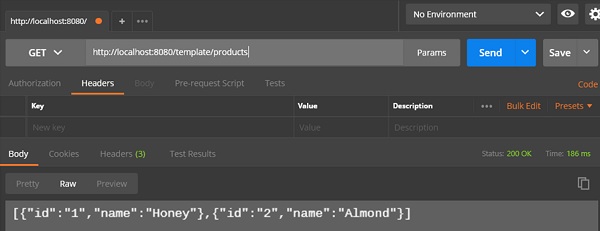
Предположим, этот URL http: // localhost: 8080 / products возвращает следующий JSON, и мы собираемся использовать этот ответ API с помощью шаблона Rest, используя следующий код —
[
   {
      "id": "1",
      "name": "Honey"
   },
   {
      "id": "2",
      "name": "Almond"
   }
]
Вы должны будете следовать данным пунктам, чтобы использовать API —
- Автоматически подключен объект шаблона Rest.
- Используйте HttpHeaders, чтобы установить заголовки запроса.
- Используйте HttpEntity, чтобы обернуть объект запроса.
- Укажите URL, HttpMethod и тип возврата для метода Exchange ().
@RestController
public class ConsumeWebService {
   @Autowired
   RestTemplate restTemplate;

   @RequestMapping(value = "/template/products")
   public String getProductList() {
      HttpHeaders headers = new HttpHeaders();
      headers.setAccept(Arrays.asList(MediaType.APPLICATION_JSON));
      HttpEntity <String> entity = new HttpEntity<String>(headers);

      return restTemplate.exchange("
         http://localhost:8080/products", HttpMethod.GET, entity, String.class).getBody();
   }
}
СООБЩЕНИЕ
Использование POST API с помощью метода RestTemplate — exchange ()
Предположим, что этот URL http: // localhost: 8080 / products возвращает ответ, показанный ниже, мы собираемся использовать этот ответ API с помощью шаблона Rest.
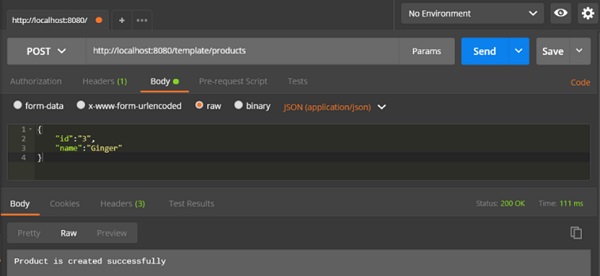
Код, приведенный ниже, является телом запроса —
{
   "id":"3",
   "name":"Ginger"
}
Код, приведенный ниже, является телом ответа —
Product is created successfully
Вы должны будете следовать приведенным ниже пунктам, чтобы использовать API —
-
Автоматически подключен объект шаблона Rest.
-
Используйте HttpHeaders, чтобы установить заголовки запроса.
-
Используйте HttpEntity, чтобы обернуть объект запроса. Здесь мы оборачиваем объект Product, чтобы отправить его в тело запроса.
-
Укажите URL, HttpMethod и тип возврата для метода exchange ().
Автоматически подключен объект шаблона Rest.
Используйте HttpHeaders, чтобы установить заголовки запроса.
Используйте HttpEntity, чтобы обернуть объект запроса. Здесь мы оборачиваем объект Product, чтобы отправить его в тело запроса.
Укажите URL, HttpMethod и тип возврата для метода exchange ().
@RestController
public class ConsumeWebService {
   @Autowired
   RestTemplate restTemplate;

   @RequestMapping(value = "/template/products", method = RequestMethod.POST)
   public String createProducts(@RequestBody Product product) {
      HttpHeaders headers = new HttpHeaders();
      headers.setAccept(Arrays.asList(MediaType.APPLICATION_JSON));
      HttpEntity<Product> entity = new HttpEntity<Product>(product,headers);

      return restTemplate.exchange(
         "http://localhost:8080/products", HttpMethod.POST, entity, String.class).getBody();
   }
}
ПОЛОЖИЛ
Использование API PUT с помощью метода RestTemplate — exchange ()
Предположим, что этот URL http: // localhost: 8080 / products / 3 возвращает ответ ниже, и мы собираемся использовать этот ответ API с помощью шаблона Rest.
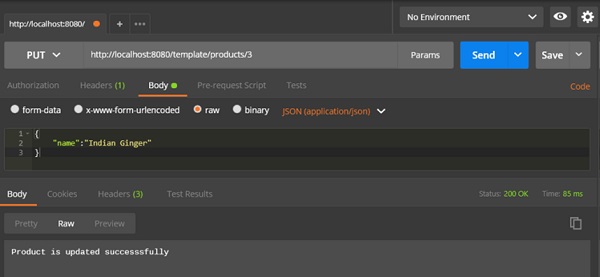
Код, приведенный ниже, является телом запроса.
{
   "name":"Indian Ginger"
}
Код, приведенный ниже, является телом ответа —
Product is updated successfully
Вы должны будете следовать приведенным ниже пунктам, чтобы использовать API —
-
Автоматически подключен объект шаблона Rest.
-
Используйте HttpHeaders, чтобы установить заголовки запроса.
-
Используйте HttpEntity, чтобы обернуть объект запроса. Здесь мы оборачиваем объект Product, чтобы отправить его в тело запроса.
-
Укажите URL, HttpMethod и тип возврата для метода exchange ().
Автоматически подключен объект шаблона Rest.
Используйте HttpHeaders, чтобы установить заголовки запроса.
Используйте HttpEntity, чтобы обернуть объект запроса. Здесь мы оборачиваем объект Product, чтобы отправить его в тело запроса.
Укажите URL, HttpMethod и тип возврата для метода exchange ().
@RestController
public class ConsumeWebService {
   @Autowired
   RestTemplate restTemplate;

   @RequestMapping(value = "/template/products/{id}", method = RequestMethod.PUT)
   public String updateProduct(@PathVariable("id") String id, @RequestBody Product product) {
      HttpHeaders headers = new HttpHeaders();
      headers.setAccept(Arrays.asList(MediaType.APPLICATION_JSON));
      HttpEntity<Product> entity = new HttpEntity<Product>(product,headers);

      return restTemplate.exchange(
         "http://localhost:8080/products/"+id, HttpMethod.PUT, entity, String.class).getBody();
   }
}
УДАЛЯТЬ
Использование API DELETE с помощью метода RestTemplate — exchange ()
Предположим, этот URL http: // localhost: 8080 / products / 3 возвращает ответ, приведенный ниже, и мы собираемся использовать этот ответ API с помощью шаблона Rest.
Эта строка кода, показанная ниже, является телом ответа —
Product is deleted successfully
Вы должны будете следовать пунктам, показанным ниже, чтобы использовать API —
-
Автоматически подключен объект шаблона Rest.
-
Используйте HttpHeaders, чтобы установить заголовки запроса.
-
Используйте HttpEntity, чтобы обернуть объект запроса.
-
Укажите URL, HttpMethod и тип возврата для метода exchange ().
Автоматически подключен объект шаблона Rest.
Используйте HttpHeaders, чтобы установить заголовки запроса.
Используйте HttpEntity, чтобы обернуть объект запроса.
Укажите URL, HttpMethod и тип возврата для метода exchange ().
@RestController
public class ConsumeWebService {
   @Autowired
   RestTemplate restTemplate;

   @RequestMapping(value = "/template/products/{id}", method = RequestMethod.DELETE)
   public String deleteProduct(@PathVariable("id") String id) {
      HttpHeaders headers = new HttpHeaders();
      headers.setAccept(Arrays.asList(MediaType.APPLICATION_JSON));
      HttpEntity<Product> entity = new HttpEntity<Product>(headers);

      return restTemplate.exchange(
         "http://localhost:8080/products/"+id, HttpMethod.DELETE, entity, String.class).getBody();
   }
}
Полный файл класса Rest Template Controller приведен ниже —
package com.tutorialspoint.demo.controller;

import java.util.Arrays;

import org.springframework.beans.factory.annotation.Autowired;
import org.springframework.http.HttpEntity;
import org.springframework.http.HttpHeaders;
import org.springframework.http.HttpMethod;
import org.springframework.http.MediaType;

import org.springframework.web.bind.annotation.PathVariable;
import org.springframework.web.bind.annotation.RequestBody;
import org.springframework.web.bind.annotation.RequestMapping;
import org.springframework.web.bind.annotation.RequestMethod;
import org.springframework.web.bind.annotation.RestController;
import org.springframework.web.client.RestTemplate;

import com.tutorialspoint.demo.model.Product;

@RestController
public class ConsumeWebService {
   @Autowired
   RestTemplate restTemplate;

   @RequestMapping(value = "/template/products")
   public String getProductList() {
      HttpHeaders headers = new HttpHeaders();
      headers.setAccept(Arrays.asList(MediaType.APPLICATION_JSON));
      HttpEntity<String> entity = new HttpEntity<String>(headers);

      return restTemplate.exchange(
         "http://localhost:8080/products", HttpMethod.GET, entity, String.class).getBody();
   }
   @RequestMapping(value = "/template/products", method = RequestMethod.POST)
   public String createProducts(@RequestBody Product product) {
      HttpHeaders headers = new HttpHeaders();
      headers.setAccept(Arrays.asList(MediaType.APPLICATION_JSON));
      HttpEntity<Product> entity = new HttpEntity<Product>(product,headers);

      return restTemplate.exchange(
         "http://localhost:8080/products", HttpMethod.POST, entity, String.class).getBody();
   }
   @RequestMapping(value = "/template/products/{id}", method = RequestMethod.PUT)
   public String updateProduct(@PathVariable("id") String id, @RequestBody Product product) {
      HttpHeaders headers = new HttpHeaders();
      headers.setAccept(Arrays.asList(MediaType.APPLICATION_JSON));
      HttpEntity<Product> entity = new HttpEntity<Product>(product,headers);

      return restTemplate.exchange(
         "http://localhost:8080/products/"+id, HttpMethod.PUT, entity, String.class).getBody();
   }
   @RequestMapping(value = "/template/products/{id}", method = RequestMethod.DELETE)
   public String deleteProduct(@PathVariable("id") String id) {
      HttpHeaders headers = new HttpHeaders();
      headers.setAccept(Arrays.asList(MediaType.APPLICATION_JSON));
      HttpEntity<Product> entity = new HttpEntity<Product>(headers);

      return restTemplate.exchange(
         "http://localhost:8080/products/"+id, HttpMethod.DELETE, entity, String.class).getBody();
   }
}
Код для Spring Boot Application Class — DemoApplication.java приведен ниже —
package com.tutorialspoint.demo;

import org.springframework.boot.SpringApplication;
import org.springframework.boot.autoconfigure.SpringBootApplication;

@SpringBootApplication
public class DemoApplication {
   public static void main(String[] args) {
      SpringApplication.run(DemoApplication.class, args);
   }
}
Код для сборки Maven — pom.xml приведен ниже —
<?xml version = "1.0" encoding = "UTF-8"?>
<project xmlns = "http://maven.apache.org/POM/4.0.0"
   xmlns:xsi = "http://www.w3.org/2001/XMLSchema-instance"
   xsi:schemaLocation = "http://maven.apache.org/POM/4.0.0
   http://maven.apache.org/xsd/maven-4.0.0.xsd">

   <modelVersion>4.0.0</modelVersion>
   <groupId>com.tutorialspoint</groupId>
   <artifactId>demo</artifactId>
   <version>0.0.1-SNAPSHOT</version>
   <packaging>jar</packaging>
   <name>demo</name>
   <description>Demo project for Spring Boot</description>

   <parent>
      <groupId>org.springframework.boot</groupId>
      <artifactId>spring-boot-starter-parent</artifactId>
      <version>1.5.8.RELEASE</version>
      <relativePath/>
   </parent>

   <properties>
      <project.build.sourceEncoding>UTF-8</project.build.sourceEncoding>
      <project.reporting.outputEncoding>UTF-8</project.reporting.outputEncoding>
      <java.version>1.8</java.version>
   </properties>

   <dependencies>
      <dependency>
         <groupId>org.springframework.boot</groupId>
         <artifactId>spring-boot-starter-web</artifactId>
      </dependency>

      <dependency>
         <groupId>org.springframework.boot</groupId>
         <artifactId>spring-boot-starter-test</artifactId>
         <scope>test</scope>
      </dependency>
   </dependencies>

   <build>
      <plugins>
         <plugin>
            <groupId>org.springframework.boot</groupId>
            <artifactId>spring-boot-maven-plugin</artifactId>
         </plugin>
      </plugins>
   </build>

</project>
Код для Gradle Build — build.gradle приведен ниже —
buildscript {
   ext {
      springBootVersion = '1.5.8.RELEASE'
   }
   repositories {
      mavenCentral()
   }
   dependencies {
      classpath("org.springframework.boot:spring-boot-gradle-plugin:${springBootVersion}")
   }
}

apply plugin: 'java'
apply plugin: 'eclipse'
apply plugin: 'org.springframework.boot'

group = 'com.tutorialspoint'
version = '0.0.1-SNAPSHOT'
sourceCompatibility = 1.8

repositories {
   mavenCentral()
}
dependencies {
   compile('org.springframework.boot:spring-boot-starter-web')
   testCompile('org.springframework.boot:spring-boot-starter-test')
}
Вы можете создать исполняемый файл JAR и запустить приложение Spring Boot, используя следующие команды Maven или Gradle:
Для Maven, вы можете использовать команду, приведенную ниже —
mvn clean install
После «BUILD SUCCESS» вы можете найти файл JAR в целевом каталоге.
Для Gradle вы можете использовать команду, показанную ниже —
gradle clean build
После «BUILD SUCCESSFUL» вы можете найти файл JAR в каталоге build / libs.
Теперь запустите файл JAR с помощью следующей команды —
java –jar <JARFILE>
Теперь приложение запущено на порт Tomcat 8080.
Теперь нажмите на URL-адреса ниже в приложении POSTMAN, и вы увидите результат.
ПОЛУЧИТЬ Продукты по шаблону отдыха — http: // localhost: 8080 / template / products
Создание продуктов POST — http: // localhost: 8080 / template / products
Обновление продукта PUT — http: // localhost: 8080 / template / products / 3
Удалить продукт — http: // localhost: 8080 / template / products / 3


